Shadow Line upgrade.


Members
Joined: Apr 2010
Posts: 14
Likes: 0
From: England, Essex
My Ride: BMW E60 520i se genuine m sport kit,18" M6 Wheels, reverse camera, lcd headrests,dvd player, multimedia device
,black kidney grills
Contributors
Joined: Jul 2010
Posts: 573
Likes: 0
From: Buffalo, NY
My Ride: 2004 530i
just did this yesterday with the oem parts, it was actually pretty easy one you get going. i hammered a bit hard on one of the lower ones but you can't really tell. took about 2 hrs but i was cleaning as i went. thanks for the writeup

Members
Joined: Apr 2011
Posts: 21
Likes: 0
From: H-town / SoCal
My Ride: 08 535xiT, 16 c300, 05 SLK350
Model Year: .
Engine: .
This how i did and it works fine even with Karcher 
Attachment 108936
Small one for hooked lines and wide one for righteous.
Attachment 108936
Small one for hooked lines and wide one for righteous.

The chrome doesn't bother me enough to pay all that money for the new parts. I'm saving my money for other mods.
BTW, thanks for the write-up, OP!
Contributors
Joined: Jul 2007
Posts: 739
Likes: 0
From: Nashville
My Ride: 2007 530i Alpine White with Navi and Premium PackageIn progress: OEM Mtech kit, H&R Sport Springs, and 19

Members
Joined: Dec 2008
Posts: 105
Likes: 0
From: St. Louis Mo
My Ride: '04 530. Black on Black
Black Grills
Tint
Ipod Retrofit June '10
I am about to start this as a summer project. I am removing the chrome ones and painting them, then putting them back. How does the clip attach to the door? OP said to tap it off the door. Do I tap the clip that is on the door, or the trim itself? Any pics of the trim off? Thanks!

Members
Joined: Jul 2011
Posts: 113
Likes: 1
Hi guys,
I have a question regarding the shadowline trim.
I recently pulled out my old (and stained) chrome trim in favor of the matte shadowline trim on my 2004 525i.
http://min.us/mdYycy4#5
I have two issues that I hope people can comment on:
1. I noticed a gap right where the trim curves into the lower door sill trim. This gap is on the outside, in between the trim and the rubber seal around the window pane, and about 1 mm wide. Is this ok? I took the car to a wash and afterwards although the interior didn't get wet, the frame area where the door seals up against was.
2. I tried my best to ensure the upper weather seal is as flush and tight against the door as possible, but in some areas it feels a little less than flush. Is this also normal?
Thanks!

Members
Joined: Jul 2011
Posts: 113
Likes: 1
Sorry about the delay, I had to head out of state for the weekend...
It's not the same, the rear left trim was skewed right out of the box but I ignored it during the install process - this could be the problem. I ordered the parts from Gary of Newport, would it make sense to ask him to resend one that's not bent?
The trim install is not that easy, here's what I would add to the DIY.
1. Pull the rubber seal off the front door beginning near the door handle (it's easy to push it back in after).
2. Pry the original trim from the front door beginning at the mirror. This was a bit arduous for me, the trim was extremely resistant to pressure. Here's a hint, if you're facing the door, pull the trim out and towards your chest.
3. Install the top trim. Be careful to ensure the clips properly seat themselves, otherwise you will need to pull off the trim up to where the problem clip is and then reinstall. The clips could end up completely above or below the door frame, double check before you commit (push the trim in). Every time you have to pull the trim to adjust, it can leave a bend in the trim leading to issues with the rubber seal from sitting fliush against the door.
4. Reinstall the top rubber seal. Make sure the rubber properly snaps into place (you can feel it), and there will be no gap between the rubber seal and the inner door seal.
4. Install the lower trim. This was pretty difficult, the rear half of the trim refused to seat properly without extreme force. I had to literally had to invoke the name of Crom to get it on.
5. Please, please, remember to reseat the exterior rubber seal against the lower part of the new trim. If you close your window before you do this part, you will damage it.
Repeat for the other side.
For the rear door, same as the original DIY instructions with the above caveats.
Neighbors were looking at me funny at this point, as I have twice hurt myself w/ pliers while pulling trim/clips that were left on the door frame.
First, here is the pre and post pics for the shadowline install. It was extremely difficult to pry off the old chrome trim and they all ended up being bent to hell (no problem, they were extremely water stained and dinged already).
Note, I've also had some other work done to the car...
Before

After

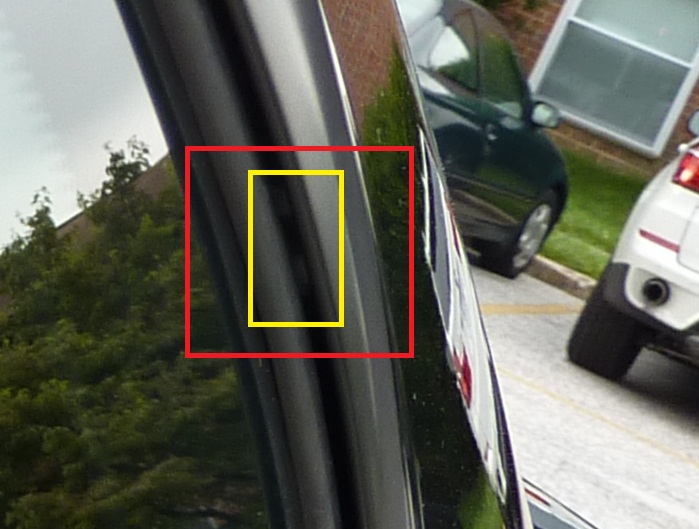
Here are the pics detailing the two trim problems.
1. You can see that there's a gap between the trim and the seal around the window.

2. In this picture, if you sight along the seal around the door frame, right before the bend there's a tiny gap...

I'm bringing in the car on Monday morning to an autobody shop for other reasons, I'll ask them for their advice too and post here w/ an update. Thanks!
It's not the same, the rear left trim was skewed right out of the box but I ignored it during the install process - this could be the problem. I ordered the parts from Gary of Newport, would it make sense to ask him to resend one that's not bent?
The trim install is not that easy, here's what I would add to the DIY.
1. Pull the rubber seal off the front door beginning near the door handle (it's easy to push it back in after).
2. Pry the original trim from the front door beginning at the mirror. This was a bit arduous for me, the trim was extremely resistant to pressure. Here's a hint, if you're facing the door, pull the trim out and towards your chest.
3. Install the top trim. Be careful to ensure the clips properly seat themselves, otherwise you will need to pull off the trim up to where the problem clip is and then reinstall. The clips could end up completely above or below the door frame, double check before you commit (push the trim in). Every time you have to pull the trim to adjust, it can leave a bend in the trim leading to issues with the rubber seal from sitting fliush against the door.
4. Reinstall the top rubber seal. Make sure the rubber properly snaps into place (you can feel it), and there will be no gap between the rubber seal and the inner door seal.
4. Install the lower trim. This was pretty difficult, the rear half of the trim refused to seat properly without extreme force. I had to literally had to invoke the name of Crom to get it on.
5. Please, please, remember to reseat the exterior rubber seal against the lower part of the new trim. If you close your window before you do this part, you will damage it.
Repeat for the other side.
For the rear door, same as the original DIY instructions with the above caveats.
Neighbors were looking at me funny at this point, as I have twice hurt myself w/ pliers while pulling trim/clips that were left on the door frame.
First, here is the pre and post pics for the shadowline install. It was extremely difficult to pry off the old chrome trim and they all ended up being bent to hell (no problem, they were extremely water stained and dinged already).
Note, I've also had some other work done to the car...
Before
After
Here are the pics detailing the two trim problems.
1. You can see that there's a gap between the trim and the seal around the window.
2. In this picture, if you sight along the seal around the door frame, right before the bend there's a tiny gap...
I'm bringing in the car on Monday morning to an autobody shop for other reasons, I'll ask them for their advice too and post here w/ an update. Thanks!