Where is the rain gutter located in the panorama roof?
 05-23-2010, 11:55 AM
#31
Senior Members

Join Date: Feb 2009
Posts: 1,026
Likes: 0
Received 0 Likes
on
0 Posts
but you have to have pretty thin hands to reach between the bumper and the battery compartment from under the car. and you cannot clean the pipes properly acting "blind", though removing the valves is pretty easy.
just try and let us know

 05-23-2010, 01:41 PM
#32
Members

Join Date: Mar 2007
Location: St Pete FL
Posts: 61
Likes: 0
Received 0 Likes
on
0 Posts
I am/was planning to snake compressed air from the top to clear them but have not done it so far
05-25-2010, 05:25 AM
#33
Senior Members
Join Date: Feb 2009
Posts: 1,026
Likes: 0
Received 0 Likes
on
0 Posts
")
i will try the trick with the compressor while my bumper is down
05-30-2010, 11:34 PM
#34
Members
Join Date: Jun 2008
Location: Las Vegas, USA
Posts: 129
Likes: 0
Received 0 Likes
on
0 Posts
My Ride: 2007 530xiT: CPO purchase in 2008, used by a BMW exec previously, and like-new when I got it. Compared to my other cars, at first I thought it felt heavy and steering was too heavy. Now, I really enjoy driving it in town and on the freeway. On my
OK, I've been procrastinating for over 6 months doing this. My 530xiT was manufactured January 2007 and from my adventure here, the drainage tubes are the same as mmitev's 2004 wagon. It's a holiday weekend, I had some time, so here goes:
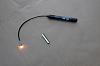
1. Here's 2 recommended tools for this job, besides the usual stuff. A tiny bendable flashlight to peer into crevices, and 8mm 1/4" deep socket for taillight removal and assembly.
2. Remove this undercladding by removing 4-10mm pastic nuts, and 3-8mm hex screws.
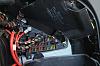
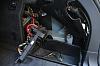
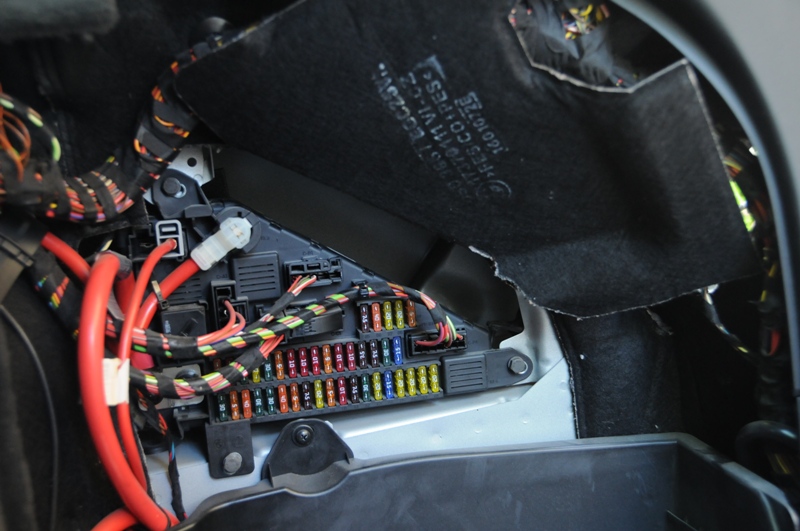
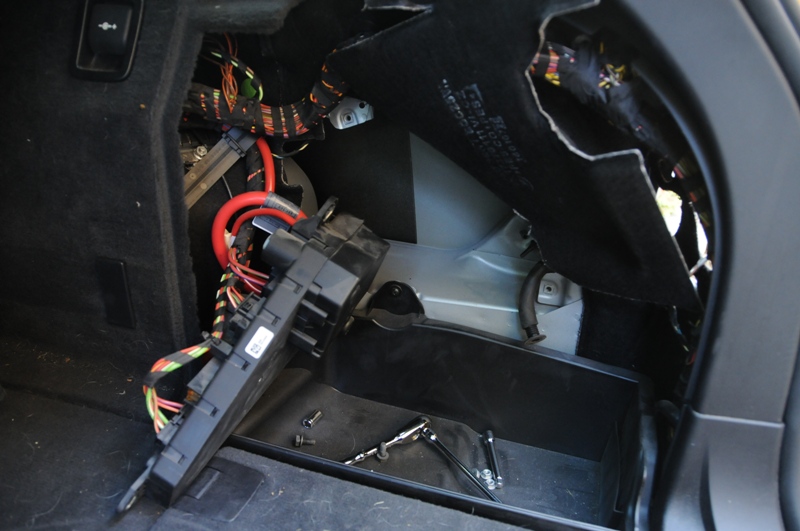
3. On the right rear of the trunk, open the latch with the cross, remove the lid, lift up the uphostery to expose the fuse box. Reach into the cavity to the right of the fuse box and you will feel the drainage tube.
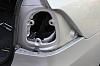
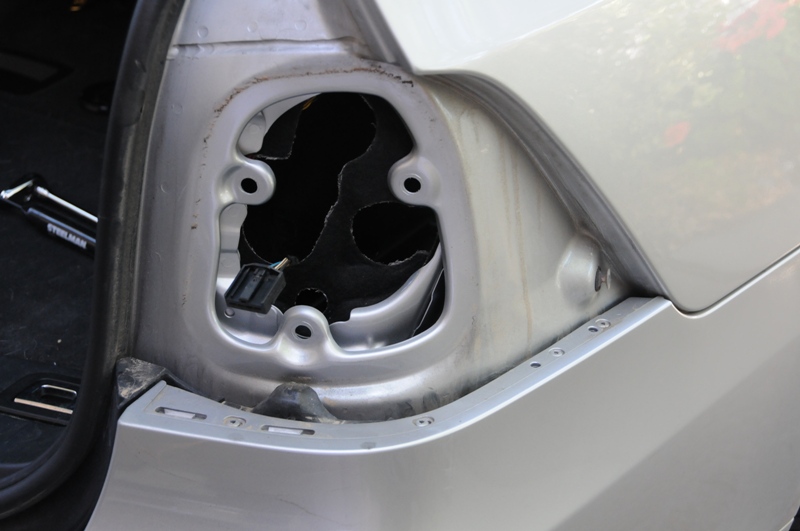
4. Remove the taillight assembly by removing 3-8mm nuts. Use your 8mm deep socket here. Be very careful here when removing nuts or you will lose the nuts into the "black hole" of the trunk. No one has mentioned this before, but I thought you could get to the tube with the taillight off. As it turned out, you can't. BUT with it removed, it helps in the reassembly.
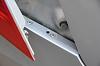
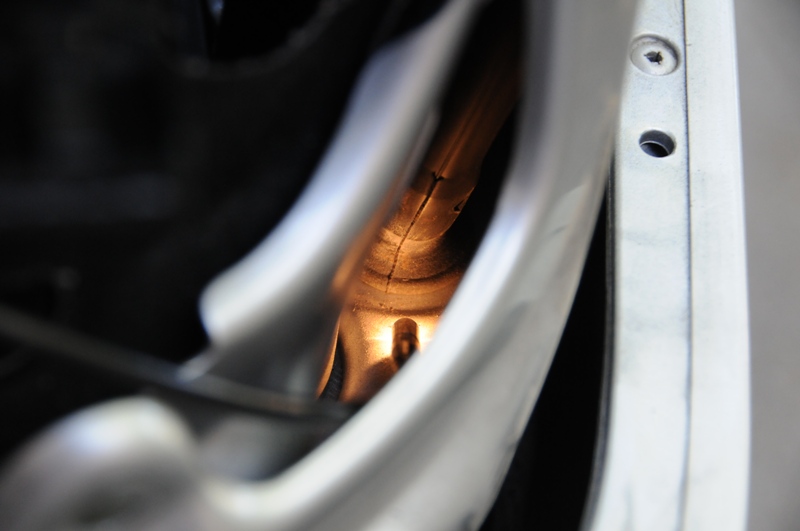
5. In this view of the taillight cavity, the right most shadow area is the area behind the bumper. You can actually see the drainage valve but you cannot reach it. The shadow area to its left is the cavity to the right of the fuse box and you can see where the drainage tube exits into the bumper cavity.

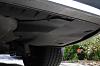
6. At this time, get on your back and reach up from under the car and remove the drainage valve from the passenger side AND then the driver side. Once the valve is off, go back to the trunk area. Remove 3-8mm nuts holding the fuse box assembly and move the assembly out of the way. This will give you a few precious inches. Pull the drainage tube and tube grommet up until the tube stops moving. The valve flange at the end of the tube prevents the tube from being removed. With your finger tips, peel the tube from the flange. You're doing this by feel only so be patient. Eventually, the tube will be peeled off the flange, and the flange will fall out into the bumper cavity. In this picture, the fuse box is moved to the side. On the right is the tube with the flange partially exposed. I put the flange back in this picture only to show size and fit. I could not remove the tube with the flange still attached.
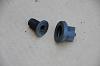
7. Here's the prize: the valve and the flange that the valve mounts to. No one mentioned the flange, but I figure its a further constriction of the tube diameter and removing the flange can't help but assist drainage. My tubes were not filled with crud but the valve had a little gunk that would eventually stop up the drain.
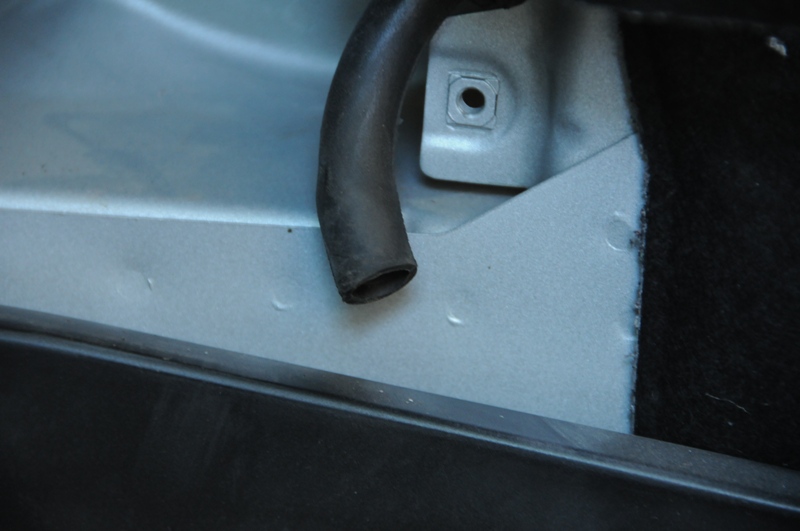
8. Tube without the flange. Much nicer. Note that access on the passenger side cavity by the fuse box was much easier than the driver side. I decided not to push my luck and left the flange in on the driver side. Maybe another day.

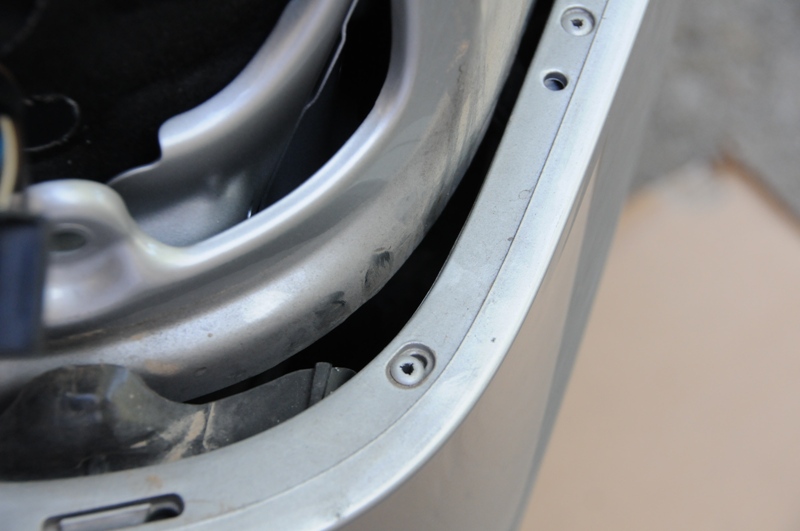
9. To reassemble, from the fuse box cavity area, put the tube back into the hole leading to the bumper cavity. The trick is to get the tube grommet to reseal with the body hole. I tried futilely for a while before I realized you can see the back of the tube grommet from the taillight cavity. With a soft tool or DULL screwdriver, press the back of the tube grommet while simultaneously pressing with your fingers on the front side of the grommet (the area to the right of the fuse box) until the grommet seals. BE VERY CAREFUL HERE. IF YOU PUNCTURE THE TUBING HERE, WATER FROM YOUR SUNROOF WILL DRAIN OUT HERE. This picture shows the grommet reattached to the body viewed from the taillight. Another reason I decided not to push my luck reattaching this grommet on the driver side.

10. Reattach the taillight assembly. Note that the forward end of the assembly has a slot that mates with a rivet on the body. Be very careful reatttaching the 3-8mm nuts. Use the 8mm deep socket to get better control. I was very careful and did not lose a nut. BUT, I concentrated so hard on not losing a nut I fumbled an 8mm regular socket and lost it somewhere in the tailight "black hole".
OK, that's it. Hope this helps.
1. Here's 2 recommended tools for this job, besides the usual stuff. A tiny bendable flashlight to peer into crevices, and 8mm 1/4" deep socket for taillight removal and assembly.

2. Remove this undercladding by removing 4-10mm pastic nuts, and 3-8mm hex screws.

3. On the right rear of the trunk, open the latch with the cross, remove the lid, lift up the uphostery to expose the fuse box. Reach into the cavity to the right of the fuse box and you will feel the drainage tube.
4. Remove the taillight assembly by removing 3-8mm nuts. Use your 8mm deep socket here. Be very careful here when removing nuts or you will lose the nuts into the "black hole" of the trunk. No one has mentioned this before, but I thought you could get to the tube with the taillight off. As it turned out, you can't. BUT with it removed, it helps in the reassembly.
5. In this view of the taillight cavity, the right most shadow area is the area behind the bumper. You can actually see the drainage valve but you cannot reach it. The shadow area to its left is the cavity to the right of the fuse box and you can see where the drainage tube exits into the bumper cavity.
6. At this time, get on your back and reach up from under the car and remove the drainage valve from the passenger side AND then the driver side. Once the valve is off, go back to the trunk area. Remove 3-8mm nuts holding the fuse box assembly and move the assembly out of the way. This will give you a few precious inches. Pull the drainage tube and tube grommet up until the tube stops moving. The valve flange at the end of the tube prevents the tube from being removed. With your finger tips, peel the tube from the flange. You're doing this by feel only so be patient. Eventually, the tube will be peeled off the flange, and the flange will fall out into the bumper cavity. In this picture, the fuse box is moved to the side. On the right is the tube with the flange partially exposed. I put the flange back in this picture only to show size and fit. I could not remove the tube with the flange still attached.
7. Here's the prize: the valve and the flange that the valve mounts to. No one mentioned the flange, but I figure its a further constriction of the tube diameter and removing the flange can't help but assist drainage. My tubes were not filled with crud but the valve had a little gunk that would eventually stop up the drain.

8. Tube without the flange. Much nicer. Note that access on the passenger side cavity by the fuse box was much easier than the driver side. I decided not to push my luck and left the flange in on the driver side. Maybe another day.
9. To reassemble, from the fuse box cavity area, put the tube back into the hole leading to the bumper cavity. The trick is to get the tube grommet to reseal with the body hole. I tried futilely for a while before I realized you can see the back of the tube grommet from the taillight cavity. With a soft tool or DULL screwdriver, press the back of the tube grommet while simultaneously pressing with your fingers on the front side of the grommet (the area to the right of the fuse box) until the grommet seals. BE VERY CAREFUL HERE. IF YOU PUNCTURE THE TUBING HERE, WATER FROM YOUR SUNROOF WILL DRAIN OUT HERE. This picture shows the grommet reattached to the body viewed from the taillight. Another reason I decided not to push my luck reattaching this grommet on the driver side.
10. Reattach the taillight assembly. Note that the forward end of the assembly has a slot that mates with a rivet on the body. Be very careful reatttaching the 3-8mm nuts. Use the 8mm deep socket to get better control. I was very careful and did not lose a nut. BUT, I concentrated so hard on not losing a nut I fumbled an 8mm regular socket and lost it somewhere in the tailight "black hole".

OK, that's it. Hope this helps.
05-31-2010, 12:17 AM
#35
Senior Members
Join Date: Jan 2007
Location: Scania, Scandinavia
Posts: 1,992
Likes: 0
Received 0 Likes
on
0 Posts
My Ride: F11 -14
OK, I've been procrastinating for over 6 months doing this. My 530xiT was manufactured January 2007 and from my adventure here, the drainage tubes are the same as mmitev's 2004 wagon. It's a holiday weekend, I had some time, so here goes:
1. Here's 2 recommended tools for this job, besides the usual stuff. A tiny bendable flashlight to peer into crevices, and 8mm 1/4" deep socket for taillight removal and assembly.
2. Remove this undercladding by removing 4-10mm pastic nuts, and 3-8mm hex screws.
3. On the right rear of the trunk, open the latch with the cross, remove the lid, lift up the uphostery to expose the fuse box. Reach into the cavity to the right of the fuse box and you will feel the drainage tube.
4. Remove the taillight assembly by removing 3-8mm nuts. Use your 8mm deep socket here. Be very careful here when removing nuts or you will lose the nuts into the "black hole" of the trunk. No one has mentioned this before, but I thought you could get to the tube with the taillight off. As it turned out, you can't. BUT with it removed, it helps in the reassembly.
5. In this view of the taillight cavity, the right most shadow area is the area behind the bumper. You can actually see the drainage valve but you cannot reach it. The shadow area to its left is the cavity to the right of the fuse box and you can see where the drainage tube exits into the bumper cavity.
6. At this time, get on your back and reach up from under the car and remove the drainage valve from the passenger side AND then the driver side. Once the valve is off, go back to the trunk area. Remove 3-8mm nuts holding the fuse box assembly and move the assembly out of the way. This will give you a few precious inches. Pull the drainage tube and tube grommet up until the tube stops moving. The valve flange at the end of the tube prevents the tube from being removed. With your finger tips, peel the tube from the flange. You're doing this by feel only so be patient. Eventually, the tube will be peeled off the flange, and the flange will fall out into the bumper cavity. In this picture, the fuse box is moved to the side. On the right is the tube with the flange partially exposed. I put the flange back in this picture only to show size and fit. I could not remove the tube with the flange still attached.
7. Here's the prize: the valve and the flange that the valve mounts to. No one mentioned the flange, but I figure its a further constriction of the tube diameter and removing the flange can't help but assist drainage. My tubes were not filled with crud but the valve had a little gunk that would eventually stop up the drain.
8. Tube without the flange. Much nicer. Note that access on the passenger side cavity by the fuse box was much easier than the driver side. I decided not to push my luck and left the flange in on the driver side. Maybe another day.
9. To reassemble, from the fuse box cavity area, put the tube back into the hole leading to the bumper cavity. The trick is to get the tube grommet to reseal with the body hole. I tried futilely for a while before I realized you can see the back of the tube grommet from the taillight cavity. With a soft tool or DULL screwdriver, press the back of the tube grommet while simultaneously pressing with your fingers on the front side of the grommet (the area to the right of the fuse box) until the grommet seals. BE VERY CAREFUL HERE. IF YOU PUNCTURE THE TUBING HERE, WATER FROM YOUR SUNROOF WILL DRAIN OUT HERE. This picture shows the grommet reattached to the body viewed from the taillight. Another reason I decided not to push my luck reattaching this grommet on the driver side.
10. Reattach the taillight assembly. Note that the forward end of the assembly has a slot that mates with a rivet on the body. Be very careful reatttaching the 3-8mm nuts. Use the 8mm deep socket to get better control. I was very careful and did not lose a nut. BUT, I concentrated so hard on not losing a nut I fumbled an 8mm regular socket and lost it somewhere in the tailight "black hole".
OK, that's it. Hope this helps.
 05-31-2010, 09:28 AM
#36
Members
Join Date: Jun 2008
Location: Las Vegas, USA
Posts: 129
Likes: 0
Received 0 Likes
on
0 Posts
My Ride: 2007 530xiT: CPO purchase in 2008, used by a BMW exec previously, and like-new when I got it. Compared to my other cars, at first I thought it felt heavy and steering was too heavy. Now, I really enjoy driving it in town and on the freeway. On my
thanks, narvselius, I will wear that title with deep humility 
didn't have time last night, and was practicing my Visio skills today, so here's picture #5 enhanced for those who are text challenged

didn't have time last night, and was practicing my Visio skills today, so here's picture #5 enhanced for those who are text challenged
 06-10-2010, 09:25 AM
#37
Members
Join Date: Mar 2007
Location: St Pete FL
Posts: 61
Likes: 0
Received 0 Likes
on
0 Posts
Check this out, something about a clamp crimping the drainage tube + swapped for bigger drainage tubes
http://www.bimmerfest.com/forums/sho...=259095&page=6
http://www.bimmerfest.com/forums/sho...=259095&page=6
06-11-2010, 02:26 PM
#38
Senior Members
Join Date: Feb 2009
Posts: 1,026
Likes: 0
Received 0 Likes
on
0 Posts
I can only confirm what yeewiz says about the taillight nuts  - I lost two of them in the "black hole" before realizing I was doing something wrong!
Luckily, they don't seem to rattle in there while I'm driving as I feared. That would have positively driven me nuts lol.
- I lost two of them in the "black hole" before realizing I was doing something wrong! Luckily, they don't seem to rattle in there while I'm driving as I feared. That would have positively driven me nuts lol.
10-24-2010, 07:24 PM
#39
Members

Join Date: Jul 2010
Location: Leavenworth KS
Posts: 92
Likes: 0
Received 0 Likes
on
0 Posts
My Ride: 2007 530 XI, 19 VMR VB3, matte grills, RPI scoop, MTEC V2 Angel Eyes
thanks, narvselius, I will wear that title with deep humility
didn't have time last night, and was practicing my Visio skills today, so here's picture #5 enhanced for those who are text challenged
Attachment 106551
didn't have time last night, and was practicing my Visio skills today, so here's picture #5 enhanced for those who are text challenged
Attachment 106551
10-25-2010, 01:48 PM
#40
Members
Join Date: Jun 2008
Location: Las Vegas, USA
Posts: 129
Likes: 0
Received 0 Likes
on
0 Posts
My Ride: 2007 530xiT: CPO purchase in 2008, used by a BMW exec previously, and like-new when I got it. Compared to my other cars, at first I thought it felt heavy and steering was too heavy. Now, I really enjoy driving it in town and on the freeway. On my
I can't answer for the sedan. other posters have mentioned that only the wagon has the SureClog valves. in any case, it's probably a good guess any drainage tube has to come down the C-pillar and drain behind the rear wheel. I would say reach up and see if you can find a tube end. also, other posters have noted that if the drainage tube entrance in the sun roof mechanism is blocked, then the overflow will go places where you don't want water to go. good luck!