Ultimate Eyebrow Upgrade
 03-23-2011, 12:10 PM
#391
Members
Join Date: Jun 2010
Location: UK
Posts: 77
Likes: 0
Received 0 Likes
on
0 Posts
My Ride: 535D
Model Year: 2006
Eugene,
Can I ask how the white LEDs compare to the orange ones?
The orange ones on my E60 (2006) are very bright, if im close to a wall, the wall lights up orange (in the dark), do you get the same affect with the white ones?
Reading the post, as my car is 2006 year, I guess these are not SMB?
Do you know where the correct LEDs can be purchased in the UK?
If any UK people have done this mod, please shout
 03-23-2011, 12:17 PM
#392
Members

Join Date: Mar 2011
Location: seattle
Posts: 11
Likes: 0
Received 0 Likes
on
0 Posts
Im no expert, but condensation on the inside is due to a small hole somewhere.
My advise would be to take it apart again, stick it somewhere warm (and dry) for atleast 24 hours, probably run a hair dryer over it for 5 mins then reseal it up properly (within a warm dry environment), and by that I mean not in a shed, garage or drying room.
HTH
My advise would be to take it apart again, stick it somewhere warm (and dry) for atleast 24 hours, probably run a hair dryer over it for 5 mins then reseal it up properly (within a warm dry environment), and by that I mean not in a shed, garage or drying room.
HTH
03-23-2011, 01:20 PM
#393
Contributors
Join Date: Jun 2009
Location: CA
Posts: 5,781
Likes: 0
Received 2 Likes
on
2 Posts
My Ride: BMW E60
Model Year: 2016
Sealing the eyebrow part is no easy task, since that's where water can easily gather and sit when it's raining or car wash. With that said, I've had success by using polyurethane glue as first coat, and then applying water repelling silicone over it.
 03-25-2011, 11:02 AM
#395
Contributors
I was sailing this boat but the fix is very simple.
Leave it out in Sunlight with a temperature over 65 degrees, you will be just fine.
If you have a propane heater that would work also (In case you dont yet have warm sunlight)
If its not cold outside, keeping the eyebrow disconnected (Disconnect the socket that powers the eyebrow)
It will help you dry faster
Good luck
03-25-2011, 02:48 PM
#396
Members
Join Date: Nov 2007
Location: calgary, ab
Posts: 89
Likes: 0
Received 0 Likes
on
0 Posts
hey guys, we dont have radioshacks in canada no more, they been bought out and its now thesource and they dont seem to carry the 4 prong led's. Any idea where i can buy online? i saw superbrightleds sells 4 prongs ones, but didn't know if i need 3 or 5mm led's. thanks
03-27-2011, 11:29 PM
#397
Members

Join Date: Mar 2008
Location: SCOTLAND, UK
Posts: 9
Likes: 0
Received 0 Likes
on
0 Posts
My Ride: 535D MSPORT
HI ALL! VERY NEW TO THIS SITE BUT I HAVE KNOWN ABOUT THE ''EUGENE EYEBROWS'' MOD FOR SOME TIME AS IVE ALWAYS HATED THE AMBER BROWS! I HAVE BOUGHT THE LEDS AND HAVE ALREADY REMOVED THE HEADLIGHTS WITH EASE! BUT HERES WHERE IM AT! TO EXPOSE THE EYEBROW/ CIRCUIT BOARD DO I JUST CUT THE BLACK SILICONE SEAL THAT I HAVE PAITNED A RED TRACK AROUND IN MY IMAGE AND REMOVE IT?????? IS THIS CORRECT? IF SO WHATS THE BEST TOOL TO REMOVED THIS. I GAVE IT A GO WITH A DECENT STANLEY KNIFE BUT ITS REAL TOUGH AND MAY TAKE SOME TIME. MY FREIND IS VERY COMPETENT WITH A SOILDERING IRON AND THE ACTUALLY REMOVAL AND FITTING OF NEW BULBS SHOULD BE EASY FOR HIM BUT I HAVE THE JOB OF REMOVING THE BROWNS! ANY HELPFULL COMENTS WOULD BE APREACIATED!!!! THANKS ALOT KRIS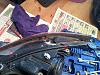
 04-14-2011, 05:12 PM
#398
Members
Join Date: May 2010
Location: Long Island, NY
Posts: 48
Likes: 0
Received 0 Likes
on
0 Posts
My Ride: '06 M5 Silver/Grey BLK, HUD, SMG, fully Loaded...RPI Scoops Red, Block Off Plates, BMC Filters. Hyper Silver Painted Wheels, RPI Full GTS Exhaust
Your car looks great, where did you get those fog lights for the M5? did they install easily to a factory switch?
Alright....
I think I am officially the first person to ever to this....
I have played with the idea of upgrading my headlight eyebrows for about a year now. but since the headlight can not be taken apart I havent done much.. I was on ebay about 2 months ago and come accross a set of eyebrows for an E60 for sale.. Seperated from the headlight just the top part so I purchased them.. I realized that the 6 leds sit on one circuit located towards the back of the brow.. I purchased the Super White leds from Radio Shack removed (and by remove I mean ripped out) the OEM Amber ones on the circuit and soldiered on the new ones.
The next challenge was how to remove the section of the eyebrow from the headlight without breaking it.. This was much harder, you have to literally cut the rubber around the entire section. I dont recommend anyone to attempt this unless you are very handy as you can damage the headlight and would have to buy a new one. I'm also including a few pictures from the progress. If anyone attempt to replicate this do it at your own risk and Just remember I did it first.. LOL
Ohh ya... and the pictures also show my newly installed Euro Stickers.....
Attachment 68284
Attachment 68285
Attachment 68286
Attachment 68287
Attachment 68288
Attachment 68289
Attachment 68290
Now here is the Progress
Attachment 68291
Attachment 68292
Attachment 68293
Attachment 68294
Attachment 68295
Attachment 68296
Attachment 68297
Attachment 68298
Attachment 68299
Attachment 68300
Attachment 68301
Attachment 68302
04-14-2011, 06:35 PM
#399
Senior Members

Join Date: Dec 2009
Location: Birmingham, AL
Posts: 878
Likes: 0
Received 0 Likes
on
0 Posts
My Ride: 06 550i
Model Year: 06
04-22-2011, 11:14 AM
#400
Members

Join Date: May 2010
Location: st paul, mn
Posts: 206
Likes: 0
Received 0 Likes
on
0 Posts
My Ride: 2007 525xi
just thought i would bump this.. Can anyone that has attempted this mod chime in, how did you cut into the headlight and how did u seal it back after you were done??