
View Poll Results: Are these posts worth doing?


Why do you even bother, this is a waste of time.


0
0%
Voters: 44. You may not vote on this poll
Today’s edition of ‘FIX my BMW!’
 03-23-2012, 09:40 AM
#1
Contributors
Thread Starter
Join Date: Jul 2010
Location: socal
Posts: 1,727
Likes: 0
Received 2 Likes
on
2 Posts
My Ride: 545I and a half dozen other rides
Well one of the members this last week asked me to do some repairs on his car since he was busy, which was no problem, so I said ok. One of the things he requested was to check the water leak he also had.
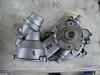
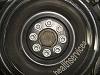
Well the old re-manufactured water pump that was just installed 3 months ago is bad already. I went ahead and tore it down, and the 5series member with a little bit of my help and tools put it back together.
This is the remanufactured pump.


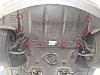
Raise car and support on jack stands. (see, I?m already assuming you know how to dothis!)
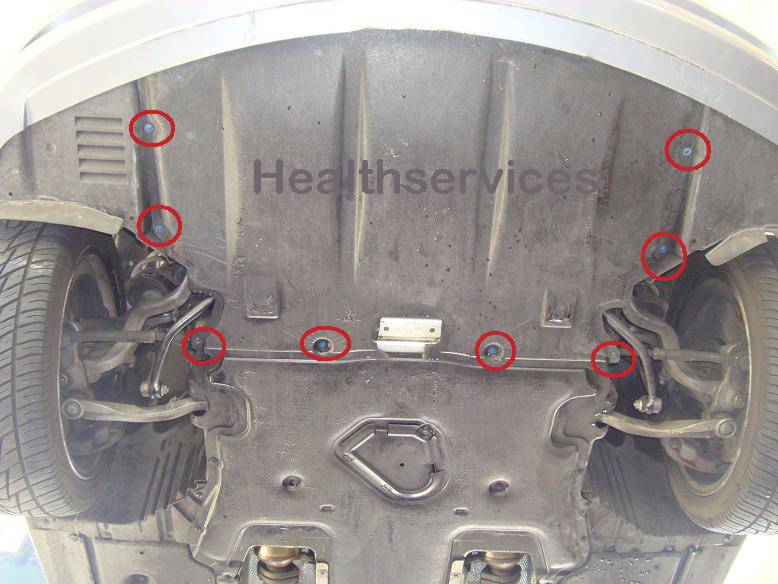
You are going to need to remove the lower front belly pan. Turn the 8 Philips head 1/4 turn fasteners 1/4 turn counter clockwise to loosen and remove the belly pan.
Drain coolant into a suitable container. Dispose of properly.
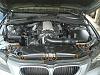
Remove 4 bolts to the engine cover and remove cover.
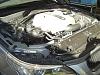
Use a flat head screwdriver remove air intake hose from throttle body. remove vacuum hose on top of intake if you have one. Use the proper Torxscrew driver and remove the 2 screws holding the air cleaner assembly.Disconnect the MAF electrical connector. Lift up assembly and place in a safeplace.

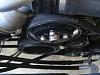
For ease of access to the water pump I would recommend removing the fan shroud, which is basically 15 mins work to save busted knuckles and gives you a lot of space to work around.
Remove the metal cover and set on top of the intake.
Remove the plastic cover.
Note: if you have not replaced the small plastic line leading from the overflow and across the top of the radiator now is the time to do it as it is very brittle and will break if you even look at it wrong!
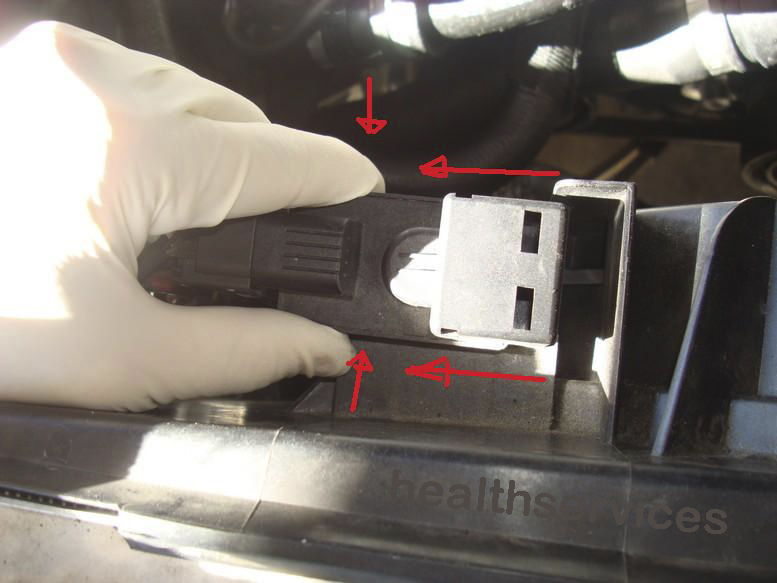
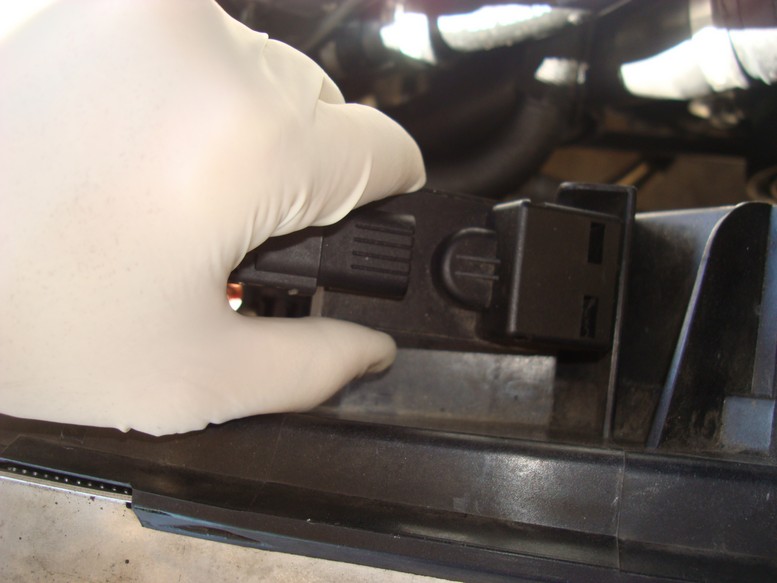
Unplug the two wire connections and move them out of the way.


Now lift the fan shroud, and on the driver?s side is a large tang, after it clears the clip, bend it back ?it is hinged?.
Remove fan shroud
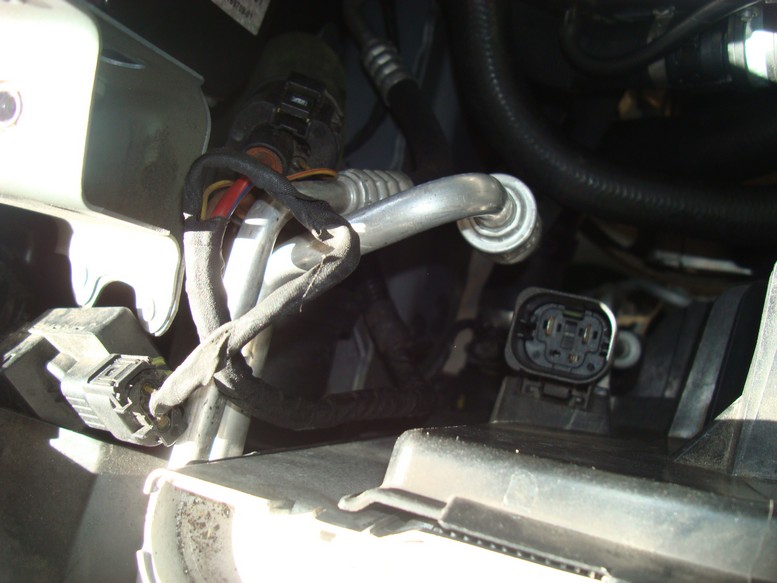
unplug two connectors from thermostat and sending unit
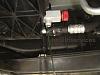
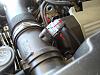
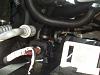
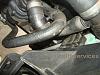
Remove air injection hold down clamps; these tubes get hard over time becoming very brittle. Removal of intake is nec to replace them so be careful!
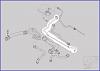
Loosen bolts to water pump pulley
Loosen tension to belt, remove belt, remove pulley
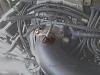
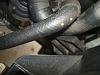
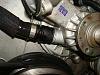
Look in the water pump weep hole, although some seepage is normal, if you see coolant here you have a bad water pump,
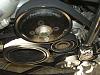
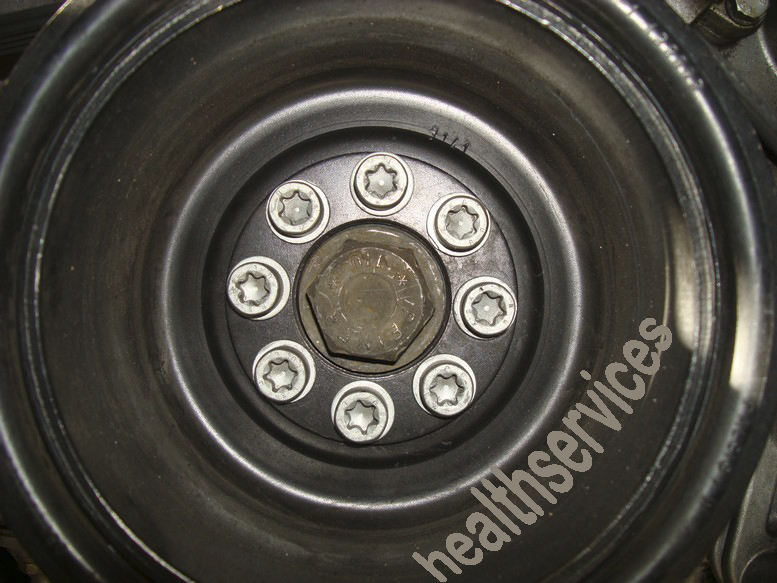
Remove 8 pulley retaining bolts and lower pulley so you can remove the lower most water pump bolt.
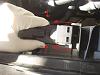
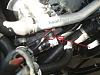
Remove hoses from Water pump.The lower one on the left is a little tricky to raise the clip. Rotate the hose until you see the clip, lift clip and remove hose.
Remove temp switch (22mm)
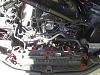
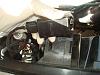
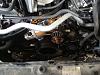
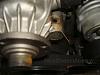
Remove the water pump retaining bolts and remove pump.
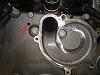
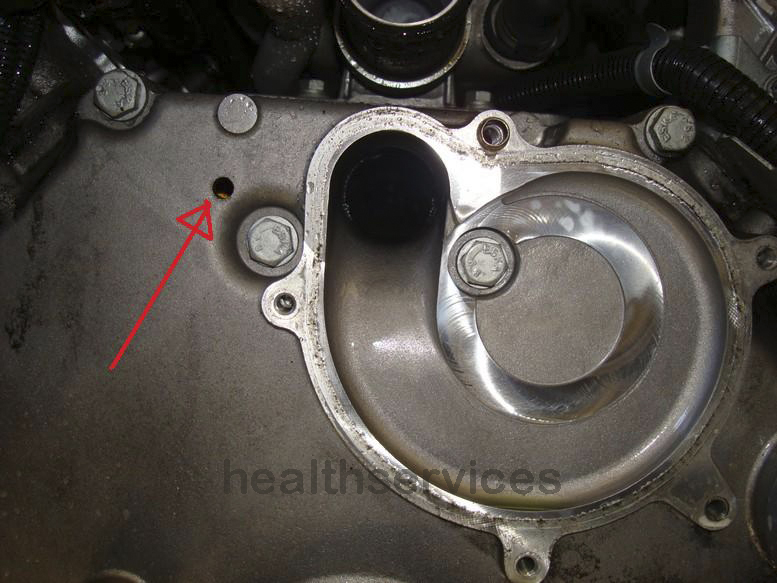
Insert pipe cleaner or rod with tissue on the end into this hole. Bend rod so the tip will touch the bottom inside. If you have coolant inside it is VERY BAD news, the water pipe under the intake is leaking.
Clean block, o-ring, and gasket surfaces, replace the electric thermostat if you bought one..
Apply sealant if youlike to use sealant, install pump. Install temp switch (use sealer if desired) Install hoses, reinstall pulley and bolts.
Use special tool tool to install ac belt. See my other thread on how to make this tool for less than $10. Use only the factory belt for the ac belt.
If you plan to reseal the vacuum pump now is a good time. It is also a good time to replace passenger lower timing cover if it is leaking at this time. Another thing that leaks inthis area is the oil pressure switch.
Re install three nuts holding air injection hose on.
Start car and let warm up, after it warms up and the cooling fan cycles, (fans do not cycle on check fan connection) turn on heater to purge air out of heater core. Turn off heater. Check coolant level. Top off coolant if nec and put cap on.
Lower car,
Test drive, clean and put away tools, and after the motor cools down, check coolant level and for any signs of leakage.
Raise car and install belly pan. Lower and put away rest of tools.
Sorry this took longer than I thought to make, more time than it took to do the actual job.
Hopefully I did not leave too many steps out and the steps are obvious as to what to do when you get there.
Trying to do this by memory with the pictures I took, in the past.
Well the old re-manufactured water pump that was just installed 3 months ago is bad already. I went ahead and tore it down, and the 5series member with a little bit of my help and tools put it back together.
This is the remanufactured pump.

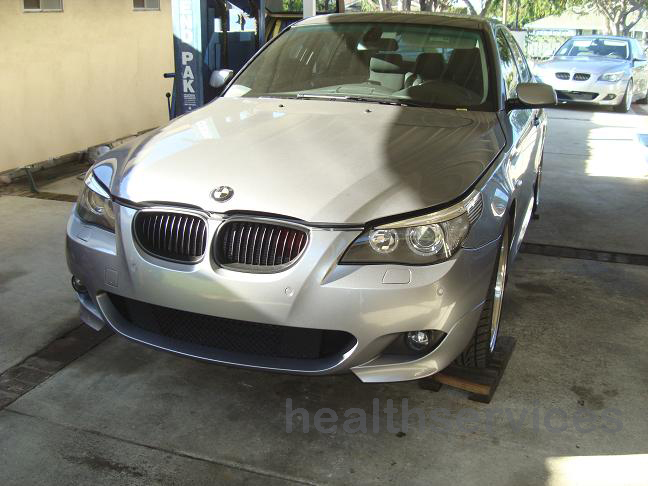
Hopefully a couple of you would like to see the removal of a water pump from a 545i

I have over 15 years experience in a past life as an automotive tech and a shop foreman, there is a good chance I will assume you know how to do certain things. Please know your limitations! If you do not feel you are mechanically inclined enough, or have the proper tools please reevaluate whether you can perform the following repair.
If you cannot perform the following repair, or just don?t want to get your hands dirty, and located in the so-cal Orange County area, I am currently available to do some of these repairs for a fee.
On with the show!
Raise car and support on jack stands. (see, I?m already assuming you know how to dothis!)
You are going to need to remove the lower front belly pan. Turn the 8 Philips head 1/4 turn fasteners 1/4 turn counter clockwise to loosen and remove the belly pan.
Drain coolant into a suitable container. Dispose of properly.

Remove 4 bolts to the engine cover and remove cover.

Use a flat head screwdriver remove air intake hose from throttle body. remove vacuum hose on top of intake if you have one. Use the proper Torxscrew driver and remove the 2 screws holding the air cleaner assembly.Disconnect the MAF electrical connector. Lift up assembly and place in a safeplace.


For ease of access to the water pump I would recommend removing the fan shroud, which is basically 15 mins work to save busted knuckles and gives you a lot of space to work around.
Remove the metal cover and set on top of the intake.

Remove the plastic cover.

Note: if you have not replaced the small plastic line leading from the overflow and across the top of the radiator now is the time to do it as it is very brittle and will break if you even look at it wrong!

Unplug the two wire connections and move them out of the way.


Now lift the fan shroud, and on the driver?s side is a large tang, after it clears the clip, bend it back ?it is hinged?.


Remove fan shroud
unplug two connectors from thermostat and sending unit

Remove air injection hold down clamps; these tubes get hard over time becoming very brittle. Removal of intake is nec to replace them so be careful!

Loosen bolts to water pump pulley

Loosen tension to belt, remove belt, remove pulley

Look in the water pump weep hole, although some seepage is normal, if you see coolant here you have a bad water pump,

Remove 8 pulley retaining bolts and lower pulley so you can remove the lower most water pump bolt.
Remove hoses from Water pump.The lower one on the left is a little tricky to raise the clip. Rotate the hose until you see the clip, lift clip and remove hose.

Remove temp switch (22mm)
Remove the water pump retaining bolts and remove pump.
Insert pipe cleaner or rod with tissue on the end into this hole. Bend rod so the tip will touch the bottom inside. If you have coolant inside it is VERY BAD news, the water pipe under the intake is leaking.
Clean block, o-ring, and gasket surfaces, replace the electric thermostat if you bought one..
Apply sealant if youlike to use sealant, install pump. Install temp switch (use sealer if desired) Install hoses, reinstall pulley and bolts.
Use special tool tool to install ac belt. See my other thread on how to make this tool for less than $10. Use only the factory belt for the ac belt.
If you plan to reseal the vacuum pump now is a good time. It is also a good time to replace passenger lower timing cover if it is leaking at this time. Another thing that leaks inthis area is the oil pressure switch.
Re install three nuts holding air injection hose on.
Re install fan shroud.
Do not forget to plug in electrical connectors to fan!
Re install radiator covers remaining coolant hoses and tighten the drain plug. Fill coolant. Start car and let warm up, after it warms up and the cooling fan cycles, (fans do not cycle on check fan connection) turn on heater to purge air out of heater core. Turn off heater. Check coolant level. Top off coolant if nec and put cap on.
Lower car,
Test drive, clean and put away tools, and after the motor cools down, check coolant level and for any signs of leakage.
Raise car and install belly pan. Lower and put away rest of tools.
Sorry this took longer than I thought to make, more time than it took to do the actual job.
Hopefully I did not leave too many steps out and the steps are obvious as to what to do when you get there.
Trying to do this by memory with the pictures I took, in the past.

 Great write up Bro, can't wait to see the next installments
 03-24-2012, 12:08 AM
#5
Senior Members
Join Date: Nov 2011
Location: Los Angeles, CA
Posts: 924
Likes: 0
Received 1 Like
on
1 Post
My Ride: 2008 AW N52 with sports package & premium package; natural brown interior
MODs:
Orion V2s
3000K H8 Yellow Fogs
Matte Black Kidney Grills
20" Miro 111
Hankook V12 Tires
H&R Sport Springs
Special coding via Simon (dbl flash hazards, digital velocity, etc.)
LED Side Markers from Trinity Autosports
LED License Plate Lights from Trinity Autosports
Carbon Delete
BMC Air Filter
RPI Scoop
RPI GT Exhaust
Future MODs:
Mtech Kit
KW Variant 2 Coilovers
CIC Retrofit
Upgrade Audio System
Nice write up.
03-24-2012, 08:29 PM
#6
Contributors
Thread Starter
Join Date: Jul 2010
Location: socal
Posts: 1,727
Likes: 0
Received 2 Likes
on
2 Posts
My Ride: 545I and a half dozen other rides
Doing these are a little more intense than I thought and takes a lot of fore thought to remember when and where to take pics. Kind of sucks afterwards when you find out the important pics are out of focus 
Also kind of sucks when you totally forgot to put in a step in and the ability to edit is no longer there.
I took some pics for the passenger valve cover gasket dis-assembly and the same side timing cover, hopefully I'll do a DIY on that in the next couple of weeks.
Also kind of sucks when you totally forgot to put in a step in and the ability to edit is no longer there.
I took some pics for the passenger valve cover gasket dis-assembly and the same side timing cover, hopefully I'll do a DIY on that in the next couple of weeks.
04-16-2012, 03:57 PM
#9
Senior Members
I happen to just be browsing and I have to give you credit for you DIYs. I am sure I can speak for everyone when I say I appreciate the time and effort you take into putting these together. I know from experience it sometimes take just as long to do a DIY as it does to do an actual job. So thanks again and don't think that your efforts are not appreciated on this forum.
04-16-2012, 08:52 PM
#10
Contributors
Thread Starter
Join Date: Jul 2010
Location: socal
Posts: 1,727
Likes: 0
Received 2 Likes
on
2 Posts
My Ride: 545I and a half dozen other rides
I happen to just be browsing and I have to give you credit for you DIYs. I am sure I can speak for everyone when I say I appreciate the time and effort you take into putting these together. I know from experience it sometimes take just as long to do a DIY as it does to do an actual job. So thanks again and don't think that your efforts are not appreciated on this forum.