
Laser Jammer Install Locations
 03-22-2005, 03:31 AM
#51
Contributors
Thread Starter

Join Date: Mar 2005
Location: U.S. of A.
Posts: 170
Likes: 0
Received 0 Likes
on
0 Posts
My Ride: 2005 545, Titanium Gray II, 6 Spd, CWP, Sat, LPP Laser Defense, V1 (hard-wired), iPod, 38% ceramic tint, CDV delete, H&R Street Performance Coil Overs, Forced Air Induction, DriveData Pro Camera System (4 cams), M5 Front Bumper
Originally Posted by Rudy' date='Mar 22 2005, 02:37 AM
Are these the instructions you're looking for?:
http://forums.e60.net/index.php?showtopic=...indpost&p=93717
http://forums.e60.net/index.php?showtopic=...indpost&p=93717
[snapback]104908[/snapback]

 05-23-2005, 06:09 AM
#52
Contributors
Thread Starter
Join Date: Mar 2005
Location: U.S. of A.
Posts: 170
Likes: 0
Received 0 Likes
on
0 Posts
My Ride: 2005 545, Titanium Gray II, 6 Spd, CWP, Sat, LPP Laser Defense, V1 (hard-wired), iPod, 38% ceramic tint, CDV delete, H&R Street Performance Coil Overs, Forced Air Induction, DriveData Pro Camera System (4 cams), M5 Front Bumper
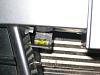
I meant to update this post several weeks ago, when I (finally) completed my LE-30 install. For anyone interested, here's how the LE-30 transponder and power switches came out.
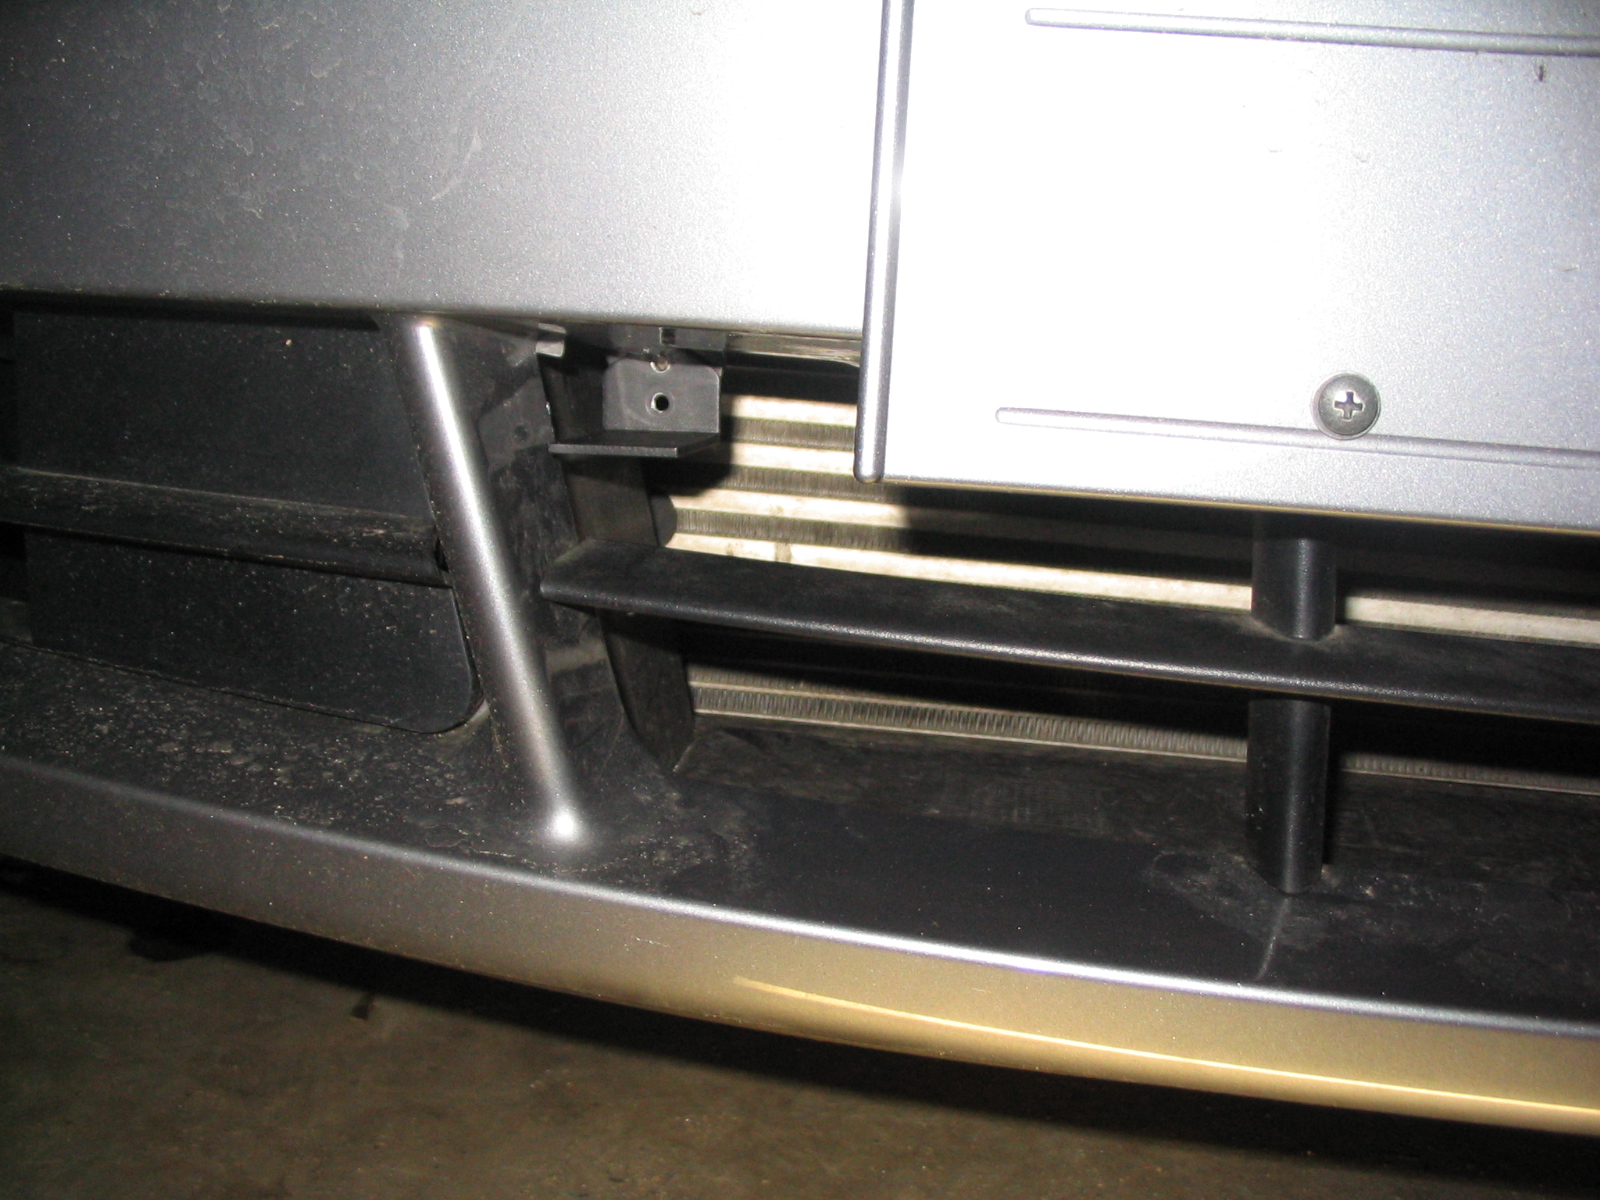
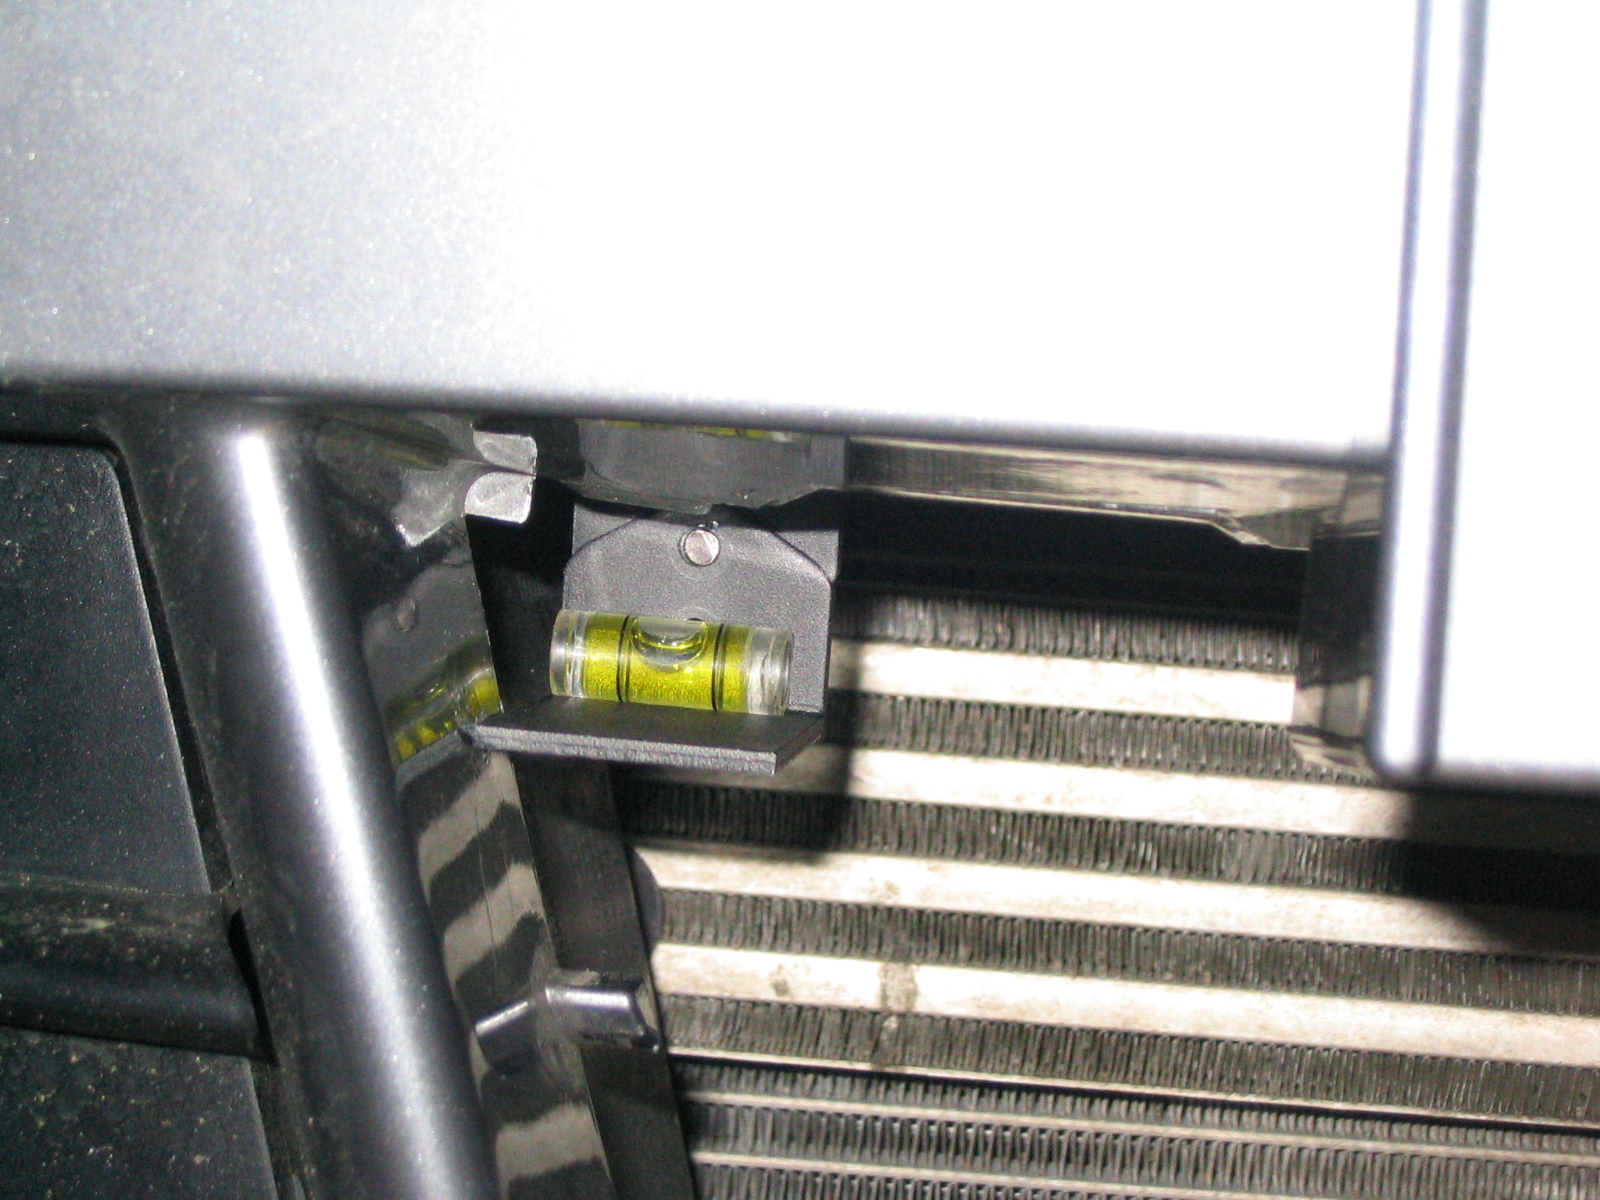
Final design of transponder holders:
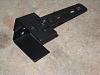
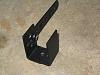
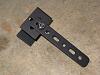
And placement:
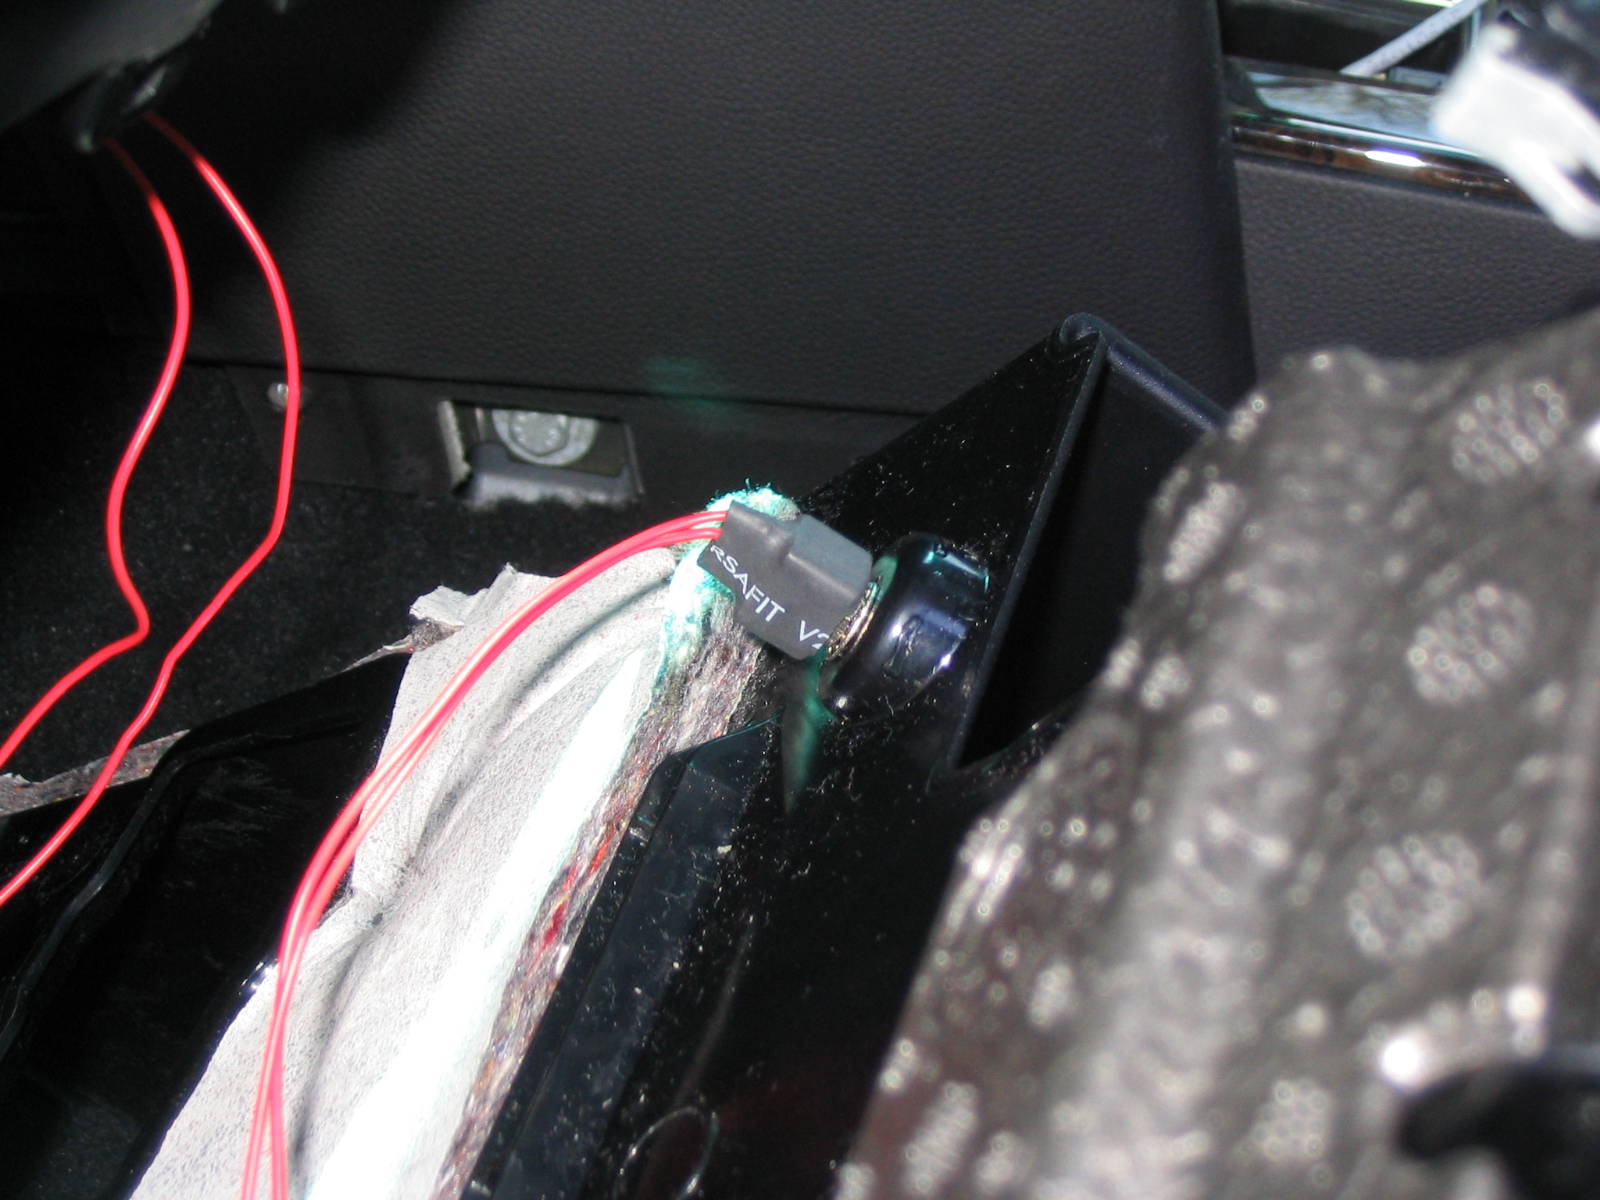
More than anything else, I agonized over the placement of the power switch. It needed to be easily accessible, concealed, and not in a position where I might accidentally flip it on or off. I figured that I would not be installing the LED, so the latter issue was critical.
Then I had a brainstorm one day when putting my dash back together after checking on the V1 and LE-30 wires....
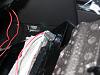

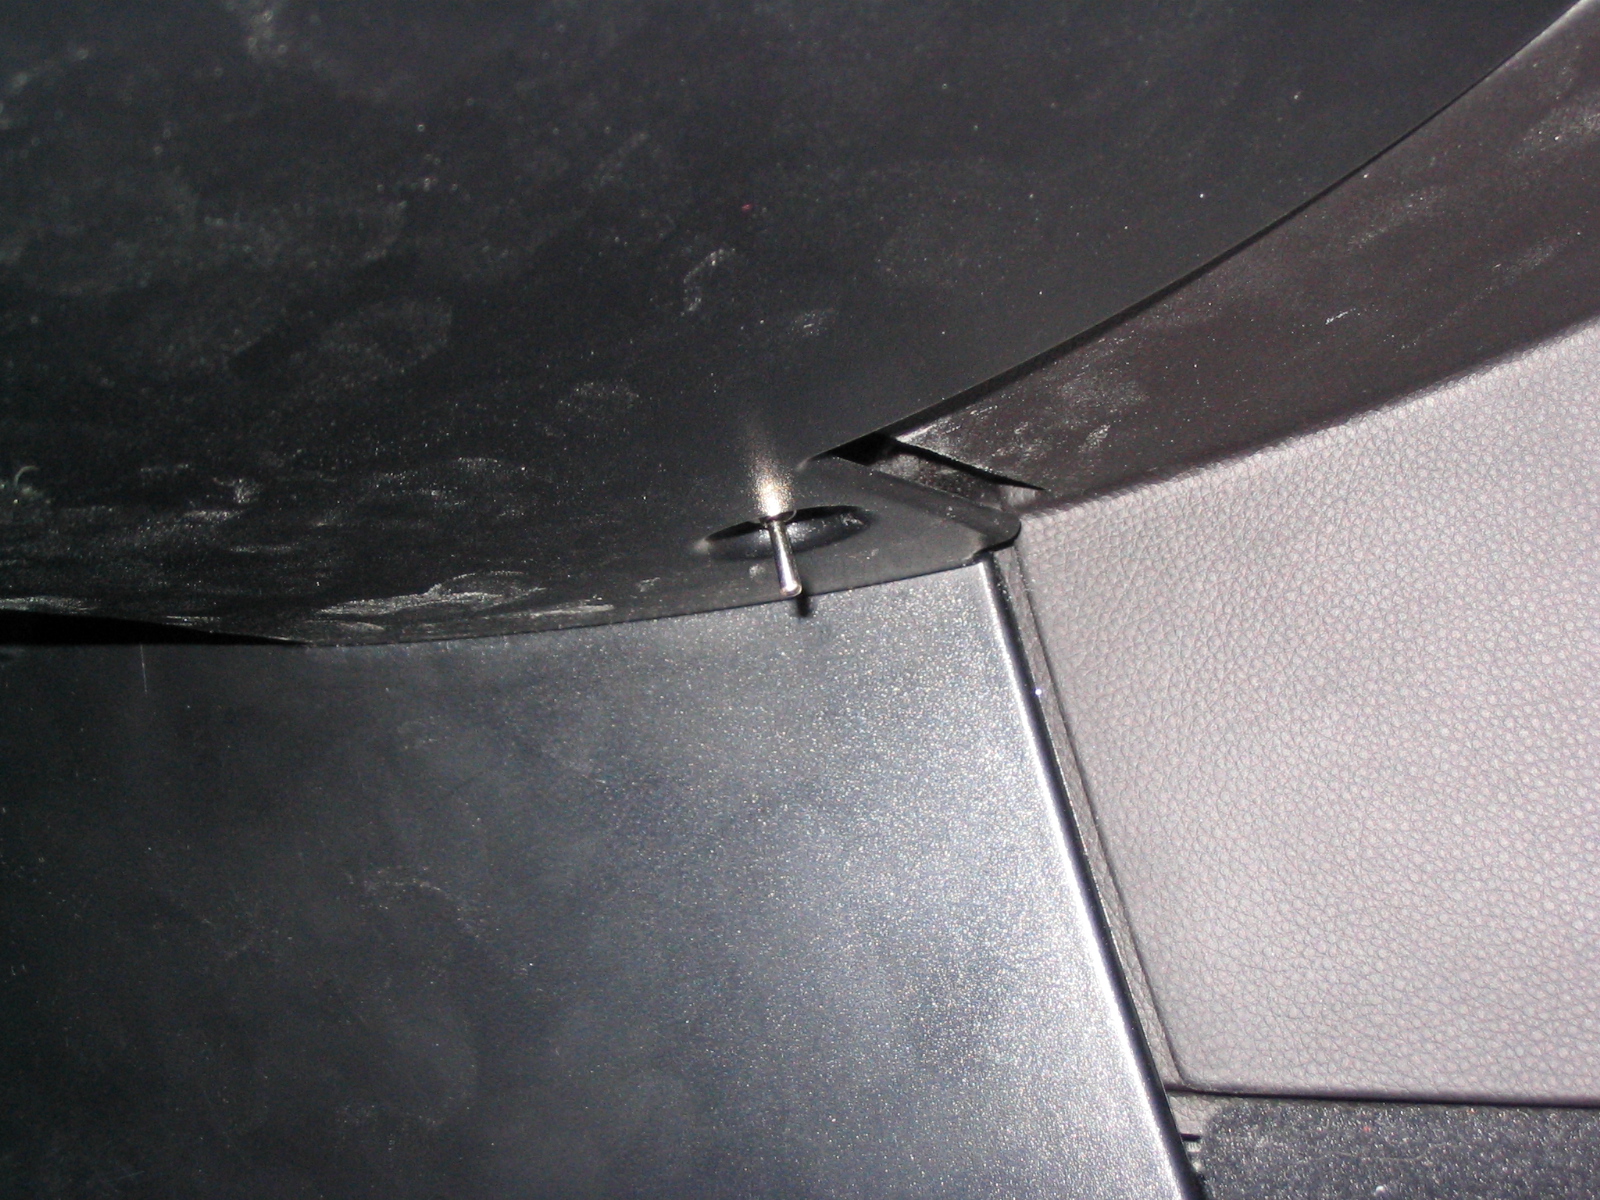
The hole I used is where one of the screws goes which holds up the plastic panel beneath the steering column.
If you choose to do this, make sure you remove the metal clip beneath the steering column, which the screw normally screws into. The metal clip is attached to a plastic and foam housing. It is also necessary to cut out some of this housing in order for the backside of the LE-30 power switch to recess properly. Otherwise you'll have a bulge in your dash cover - which is unsightly, a distraction, and makes this whole process look much less stealthy and more obvious. I simply used a dremel tool to carve out enough of the foam and plastic housing/base and periodically checked the fit while I was carving. It only took me about 10 minutes to get it all sorted.
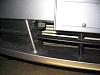
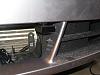
View with front plate holder removed. Note that I cleaned up the wires afterwards. This pic had poor lighting but you can see (or rather not see) that the transponders are almost unnoticable. I'll post a daylight pic to this thread when I can, but bottom line is you really have to know what the front of this car looks like AND you have to visually hunt for the transponders to see them. It's not a setup that is obvious to the average person.

Final design of transponder holders:


And placement:

More than anything else, I agonized over the placement of the power switch. It needed to be easily accessible, concealed, and not in a position where I might accidentally flip it on or off. I figured that I would not be installing the LED, so the latter issue was critical.
Then I had a brainstorm one day when putting my dash back together after checking on the V1 and LE-30 wires....

The hole I used is where one of the screws goes which holds up the plastic panel beneath the steering column.
If you choose to do this, make sure you remove the metal clip beneath the steering column, which the screw normally screws into. The metal clip is attached to a plastic and foam housing. It is also necessary to cut out some of this housing in order for the backside of the LE-30 power switch to recess properly. Otherwise you'll have a bulge in your dash cover - which is unsightly, a distraction, and makes this whole process look much less stealthy and more obvious. I simply used a dremel tool to carve out enough of the foam and plastic housing/base and periodically checked the fit while I was carving. It only took me about 10 minutes to get it all sorted.
View with front plate holder removed. Note that I cleaned up the wires afterwards. This pic had poor lighting but you can see (or rather not see) that the transponders are almost unnoticable. I'll post a daylight pic to this thread when I can, but bottom line is you really have to know what the front of this car looks like AND you have to visually hunt for the transponders to see them. It's not a setup that is obvious to the average person.
 05-23-2005, 11:43 PM
#53
Members

Join Date: Feb 2005
Location: So. California
Posts: 237
Likes: 0
Received 0 Likes
on
0 Posts
My Ride: '05 545 Sport Week 9
Thanks for posting...do you have any other pics of the routing of the wire through the engine compartment and past radiator, etc?
Did you consider just using double sided foam tape to mount the transponder to the bumper?
Where did you mount the speaker?
Thanks!
Did you consider just using double sided foam tape to mount the transponder to the bumper?
Where did you mount the speaker?
Thanks!
06-10-2005, 09:51 PM
#54
Members
Join Date: Feb 2005
Location: So. California
Posts: 237
Likes: 0
Received 0 Likes
on
0 Posts
My Ride: '05 545 Sport Week 9
Woohoo, installed my Lidatek today....awesome! I hid all the wires through the engine compartment by removing the headlight and a lot of shrouding around the radiator. No wires are visible in the engine or passenger compartment. My two remaining tasks are to wire the alert to make my BRAKE light flash in the instrument cluster when I get an alert and to install a better looking power switch below the dash somewhere. I tested it all out with a TV remote control and it works great.
Anyone know how to remove the boot around the parking brake? In older models it just pulled out, but I can't seem to get this one out? I need access to the brake wiring.
Anyone know how to remove the boot around the parking brake? In older models it just pulled out, but I can't seem to get this one out? I need access to the brake wiring.
09-10-2005, 08:25 PM
#55
Contributors
Thread Starter
Join Date: Mar 2005
Location: U.S. of A.
Posts: 170
Likes: 0
Received 0 Likes
on
0 Posts
My Ride: 2005 545, Titanium Gray II, 6 Spd, CWP, Sat, LPP Laser Defense, V1 (hard-wired), iPod, 38% ceramic tint, CDV delete, H&R Street Performance Coil Overs, Forced Air Induction, DriveData Pro Camera System (4 cams), M5 Front Bumper
Originally Posted by TitaniumGray5' date='May 24 2005, 03:43 AM
Thanks for posting...do you have any other pics of the routing of the wire through the engine compartment and past radiator, etc?
Did you consider just using double sided foam tape to mount the transponder to the bumper?
Where did you mount the speaker?
Thanks!
Did you consider just using double sided foam tape to mount the transponder to the bumper?
Where did you mount the speaker?
Thanks!
[snapback]132551[/snapback]
Apologies on slow response... I am just getting back to the Board after an unplanned hiatus...
At any rate, yes I did look at using double-sided tape to mount the transponders. I chose not to for 2 reasons: 1) car is a lease, and 2) I'm not convinced it would hold up from driving/washing/weather (get all 4 seasons where I live).
I mounted the speaker beneath the steering column (tucked inside the dash). It's pretty loud and has startled passengers on a few occasions.
BTW, if you get your Brake Light concept working please post instructions and pics.
 01-06-2006, 08:41 PM
#56
Contributors
Thread Starter
Join Date: Mar 2005
Location: U.S. of A.
Posts: 170
Likes: 0
Received 0 Likes
on
0 Posts
My Ride: 2005 545, Titanium Gray II, 6 Spd, CWP, Sat, LPP Laser Defense, V1 (hard-wired), iPod, 38% ceramic tint, CDV delete, H&R Street Performance Coil Overs, Forced Air Induction, DriveData Pro Camera System (4 cams), M5 Front Bumper
Update: I just upgraded my LE-30's to v2.0, since both my v1.1 units started falsing frequently within a couple of weeks of one another.
This brings me to raise the following points/comments:
1. Lidatek's customer service has been awesome (HUGE THANKS to Andy for tech help and sending me both units before I returned the defective ones, so I would not be without protection)
2. Did I mention how great Lidatek's customer service is???
3. I discovered there is a nice pocket beneath the air filter assembly which allows the wires to the transponders to be completely hidden. It's much easier than removing the headlight assembly as mentioned in another post in this thread.
09-16-2007, 01:42 AM
#57
Contributors
Join Date: Jul 2007
Location: Auckland, New Zealand
Posts: 87
Likes: 0
Received 0 Likes
on
0 Posts
My Ride: BMW 530d
Just wanted to say thank you Road Runner. I installed a Blinder M25 and Bel XR80 this weekend and your photos and instructions were most useful. Thanks for taking the time to write and upload!!


Thread
Thread Starter
Forum
Replies
Last Post
kurtb23
Private Member Classifieds
14
04-22-2015 04:30 PM
rorschach76
Private Member Classifieds
0
03-19-2015 08:59 AM