DIY: Increased Emission No More!!
 02-25-2011, 07:59 AM
#51
Members
Join Date: Dec 2008
Location: Austin, TX
Posts: 69
Likes: 0
Received 0 Likes
on
0 Posts
My Ride: 2008 BMW 550i Sport Carbon Metallic / Black
Traded in:
2005 BMW 545i Sport Black/Black
 02-26-2011, 10:43 PM
#52
Members
Join Date: Dec 2008
Location: Austin, TX
Posts: 69
Likes: 0
Received 0 Likes
on
0 Posts
My Ride: 2008 BMW 550i Sport Carbon Metallic / Black
Traded in:
2005 BMW 545i Sport Black/Black

 08-01-2011, 10:56 AM
#53
Members

Join Date: May 2011
Posts: 30
Likes: 0
Received 0 Likes
on
0 Posts
I got new CCV form FCP.com and the ones I got look different from the ones on the car now. I called them and the guy did some research called me back saying BMW did a SIB that states the old style CCV is no longer needed. The difference between the old one and new one is the plastic nipple on the end of it. Check out this link below. I checked the part number it is right on realoem.com and pelcanparts.com.
The guy form fcp told me that the pipes that route the air form one ccv to the intake and back to the other ccv is no longer needed. Can someone help me with this has someone replaced this DIY or gotten it replaced by the dealer and did they remove the rubber hoses. Check the link below for the pictures of both. You will see what I am talking about.
http://www.pelicanparts.com/euro/cat..._pg1.htm#item3
03-10-2012, 08:13 AM
#55
Members
Join Date: Mar 2011
Location: Las Vegas
Posts: 95
Likes: 0
Received 0 Likes
on
0 Posts
My Ride: 2008 BMW M5
Replaced both my valves this morning, and cleared check engine light. Hasn't come back on. The idle is perfect now without any fluctuation! Thx e6t.lab.rat for the DIY!
 .
04-12-2012, 07:34 PM
.
04-12-2012, 07:34 PM
#57
Members
Senior Members
Join Date: Apr 2010
Location: Houston, TX
Posts: 299
Likes: 0
Received 0 Likes
on
0 Posts
My Ride: BMW 550i
Model Year: 2011
I just installed the Crankcase Vent Valve repair kit and it was very easy to replace. Only the right side of mine was torn, but I went ahead and replaced both. Cleared the Check Engine Light with my INPA Loader, hopefully it doesnt come back on. Thanks once again for this write up.

 08-10-2012, 08:32 AM
#58
Contributors

Join Date: Aug 2008
Location: Clarendon/Tysons Corner, VA
Posts: 340
Likes: 0
Received 0 Likes
on
0 Posts
My Ride: See Signature
Model Year: 2015
Engine: N55
Wow, this is a wonderful DIY write-up. I purchased the PRVs and will attempt this next week when they arrive. Thanks to all who have contributed to this thread, especially member e6t.lab.rat!! 
08-13-2012, 07:07 PM
#59
Members
Join Date: May 2012
Location: New Jersey
Posts: 133
Likes: 0
Received 0 Likes
on
0 Posts
My Ride: 2008 550i Alpine White
I also had the CEL on for weeks. Codes were p21879 and p2189. I just replaced the cvv also. Thank you for this wonderful thread! Hopefully that'll be end of the dreaded check engine light. Now on to the steering angle sensor.....

08-22-2012, 09:53 AM
#60
New Members

Join Date: Aug 2012
Location: arizona
Posts: 1
Likes: 0
Received 0 Likes
on
0 Posts
Hi all!
Well as the title says, I repaired my "increase emissions" code on my V8 which saved me at least $200 from the dealer (i'm sure dealer would of found a boatload of urgent/recommended repairs/codes so it could of easily been more). You would not believe how easy this was, and i will share with you all the quick and simple procedures to rid of this dreaded code, which i've seen sneaked up on some members here recently.
I got my code a month ago and just wanted to be sure it wouldn't pop up again before i posted this. Well, i've driven my '05 545 for 150 miles since this repair (Aug27) and guess what, no codes! So I know I'm safe posting this now. I'm not saying this is a cure all nor might it solve your particular problem (at least I hope it does!) but this is probably the first repair your dealership may attempt in resolving this issue. Keep in mind this repair was done on my V8. I'm guessing it should be a relative repair to you I6's, but may differ in appearance and cost than the v8's. Please research it here: http://www.realoem.com/bmw/ for those with I6's.
Tools needed: Just ONE FLAT HEAD SCREWDRIVER. Seriously! I even used this to remove the engine cover. haha
Total time doing repair: 30 minutes tops!!
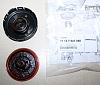
This is the one item (two units) which needed replacing: it's called a "Pressure Regulating Valve - Repair Kit." For you experienced mechanics, it acts like the old PCV (positive crankcase valve) valve in older vehicles. This one's just pricier. BMW Part # 11-12-7-547-058 at approximately $30 each.
[attachment=114841 SC01377.JPG]
And this tool is a life saver. It's called "CodeKey." I discovered it at my local Costco Warehouse for less than $40. Not only will this instrument find the trouble code number (which btw is universal to all vehicles built after 1996 regardless of make), but also the description of what this code number stands for. And to top it all off, it will allow you to "turn off" the "Service Engine Soon" light also.
*** Note: Turning off the "Service Engine Light" before the repair is made will only re-illuminate this light even after driving only several miles. Trust me I know. The car's are pretty intelligent like that.
[attachment=114842SC01407.JPG]
Step 1
Remove engine cover with, yes you guessed it: that handy mandy screwdriver. I don't have a Torx set. Don't need one. haha
I don't need to place a pic here now do I?
Step 2
Remove the cylinder head covers. No tools are required to remove these as they are held in by two studs inside of rubber grommets, one forward and the other aft. Just gently tug on these straight outwards and it should pop right out.
Step 3
Passenger side cylinder head. Do you notice the black round plastic piece towards the front of the engine (centered in pic)? Well, that is the Pressure Regulating Valve, held in by six built-in clips. Disconnect the hose and unclip valve with the handy screwdriver (or your fingernails) and pull it out.
[attachment=114840SC01385.JPG]
Pic of driver side
[attachment=114845SC01387.JPG]
What will happen next is the rubber orange valve will remain in orifice with the spring. No worries. Gently pull the orange rubber valve out to expose the spring. (This pic is of the drivers side)
[attachment=114843SC01394.JPG]
Remove old spring. Wipe down chamber with a clean towel. Repeat step on other side cylinder head.
[attachment=114844SC01393.JPG]
Step 4
Reinstallation. Just do it reversed. With a clean orifice, insert spring, then apply orange valve. Just be sure you seat this rubber valve properly in the existing groove. Snap fit the plastic cover (make sure you hear six clicks) and most importantly, don't forget to re-connect hose. Now install the engine covers.
Here you will notice the groove along the outer edge.
[attachment=114847SC01397.JPG]
Step 5
Connecting CodeKey. With key in the ignition, turn to position 2. This position will illuminate the instrument panel but should not start the engine. Do not start the engine. Now insert CodeKey plug into our vehicle OBD II connector. It is located immediately above the trunk open switch. Your CodeKey is now on, press "Ready" and it will begin to search for code (s). Once done, your CodeKey will display the code number and description. WRITE THIS DOWN! for future reference. I was so anxious to get this done, I neglected to log it down and take pics. Sorry! So I'll do my best to try and remember what codes I had. I had five codes, two weren't described (although did have a number), one related to MAF issue, the other two I just could not remember. I believe the MAF code might be related to me removing the charcoal filter. Not sure though, but I went ahead and cleaned my MAF sensor anyway.
I'm guessing the several codes I received were a result of having a bad pressure regulating valve, that somehow they're inter-related/twined. As if to say when one thing goes bad so will others, but those others may not necessarily be at fault. I hope I'm making sense. Anyway, I went ahead and erased all codes. I drove for 50 miles, re-inserted my CodeKey and "No Codes Found" was displayed. SWEET!!
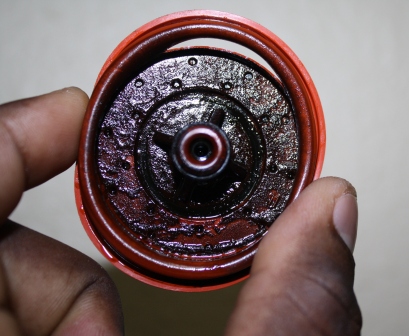
This by the way is what my old pressure regulating valve looked like when removed:
[attachment=114846SC01398.JPG]
Notice how filthy the one on the left looks compared to the one on the right. Not only was it filthy, but there was a tear in the rubber valve!!
Hope this helps!! Any questions? Feel free to pm me anytime. Good Luck!
Well as the title says, I repaired my "increase emissions" code on my V8 which saved me at least $200 from the dealer (i'm sure dealer would of found a boatload of urgent/recommended repairs/codes so it could of easily been more). You would not believe how easy this was, and i will share with you all the quick and simple procedures to rid of this dreaded code, which i've seen sneaked up on some members here recently.
I got my code a month ago and just wanted to be sure it wouldn't pop up again before i posted this. Well, i've driven my '05 545 for 150 miles since this repair (Aug27) and guess what, no codes! So I know I'm safe posting this now. I'm not saying this is a cure all nor might it solve your particular problem (at least I hope it does!) but this is probably the first repair your dealership may attempt in resolving this issue. Keep in mind this repair was done on my V8. I'm guessing it should be a relative repair to you I6's, but may differ in appearance and cost than the v8's. Please research it here: http://www.realoem.com/bmw/ for those with I6's.
Tools needed: Just ONE FLAT HEAD SCREWDRIVER. Seriously! I even used this to remove the engine cover. haha
Total time doing repair: 30 minutes tops!!
This is the one item (two units) which needed replacing: it's called a "Pressure Regulating Valve - Repair Kit." For you experienced mechanics, it acts like the old PCV (positive crankcase valve) valve in older vehicles. This one's just pricier. BMW Part # 11-12-7-547-058 at approximately $30 each.
[attachment=114841
SC01377.JPG]And this tool is a life saver. It's called "CodeKey." I discovered it at my local Costco Warehouse for less than $40. Not only will this instrument find the trouble code number (which btw is universal to all vehicles built after 1996 regardless of make), but also the description of what this code number stands for. And to top it all off, it will allow you to "turn off" the "Service Engine Soon" light also.
*** Note: Turning off the "Service Engine Light" before the repair is made will only re-illuminate this light even after driving only several miles. Trust me I know. The car's are pretty intelligent like that.
[attachment=114842
SC01407.JPG]Step 1
Remove engine cover with, yes you guessed it: that handy mandy screwdriver. I don't have a Torx set. Don't need one. haha
I don't need to place a pic here now do I?
Step 2
Remove the cylinder head covers. No tools are required to remove these as they are held in by two studs inside of rubber grommets, one forward and the other aft. Just gently tug on these straight outwards and it should pop right out.
Step 3
Passenger side cylinder head. Do you notice the black round plastic piece towards the front of the engine (centered in pic)? Well, that is the Pressure Regulating Valve, held in by six built-in clips. Disconnect the hose and unclip valve with the handy screwdriver (or your fingernails) and pull it out.
[attachment=114840
SC01385.JPG]Pic of driver side
[attachment=114845
SC01387.JPG]What will happen next is the rubber orange valve will remain in orifice with the spring. No worries. Gently pull the orange rubber valve out to expose the spring. (This pic is of the drivers side)
[attachment=114843
SC01394.JPG]Remove old spring. Wipe down chamber with a clean towel. Repeat step on other side cylinder head.
[attachment=114844
SC01393.JPG]Step 4
Reinstallation. Just do it reversed. With a clean orifice, insert spring, then apply orange valve. Just be sure you seat this rubber valve properly in the existing groove. Snap fit the plastic cover (make sure you hear six clicks) and most importantly, don't forget to re-connect hose. Now install the engine covers.
Here you will notice the groove along the outer edge.
[attachment=114847
SC01397.JPG]Step 5
Connecting CodeKey. With key in the ignition, turn to position 2. This position will illuminate the instrument panel but should not start the engine. Do not start the engine. Now insert CodeKey plug into our vehicle OBD II connector. It is located immediately above the trunk open switch. Your CodeKey is now on, press "Ready" and it will begin to search for code (s). Once done, your CodeKey will display the code number and description. WRITE THIS DOWN! for future reference. I was so anxious to get this done, I neglected to log it down and take pics. Sorry! So I'll do my best to try and remember what codes I had. I had five codes, two weren't described (although did have a number), one related to MAF issue, the other two I just could not remember. I believe the MAF code might be related to me removing the charcoal filter. Not sure though, but I went ahead and cleaned my MAF sensor anyway.
I'm guessing the several codes I received were a result of having a bad pressure regulating valve, that somehow they're inter-related/twined. As if to say when one thing goes bad so will others, but those others may not necessarily be at fault. I hope I'm making sense. Anyway, I went ahead and erased all codes. I drove for 50 miles, re-inserted my CodeKey and "No Codes Found" was displayed. SWEET!!
This by the way is what my old pressure regulating valve looked like when removed:
[attachment=114846
SC01398.JPG]Notice how filthy the one on the left looks compared to the one on the right. Not only was it filthy, but there was a tear in the rubber valve!!
Hope this helps!! Any questions? Feel free to pm me anytime. Good Luck!