DIY: Increased Emission No More!!
 03-28-2010, 11:41 PM
#41
Contributors
Thread Starter

Join Date: Jan 2009
Location: Sin City
Posts: 948
Likes: 0
Received 1 Like
on
1 Post
My Ride: Jet Black '05 545i, Sport/Premium Pkg, Steptronic, Adaptive Xenon, Nav, L7, Blue2th, PDC,
Drive it for a few more days and see if the fault will just clear it self out. If not then the dealers will have to clear it for you or, an indy shop if they're willing. Or there might be other codes as well that may need to be addressed or looked at.
 04-22-2010, 06:01 AM
#42
Contributors
Join Date: Aug 2005
Location: Houston, Texas
Posts: 2,114
Likes: 0
Received 0 Likes
on
0 Posts
My Ride: 2005 BMW 545i, Silver Grey, Sport Package, R. Shades, Cold Pkg, Sat. Rad., Prem. Sound.
I think with emission errors, there are logs of components involved. All troubleshooting and the DIY are great. I'm going to do mine for maintenance sake.
04-22-2010, 03:16 PM
#43
Contributors
Join Date: Aug 2005
Location: Houston, Texas
Posts: 2,114
Likes: 0
Received 0 Likes
on
0 Posts
My Ride: 2005 BMW 545i, Silver Grey, Sport Package, R. Shades, Cold Pkg, Sat. Rad., Prem. Sound.
I recently had an "increased emission" error come up. I took it to the dealership (extended warranty) and the issue was an "ignition pump." I do not have the code with me, but if someone needs it let me know. The total cost of the repair was around $368 (236 labor + 132 parts).
I think with emission errors, there are logs of components involved. All troubleshooting and the DIY are great. I'm going to do mine for maintenance sake.
I think with emission errors, there are logs of components involved. All troubleshooting and the DIY are great. I'm going to do mine for maintenance sake.
04-25-2010, 12:17 PM
#44
Senior Members

Join Date: Nov 2009
Location: Warwick, RI
Posts: 272
Likes: 0
Received 0 Likes
on
0 Posts
My Ride: 2005 545i Sport 6MT
 05-10-2010, 10:20 PM
#46
Contributors
Thread Starter
Join Date: Jan 2009
Location: Sin City
Posts: 948
Likes: 0
Received 1 Like
on
1 Post
My Ride: Jet Black '05 545i, Sport/Premium Pkg, Steptronic, Adaptive Xenon, Nav, L7, Blue2th, PDC,
I'll go ahead and re-post the steps along with the pics again, and hope this time it don't get wiped out lol...
Step 1
Remove engine cover with, yes you guessed it: that handy mandy screwdriver. I don't have a Torx set. Don't need one. haha
I don't need to place a pic here now do I?
Step 2
Remove the cylinder head covers. No tools are required to remove these as they are held in by two studs inside of rubber grommets, one forward and the other aft. Just gently tug on these straight outwards and it should pop right out.
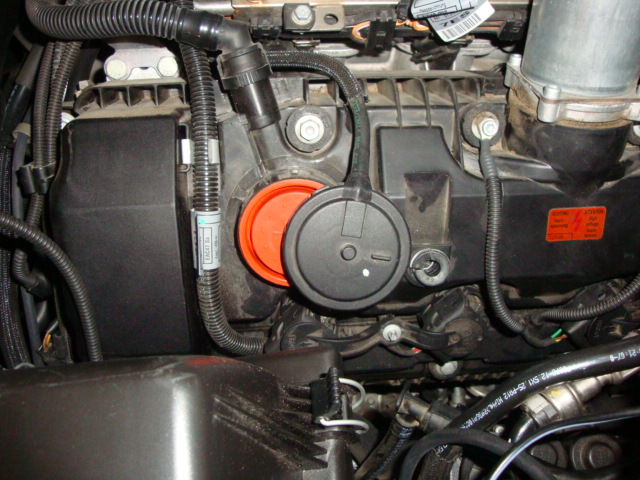
Step 3
Passenger side cylinder head. Do you notice the black round plastic piece towards the front of the engine (centered in pic)? Well, that is the Pressure Regulating Valve, held in by six built-in clips. Disconnect the hose and unclip valve with the handy screwdriver (or your fingernails) and pull it out.

Pic of driver side
What will happen next is the rubber orange valve will remain in orifice with the spring. No worries. Gently pull the orange rubber valve out to expose the spring. (This pic is of the drivers side)

Remove old spring. Wipe down chamber with a clean towel. Repeat step on other side cylinder head.

Step 4
Reinstallation. Just do it reversed. With a clean orifice, insert spring, then apply orange valve. Just be sure you seat this rubber valve properly in the existing groove. Snap fit the plastic cover (make sure you hear six clicks) and most importantly, don't forget to re-connect hose. Now install the engine covers.
Here you will notice the groove along the outer edge.

This by the way is what my old pressure regulating valve looked like when removed:

Hope this helps
07-05-2010, 05:11 PM
#47
Members

Join Date: Aug 2007
Location: Sydney, Australia
Posts: 42
Likes: 0
Received 0 Likes
on
0 Posts
My Ride: 2004 530i, Mysthic Blue, built June 2004, Cream Leather Interior, Dark Woodgrain Dash,
The pics were there, before this site got updated a few months ago.
I'll go ahead and re-post the steps along with the pics again, and hope this time it don't get wiped out lol...
Step 1
Remove engine cover with, yes you guessed it: that handy mandy screwdriver. I don't have a Torx set. Don't need one. haha
I don't need to place a pic here now do I?
Step 2
Remove the cylinder head covers. No tools are required to remove these as they are held in by two studs inside of rubber grommets, one forward and the other aft. Just gently tug on these straight outwards and it should pop right out.
Step 3
Passenger side cylinder head. Do you notice the black round plastic piece towards the front of the engine (centered in pic)? Well, that is the Pressure Regulating Valve, held in by six built-in clips. Disconnect the hose and unclip valve with the handy screwdriver (or your fingernails) and pull it out.
Attachment 105419
Pic of driver side
Attachment 105420
What will happen next is the rubber orange valve will remain in orifice with the spring. No worries. Gently pull the orange rubber valve out to expose the spring. (This pic is of the drivers side)
Attachment 105421
Remove old spring. Wipe down chamber with a clean towel. Repeat step on other side cylinder head.
Attachment 105422
Step 4
Reinstallation. Just do it reversed. With a clean orifice, insert spring, then apply orange valve. Just be sure you seat this rubber valve properly in the existing groove. Snap fit the plastic cover (make sure you hear six clicks) and most importantly, don't forget to re-connect hose. Now install the engine covers.
Here you will notice the groove along the outer edge.
Attachment 105417
This by the way is what my old pressure regulating valve looked like when removed:
Attachment 105418
Hope this helps
Did you need to reset and codes after you installed the new valves, all it was all good after you put it all back together again and it self tested and returned to normal.
What to do the valves cost and associated parts, as I have to double that price when I buy them in Australia/Sydney from the dealers.
Do you need several different parts - Pressure values, new o-rings, etc to get the job done, or is it just one part.
Im tempted to buy a OBDII device reader, but then what do I do with the code, and what the description means, it just gives an understanding of how serious or not the problem is. But it least it narrows down the problem area, before I visit the mechanic to handover the car for repair.
PS. Was in Vegas in early May, that place never stops growing. I saw a few e60s down the strip and they looked mighty fine.
02-18-2011, 04:35 PM
#48
Members
Join Date: Jan 2011
Location: Killeen, Tx
Posts: 185
Likes: 0
Received 0 Likes
on
0 Posts
My Ride: 05 545i
19" MRR GT1
Interior LED retrofit
a good read, and very helpful, I just wanted to confirm that the problem related to the rough idle when you started the car and then the Engine light coming on. With so many DTC and OBD-II Trouble codes, and I dont have a OBDII device connected to the car, but from my initial reaction, the rough starting idle looks like the pressure valves have gone on my 2004-e60, so getting this 1st understood is my 1st step and then getting it fixed.
Did you need to reset and codes after you installed the new valves, all it was all good after you put it all back together again and it self tested and returned to normal.
What to do the valves cost and associated parts, as I have to double that price when I buy them in Australia/Sydney from the dealers.
Do you need several different parts - Pressure values, new o-rings, etc to get the job done, or is it just one part.
Im tempted to buy a OBDII device reader, but then what do I do with the code, and what the description means, it just gives an understanding of how serious or not the problem is. But it least it narrows down the problem area, before I visit the mechanic to handover the car for repair.
PS. Was in Vegas in early May, that place never stops growing. I saw a few e60s down the strip and they looked mighty fine.
02-19-2011, 10:19 AM
#49
Contributors
Thread Starter
Join Date: Jan 2009
Location: Sin City
Posts: 948
Likes: 0
Received 1 Like
on
1 Post
My Ride: Jet Black '05 545i, Sport/Premium Pkg, Steptronic, Adaptive Xenon, Nav, L7, Blue2th, PDC,
It shouldn't hurt to R/R. It's really easy to do and fairly cheap. It's been nearly a year and a half since this repair and no CEL thus far (knock on wood!). Hope this helps and good luck.
02-23-2011, 05:20 PM
#50
Members
Join Date: Jan 2011
Location: Killeen, Tx
Posts: 185
Likes: 0
Received 0 Likes
on
0 Posts
My Ride: 05 545i
19" MRR GT1
Interior LED retrofit
Sounds like a PRV problem. Possibly a sticking valve from all the buildup of old oil and not allowing enough vaccuum at startup until the car warms up. The heat eventually makes that buildup more viscous thus no problem after a few minutes of warmup. How many miles on your 5er? BMW had a recall on these valve a few years back so you may as well replace yours. At the time of my repair they had over 30 sets of these at the shop "just in case."
It shouldn't hurt to R/R. It's really easy to do and fairly cheap. It's been nearly a year and a half since this repair and no CEL thus far (knock on wood!). Hope this helps and good luck.
It shouldn't hurt to R/R. It's really easy to do and fairly cheap. It's been nearly a year and a half since this repair and no CEL thus far (knock on wood!). Hope this helps and good luck.
I replaced the valves. Unfortunately this did not fix the issue. Still have the issue, however my problem only seems to arise during HOT start. It is also exacerbated when the ambient temperature is 70+ degrees. It was really embarrasing to have a co-worker in the car today when it shook like an epileptic squirrel and then stalled.