
DIY: E60 Rear Seat Heat Retrofit

Thread Starter
Senior Members
Joined: Oct 2009
Posts: 1,380
Likes: 4
From: Indiana, USA
My Ride: 2007 530xi: Sport, NAV, PDC, HUD, Cold Wthr, CA, Logic 7, HD Radio, SAT, Custom NCS coded options 2008 535xi: Sport, Night Vision, NAV, PDC, HUD, Cold Wthr, CA, Logic 7, SAT, Custom NCS coded options, Rear Seat Heat Retrofit, Passport 9500ci
Model Year: 2008
Engine: N54
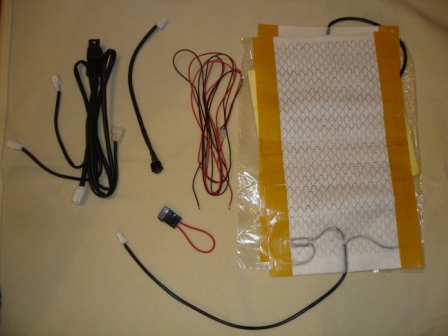
The product used cost $180 and includes everything you need to add heat to the seat bottom and seat back and has a Hi-off-low lighted switch.
These heat up nicely and are better than OEM in that the back area is heated. On the other hand, the switches are mechanical so they do not turn themselves off. If you leave the switch on when you turn off the car, they will heat up again after you turn the car back on.
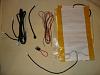
The kit is the Innovative Heat II from : http://www.autowarm.com/products.php
They provide a couple installation accessories -
- You will want the Drill bit to get a perfect fit for the 20mm switch. There is very little tolerance.
- You may want to use the punches. I tried it without and with the punches and I preferred to use them
- You DO NOT need the install kit with the hog ring pliers. There is nothing in there you need.
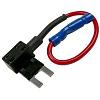
- You will also need 2 10amp add-a-circuit fuse box taps that you get from an auto parts store. You will use these to tap into the fuse panel in the trunk.
Note that these use a mini type fuse. Be sure you have 2 of the 10 amp mini fuses AND 2 mini fuses that you will replace in the trunk fuse panel. I used a 5 amp and 7.5 amp mini fuse.
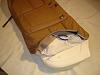
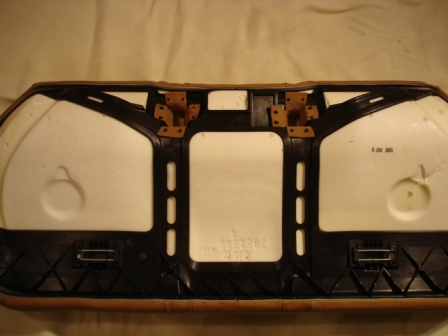
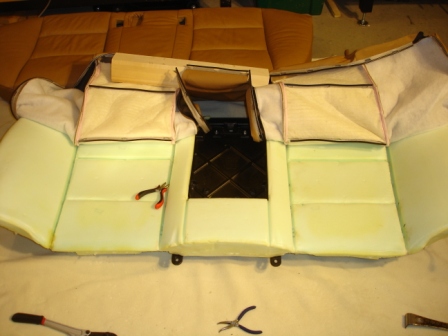
1) Remove the rear bottom seat. If you take longer than 10secs to pull that out you are doing it wrong
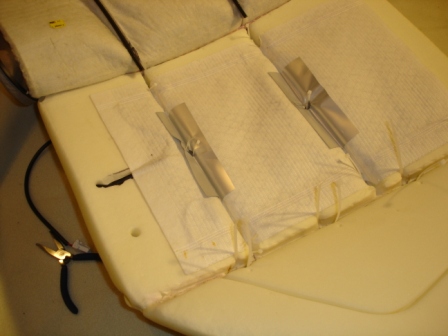
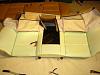
This is the botton view of the seat.
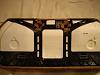
2) Remove the leather cover by unclipping the plastic track that goes around the perimeter. Work with just one side at a time to keep the cover aligned. You are going to peel back the cover one one seat - add the heat element - replace the cover - repeat on the other seat. In this pic, you can see the where the seam is attached with hog rings - you will either cut or pry them all off. Later you will re-attach with zip ties and NOT hog rings.
Here you see the whole seat cusion revealed and location of the where the rings where attached.
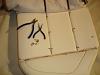
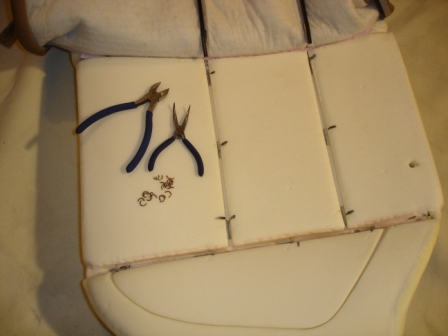
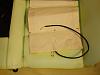
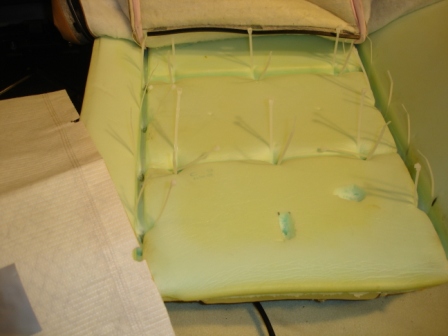
Place the pad into the creases and mark the location of where the rings go onto the element. you will make a hole in the center so the seat cover can be re-attached through the pad with a zip tie.. The edges only need a notch to make room for the zip ties

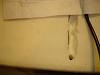
Also cut a notch into the foam to allow room for the cable and temp sensor so you don't get a bulge in the seat. Punch a hole through the foam to pass the cable through and out the seat bottom.
Here you see the pad in position with zip ties in place and about to be attached back to the cover
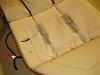
Final pic of the seat bottom

More to follow....
These heat up nicely and are better than OEM in that the back area is heated. On the other hand, the switches are mechanical so they do not turn themselves off. If you leave the switch on when you turn off the car, they will heat up again after you turn the car back on.
The kit is the Innovative Heat II from : http://www.autowarm.com/products.php
They provide a couple installation accessories -
- You will want the Drill bit to get a perfect fit for the 20mm switch. There is very little tolerance.
- You may want to use the punches. I tried it without and with the punches and I preferred to use them
- You DO NOT need the install kit with the hog ring pliers. There is nothing in there you need.

- You will also need 2 10amp add-a-circuit fuse box taps that you get from an auto parts store. You will use these to tap into the fuse panel in the trunk.
Note that these use a mini type fuse. Be sure you have 2 of the 10 amp mini fuses AND 2 mini fuses that you will replace in the trunk fuse panel. I used a 5 amp and 7.5 amp mini fuse.

1) Remove the rear bottom seat. If you take longer than 10secs to pull that out you are doing it wrong
This is the botton view of the seat.
2) Remove the leather cover by unclipping the plastic track that goes around the perimeter. Work with just one side at a time to keep the cover aligned. You are going to peel back the cover one one seat - add the heat element - replace the cover - repeat on the other seat. In this pic, you can see the where the seam is attached with hog rings - you will either cut or pry them all off. Later you will re-attach with zip ties and NOT hog rings.

Here you see the whole seat cusion revealed and location of the where the rings where attached.
Place the pad into the creases and mark the location of where the rings go onto the element. you will make a hole in the center so the seat cover can be re-attached through the pad with a zip tie.. The edges only need a notch to make room for the zip ties
Also cut a notch into the foam to allow room for the cable and temp sensor so you don't get a bulge in the seat. Punch a hole through the foam to pass the cable through and out the seat bottom.

Here you see the pad in position with zip ties in place and about to be attached back to the cover
Final pic of the seat bottom
More to follow....
 Keep it coming!


Thread Starter
Senior Members
Joined: Oct 2009
Posts: 1,380
Likes: 4
From: Indiana, USA
My Ride: 2007 530xi: Sport, NAV, PDC, HUD, Cold Wthr, CA, Logic 7, HD Radio, SAT, Custom NCS coded options 2008 535xi: Sport, Night Vision, NAV, PDC, HUD, Cold Wthr, CA, Logic 7, SAT, Custom NCS coded options, Rear Seat Heat Retrofit, Passport 9500ci
Model Year: 2008
Engine: N54
Rear Seat Heat Retrofit Part II - Seat Back
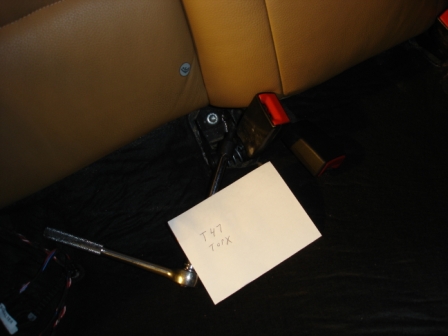
The upper seat section is removed via 2 screws in the middle seat between the seat belt and two sliding locks accessable only from the boot/trunk.
I also removed all 4 seat belt bolts to get them all out of the way and make it easier to remove the back and move around inside the car.
The two smaller screws take a T25 Torx bit
The large screws for the seat belt take a T47 TORX bit
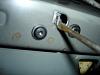
Climb inside boot/trunk head first until your head is touch the seat back and look straight up. You will see 2 circular holes. This is where you insert a screwdriver blade where shown use it to pry a sliding type latch free
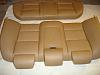
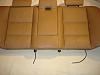
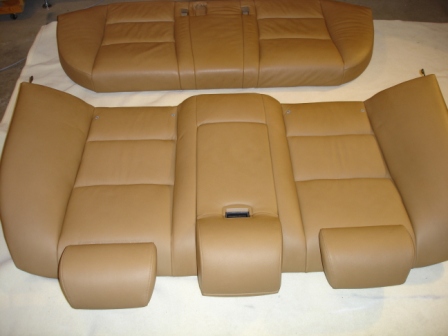
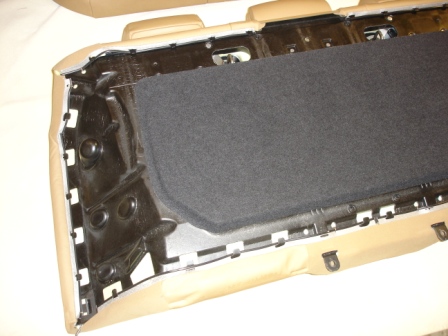
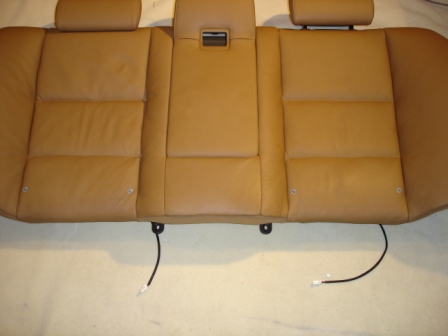
Upper section removed
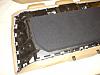
The back of the upper section. Begin to remove the leather cover by simply unhooking the cover from the posts. With this section, I removed the entire lower portion of the cover for both seats but left the top
attached where the head rests are.
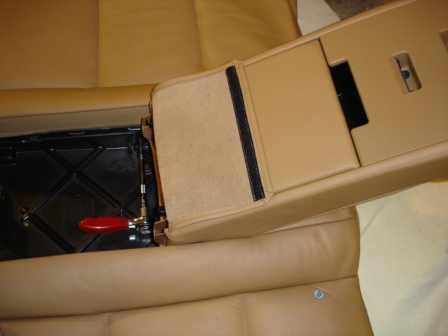
Remove the center arm rest via 4 screws as shown. This was a torx bit but I don't recall which size.
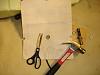
Here you see the cover lifted up over the top and I have removed all the hog rings. You can also see a pair of bolt cutters in the pic. My hand was getting tired with the smaller wire cutters!
Those hog rings are tough. Sometimes it worked better just to twist them open and remove - others were easier to cut.
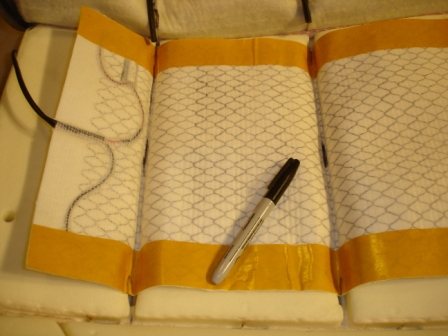
Laying out the marks on the heating pad
The small cut outs along the edge I used one of the punches this time - nice quick process. The larger hole in the middle is about 1 " - I used a pair of scissors - fold the pad in half and cut out a semi-circle.
Afterwards you cover the hole with the provded tape then punch a smaller hole in the tape with one of the punches. The reason for this is cutting the hole cuts the internal electrical wires within the pad and they need to be sealed off with the tape.(The tape goes on both sides to "sandwich" the cut edges between the tape. All 4 pads are actually done this exact same way.
Zips ties installed and ready for the pad. You can see by now I switched to larger zip ties. They were easier to handle. After pulling tight and snipping the end, be sure to twist the lock head down into the foam so it does not come though the leather!

Pad in place and ready to reattach the cover

Finished!
Coming up next is the process for routing the cables, installing the switches in the rear vent area where the oem switches go and connecting up the power in the trunk fuse box.
The upper seat section is removed via 2 screws in the middle seat between the seat belt and two sliding locks accessable only from the boot/trunk.
I also removed all 4 seat belt bolts to get them all out of the way and make it easier to remove the back and move around inside the car.
The two smaller screws take a T25 Torx bit

The large screws for the seat belt take a T47 TORX bit
Climb inside boot/trunk head first until your head is touch the seat back and look straight up. You will see 2 circular holes. This is where you insert a screwdriver blade where shown use it to pry a sliding type latch free

Upper section removed
The back of the upper section. Begin to remove the leather cover by simply unhooking the cover from the posts. With this section, I removed the entire lower portion of the cover for both seats but left the top
attached where the head rests are.
Remove the center arm rest via 4 screws as shown. This was a torx bit but I don't recall which size.
Here you see the cover lifted up over the top and I have removed all the hog rings. You can also see a pair of bolt cutters in the pic. My hand was getting tired with the smaller wire cutters!
Those hog rings are tough. Sometimes it worked better just to twist them open and remove - others were easier to cut.
Laying out the marks on the heating pad

The small cut outs along the edge I used one of the punches this time - nice quick process. The larger hole in the middle is about 1 " - I used a pair of scissors - fold the pad in half and cut out a semi-circle.
Afterwards you cover the hole with the provded tape then punch a smaller hole in the tape with one of the punches. The reason for this is cutting the hole cuts the internal electrical wires within the pad and they need to be sealed off with the tape.(The tape goes on both sides to "sandwich" the cut edges between the tape. All 4 pads are actually done this exact same way.

Zips ties installed and ready for the pad. You can see by now I switched to larger zip ties. They were easier to handle. After pulling tight and snipping the end, be sure to twist the lock head down into the foam so it does not come though the leather!
Pad in place and ready to reattach the cover

Finished!
Coming up next is the process for routing the cables, installing the switches in the rear vent area where the oem switches go and connecting up the power in the trunk fuse box.

Thread Starter
Senior Members
Joined: Oct 2009
Posts: 1,380
Likes: 4
From: Indiana, USA
My Ride: 2007 530xi: Sport, NAV, PDC, HUD, Cold Wthr, CA, Logic 7, HD Radio, SAT, Custom NCS coded options 2008 535xi: Sport, Night Vision, NAV, PDC, HUD, Cold Wthr, CA, Logic 7, SAT, Custom NCS coded options, Rear Seat Heat Retrofit, Passport 9500ci
Model Year: 2008
Engine: N54
Rear Seat Heat Retrofit Final Installment: Electrical Connections
General process:
-The switches for the seats go in the rear seat vent console
- Cable for the switches are routed under the carpet over the top of the hump to the center of the seat bottom
- The left seat power routes up the left door and right seat routes up the right door
- Both seats are grounded right at the door area and the hot lead is sent to the trunk fuse box.
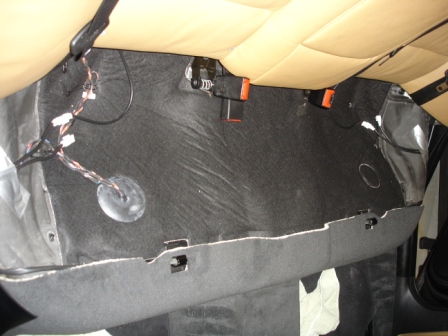
- The driver side seat hot lead goes into the trunk area near where the head of the person sitting in the seat and is then passed over to the passenger side along the rear deck support beam (the same area where the seat back sliding locks are located)
- The power comes from removing 2 fuses from the fuse panel and inserting the add-a-circuit adapters. There are only 4 circuits that I found that are switched off when the ignition is off. My photo shows the ones I tapped into.
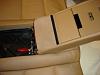
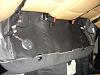
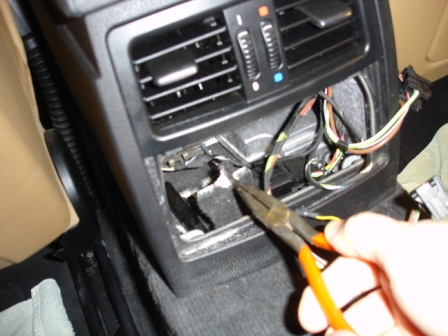
Remove the lower part of the rear console first by inserting a pry tool into the very tight fitting panel and pull it straight out. My tool of choice is a paint bucket tool for prying the lid off paint cans

Cut/tear the little piece of carpet and foam that is attached in there so you can get under the carpet
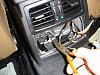
To fish the cable for the switches I used a stiff wire to push under the carpet from the rear seat over the hump and into the center console. I attached a string to the wire because catching the string and pulling it out from the center console was much easier. Use the string to then tie to the cable from the kit and then pull that under the carpet and into the console. Don't underestimate how frustrating this part was! Where the carpet comes down from the seat area and makes the 90deg turn onto the hump is a very tight fit - it seems there is a brace in there to hold it tight and form fitting. I pryed against it with a short wide piece of wood to get some clearance.

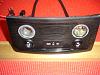
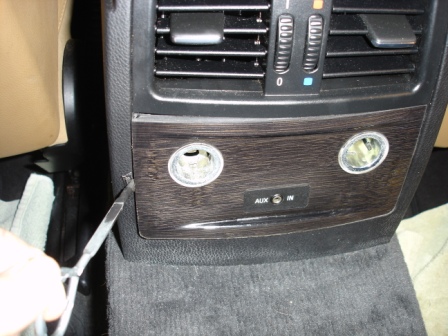
Here you can see I took the panel, protected the front with tape and marked the center black rectangles (where the OEM switches would go)
I didn't order the 20mm bit they offered. Dumb. I have lots of bits and figured I had to have something but I didn't. A trip to the home store - nothing. But I did get the idea to check out my air-tool cone-shaped grinding bits and I was able to make it work. I drilled a 3/4 hole with a forstner bit then widened it to fit with the grinding bit.

Finished panel with switches. Be careful Drilling this panel - you split the wood face or make an ugly scratch and you are buying a new one!
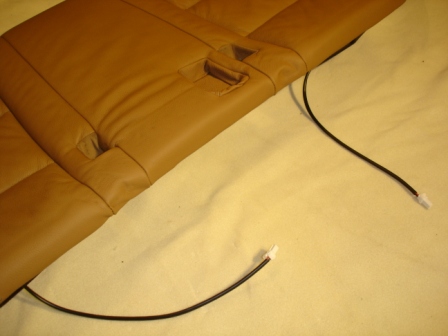
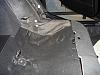
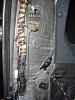
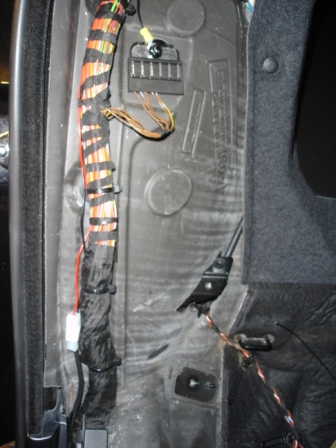
Here, the cable is routed under the edge of the carpet at the front of the seat, into the plastic trim on the edge of the seat by the door and you can see the 2 plugs - one for the seat bottom - one for the top.
You can also see another white plug right at the edge of the door - this plug is used to connect to the power leads from the trunk.
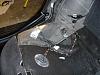
Passenger side close up. Note the 2 plugs for the heat pads, the plug for the power from the trunk, and... there is a small black box wedged between the seat and door next to the duct tape... this is the control module - there is one for each seat harness.
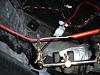
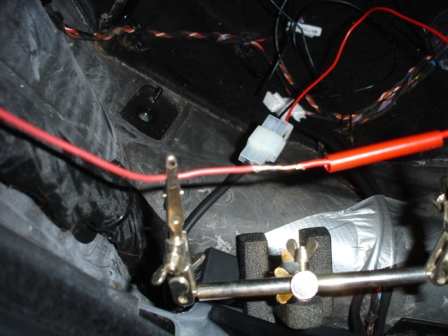
Here you see wher I am prepping the power connection for the trunk. I try not to depend on simple crimped splices when the connection is going to be hidden. Note how to solder wires together in a splice - you twist them so they continue in s straight line - solder them together and apply heat shrink. The reason for the splice here is because the supplied cable was too short to route properly all the way to the trunk. Guess I forgot to mention at the beginning you needed to buy some extra stranded wire.
Close up of the passenger side door area.
You can see the control module at the bottom, the white power plug with a red wire I just soldered routing to the trunk, and at the top where the grounding bar is with the 4 brown wires you can see where I added the wire with the yellow spade plug. I also soldered this spade plug to the wire. Yellow is too big for the size wire but it needed to be to fit the grounding post.
The wire harness is complete. 2 connections for each seat shown.
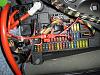
In the fuse panel, the top 4 fuses were the only ones that power down with the ignition. I used a 7.5 amp and a 5 amp circuit, removed the fuses, inserted the add-a-circuit, then installed the mini 5amp and mini 7.5 amp fuses in the adapter and the 2 10amp fuses for the heaters. Make sure you understand which fuse socket in the adapter goes for the original circuit and which one is for the heater - read your instructions with the add-a-circuit that you purchase.
I hope this helps you have an easier time at it. If you improve upon my process when you do this yourself, please come back and share to make this better for everyone.
Cheers!
-Jim
General process:
-The switches for the seats go in the rear seat vent console
- Cable for the switches are routed under the carpet over the top of the hump to the center of the seat bottom
- The left seat power routes up the left door and right seat routes up the right door
- Both seats are grounded right at the door area and the hot lead is sent to the trunk fuse box.
- The driver side seat hot lead goes into the trunk area near where the head of the person sitting in the seat and is then passed over to the passenger side along the rear deck support beam (the same area where the seat back sliding locks are located)
- The power comes from removing 2 fuses from the fuse panel and inserting the add-a-circuit adapters. There are only 4 circuits that I found that are switched off when the ignition is off. My photo shows the ones I tapped into.
Remove the lower part of the rear console first by inserting a pry tool into the very tight fitting panel and pull it straight out. My tool of choice is a paint bucket tool for prying the lid off paint cans
Cut/tear the little piece of carpet and foam that is attached in there so you can get under the carpet
To fish the cable for the switches I used a stiff wire to push under the carpet from the rear seat over the hump and into the center console. I attached a string to the wire because catching the string and pulling it out from the center console was much easier. Use the string to then tie to the cable from the kit and then pull that under the carpet and into the console. Don't underestimate how frustrating this part was! Where the carpet comes down from the seat area and makes the 90deg turn onto the hump is a very tight fit - it seems there is a brace in there to hold it tight and form fitting. I pryed against it with a short wide piece of wood to get some clearance.

Here you can see I took the panel, protected the front with tape and marked the center black rectangles (where the OEM switches would go)
I didn't order the 20mm bit they offered. Dumb. I have lots of bits and figured I had to have something but I didn't. A trip to the home store - nothing. But I did get the idea to check out my air-tool cone-shaped grinding bits and I was able to make it work. I drilled a 3/4 hole with a forstner bit then widened it to fit with the grinding bit.

Finished panel with switches. Be careful Drilling this panel - you split the wood face or make an ugly scratch and you are buying a new one!

Here, the cable is routed under the edge of the carpet at the front of the seat, into the plastic trim on the edge of the seat by the door and you can see the 2 plugs - one for the seat bottom - one for the top.
You can also see another white plug right at the edge of the door - this plug is used to connect to the power leads from the trunk.

Passenger side close up. Note the 2 plugs for the heat pads, the plug for the power from the trunk, and... there is a small black box wedged between the seat and door next to the duct tape... this is the control module - there is one for each seat harness.

Here you see wher I am prepping the power connection for the trunk. I try not to depend on simple crimped splices when the connection is going to be hidden. Note how to solder wires together in a splice - you twist them so they continue in s straight line - solder them together and apply heat shrink. The reason for the splice here is because the supplied cable was too short to route properly all the way to the trunk. Guess I forgot to mention at the beginning you needed to buy some extra stranded wire.
Close up of the passenger side door area.
You can see the control module at the bottom, the white power plug with a red wire I just soldered routing to the trunk, and at the top where the grounding bar is with the 4 brown wires you can see where I added the wire with the yellow spade plug. I also soldered this spade plug to the wire. Yellow is too big for the size wire but it needed to be to fit the grounding post.
The wire harness is complete. 2 connections for each seat shown.
In the fuse panel, the top 4 fuses were the only ones that power down with the ignition. I used a 7.5 amp and a 5 amp circuit, removed the fuses, inserted the add-a-circuit, then installed the mini 5amp and mini 7.5 amp fuses in the adapter and the 2 10amp fuses for the heaters. Make sure you understand which fuse socket in the adapter goes for the original circuit and which one is for the heater - read your instructions with the add-a-circuit that you purchase.

I hope this helps you have an easier time at it. If you improve upon my process when you do this yourself, please come back and share to make this better for everyone.
Cheers!
-Jim
Contributors
Joined: Jul 2009
Posts: 804
Likes: 0
From: Harrisburg, PA area
My Ride: SOLD...Jet Black 2008 550i M Sport with SAT, black interior. RPI exhaust and air scoop, 35% huper optik tint all around, CF roundels, flat black kidneys, Springfield Armory XD-40 jet black in glove box, charcoal filter removed.
Awesome write up - I WANT TO DO THIS mod, but I don't know man. i need more encouragement by way of others doing it and it working out OK too.

Contributors
Joined: Nov 2005
Posts: 4,719
Likes: 3
From: London, UK
My Ride: BMW E60 520d SE Saloon M47 2.0dTitanium Grey II, Grey−Dakota Leather, Visibility Package, Media Package, Through Load System, Lumbar support − fr seats, Automatic Air Conditioning−Advanced, High beam assistant, Hi−Fi Loudspeak
Model Year: 2006
In the fuse panel, the top 4 fuses were the only ones that power down with the ignition. I used a 7.5 amp and a 5 amp circuit, removed the fuses, inserted the add-a-circuit, then installed the mini 5amp and mini 7.5 amp fuses in the adapter and the 2 10amp fuses for the heaters. Make sure you understand which fuse socket in the adapter goes for the original circuit and which one is for the heater - read your instructions with the add-a-circuit that you purchase.
http://forums.e60.net/index.php?showtopic=37190
Thread Starter
Senior Members
Joined: Oct 2009
Posts: 1,380
Likes: 4
From: Indiana, USA
My Ride: 2007 530xi: Sport, NAV, PDC, HUD, Cold Wthr, CA, Logic 7, HD Radio, SAT, Custom NCS coded options 2008 535xi: Sport, Night Vision, NAV, PDC, HUD, Cold Wthr, CA, Logic 7, SAT, Custom NCS coded options, Rear Seat Heat Retrofit, Passport 9500ci
Model Year: 2008
Engine: N54
If you look at one of my DIY, I actually show you the OEM position for rear lighter sockets. A much neater solution and the fuse for that is already in place on the fuse box.
http://forums.e60.ne...showtopic=37190
http://forums.e60.ne...showtopic=37190
Thanks. I like the thought and I'll check it out. I am wondering though about the current draw. The seats pull ~10amps so it seems that if the seats are on, and an accessory is plugged into the cig lighter socket, then we might be blowing some fuses?