Euro Lci tail lights


Contributors
Joined: Jan 2007
Posts: 1,615
Likes: 3
From: Orlando, FL
My Ride: 2005 530i Silver Gray/ Gray Leather. SP,PP
Originally Posted by 06530-6M' post='901018' date='Jun 4 2009, 03:56 PM
Has anyone else from the first GB, and who purchased these Euro lights, received their order yet? It wouldn't make sense for me to be the only one who has ...
I have been swamped with important work that needs to be published ASAP so haven't had a chance to install the lights yet. They sure do look pretty sitting there on the counter in my laundry room though!
I have been swamped with important work that needs to be published ASAP so haven't had a chance to install the lights yet. They sure do look pretty sitting there on the counter in my laundry room though!
Thread Starter
Contributors
Joined: Dec 2008
Posts: 2,306
Likes: 0
From: Temecula, Ca
My Ride: '10 Switzer "Ultimate Street Edition" GT-R
Originally Posted by nelson29' post='901828' date='Jun 5 2009, 10:54 AM
Got them 
Will post pics tonight.
Will post pics tonight.
Contributors
Joined: Jun 2008
Posts: 292
Likes: 0
From: Orlando, FL
Can someone please point me to a step by step DIY for the install of the LCI lights? Yes, I did a search, including Bruce's own "LCI Tail-lights DIY" in his signature, but I'm a dufus. Sorry. I can't even get the carpeted covers off and if I do something that hurts my car I know I'd lose it. I have NO mechanical skills of any kind, so please don't assume I know something I should ... Please be kind.
Contributors
Joined: Jan 2007
Posts: 1,615
Likes: 3
From: Orlando, FL
My Ride: 2005 530i Silver Gray/ Gray Leather. SP,PP
Originally Posted by 06530-6M' post='901978' date='Jun 5 2009, 04:45 PM
Can someone please point me to a step by step DIY for the install of the LCI lights? Yes, I did a search, including Bruce's own "LCI Tail-lights DIY" in his signature, but I'm a dufus. Sorry. I can't even get the carpeted covers off and if I do something that hurts my car I know I'd lose it. I have NO mechanical skills of any kind, so please don't assume I know something I should ... Please be kind.
Contributors
Joined: Jan 2007
Posts: 1,615
Likes: 3
From: Orlando, FL
My Ride: 2005 530i Silver Gray/ Gray Leather. SP,PP

Contributors
Joined: Nov 2005
Posts: 4,719
Likes: 3
From: London, UK
My Ride: BMW E60 520d SE Saloon M47 2.0dTitanium Grey II, Grey−Dakota Leather, Visibility Package, Media Package, Through Load System, Lumbar support − fr seats, Automatic Air Conditioning−Advanced, High beam assistant, Hi−Fi Loudspeak
Model Year: 2006
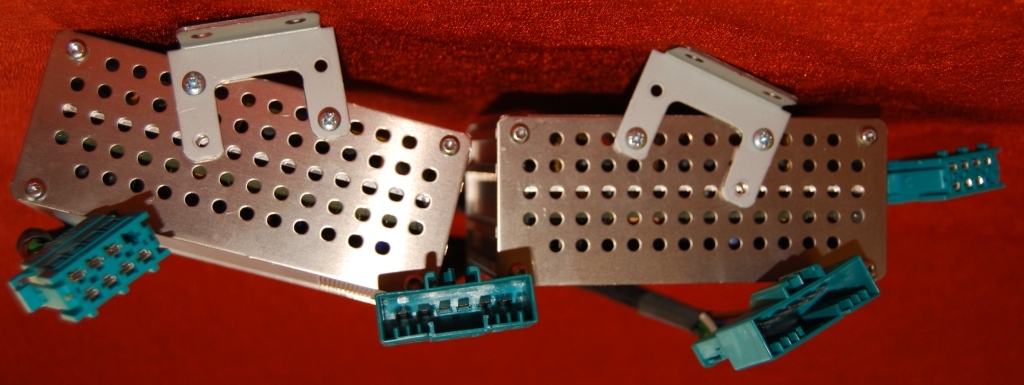
For the people who are receiving their lights from Heiko, they will get the brackets in a separate packet that you must first screw on to the enclosure before you attempt to install this.
The first lot of cables can only have the brackets mounted on the side where the cables exit, this is due to the shorter lengths of the cables. The later ones can choose any side and way its shown in the picture is actually better because you use the full length of the cable provided.
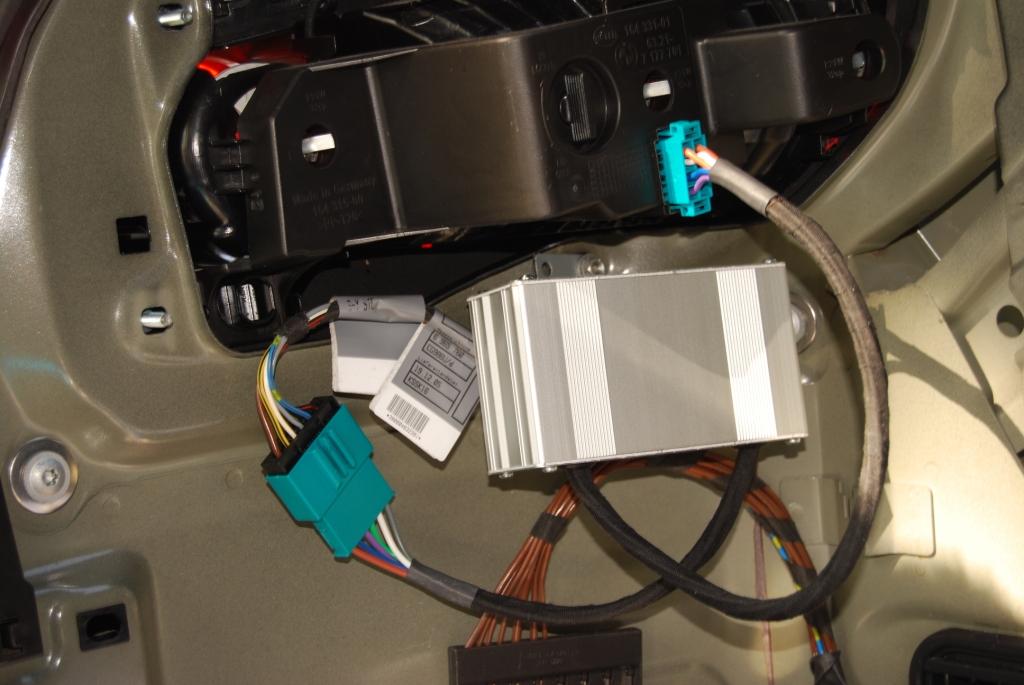
The enclosure mounts to the bottom most screw of the lights and then hang at an angle to the rear end of the car. The cables are marked right and left and the way you mount the brackets is so that you use the Right hole of the bracket on the Right side and the Left hole for the Left side when hanging it from the light's screw.
See pictures of how the brackets should be attached. And also how they should be screwed and connected to the lights. The picture is showing the LEFT side.

The first lot of cables can only have the brackets mounted on the side where the cables exit, this is due to the shorter lengths of the cables. The later ones can choose any side and way its shown in the picture is actually better because you use the full length of the cable provided.
The enclosure mounts to the bottom most screw of the lights and then hang at an angle to the rear end of the car. The cables are marked right and left and the way you mount the brackets is so that you use the Right hole of the bracket on the Right side and the Left hole for the Left side when hanging it from the light's screw.
See pictures of how the brackets should be attached. And also how they should be screwed and connected to the lights. The picture is showing the LEFT side.