Oil-coated front differential - 2007 530xi - Where is the oil coming from?
 04-18-2014, 07:01 AM
#11
Senior Members

Join Date: Mar 2011
Location: Boston
Posts: 1,198
Likes: 0
Received 3 Likes
on
3 Posts
My Ride: '06 530i, '07 C280 4matic, '98 ML320
While the intake manifold is out, drivers side engine mount is there easily accessible.
Depending on the mileage on the car, you may want to think about replacing the engine mounts.
Depending on the mileage on the car, you may want to think about replacing the engine mounts.
 04-20-2014, 07:04 PM
#12
Members
Thread Starter
Join Date: Apr 2010
Location: United States/Colorado/Littleton
Posts: 45
Likes: 0
Received 0 Likes
on
0 Posts
My Ride: 2007 530xi (N52 6-cylinder engine)2002 325xi (M54 6-cylinder engine)2008 Specialized Roubaix road bike
04-26-2014, 11:08 AM
#13
Members
Thread Starter
Join Date: Apr 2010
Location: United States/Colorado/Littleton
Posts: 45
Likes: 0
Received 0 Likes
on
0 Posts
My Ride: 2007 530xi (N52 6-cylinder engine)2002 325xi (M54 6-cylinder engine)2008 Specialized Roubaix road bike
The oil filter housing gasket was the culprit.
Thanks to pcy and other members of this forum for providing good DIY instructions, photos, etc. I hope this post will be useful to others who may do the same.
My original concern was that the front differential was covered in oil. pcy suggested that I clean the oil off and track down the source of the leak. But due to the difficulty of having to possibly disassemble things twice I dove in, head first, intent on fixing several things "while I was in there." The oil leak would certainly get fixed, I was sure (in fact, the oil leaks no more).
$736.82 was my out-of-pocket expense after factoring in shipping and core charge returns.
The scope of the project included:
• Starter, replace with remanufactured Bosch OEM
• CCV (Crank Case Ventilation) overhaul
• Oil filter housing gasket, replacement
• Oil heat exchanger gasket, replacement
• Spark plugs, replacement
• Valve Cover Gasket, replacement of 5 related gaskets and 22 new bolts
Time: 16 hours over 2 days. I never said I was fast.
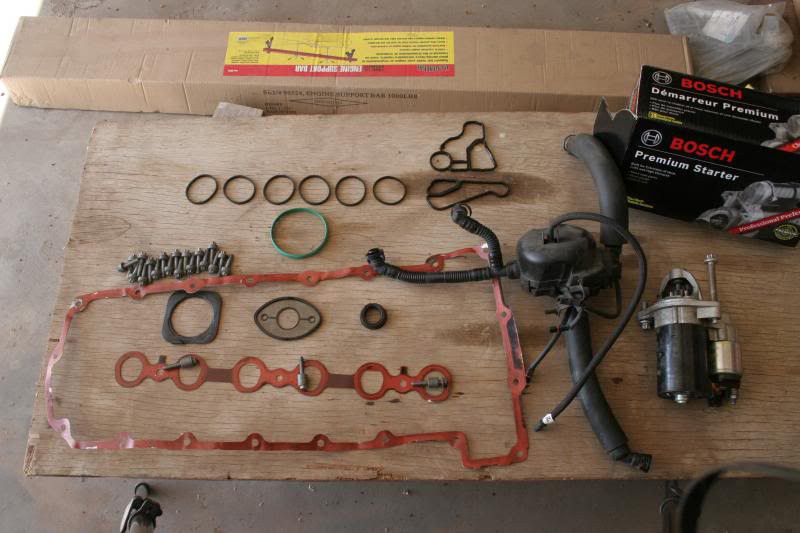
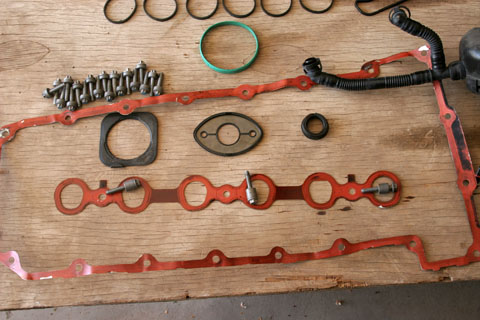
These are the replaced parts. From the top, left: 6 intake manifold gaskets; oil filter housing gasket; oil heat exchanger gasket; throttle body gasket (green); crankcase ventilation valve and pipes; starter motor; valve cover gaskets (orange); oil filler cap “apron” gasket (square); Valvetronic motor gasket (elliptical); Valvetronic eccentric shaft sensor gasket (black, round); 22 aluminum bolts for VCG
Oh yeah, spark plugs too...
STARTER
The starter had been slow to engage for a year or two. I paid extra and got the remanufactured Bosch unit. It’s about $100 more than “brand B” but I trust it. New aluminum bolts were used, as specified.
TORQUE
• E-14 85mm bolt: 20Nm + 180 degrees
• E-14 30mm bolt 20Nm + 90 degrees
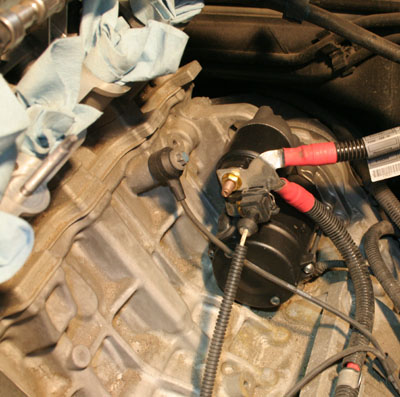
The new starter works perfectly, without the delay of the old one. The ratcheting E-Torx wrenches worked only on the 30mm bolt; there wasn’t enough clearance around the rear bolt’s head. I had to substitute a 7/16” box-end 12-point wrench, which fit perfectly. Torque on the front bolt was done in a single 90-degree stroke. The rear bolt had to be done in several short strokes, re-positioning the wrench after about 30 degrees each time. It was impossible to get a torque wrench on the rear bolt so I estimated the 20 Nm, marked the edge of the bolt with a black marker and rotated it approximately 180 degrees as specified. Also to note, it appears to be impossible to replace the starter without removing the intake manifold.
CRANKCASE VENTILATION
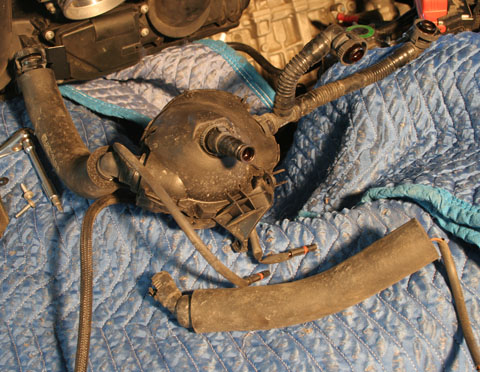
An oil-soaked front differential inspired me to look into this. Since I was replacing the VCG I anticipated breaking the pipe from the valve cover. I decided to just replace everything in the CCV system. Components include: Oil separator, 3 pipes, and a reinforced vacuum line.
Intake manifold had to come off for the starter anyway. The injectors are inserted directly into the cylinder head rather than in the intake manifold, making manifold removal less complicated.
Upon removal of the intake manifold and subsequent inspection of the CCV, there were no oil leaks to be found on the CCV, its pipes, or around the valve cover gasket. The source of the oil leak appeared to be only the oil filter housing gasket.
The CCV pipes were brittle and were easily snapped making this a worthwhile project. Upon cracking open the CCV valve, I found it to be free of the “mayo” slime that is reported in the forums. The oily, somewhat gritty interior appeared perfectly normal.
Regarding the order of the CCV heating element connections, some users in the forums expressed concern that order of the wires was important. But I don’t think the order was important—even though I put them back in the same order. All connections, including the voltage source, were 2-wire connections. This made me believe that all four wires plugged into a “bus” and were all turned on and off together. I may be wrong but I don’t see how individual control of the wires could be done.
VALVE COVER GASKET AND OTHER GASKETS ON THE VALVE COVER
There appeared to be a leak at the front of the cylinder head, which was not true. I had suspected a leaking VCG. Upon removal the VCG appeared to be sealed tightly. Regardless of where the leak had originated, the VCG was due to be done. This requires the removal of the Valvetronic motor. The elliptical gasket under the Valvetronic motor was replaced. Torque specification for the 3 E-8 bolts (plated steel, not aluminum) holding down the motor is 9 Nm. There are 5 gaskets contacting the valve cover, all replaced:
Torque specifications were confusing as there are two conflicting values in Bentley, which gave two 2-stage procedures. TIS has another 9 Nm, single stage procedure. I torqued the Valvetronic motor bolts to 9 Nm as specified in TIS. The steel bolts appeared to be coated, which is good since they threaded into a magnesium (probably) bracket on the cylinder head (confirmed non-magnetic). 9 Nm “felt right” and were convincingly snug without feeling like the threads would fail.
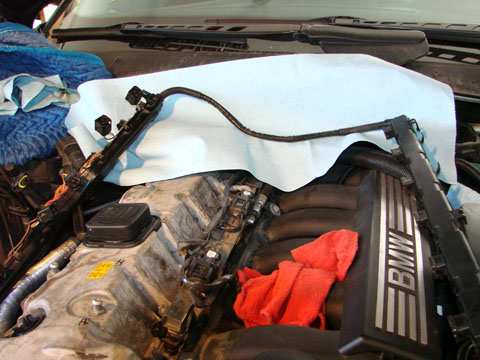
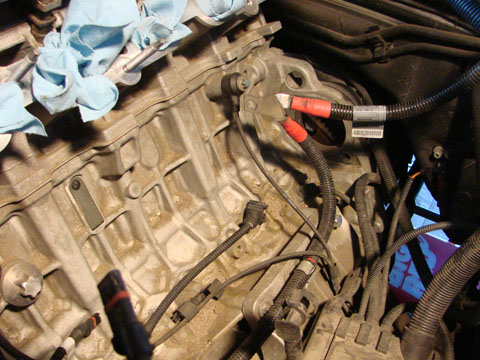
Getting the valve cover off over the tall Valvetronic hardware was challenging at first. Then I found out that the spark plug coil harness and the fuel injector loom was connected by a single cable that could be lifted out of the back of the engine (see photo below), giving plenty of room to work. Luckily I recalled how to remove the injector electrical "loom" from doing it on my E46, which had been an hours-long character-building experience. It was straightforward this time.
SPARK PLUGS
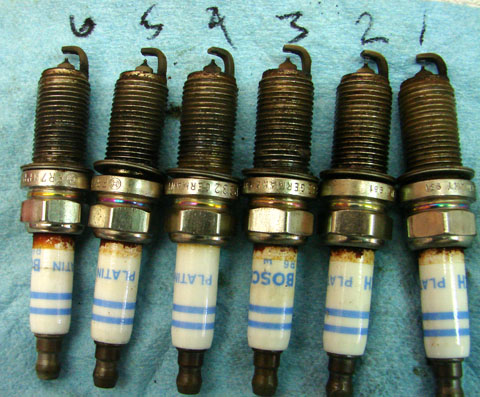
These were replaced previously at 67.7k miles. BMW’s recommended service interval is 100k. This interval is 64.2k miles.23 Nm “felt” perfect as I could feel the crush-washers compressing and feeling seated about the time the torque was reached.
Each plug was uniformly gapped at just over 1mm, I surmised. I used the wire gauge, which had .89mm and 1.11mm wires, giving a “go, no go” fit as the .89mm slipped through easily without contact and the 1.11mm was simply too large to go. This is the same way I checked the gaps on the previous change, as they were also uniformly gapped.
Numbers 2, 3, and 5 had a small amount of oil around the plugs, no more than a couple of teaspoons in each. 1, 4, and 6 were dry. I inserted the plugs dry this time, without anti-seize which caused some minor binding during removal.
NGK PLZFR6A-11S
OIL FILTER HOUSING GASKET
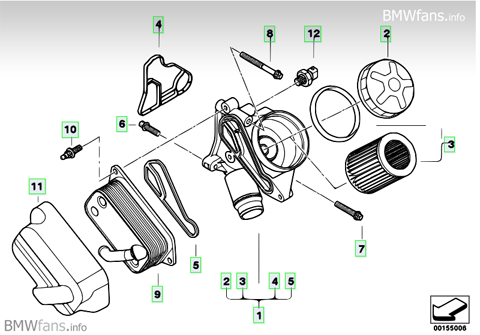
This was the source of the leak (#4 in the image). The oil migrated both forward and backward. The front of the cylinder head had been coated with thick, oily grime. The front of the oil pan and front differential had also been coated. The engine block under the intake manifold was spotless, without a trace of oil.
The oil appeared to have escaped at the front of the oil filter housing, was blown across the cylinder head’s front, and then ran down to the oil pan, the front of which is coated. I inferred that wind action caused the migration to the differential. Thanks to user pcy for his help in the “wind blown” method of oil migration.
I performed very little grease removal except for a patch here and there so I could check later for additional oil. However, I think the problem has been solved by replacing the OFH gasket.
Torque: OFH to cylinder head with three M8 bolts: 22 Nm, which felt good. The gasket was fully compressed.
HEAT EXCHANGER GASKET, FOR OIL
The gasket was sealed tightly but since I was in there it got replaced.
Torque: Heat exchanger to OFH with three M8x20 bolts: 16 Nm, which felt good. The gasket was fully compressed.
INTAKE MANIFOLD GASKETS AND THROTTLE BODY GASKET
I cleaned the throttle body with Throttle Body Cleaner spray.
HAZARDS OF THE JOB
Dirt and grit falling into the intake ports
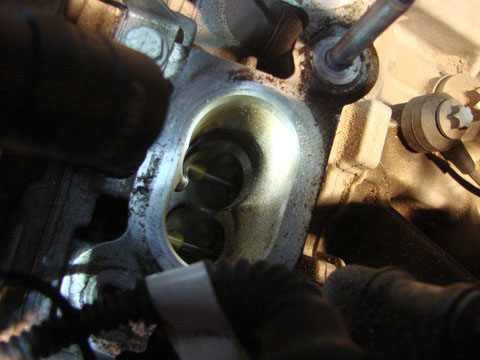
Dirt and grit falling into the intake ports as the intake manifold is being removed is something that should be prevented to the extent possible. Still, even using shop air to blow off the dirt before removing the manifold, some particles are bound to fall in. Luckily for me, all 12 intake valves were closed. I could see the grit—granular dirt had fallen into #1 and #2 intake ports (about � teaspoon each). I tried blowing 120psi air into the cylinders and did remove about � of the dirt. The remaining dirt was being bound to the port walls and on the intake valves by the oily environment. I sprayed in brake cleaner to break up the oily film and cause the particles to become part of the suspension of brake cleaner and dirt. Shop air then blew the slurry out effectively. 2 or 3 cycles of brake cleaner/shop air cleaned out the dirt. I considered that some of the volatile brake cleaner may have seeped past the valves that “appeared” fully closed. Later, and before starting the engine I disconnected all coils and cranked the engine, now without spark, in order to blow out any brake cleaner in order to avoid possible detonation.
Thanks to pcy and other members of this forum for providing good DIY instructions, photos, etc. I hope this post will be useful to others who may do the same.
My original concern was that the front differential was covered in oil. pcy suggested that I clean the oil off and track down the source of the leak. But due to the difficulty of having to possibly disassemble things twice I dove in, head first, intent on fixing several things "while I was in there." The oil leak would certainly get fixed, I was sure (in fact, the oil leaks no more).
$736.82 was my out-of-pocket expense after factoring in shipping and core charge returns.
The scope of the project included:
• Starter, replace with remanufactured Bosch OEM
• CCV (Crank Case Ventilation) overhaul
• Oil filter housing gasket, replacement
• Oil heat exchanger gasket, replacement
• Spark plugs, replacement
• Valve Cover Gasket, replacement of 5 related gaskets and 22 new bolts
Time: 16 hours over 2 days. I never said I was fast.
These are the replaced parts. From the top, left: 6 intake manifold gaskets; oil filter housing gasket; oil heat exchanger gasket; throttle body gasket (green); crankcase ventilation valve and pipes; starter motor; valve cover gaskets (orange); oil filler cap “apron” gasket (square); Valvetronic motor gasket (elliptical); Valvetronic eccentric shaft sensor gasket (black, round); 22 aluminum bolts for VCG
Oh yeah, spark plugs too...
STARTER
The starter had been slow to engage for a year or two. I paid extra and got the remanufactured Bosch unit. It’s about $100 more than “brand B” but I trust it. New aluminum bolts were used, as specified.
TORQUE
• E-14 85mm bolt: 20Nm + 180 degrees
• E-14 30mm bolt 20Nm + 90 degrees
The new starter works perfectly, without the delay of the old one. The ratcheting E-Torx wrenches worked only on the 30mm bolt; there wasn’t enough clearance around the rear bolt’s head. I had to substitute a 7/16” box-end 12-point wrench, which fit perfectly. Torque on the front bolt was done in a single 90-degree stroke. The rear bolt had to be done in several short strokes, re-positioning the wrench after about 30 degrees each time. It was impossible to get a torque wrench on the rear bolt so I estimated the 20 Nm, marked the edge of the bolt with a black marker and rotated it approximately 180 degrees as specified. Also to note, it appears to be impossible to replace the starter without removing the intake manifold.
CRANKCASE VENTILATION
An oil-soaked front differential inspired me to look into this. Since I was replacing the VCG I anticipated breaking the pipe from the valve cover. I decided to just replace everything in the CCV system. Components include: Oil separator, 3 pipes, and a reinforced vacuum line.
Intake manifold had to come off for the starter anyway. The injectors are inserted directly into the cylinder head rather than in the intake manifold, making manifold removal less complicated.
Upon removal of the intake manifold and subsequent inspection of the CCV, there were no oil leaks to be found on the CCV, its pipes, or around the valve cover gasket. The source of the oil leak appeared to be only the oil filter housing gasket.
The CCV pipes were brittle and were easily snapped making this a worthwhile project. Upon cracking open the CCV valve, I found it to be free of the “mayo” slime that is reported in the forums. The oily, somewhat gritty interior appeared perfectly normal.
Regarding the order of the CCV heating element connections, some users in the forums expressed concern that order of the wires was important. But I don’t think the order was important—even though I put them back in the same order. All connections, including the voltage source, were 2-wire connections. This made me believe that all four wires plugged into a “bus” and were all turned on and off together. I may be wrong but I don’t see how individual control of the wires could be done.
VALVE COVER GASKET AND OTHER GASKETS ON THE VALVE COVER
There appeared to be a leak at the front of the cylinder head, which was not true. I had suspected a leaking VCG. Upon removal the VCG appeared to be sealed tightly. Regardless of where the leak had originated, the VCG was due to be done. This requires the removal of the Valvetronic motor. The elliptical gasket under the Valvetronic motor was replaced. Torque specification for the 3 E-8 bolts (plated steel, not aluminum) holding down the motor is 9 Nm. There are 5 gaskets contacting the valve cover, all replaced:
- Valve cover gasket (orange, rectangular, coated aluminum)
- Spark plug hole gasket (coated aluminum sheet),
- Valvetronic eccentric position sensor gasket (round, surrounding the plug with 9 electrical pins),
- Oil fill cap skirt (squarish in shape). Doesn’t seem to seal anything but provides padding for the decorative engine cover.
- Valvetronic worm shaft gasket (elliptical gasket with 2 screw holes)
Torque specifications were confusing as there are two conflicting values in Bentley, which gave two 2-stage procedures. TIS has another 9 Nm, single stage procedure. I torqued the Valvetronic motor bolts to 9 Nm as specified in TIS. The steel bolts appeared to be coated, which is good since they threaded into a magnesium (probably) bracket on the cylinder head (confirmed non-magnetic). 9 Nm “felt right” and were convincingly snug without feeling like the threads would fail.
Getting the valve cover off over the tall Valvetronic hardware was challenging at first. Then I found out that the spark plug coil harness and the fuel injector loom was connected by a single cable that could be lifted out of the back of the engine (see photo below), giving plenty of room to work. Luckily I recalled how to remove the injector electrical "loom" from doing it on my E46, which had been an hours-long character-building experience. It was straightforward this time.
SPARK PLUGS
These were replaced previously at 67.7k miles. BMW’s recommended service interval is 100k. This interval is 64.2k miles.23 Nm “felt” perfect as I could feel the crush-washers compressing and feeling seated about the time the torque was reached.
Each plug was uniformly gapped at just over 1mm, I surmised. I used the wire gauge, which had .89mm and 1.11mm wires, giving a “go, no go” fit as the .89mm slipped through easily without contact and the 1.11mm was simply too large to go. This is the same way I checked the gaps on the previous change, as they were also uniformly gapped.
Numbers 2, 3, and 5 had a small amount of oil around the plugs, no more than a couple of teaspoons in each. 1, 4, and 6 were dry. I inserted the plugs dry this time, without anti-seize which caused some minor binding during removal.
NGK PLZFR6A-11S
OIL FILTER HOUSING GASKET
This was the source of the leak (#4 in the image). The oil migrated both forward and backward. The front of the cylinder head had been coated with thick, oily grime. The front of the oil pan and front differential had also been coated. The engine block under the intake manifold was spotless, without a trace of oil.
The oil appeared to have escaped at the front of the oil filter housing, was blown across the cylinder head’s front, and then ran down to the oil pan, the front of which is coated. I inferred that wind action caused the migration to the differential. Thanks to user pcy for his help in the “wind blown” method of oil migration.
I performed very little grease removal except for a patch here and there so I could check later for additional oil. However, I think the problem has been solved by replacing the OFH gasket.
Torque: OFH to cylinder head with three M8 bolts: 22 Nm, which felt good. The gasket was fully compressed.
HEAT EXCHANGER GASKET, FOR OIL
The gasket was sealed tightly but since I was in there it got replaced.
Torque: Heat exchanger to OFH with three M8x20 bolts: 16 Nm, which felt good. The gasket was fully compressed.
INTAKE MANIFOLD GASKETS AND THROTTLE BODY GASKET
- Throttle body gasket
- Intake gasket set
I cleaned the throttle body with Throttle Body Cleaner spray.
HAZARDS OF THE JOB
Dirt and grit falling into the intake ports
Dirt and grit falling into the intake ports as the intake manifold is being removed is something that should be prevented to the extent possible. Still, even using shop air to blow off the dirt before removing the manifold, some particles are bound to fall in. Luckily for me, all 12 intake valves were closed. I could see the grit—granular dirt had fallen into #1 and #2 intake ports (about � teaspoon each). I tried blowing 120psi air into the cylinders and did remove about � of the dirt. The remaining dirt was being bound to the port walls and on the intake valves by the oily environment. I sprayed in brake cleaner to break up the oily film and cause the particles to become part of the suspension of brake cleaner and dirt. Shop air then blew the slurry out effectively. 2 or 3 cycles of brake cleaner/shop air cleaned out the dirt. I considered that some of the volatile brake cleaner may have seeped past the valves that “appeared” fully closed. Later, and before starting the engine I disconnected all coils and cranked the engine, now without spark, in order to blow out any brake cleaner in order to avoid possible detonation.
Last edited by latitude39; 04-26-2014 at 01:46 PM.
04-26-2014, 01:44 PM
#15
Members
Thread Starter
Join Date: Apr 2010
Location: United States/Colorado/Littleton
Posts: 45
Likes: 0
Received 0 Likes
on
0 Posts
My Ride: 2007 530xi (N52 6-cylinder engine)2002 325xi (M54 6-cylinder engine)2008 Specialized Roubaix road bike
Thanks. Yes, money saved and MUCH satisfaction. It idles smoother, accelerates stronger, starts instantly (wife noticed that first), and no more oil leak. Motor mounts could have been done...next time.
05-23-2024, 06:59 AM
#16
New Members

Join Date: May 2024
Location: puerto Rico
Posts: 2
Received 0 Likes
on
0 Posts
My Ride: BMW 525i 2006
Thanks for the heads-up. I think I know what you're talking about--the heater wires for the CCV pipes and valve, right? I saw in another thread where you had shown someone how to reconnect those wires.
Yes, I will label, take photos, and work slowly and methodically since I do jobs like this once a year or so.
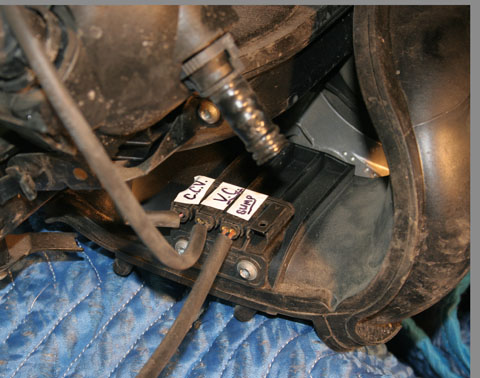
Here's a photo of the 3 heater wires I can account for, 1 for the valve and 2 for the insulated pipes.
Yes, I will label, take photos, and work slowly and methodically since I do jobs like this once a year or so.
Here's a photo of the 3 heater wires I can account for, 1 for the valve and 2 for the insulated pipes.
05-23-2024, 08:47 AM
#17
Members
Senior Members

This is a 10 year old thread!
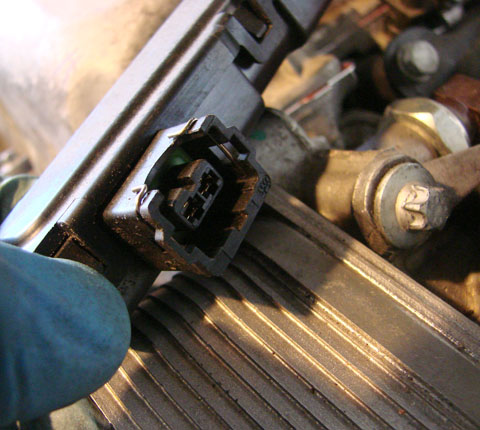
If you are asking about the small two wire connectors that are on the oil separator and several other things attached to the intake manifold and connected to that connector on the back of the manifold...there are all the same...that is, you can plug any of them in any of the connectors on that bank of sockets that is on the back of the manifold.
If you are asking about the small two wire connectors that are on the oil separator and several other things attached to the intake manifold and connected to that connector on the back of the manifold...there are all the same...that is, you can plug any of them in any of the connectors on that bank of sockets that is on the back of the manifold.
The following users liked this post:
bestfreshman (05-23-2024)

Thread
Thread Starter
Forum
Replies
Last Post
mantraguy
E61 Touring Discussion
1
03-09-2015 02:56 AM