Non-SA693 Sirius Retrofit in stock location, keeping CD Changer
 08-14-2008, 01:14 PM
#1
Members
Thread Starter
Join Date: Oct 2007
Location: Minneapolis, MN
Posts: 9
Likes: 0
Received 0 Likes
on
0 Posts
My Ride: 2004 545iA Sport Pkg, Nav, L7 Premium Audio, Bluetooth, CD Changer, Aux Input, no Sirius, yet...
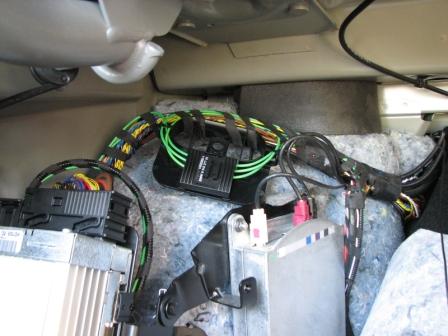
Well, after a minor setback this winter, and my not wanting to work in a cold garage, I?ve finally gotten my SAT retrofit for Sirius project completed ? WITHOUT having to remove the CD changer from my glove box. It took a little research, and some signal tracing, but worked as I suspected (and hoped) all along. I manufactured a MOST harness with stock BMW parts that connects to the fiber block above the rear left wheel well (there are available spots to extend the fiber MOST loop.)
NOTE: Do not perform this procedure before you have your SAT/SDARS receiver in hand and ready to install, if you do the fiber loop will be open. There is a BMW part to connect to the MOST housing that will close the loop, but I do not have that as part of this process. You may research if you wish, or talk to a dealer parts department.
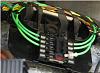
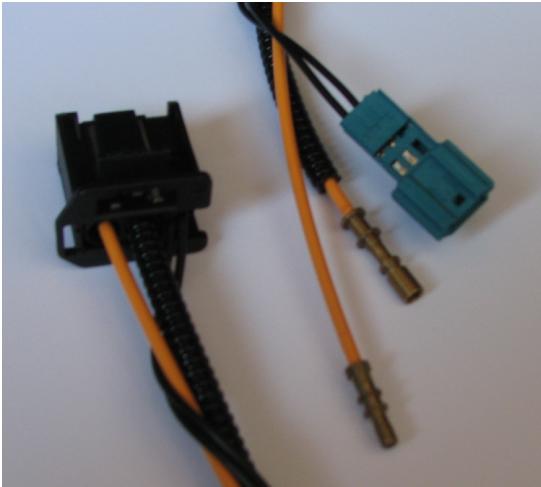
This is what the harness I constructed looks like, it has the MOST connector used on all audio/NAV/CCC devices, and a male and female fiber pin and socket connector on the other end, along with the stock BMW AMP/TYCO 3 pin housing and pin contacts for connection to the power lead already in the trunk. It is about 1meter in length. I mapped and matched the pin-outs to the MOST connector for my CD changer in the dash. Finding the tool to cleave, strip and crimp the AMP/TYCO fiber parts was the most challenging aspect of this project ? I ordered parts for and made two harnesses just in case my fiber skills were not up to par. Part numbers and quantities below.

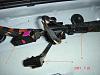
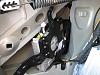
I disassembled the left rear compartment in my trunk, and followed approximately this process:
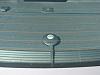
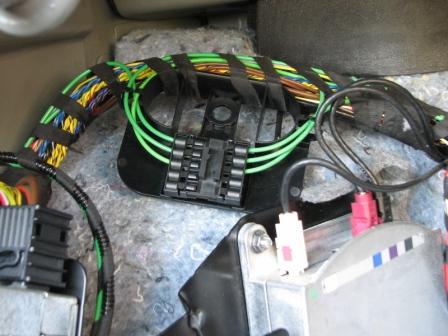
Step 1: Locate and open the fiber block. Do this carefully, if not sure, do not attempt. If you live in a cold climate, warm your car up indoors or you WILL do damage to the delicate fiber connectors. To begin, simply loosen the block from the bracket by sliding the block forward, loosening the cables from the guide beforehand to create some slack.

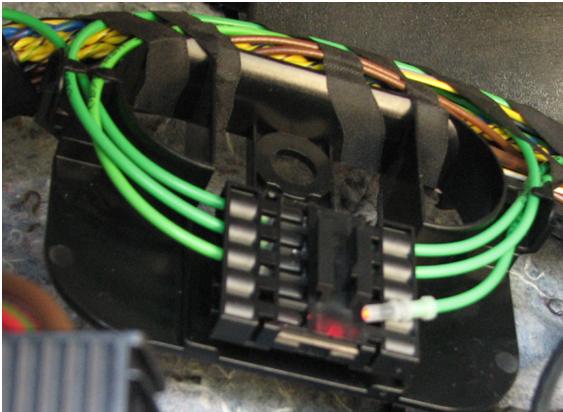
Step 2: Take the top cover off of the block, by carefully prying open with a small flat screwdriver from the back, then the front. This should now expose the mated fibers. There is a release tab beneath each that can be pushed in with a small screwdriver or punch. Press in and release one strand from the bottom fiber pair. One will be male, the other female. You may still see light being emitted from one of the fibers ? it will be the male fiber of the pair.

Step 3: Offset the existing fiber by one row, and connect the male and female ends of the harness to their counterparts in the fiber block. Be sure they "click" into place in the block. The female fiber socket connector should receive the ?light in?, I put the wire loom on this fiber to keep it straight. You have now just extended the fiber MOST loop.
Step 4: Replace the lid on the fiber block, and reattach to the mount, being sure to store the fiber back in its guides and to reconnect the block.
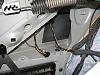
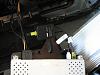
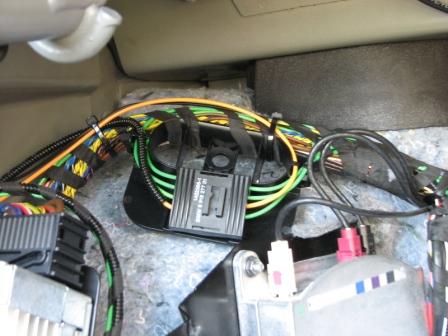
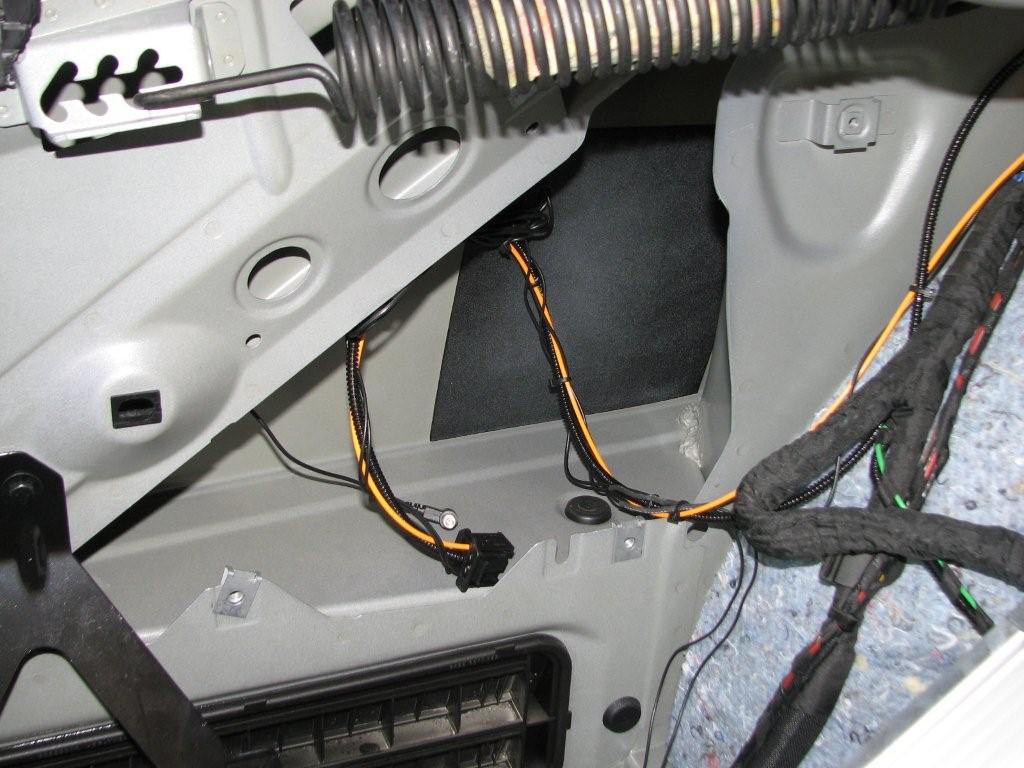
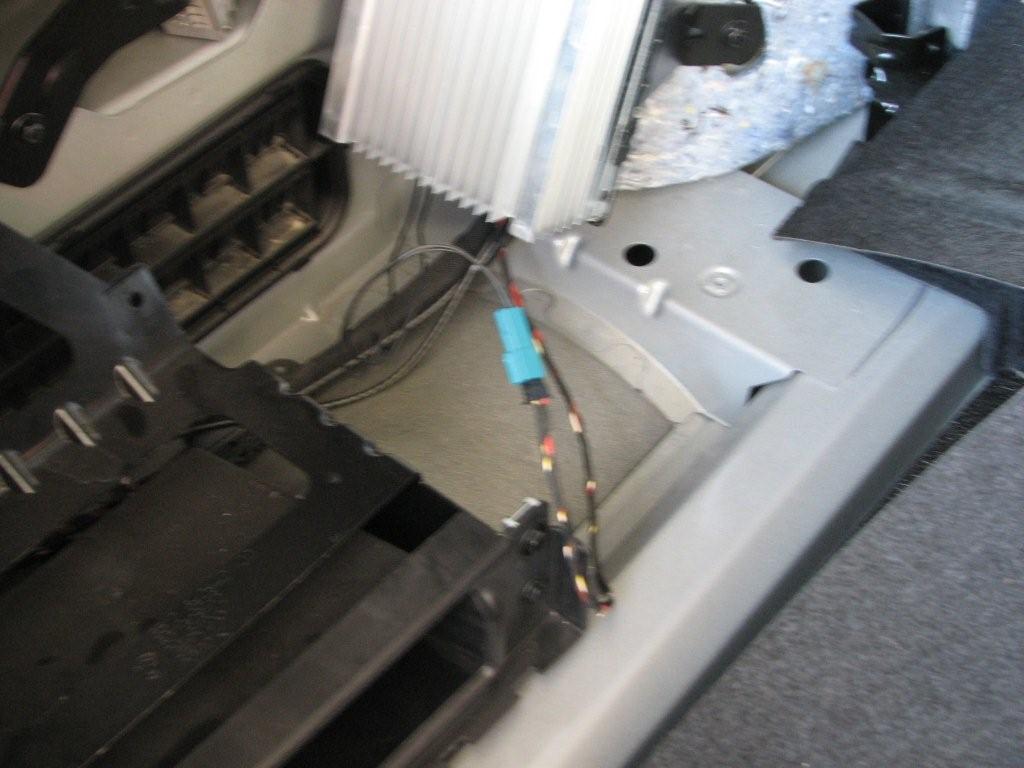
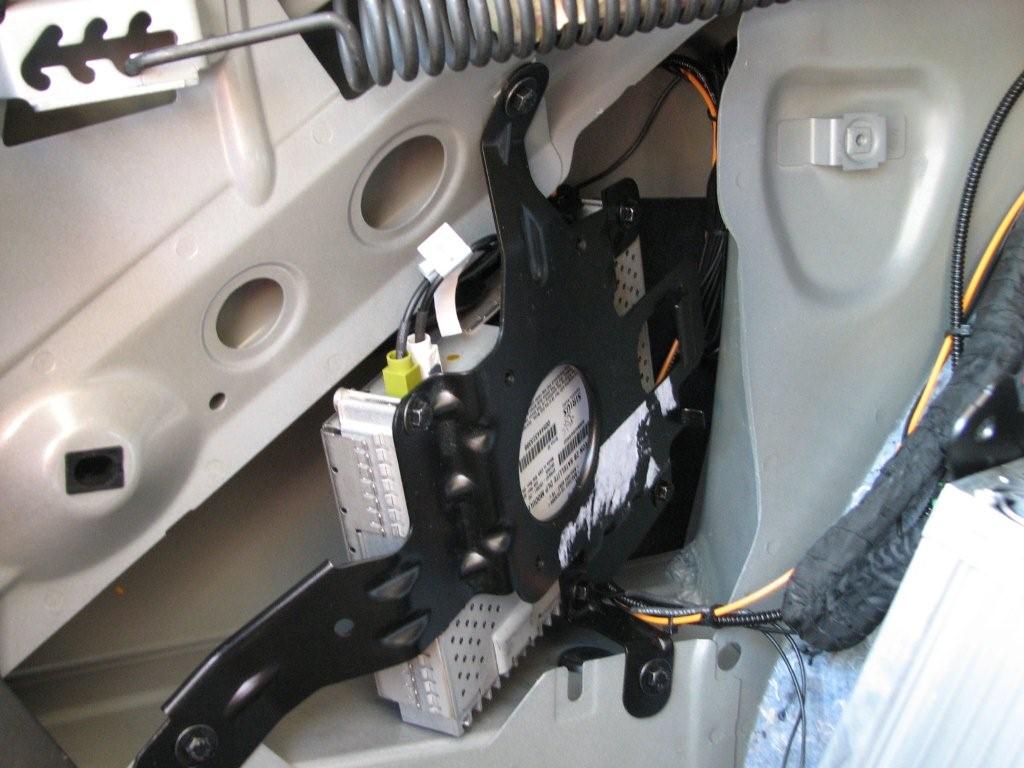
Step 5: Thread the fiber to the stock SAT receiver mounting position adjacent to the amplifier in the left rear wheel well.
Step 6: Connect the power:
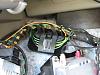
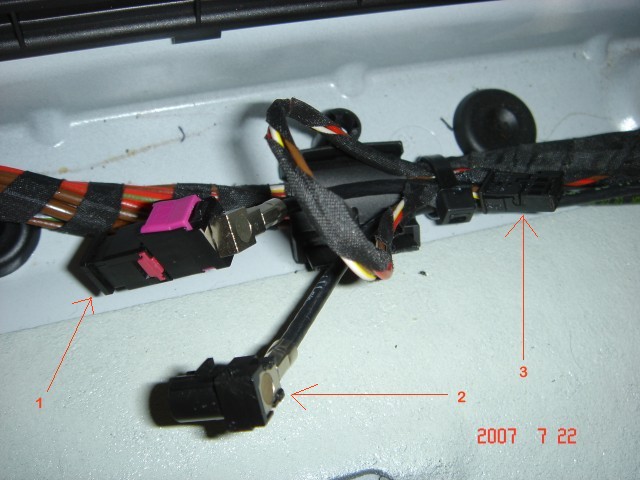
Power is taken from a pigtail near the cell phone antenna connection (#3 in the attached-photo is borrowed).
My harness connected to the pigtail.

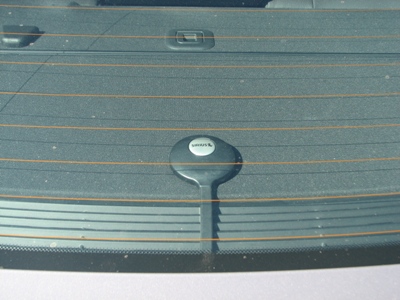
Step 7: Install Sirius antenna by whatever means you choose. I have chosen the SIR-SP and SIR-3 to the package shelf option. (there is a sharkfin replacement option that I researched, but I?m trying to limit scope and cost.)
Step 8: Install Sirius Receiver, and connect power/fiber MOST plug, and the Sirius Antenna plug.
Step 9: Go to dealer and pay for 30 min of shop time to have Sirius added to your I-Drive menu. (you may need an update to your CIP/ProgMAN if your e60 has never been updated, any of the recent versions should work, 25 or better preferred.
Step 10: Activate Sirius and you are done?..enjoy.
Parts List for my harness (you will need to acquire tools to cleave and polish the fiber, and crimp the fiber contacts) These are from Circle BMW in NJ:
Qty Description Part Number
1 Optical Fiber Cable (7M with m/m ends) 61120142318
1 Corrugated Metal Tube 61136918242
1 Optical Fiber Cable, Pin Contact (male) 61136901847
1 Optical Fiber Cable, Socket Contact (female) 61136901846
1 Envelope F Optical Fiber Cable - 2POL 61138387214
1 Universal Pin Terminal - Uncoded - 3POL 61138377213
2 Bushing Contact - 0.2-0.5 61130005197
2 Pin Contact - 0.2-0.5 61130005198
1 Socket Housing (MOST) 61136901844
1 Covering Cap (Housing wiring insert) 61136905200
(BTW - I replied to a topic in Bimmerfest as well, but thought I would post here as a DIY)
NOTE: Do not perform this procedure before you have your SAT/SDARS receiver in hand and ready to install, if you do the fiber loop will be open. There is a BMW part to connect to the MOST housing that will close the loop, but I do not have that as part of this process. You may research if you wish, or talk to a dealer parts department.
This is what the harness I constructed looks like, it has the MOST connector used on all audio/NAV/CCC devices, and a male and female fiber pin and socket connector on the other end, along with the stock BMW AMP/TYCO 3 pin housing and pin contacts for connection to the power lead already in the trunk. It is about 1meter in length. I mapped and matched the pin-outs to the MOST connector for my CD changer in the dash. Finding the tool to cleave, strip and crimp the AMP/TYCO fiber parts was the most challenging aspect of this project ? I ordered parts for and made two harnesses just in case my fiber skills were not up to par. Part numbers and quantities below.
I disassembled the left rear compartment in my trunk, and followed approximately this process:
Step 1: Locate and open the fiber block. Do this carefully, if not sure, do not attempt. If you live in a cold climate, warm your car up indoors or you WILL do damage to the delicate fiber connectors. To begin, simply loosen the block from the bracket by sliding the block forward, loosening the cables from the guide beforehand to create some slack.
Step 2: Take the top cover off of the block, by carefully prying open with a small flat screwdriver from the back, then the front. This should now expose the mated fibers. There is a release tab beneath each that can be pushed in with a small screwdriver or punch. Press in and release one strand from the bottom fiber pair. One will be male, the other female. You may still see light being emitted from one of the fibers ? it will be the male fiber of the pair.
Step 3: Offset the existing fiber by one row, and connect the male and female ends of the harness to their counterparts in the fiber block. Be sure they "click" into place in the block. The female fiber socket connector should receive the ?light in?, I put the wire loom on this fiber to keep it straight. You have now just extended the fiber MOST loop.
Step 4: Replace the lid on the fiber block, and reattach to the mount, being sure to store the fiber back in its guides and to reconnect the block.
Step 5: Thread the fiber to the stock SAT receiver mounting position adjacent to the amplifier in the left rear wheel well.
Step 6: Connect the power:
Power is taken from a pigtail near the cell phone antenna connection (#3 in the attached-photo is borrowed).
My harness connected to the pigtail.
Step 7: Install Sirius antenna by whatever means you choose. I have chosen the SIR-SP and SIR-3 to the package shelf option. (there is a sharkfin replacement option that I researched, but I?m trying to limit scope and cost.)
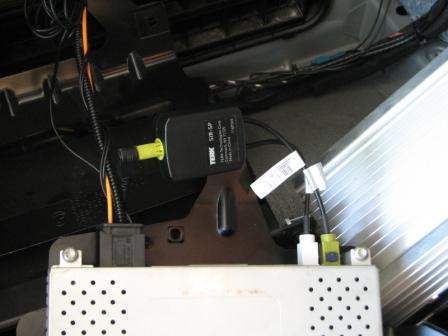
Step 8: Install Sirius Receiver, and connect power/fiber MOST plug, and the Sirius Antenna plug.
Step 9: Go to dealer and pay for 30 min of shop time to have Sirius added to your I-Drive menu. (you may need an update to your CIP/ProgMAN if your e60 has never been updated, any of the recent versions should work, 25 or better preferred.
Step 10: Activate Sirius and you are done?..enjoy.
Parts List for my harness (you will need to acquire tools to cleave and polish the fiber, and crimp the fiber contacts) These are from Circle BMW in NJ:
Qty Description Part Number
1 Optical Fiber Cable (7M with m/m ends) 61120142318
1 Corrugated Metal Tube 61136918242
1 Optical Fiber Cable, Pin Contact (male) 61136901847
1 Optical Fiber Cable, Socket Contact (female) 61136901846
1 Envelope F Optical Fiber Cable - 2POL 61138387214
1 Universal Pin Terminal - Uncoded - 3POL 61138377213
2 Bushing Contact - 0.2-0.5 61130005197
2 Pin Contact - 0.2-0.5 61130005198
1 Socket Housing (MOST) 61136901844
1 Covering Cap (Housing wiring insert) 61136905200
(BTW - I replied to a topic in Bimmerfest as well, but thought I would post here as a DIY)

 08-14-2008, 01:41 PM
#3
Contributors

Join Date: Nov 2005
Location: London, UK
Posts: 4,719
Likes: 0
Received 3 Likes
on
3 Posts
My Ride: BMW E60 520d SE Saloon M47 2.0dTitanium Grey II, Grey−Dakota Leather, Visibility Package, Media Package, Through Load System, Lumbar support − fr seats, Automatic Air Conditioning−Advanced, High beam assistant, Hi−Fi Loudspeak
Model Year: 2006
Just to be on the safe side I would put both optic fibers into the corrugate tubing for protection.
I was actually going to do exactly this but to move the CDC from the glove box to this area and mount it in the OEM stand used for the OEM DVD changer (STORING PARTITION BRACKET 65159120729) . The DIY will be exactly like this except in the glove box you will need to join both ends of the optic fiber using OPTICAL FIBER CABLE, CONNECTOR 61136906535
I was actually going to do exactly this but to move the CDC from the glove box to this area and mount it in the OEM stand used for the OEM DVD changer (STORING PARTITION BRACKET 65159120729) . The DIY will be exactly like this except in the glove box you will need to join both ends of the optic fiber using OPTICAL FIBER CABLE, CONNECTOR 61136906535
08-15-2008, 04:59 AM
#4
Members
Thread Starter
Join Date: Oct 2007
Location: Minneapolis, MN
Posts: 9
Likes: 0
Received 0 Likes
on
0 Posts
My Ride: 2004 545iA Sport Pkg, Nav, L7 Premium Audio, Bluetooth, CD Changer, Aux Input, no Sirius, yet...
Yes, this is for non prepped cars. SA693 is the SAT/SDARS prewire option that I somehow missed out on.
Originally Posted by nigxdoof' post='646847' date='Aug 14 2008, 04:23 PM
Oh man, this is awesome.
This is for Non-Prepped Sat cars right?
This is for Non-Prepped Sat cars right?
08-15-2008, 05:04 AM
#5
Members
Thread Starter
Join Date: Oct 2007
Location: Minneapolis, MN
Posts: 9
Likes: 0
Received 0 Likes
on
0 Posts
My Ride: 2004 545iA Sport Pkg, Nav, L7 Premium Audio, Bluetooth, CD Changer, Aux Input, no Sirius, yet...
yeah - thought about corrugated cover on both strands, but wanted to follow the factory lead - they only shield one strand in most cases, strap the other to it for rigidity. Also, it was a real peice of work putting it on. I should have said to feed it through the shield before crimping the ends 
As for your DIY suggestion, sure - that make sense, you need to close the loop after removing the SDARS receiveer from the glovve box if you chose that route - or you could add the changer. Guess I'm old school, I still like having 7 CDs in the car.
As for your DIY suggestion, sure - that make sense, you need to close the loop after removing the SDARS receiveer from the glovve box if you chose that route - or you could add the changer. Guess I'm old school, I still like having 7 CDs in the car.
Originally Posted by bruce_miranda' post='646860' date='Aug 14 2008, 04:41 PM
Just to be on the safe side I would put both optic fibers into the corrugate tubing for protection.
I was actually going to do exactly this but to move the CDC from the glove box to this area and mount it in the OEM stand used for the OEM DVD changer (STORING PARTITION BRACKET 65159120729) . The DIY will be exactly like this except in the glove box you will need to join both ends of the optic fiber using OPTICAL FIBER CABLE, CONNECTOR 61136906535
I was actually going to do exactly this but to move the CDC from the glove box to this area and mount it in the OEM stand used for the OEM DVD changer (STORING PARTITION BRACKET 65159120729) . The DIY will be exactly like this except in the glove box you will need to join both ends of the optic fiber using OPTICAL FIBER CABLE, CONNECTOR 61136906535
11-25-2009, 06:50 AM
#6
Members

Join Date: Oct 2007
Posts: 4
Likes: 0
Received 0 Likes
on
0 Posts
Originally Posted by jomo9999' post='647276' date='Aug 15 2008, 06:59 AM
Yes, this is for non prepped cars. SA693 is the SAT/SDARS prewire option that I somehow missed out on.
Recognizing this is an old post, but adding relevant information:
For those not wanting to order all those additional parts, mObridge's XM integration kit uses the Sirius SAT interface in iDrive (or radio in 1er and 3er) and DOES NOT REQUIRE SA693 prep & parts by nature of the included fiber/power harness which will plug into the MOST block or inline to the BMW Assist TCU/UFL/6FL/Logic-7 amp (whatever your pleasure) and simply gets wired to power and GND.
More information is available at: www.mobridgeusa.com (or can be seen at CES, Jan. 7-11 2010, LVCC North Hall, booth #2628).
Companies such as Europeanautosource.com and DiceElectronics.com (must call latter, as it's not in their web catalog) have stock of this kit, which is part #XMD-A2010-BMW.
In 2006 and earlier cars (dual Fakra antenna plug), the XMD kit antenna must be used, however in 2007 and later cars (single purple Fakra antenna plug) the factory antenna can be used. It may be possible to retrofit a later model sharkfin into 2006 and earlier models however check carefully with respect to the other leads such as BMW Assist (if you have the latter).
Like the factory Sirius unit (unless the off chance you're replacing a factory Sirius unit), it does require retrofit coding (enabling of Sirius the iDrive or radio, which for aftermarket product is highly advised to use the Autologic tester or a skilled shop with EDIABAS/INPA to mod the vehicle order).
Cheers!
12-24-2011, 02:04 PM
#7
Contributors
Join Date: Jul 2007
Location: Saint Louis, Missouri, USA
Posts: 1,100
Likes: 0
Received 1 Like
on
1 Post
My Ride: 2010 535i M Sport 6MT
Model Year: 2010
I considered using this DIY to retrofit the BMW satellite module in my E60. Ultimately, I decided not to because I cannot simply add a Sirius radio to my multi-XM radio subscription, However, I have done the pricing research. These prices are in USD with the BMW CCA membership courtesy discount at my local BMW Center, as of the date of this post. Taxes are extra.
HTML Code:
Qty	  Each	Part number	Description
1	$32.02	61120142318	Optical Fiber Cable (7M with m/m ends)
1	 $2.28	61136918242	Corrugated Metal Tube
1	 $1.43	61136901847	Optical Fiber Cable, Pin Contact (male)
1	 $2.31	61136901846	Optical Fiber Cable, Socket Contact (female)
1	 $1.48	61138387214	Envelope F Optical Fiber Cable - 2POL
2	 $1.35	61130005197	Bushing Contact - 0.2-0.5
1		61138377213	Universal Pin Terminal - Uncoded - 3POL (discontinued)
1	 $1.64	61136931929	Universal Pin Terminal - Uncoded - 3POL
2	 $1.44	61130005198	Pin Contact - 0.2-0.5
1	 $5.41	61136901844	Socket Housing (MOST)
1	 $2.99	61136905200	Covering Cap (Housing wiring insert)

If you need the mounting bracket:
1	$10.71	65106925468	Bracket, satellite-radio/compensator
7	 $0.38	07119902932 	Hex bolt (for bracket)
4	 $0.62	61131372033	Body nut (for bracket)
11-01-2012, 09:17 AM
#8
New Members

Join Date: Sep 2012
Location: Greensboro, NC (USA)
Posts: 246
Likes: 0
Received 0 Likes
on
0 Posts
Sorry to drag up an old thread folks, but I have a question on this.
You mentioned that there is tool needed to cleave, strip and crimp the AMP/TYCO fiber parts. Where did you get this tool???
You mentioned that there is tool needed to cleave, strip and crimp the AMP/TYCO fiber parts. Where did you get this tool???
08-28-2013, 12:52 PM
#9
New Members
Join Date: Sep 2012
Location: Greensboro, NC (USA)
Posts: 246
Likes: 0
Received 0 Likes
on
0 Posts
Update to anyone else looking at doing this:
I never could find anyone that has these two parts (all sites say not available anymore..)
$1.43 61136901847 Optical Fiber Cable, Pin Contact (male)
$2.31 61136901846 Optical Fiber Cable, Socket Contact (female)
The closest I could find with the same description were these:
61136918340 and
61136918338
I'm not sure if they're the same, but I'm going to find out soon! The picture depicting them is exactly the same, but who knows.. guess we shall see! One of the connectors originally listed was available until a few weeks ago.. Not sure what's going on there
Last edited by ncsugrad2006; 08-28-2013 at 12:57 PM.

Thread
Thread Starter
Forum
Replies
Last Post
rorschach76
Private Member Classifieds
0
03-19-2015 08:59 AM