Diversity Amplifier Replacement
 11-15-2009, 07:31 PM
#11
Contributors
Thread Starter
Join Date: Aug 2004
Location: Quincy, MA, USA
Posts: 1,103
Likes: 0
Received 0 Likes
on
0 Posts
My Ride: E60 530i
Model Year: 2004
Engine: M54
Originally Posted by Rudy' post='1055423' date='Nov 15 2009, 08:56 PM
Considering the rear window contains the antenna elements for both the remote key as well as FM, I'm not sure how you can point straight to the amplifier if someone was having both key distance and FM reception issues... 
 11-16-2009, 12:03 AM
#12
Contributors
Join Date: Mar 2009
Location: Essex, UK.
Posts: 2,553
Likes: 0
Received 0 Likes
on
0 Posts
My Ride: 2006 530 d M-sport e60
to be honest i never thought about about the remote distance, having said that it works really now even through glass and walls so......
11-16-2009, 03:59 AM
#13
Super Moderator
Join Date: Mar 2004
Location: Pittsburgh, PA USA
Posts: 17,310
Likes: 0
Received 2 Likes
on
2 Posts
My Ride: G30 M550i
Model Year: 2018
Originally Posted by lcc014' post='1055529' date='Nov 15 2009, 11:31 PM
The last resort is to try a new amplifier. If that works, then it was the amplifier problem. Otherwise, it was the rear window problem. Make sense ?
12-02-2010, 05:49 PM
#14
Contributors
Join Date: Dec 2005
Location: Alberta, Canada
Posts: 530
Likes: 0
Received 0 Likes
on
0 Posts
My Ride: '06 530xi
Thanks for the guide! I used it when I replaced my diversity antenna today.
Here are some tips and reference pictures to help the replacement go more smoothly:
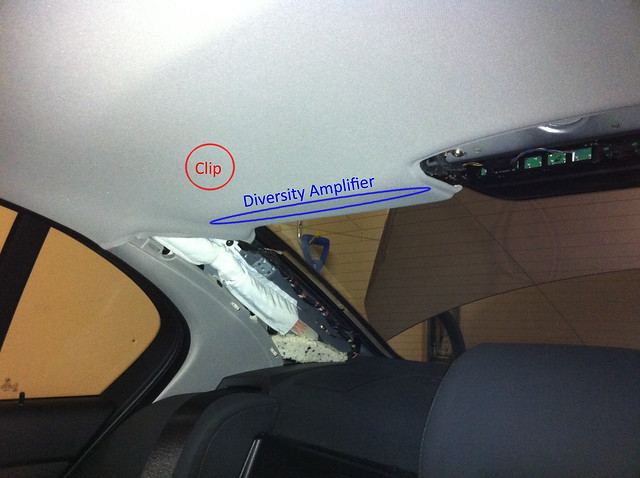
1) Fold down the split seat and remove the head rest. Then sit on top of it facing forward like a passenger and lean backwards so that you can get your head under the back window to see the clips.
2) There is a roof liner clip and should be pulled down to gain more access to the amplifier.
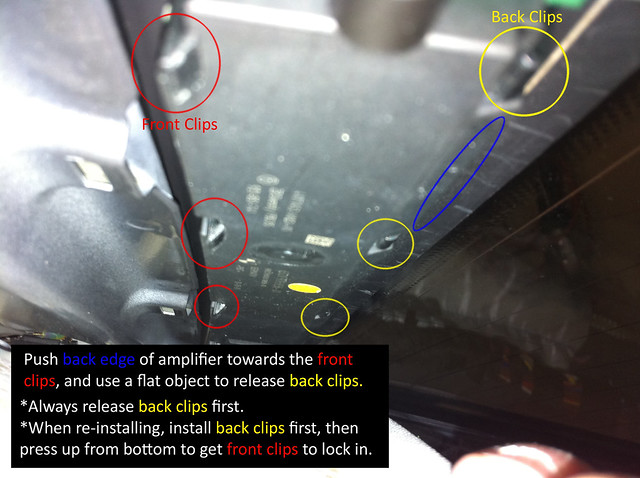
3) Grip the back edge of the amplifier, and push against the front clips to release it easier.
4) When re-installing, get back clips in first, then press up from the bottom to get the front clips to lock in.
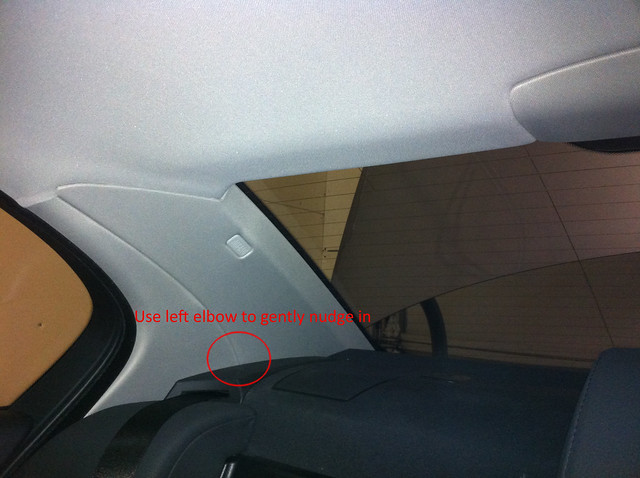
5) The most bottom C pillar clip didn't want to clip in for me. Frustrated, I elbowed it gently and it clipped in

Here are some tips and reference pictures to help the replacement go more smoothly:
1) Fold down the split seat and remove the head rest. Then sit on top of it facing forward like a passenger and lean backwards so that you can get your head under the back window to see the clips.
2) There is a roof liner clip and should be pulled down to gain more access to the amplifier.
3) Grip the back edge of the amplifier, and push against the front clips to release it easier.
4) When re-installing, get back clips in first, then press up from the bottom to get the front clips to lock in.
5) The most bottom C pillar clip didn't want to clip in for me. Frustrated, I elbowed it gently and it clipped in
12-02-2010, 07:32 PM
#15
Members

Join Date: Sep 2008
Location: USA (CA)
Posts: 27
Likes: 0
Received 0 Likes
on
0 Posts
My Ride: 2004 530I
Thanks for the guide! I used it when I replaced my diversity antenna today.
Here are some tips and reference pictures to help the replacement go more smoothly:
1) Fold down the split seat and remove the head rest. Then sit on top of it facing forward like a passenger and lean backwards so that you can get your head under the back window to see the clips.
2) There is a roof liner clip and should be pulled down to gain more access to the amplifier.
3) Grip the back edge of the amplifier, and push against the front clips to release it easier.
4) When re-installing, get back clips in first, then press up from the bottom to get the front clips to lock in.
5) The most bottom C pillar clip didn't want to clip in for me. Frustrated, I elbowed it gently and it clipped in
Nice DIY guys... I might also order from Gary. My FM reception is going high and low latly...
Thanks GUys..
12-02-2010, 07:57 PM
#16
Contributors
Join Date: Dec 2005
Location: Alberta, Canada
Posts: 530
Likes: 0
Received 0 Likes
on
0 Posts
My Ride: '06 530xi
In total, this will be the second time that my diversity amplifier has been changed. 1st time was under warranty, and 2nd time is today.
The part numbers:
Factory install diversity amplifier: 65 20 6 931 719
Revision 1 diversity amplifier part no: 65 20 6 988 057
Revision 2 diversity amplifier part no: 69 20 9 193 836
BMW must have known that the diversity amplifier was defective... why else would they revise the diversity amplifier twice
01-09-2011, 06:42 AM
#18
Members

Join Date: Jul 2004
Location: Massachusetts
Posts: 175
Likes: 0
Received 0 Likes
on
0 Posts
GREAT POST!!! Only took me 10 minutes to replace mine with these instructions. It really helped to know which way to push and pull on things. Seems to have made a BIG improvement with my FM reception.
THANKS!
THANKS!
02-25-2011, 04:58 AM
#19
Super Moderator
Join Date: Mar 2004
Location: Pittsburgh, PA USA
Posts: 17,310
Likes: 0
Received 2 Likes
on
2 Posts
My Ride: G30 M550i
Model Year: 2018
https://5series.net/forums/topic/105...st__p__1262159
03-12-2011, 01:12 PM
#20
Contributors
Join Date: Aug 2009
Location: UK - Romford, Essex
Posts: 379
Likes: 0
Received 0 Likes
on
0 Posts
Been a busy day today, managed to get the brake fluid done and also installed the latest revision of the diversity amplifier to resolve the progressively worse key reception distance.
Thanks for the guide, it took less then 10 minutes, knowing which way to push the amplifier and clips definitely helped
Thanks for the guide, it took less then 10 minutes, knowing which way to push the amplifier and clips definitely helped