Changing the orange LED to white LED on the cluster to look like M5 or
 03-16-2009, 07:25 AM
#51
Members

Join Date: Jul 2007
Location: Toronto
Posts: 24
Likes: 0
Received 0 Likes
on
0 Posts
My Ride: Model: 2004 530i
Color: Silver Grey Metallic
Option: Xenon Headlight, heated Steering wheels and seat, Parking Distance Control, Bucket Seat, 18" Stock Wheels.
Add-on "Option": Whole set OEM M5 Kit and M5 19" Wheels and other wheels, Quad Exhaust, Tinted Windows, Xenon Angel Eye, Chrome Grille, White LED License Plate Lights. [More update options coming up soon!]
Thank you so much for the DIY instruction! now I'm planning on doing it!
 03-18-2009, 07:04 PM
#52
Contributors
Join Date: Sep 2007
Location: Hong Kong
Posts: 3,019
Likes: 0
Received 0 Likes
on
0 Posts
My Ride: 530i
Mods: M5 sporty package, M5 Steering wheel, Sprint Booster
Originally Posted by iznissin' post='818184' date='Mar 16 2009, 11:25 PM
Thank you so much for the DIY instruction! now I'm planning on doing it!
 03-18-2009, 07:18 PM
#53
Contributors
Join Date: Jun 2006
Location: HK (N.T), UK (Surrey)
Posts: 4,533
Likes: 0
Received 0 Likes
on
0 Posts
My Ride: BMW E60 530i , Silver with leather Air Con iDrive 17" Breyton Rims with Dunlop Sp Sport tyres (M-Tech Bodykit and rims WANTED)
Alfa Romeo 147 TS1.6 , Black with Air Con 17" Multi Spoke alloys with Bridgestone RE040 tyres
Toyota MR-S 1.8 VVTI , Lagoon Blue with Red leather Air Con 15" standard alloys with Toyo tyres
Toyota Celica 1.8 VVTI, Lagoon Blue, Air Con, 16" Standard alloys with Kuhmo KU31, EBC Green Stuff
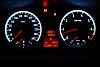
I have got a better pic of M5 cluster which moded by Ricky 
 05-13-2009, 09:38 PM
#55
Contributors
Join Date: Sep 2007
Location: Hong Kong
Posts: 3,019
Likes: 0
Received 0 Likes
on
0 Posts
My Ride: 530i
Mods: M5 sporty package, M5 Steering wheel, Sprint Booster
Originally Posted by alpinaandy' post='846882' date='Apr 15 2009, 12:18 AM
Does anyone know the full spec of the LED needed??
thanks in advance guys.
thanks in advance guys.
Use 3528 size white LED is OK.
 05-14-2009, 03:01 AM
#56
Members

Join Date: Apr 2009
Location: UK
Posts: 36
Likes: 0
Received 0 Likes
on
0 Posts
My Ride: E60 M5
Hi
They've got loads of different brightness types on ebay, surely I wont want super bright ones? any ideas?
http://cgi.ebay.co.uk/20-x-ULTRA-BRIGHT-WHITE-PLCC-2-SMD-LEDs-SMT-LED-PLCC2_W0QQitemZ260375065038QQcmdZViewItemQQptZUK_BOI_Electrical_Components_Supplies_ET?hash=item260375065038&_trksid=p3286.c0.m14&_trkparms=72%3A1683%7C66%3A2%7C65%3A12%7C39%3A1%7C240%3A1318%7C301%3A0%7C293%3A1%7C294%3A50
or these have the number you say, I could remove them from this board?
http://cgi.ebay.co.uk/24-SMD-3528-Car-Dome-Door-Automotive-LED-Light-A366_W0QQitemZ270388123263QQcmdZViewItemQQptZUK_CarsParts_Vehicles_CarParts_SM?hash=item270388123263&_trksid=p3286.c0.m14&_trkparms=72%3A1683%7C66%3A2%7C65%3A12%7C39%3A1%7C240%3A1318%7C301%3A1%7C293%3A1%7C294%3A50
Thanks in advance for your help!
05-14-2009, 04:21 AM
#57
Contributors
Join Date: Sep 2007
Location: Hong Kong
Posts: 3,019
Likes: 0
Received 0 Likes
on
0 Posts
My Ride: 530i
Mods: M5 sporty package, M5 Steering wheel, Sprint Booster
Originally Posted by alpinaandy' post='878118' date='May 14 2009, 07:01 PM
Hi
They've got loads of different brightness types on ebay, surely I wont want super bright ones? any ideas?
http://cgi.ebay.co.uk/20-x-ULTRA-BRIGHT-WH...%3A1%7C294%3A50
or these have the number you say, I could remove them from this board?
http://cgi.ebay.co.uk/24-SMD-3528-Car-Dome...%3A1%7C294%3A50
Thanks in advance for your help!
05-17-2009, 06:03 AM
#58
Senior Members

Join Date: May 2009
Posts: 309
Likes: 0
Received 0 Likes
on
0 Posts
My Ride: C200 CGI Style Edition
Originally Posted by pinguhk' post='802010' date='Feb 26 2009, 08:11 PM
1st thing to do is unplug the battery.
01. Before the change.
Attachment 72727
02. There are 2 screws at the top which need to be undone to take out the cluster.
Attachment 72728
03. At the back there is a plug which need to take off.
Attachment 72729
04. Undo these 4 screws with a T10 screw driver
Attachment 72730
05. Undo the 4 clips by pushing it down and out.
Attachment 72731
06. Undo the 2 clips, then take off the casing.
Attachment 72732
07. Use a card and a fork to take off the needles, don't use too much force cos they will brake very easy.
Attachment 72733
Attachment 72734
08. At the back turn the plastic ring in the center clockwise to undo the ring and panel.
Attachment 72735
Attachment 72736
09. Undo the 2 screws with a T9 screw driver.
Attachment 72737
10. Take off the gear for the Cruise Control ring and rev ring.
Attachment 72738
11. You will see the 4 LEDs in each of the ring.
Attachment 72739
12. At the back. The board is fixed to a socket so just undo the board by pulling it up slowly.
Attachment 72740
13. Take out the LED board.
Attachment 72741
Attachment 72742
14. You will see 4 LEDs on each ring.
Attachment 72743
15. Use a solder iron to take off the old LEDs .
Attachment 72744
Attachment 72745
16. For the new 1s you will need 8 white LEDs. Solder the new white LEDs back on. Each ring will need 4 LEDs. On each led legs there will be a + and - for the power so get a multi meter to test which is which. If solder wrongly it will not light up.
Attachment 72746
17. On the white case use some double sided tape to sick down the board coz if not the board will not stay in place.
Attachment 72747
18. Spray the ring which ever colour you like.
Attachment 72748
Attachment 72749
19. For the needle paint them red.
Attachment 72750
Attachment 72751
Attachment 72752
Attachment 72753
20. There you go finished here is the end product.
Attachment 72754
Attachment 72755
I would like to say many thanks to ricky1329 helping to make this dream come true.
If it was not for him this mod would never have happened and I would not have done a DIY.
If you what any more info on any thing about this mod, please ask us in the Topic and we would be happy to post it up for every 1 to read.
If you would like to buy a set of white LEDs please pm me for a price.
E60 Club in Hong Kong???
I want to join..hahaha
05-17-2009, 07:51 AM
#59
Senior Members

Join Date: Mar 2009
Location: Northern Virginia - USA
Posts: 421
Likes: 0
Received 0 Likes
on
0 Posts
My Ride: 2007 550i Jet Black|Black
Options: Sport|Premium|Cold Weather|PDC|Nav|Satellite Radio|Active Steering|Convenience Entry
Mods: Trinity Side Skirts|Trinity Black Grilles|LCI Tail Lights with Bruce V6|Fog Light Bezel Rings|MTEC V2 Angel Eyes|LED License Plate Lights
You are a brave man!
Originally Posted by pinguhk' post='802010' date='Feb 26 2009, 08:11 AM
1st thing to do is unplug the battery.
01. Before the change.
Attachment 72727
02. There are 2 screws at the top which need to be undone to take out the cluster.
Attachment 72728
03. At the back there is a plug which need to take off.
Attachment 72729
04. Undo these 4 screws with a T10 screw driver
Attachment 72730
05. Undo the 4 clips by pushing it down and out.
Attachment 72731
06. Undo the 2 clips, then take off the casing.
Attachment 72732
07. Use a card and a fork to take off the needles, don't use too much force cos they will brake very easy.
Attachment 72733
Attachment 72734
08. At the back turn the plastic ring in the center clockwise to undo the ring and panel.
Attachment 72735
Attachment 72736
09. Undo the 2 screws with a T9 screw driver.
Attachment 72737
10. Take off the gear for the Cruise Control ring and rev ring.
Attachment 72738
11. You will see the 4 LEDs in each of the ring.
Attachment 72739
12. At the back. The board is fixed to a socket so just undo the board by pulling it up slowly.
Attachment 72740
13. Take out the LED board.
Attachment 72741
Attachment 72742
14. You will see 4 LEDs on each ring.
Attachment 72743
15. Use a solder iron to take off the old LEDs .
Attachment 72744
Attachment 72745
16. For the new 1s you will need 8 white LEDs. Solder the new white LEDs back on. Each ring will need 4 LEDs. On each led legs there will be a + and - for the power so get a multi meter to test which is which. If solder wrongly it will not light up.
Attachment 72746
17. On the white case use some double sided tape to sick down the board coz if not the board will not stay in place.
Attachment 72747
18. Spray the ring which ever colour you like.
Attachment 72748
Attachment 72749
19. For the needle paint them red.
Attachment 72750
Attachment 72751
Attachment 72752
Attachment 72753
20. There you go finished here is the end product.
Attachment 72754
Attachment 72755
I would like to say many thanks to ricky1329 helping to make this dream come true.
If it was not for him this mod would never have happened and I would not have done a DIY.
If you what any more info on any thing about this mod, please ask us in the Topic and we would be happy to post it up for every 1 to read.
If you would like to buy a set of white LEDs please pm me for a price.
01. Before the change.
Attachment 72727
02. There are 2 screws at the top which need to be undone to take out the cluster.
Attachment 72728
03. At the back there is a plug which need to take off.
Attachment 72729
04. Undo these 4 screws with a T10 screw driver
Attachment 72730
05. Undo the 4 clips by pushing it down and out.
Attachment 72731
06. Undo the 2 clips, then take off the casing.
Attachment 72732
07. Use a card and a fork to take off the needles, don't use too much force cos they will brake very easy.
Attachment 72733
Attachment 72734
08. At the back turn the plastic ring in the center clockwise to undo the ring and panel.
Attachment 72735
Attachment 72736
09. Undo the 2 screws with a T9 screw driver.
Attachment 72737
10. Take off the gear for the Cruise Control ring and rev ring.
Attachment 72738
11. You will see the 4 LEDs in each of the ring.
Attachment 72739
12. At the back. The board is fixed to a socket so just undo the board by pulling it up slowly.
Attachment 72740
13. Take out the LED board.
Attachment 72741
Attachment 72742
14. You will see 4 LEDs on each ring.
Attachment 72743
15. Use a solder iron to take off the old LEDs .
Attachment 72744
Attachment 72745
16. For the new 1s you will need 8 white LEDs. Solder the new white LEDs back on. Each ring will need 4 LEDs. On each led legs there will be a + and - for the power so get a multi meter to test which is which. If solder wrongly it will not light up.
Attachment 72746
17. On the white case use some double sided tape to sick down the board coz if not the board will not stay in place.
Attachment 72747
18. Spray the ring which ever colour you like.
Attachment 72748
Attachment 72749
19. For the needle paint them red.
Attachment 72750
Attachment 72751
Attachment 72752
Attachment 72753
20. There you go finished here is the end product.
Attachment 72754
Attachment 72755
I would like to say many thanks to ricky1329 helping to make this dream come true.
If it was not for him this mod would never have happened and I would not have done a DIY.
If you what any more info on any thing about this mod, please ask us in the Topic and we would be happy to post it up for every 1 to read.
If you would like to buy a set of white LEDs please pm me for a price.
05-17-2009, 05:52 PM
#60
Contributors
Join Date: Sep 2007
Location: Hong Kong
Posts: 3,019
Likes: 0
Received 0 Likes
on
0 Posts
My Ride: 530i
Mods: M5 sporty package, M5 Steering wheel, Sprint Booster
Originally Posted by IQ21' post='880928' date='May 17 2009, 10:03 PM
E60 Club in Hong Kong???
I want to join..hahaha
I want to join..hahaha