alternator replacement 545i
 09-10-2012, 06:38 AM
#11
New Members

Join Date: Feb 2012
Location: United States
Posts: 2
Likes: 0
Received 0 Likes
on
0 Posts
 Napa has better pricing but only carries 3 year warranty.
 09-13-2012, 05:16 PM
#12
New Members
Join Date: Feb 2012
Location: United States
Posts: 2
Likes: 0
Received 0 Likes
on
0 Posts
Thanks for the great write up! mine just went south today. Unfortunately getting a mechanic to do it means using their parts which takes $300 labor to around $1000 for the entire job. Auto zone has a re manufactured one with lifetime warranty for $250. So given these tend to go bad over time, I'm guessing getting the experience under my belt is worth the savings! Napa has better pricing but only carries 3 year warranty.
Napa has better pricing but only carries 3 year warranty.It took us a total of about 4.5 hours over the course of 2 evenings. *If you have all your parts, tools ready with 2 people, if all goes well, you should be able to get it done in under 3 hours.
Tools:
Torque wrench
Screw drivers
Socket set - 13mm and 16mm sockets primarily with 3" extension.
Torx socket set T20 - T60
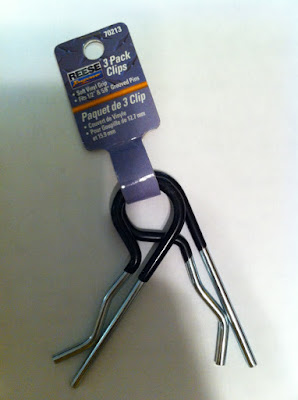
Large cotter pin - kind used for tow hitch type work (I got a pack of 3 for $1.50 from Autozone)
Vinyl work gloves
Wet/Dry Vac - came in handy to clean up all the junk stuck between the radiator panels and between radiator and condenser.
cardboard (to protect the radiator fins)
old blanket or padding of some sort (old fashioned fender protector) to lay over the radiator (you will lean on it a bit)
flashlight
Optional:
- Remove under car panel. only the one under the engine (not required but we did it to be ready to grab something from floor if we dropped a tool, bolt or something).
Removal:
- Disconnect battery negative cable and insulate it so it will not make contact with the battery (I wrapped it in a towel and stuffed it down in the battery cavity).
- Remove top engine cover.
- Disconnect MAF sensor plug and move it safely out of the way.
- Remove air filter top cover and hose going to throttle body.
- Remove metal radiator cover (place all bolts in a ziploc bag and label it appropriately).
- Remove plastic over over radiator/fan (place all bolts in a ziploc bag and label it appropriately).
- Remove electrical connectors (2) on fan assembly.
- The fan assembly has 2 plastic tabs. one on each vertical side, the passenger side tab is fixed (do not try to move it, however the drivers side has a tab that hinges and moves 90 degrees towards the engine). this will allow you to clear the radiator hoses.
- Lift up the fan assembly about 1/2 inch and fold the drivers side tab towards the engine using care not to damage the hoses or the tab.
- Once you have cleared the tab from the hoses, now lift up the entire fan assembly and out of the car.
- Belt removal
- Now you will need a pin or BMW special tool that goes through the idler pulley bracket to hold the pulley in position and out of the way while you remove the belt. (we bought 3 large cotter pins from Autozone and cut off the curved part of the pin using a dremell cut off tool and left only the straight shaft and the loop at the end to hold on to.
- Take a picture of the belt routing so you have it for reference later
- Mark the direction of the belt (I used a sharpie marker and made an arrow pointing towards the engine block).
- Use T60 socket to turn the pulley clockwise to loosen the belt. When the pulley is fully extended you will slide the cotter pin through the hole under the T60 socket.
- Now you can slip off the drive belt.
- Release the tension on the pulley but ensure the cotter pin is inserted enough to keep the pulley from going all the way back up.
- It is a good idea at this time to pop off the plastic cover from the alternator's idler pulley (NOT the 6 grove main alternator pulley) and remove the pulley from the alternator. (you will mount this pulley on the new alternator later) if you take it off the alternator now while the alternator is bolted to the car, it will make it easier to remove the pulley and to take the alternator out of the car.
- Remove both alternator mounting bolts (long = bottom bolt).
- Try to dislodge the alternator from engine mount. you may need to pry it out.
- Once the alternator is dismounted from the engine, carefully turn it so the electrical connectors are facing you. remove the large nut (13mm) and remove the black cable.
- Disconnect the plastic wiring harness plug.
- You should be able to lift the alternator out of the car now.
Installation:
- Install idler pulley on new alternator.
- Lower new alternator into car and carefully install the 2 wires.
- Position the alternator into place and get the bottom "U" shape mount into position.
- Slide lower bolt through alternator (it will not go all the way through to thread yet but get it in so so that only about 1 - 1 1/2" are exposed) this will take some wiggling of the alternator.
- Position upper bolt into position and wiggle until you can start threading it (it will be a little tight to thread, slowly tighten the top bolt with a ratchet while wiggling the alternator but don't force it if it's too hard to turn. you don't want to strip threads. Don't fully tighten it, leave a couple turns out so the alternator wiggles a bit.
- Now try to get the bottom bolt to start threading by wiggling the alternator in place.
- Once both bolts are started, tighten them both and torque to spec.
- Clean off all the pulleys to ensure there is no dirt on them.
- Route the belt back the way it was when you took it off (ensure the mark you made previously to show direction is the same). you may have to release the tension again but leave the pin in place for now.
- Once you have the belt on correctly check it for proper seating on all the pulleys.
- Release the tension again and remove the cotter pin.
- Double check the tension on the belt
- Install the fan back into place. (be careful to get that plastic hinged tab back in place and ensure it's locked back into position between the hoses) clean off as needed.
- Re-connect electrical connectors for fan.
- Clean all the remaining parts as needed prior to re-installation.
- Install plastic cover.
- Install metal cover.
- Install intake hose.
- Install air box top.
- Re-connect MAF sensor plug.
- Clean up and remove ALL TOOLS from the engine compartment.
- Re-connect negative battery cable.
- Start car and monitor voltage. It's normal for Active Sterring malfunctino and other errors... they should clear. I turned the steering wheel from lock to lock (all the way left and then all the way right) to try and clear the active steering warning but it didn't work. It just cleared by itself after a few minutes of having the car running.
What I did NOT have to do:
- I did not need to disconnect any hoses or coolant lines
- I did not have to remove the oil cooler located just right and front of the alternator.
- If I didn't mention it above, I did NOT do it...
Pictures:
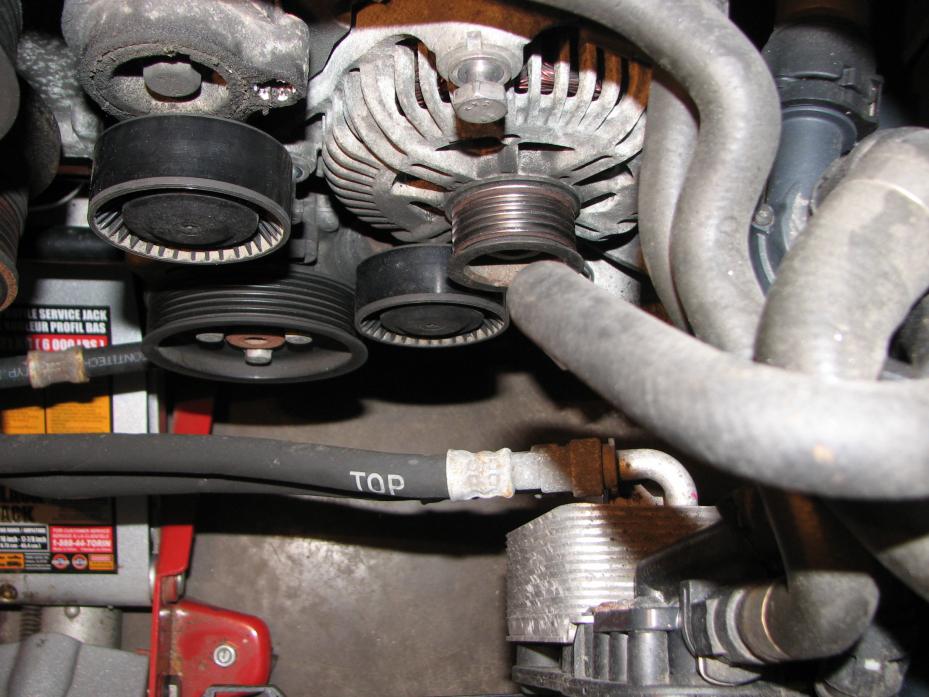
look closely, you can see a lot in this picture: belt routing, pully retaining clip, alternator mount bolts etc...

Clip:

 01-13-2013, 07:35 PM
#13
New Members

Join Date: Jan 2013
Location: Wichita, KS
Posts: 2
Likes: 0
Received 0 Likes
on
0 Posts
My Ride: '04 545i Sport, 6-speed
Thank you so much, amar67 and NeverEnough!, for sharing your experience. I have the Bentley manuals but your extra insight, detailed steps, and great photos, made my alternator replacement go so easily yesterday. Cheers!
04-12-2013, 03:34 AM
#14
New Members

Join Date: Sep 2012
Location: Houston
Posts: 24
Likes: 0
Received 0 Likes
on
0 Posts
Thank you for the specific instructions. I just replaced mine yesterday. It took me a while but the instructions were to the point specific and awesome. This 52 year old man felt proud to get it done. It was tough getting it out of there and dealing with the last two connections to the alternator but patience helped out . . . and arm strength.
07-02-2013, 01:20 PM
#16
New Members
THANKS TO NeverEnough! and amar67
for posting this write up, was doing the alternator replacement today and following the Bentley got me somewhat disappointed and frustrated (don't know where Bentley sometimes gets his info from ) as there is no way in hell I could get the cables disconnected while alternator still is on place, without removing airconditioning compressor lines and aux cooling pump hoses. And doing that was a bit more than I bargained for.
And taking pics of this job is a bit difficult or I would post some to clarify, am about t pull the alternator and if I get a a Kodak moment will post something later......
07-02-2013, 06:07 PM
#17
New Members

Join Date: Sep 2012
Location: Greensboro, NC (USA)
Posts: 246
Likes: 0
Received 0 Likes
on
0 Posts
I had planned on posting picture as well, but there just wasn't enough room to take any decent ones.. whoever wrote the Bentley manual clearly had the engine out when they wrote up the procedure..
07-03-2013, 03:55 AM
#18
New Members

Her is some pics of my experience half way in it. The one of the drivers side radiator hole watch out for that as it swallowed one of my long torx T20 bits no way to relocate that one and will be rattling or rusting in some unknown cavity there.
Last edited by cmyachtie; 07-03-2013 at 04:13 AM.
07-03-2013, 02:21 PM
#19
New Members
This is day 2 (am retired and only work max 4 hrs...LOL)
Nevertheless am not having fun doing this, NOT!!!, can anyone post a pic or tell me how to remove the small wire harness connector off the back of alternator?
Am unable to see it but can get my hand around it to feel the connector, suspect there must a tab or spring clip but what ?? and how??
thanks