E60/E61 HOWTO: Remove front outer PDC sensor without removing bumper/grilles
 01-03-2014, 02:48 AM
#1
New Members
Thread Starter

Join Date: Jan 2014
Location: london
Posts: 1
Likes: 0
Received 0 Likes
on
0 Posts
My Ride: F11
Model Year: 2011
Background:
The fault symptom I had was the check control indication of a 'PDC system failure', the PDC button indicator flashed and although the PDC display appeared on the iDrive, it was not operational.
After a cursory inspection of all sensors for damage (none found), I checked the PDC control module in the spare wheel well (under the boot). I disconnected the module, inspected and reconnected it with no moisture or damage etc however the fault remained.
I then (with ignition in position II) activated PDC and listen to each sensor in turn for the clicking sound. All were clicking except the outer front driver's side sensor.
After looking at multiple forums and the BMW DIS system, the only methods I could find to access the sensor included removing the bumper - a step I thought excessive given the sensor was only located just below the headlight. I also failed to find any useful photos or diagrams so I therefore documented my progress for everyone's benefit!
This procedure was conducted on a UK-spec pre-LCI (2004/54) E61 530d with Adaptive Xenon headlamps (and therefore headlamp washers) though I should imagine there will be little difference on other variants/engines. This is for the driver's side; follow the same procedure for passenger though the bolt positions etc will be mirrored.
Equipment required:
Flat head screwdriver (small/medium size)
Torx driver
Extended reach 9mm socket
Rags/hairdrier/WD40 or replacement PDC sensor etc (straight connection, angled connection sensors are for the rear).
Method:
Total time taken about 30 minutes, seems to have done the trick with my PDC system so fingers crossed...
If your inner front sensors are suspect, you will probably have to remove the central grille at least - the inner sensors are inaccessible when just removing the headlamp.
The fault symptom I had was the check control indication of a 'PDC system failure', the PDC button indicator flashed and although the PDC display appeared on the iDrive, it was not operational.
After a cursory inspection of all sensors for damage (none found), I checked the PDC control module in the spare wheel well (under the boot). I disconnected the module, inspected and reconnected it with no moisture or damage etc however the fault remained.
I then (with ignition in position II) activated PDC and listen to each sensor in turn for the clicking sound. All were clicking except the outer front driver's side sensor.
After looking at multiple forums and the BMW DIS system, the only methods I could find to access the sensor included removing the bumper - a step I thought excessive given the sensor was only located just below the headlight. I also failed to find any useful photos or diagrams so I therefore documented my progress for everyone's benefit!
This procedure was conducted on a UK-spec pre-LCI (2004/54) E61 530d with Adaptive Xenon headlamps (and therefore headlamp washers) though I should imagine there will be little difference on other variants/engines. This is for the driver's side; follow the same procedure for passenger though the bolt positions etc will be mirrored.
Equipment required:
Flat head screwdriver (small/medium size)
Torx driver
Extended reach 9mm socket
Rags/hairdrier/WD40 or replacement PDC sensor etc (straight connection, angled connection sensors are for the rear).
Method:
- Open the bonnet, ensure ignition is off (strictly you should disconnect the battery).
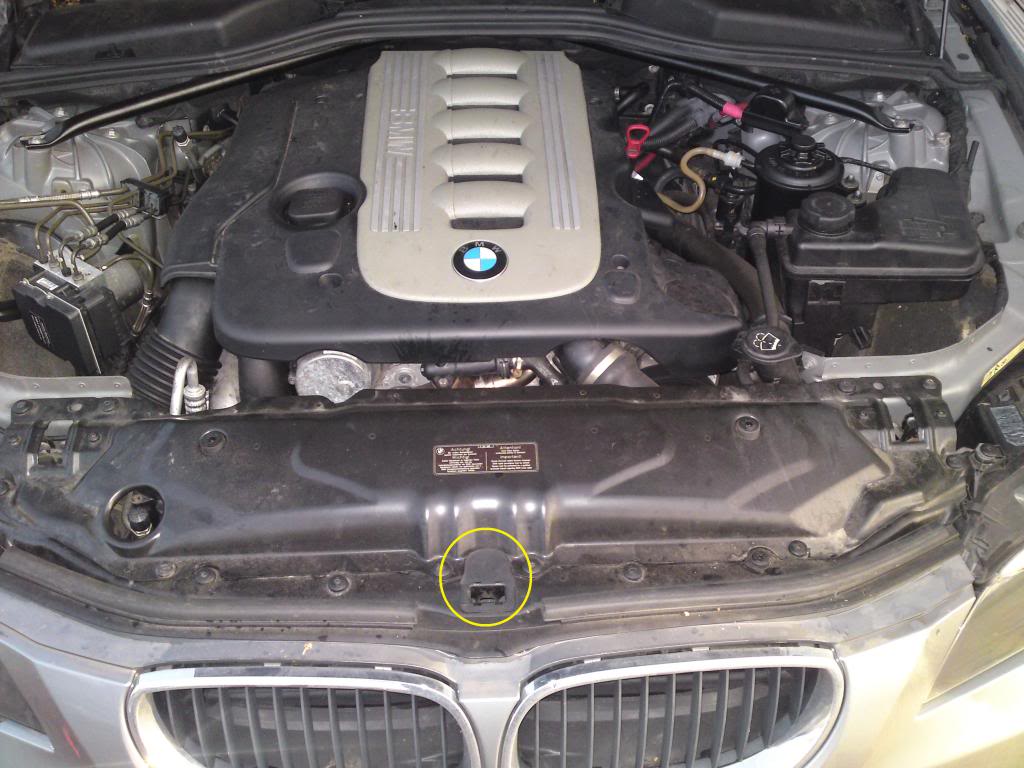
- Remove the upper front radiator cover plate by removing the 10 Torx bolts(circled below) . Once removed, carefully move it out of the way - it will be constrained by the bonnet release cables but it will sit on the engine far enough to be out of the way.
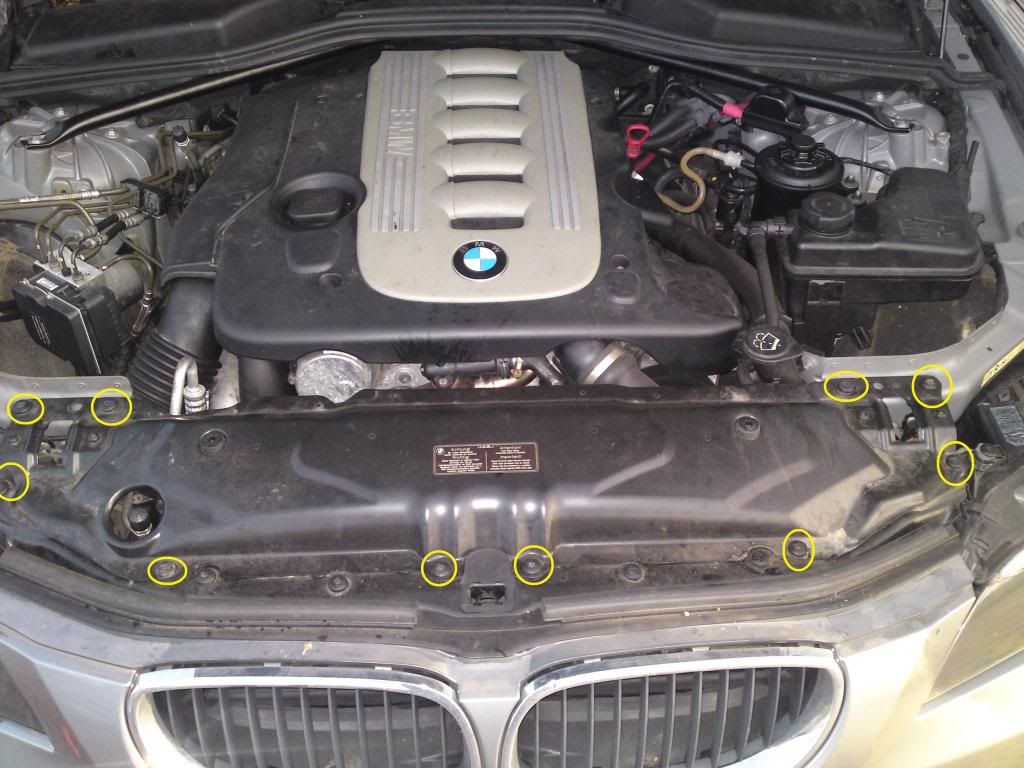
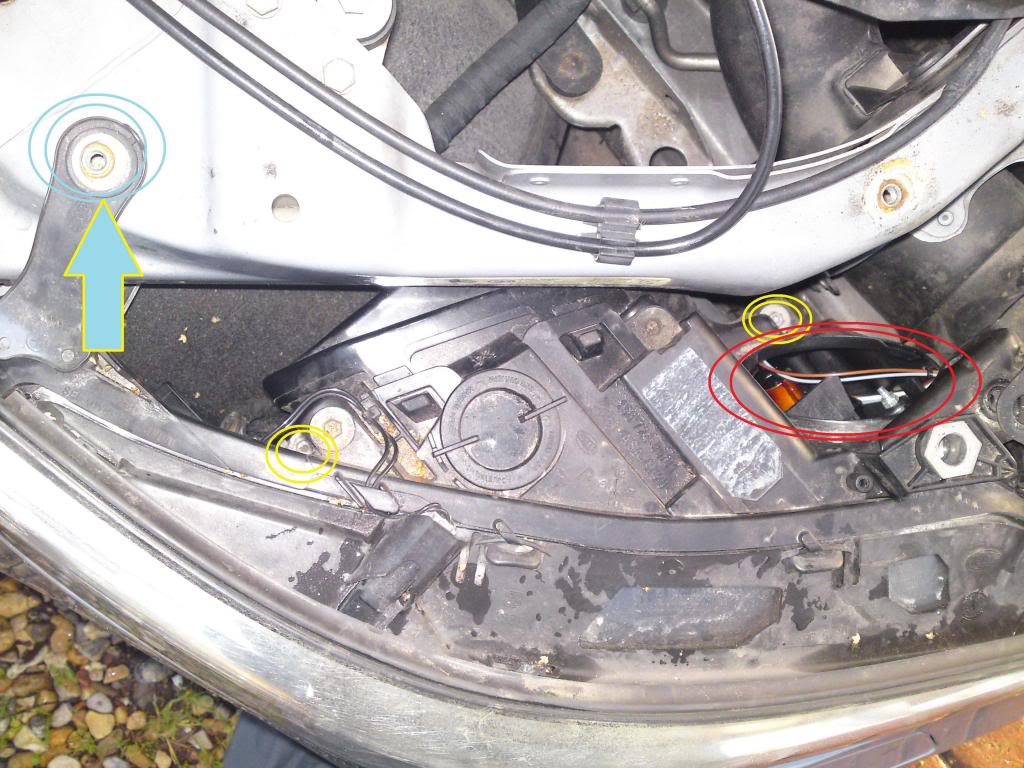
- Now loosen the front grille cover plate by removing the newly revealed 6 Torx bolts (circled in yellow in the below image). Remove the Torx bolt (blue arrow on image) bolted to the top of the headlamp - note this bolt has a longer shaft.

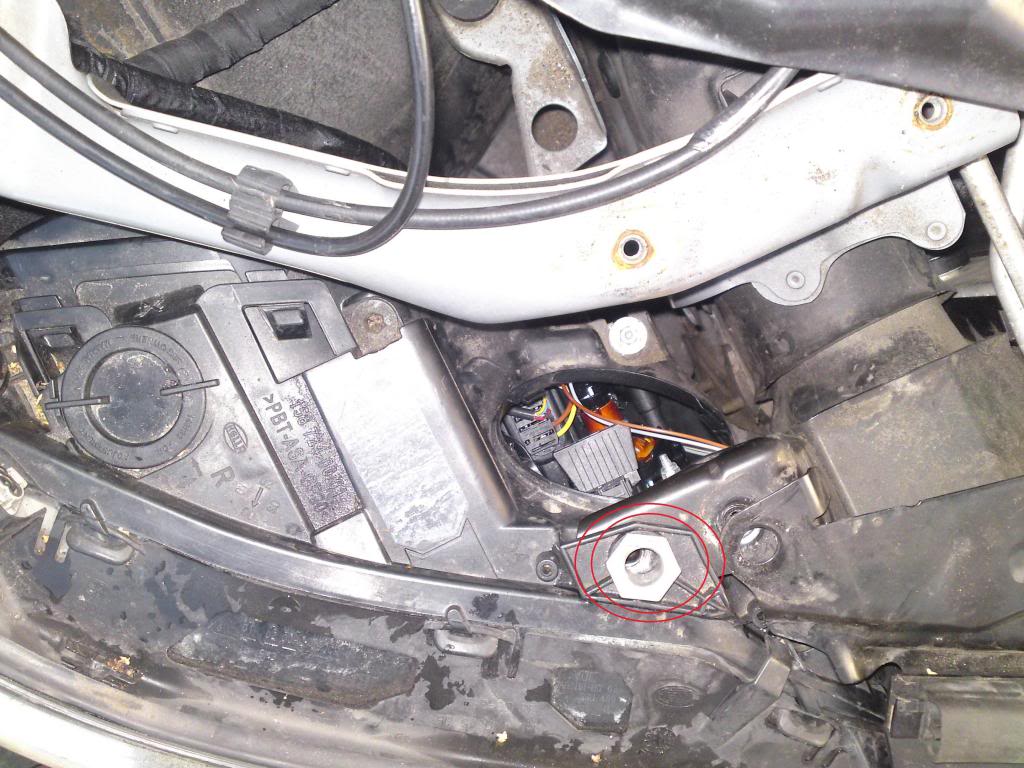
- Remove the last Torx bolt (highlighted blue below). Remove the main beam lamp cover on the headlamp unit (circled in red on below image) for access. Using an extended 9mm socket, remove the 2 bolts circled in yellow below - beware that space for the removal of the left hand bolt is tight! Don't worry if you drop a bolt - it can be easily recovered once the headlamp is removed.
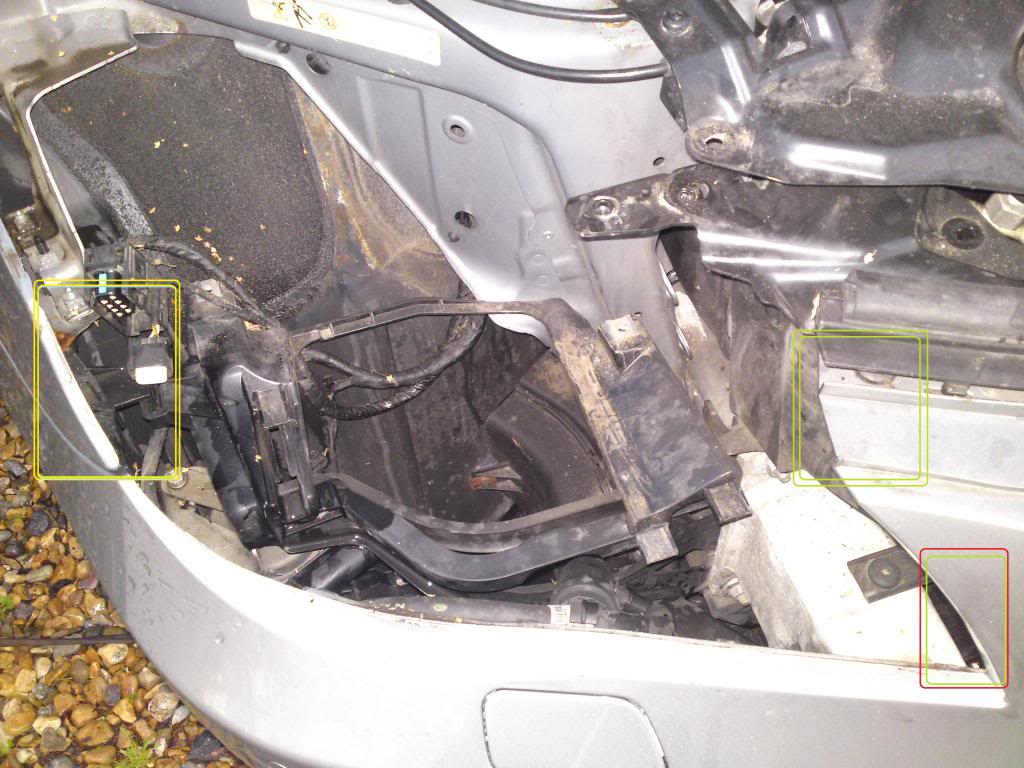
- Now the headlamp can be carefully removed by a combination of:
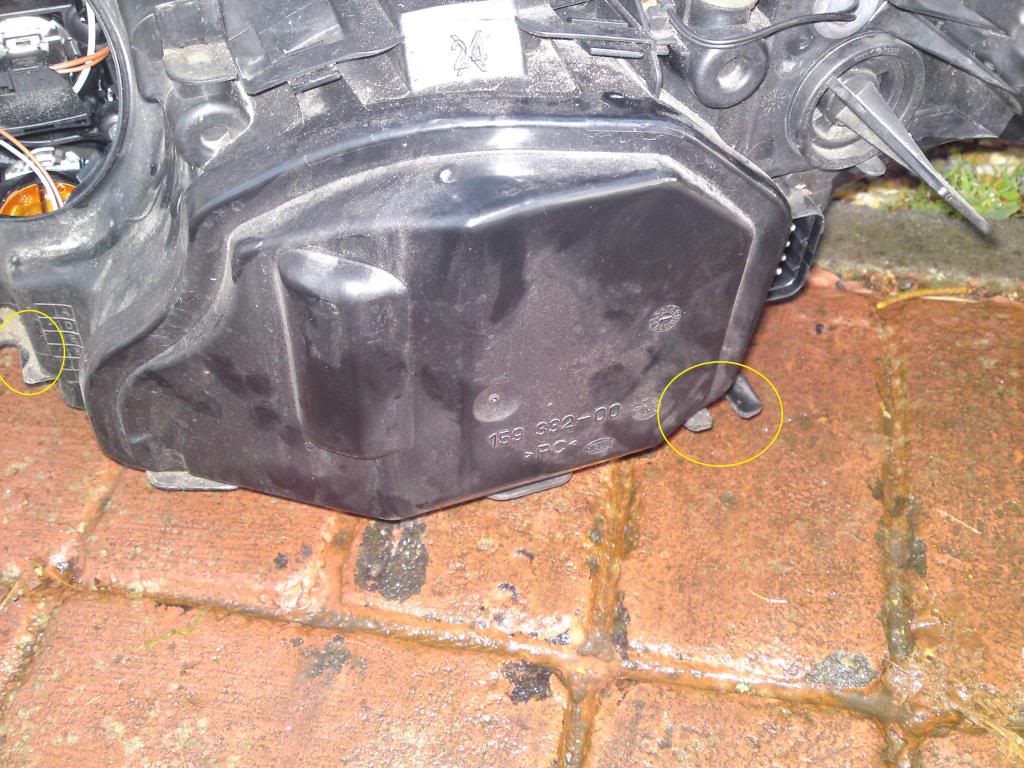
-> pulling it forward (the left hand side locates along the edge of the bonnet (highlighted in yellow below) - beware of the rubber condensation drain tube snagging on the bonnet lip
-> gently pulling the centre grille forward (highlighted in green below) to release the right-hand edge of the headlamp (highlighted in red below)
-> wiggling the headlamp unit forward until it is released - remaining careful of your paintwork!
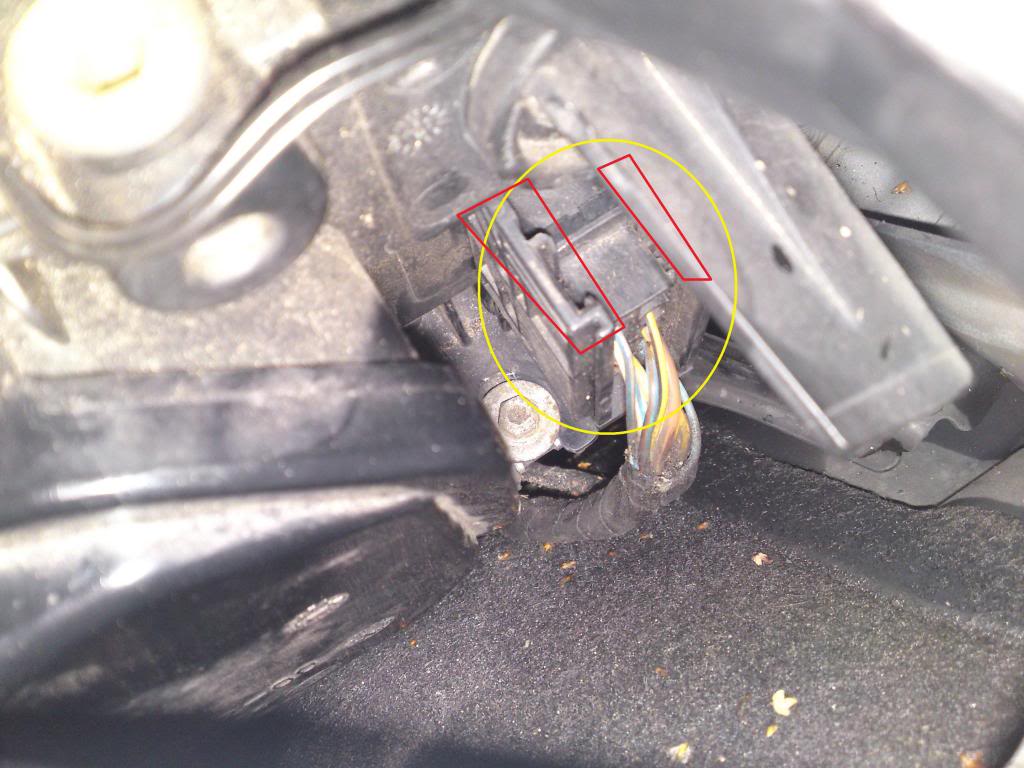
- Remove the 2 wiring harnesses:
-> the main connector (circled in yellow below) is disconnected by pushing down on the top of each side (highlighted in red) which moves the connector on it's cam and removes it from the headlamp unit
-> the smaller connector underneath can be pulled (only apply force on the connector not the wires!) off however I used a flat headed screwdriver to release the retaining tabs.
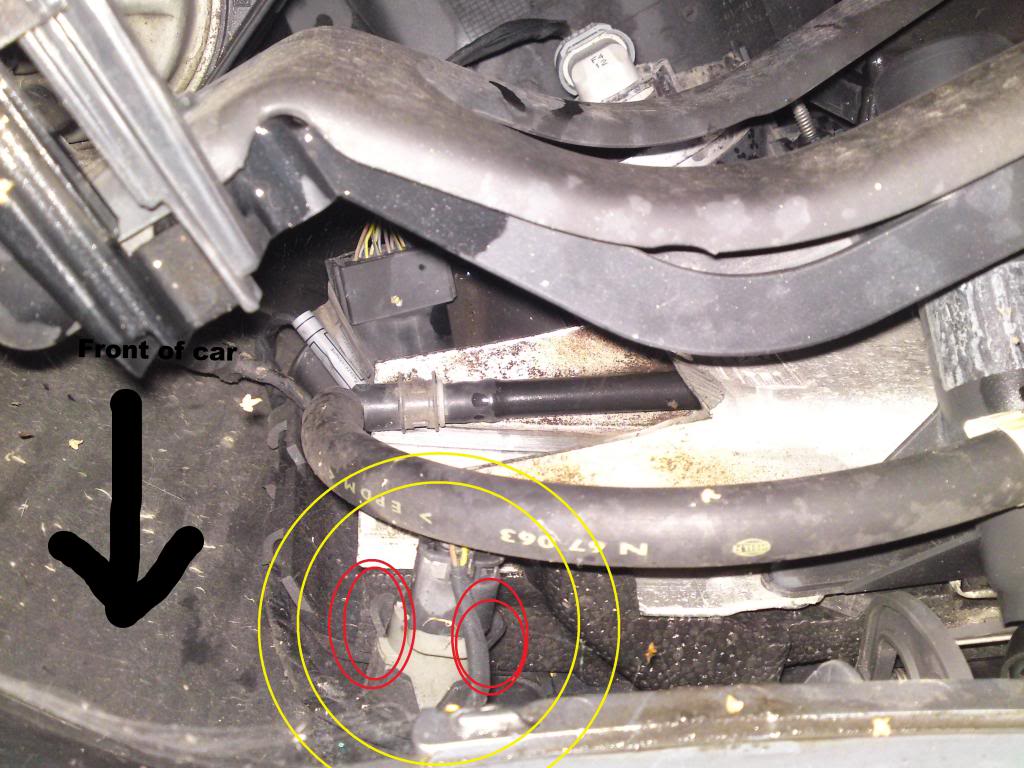
- The headlamp unit is now free - put it somewhere safe. Looking inside the bumper, you can now see the outer PDC sensor n(circled yellow below! - image was taken looking down) amongst the washer pipe and other gubbins. To remove the sensor, disconnect the wiring harness and gently prise open the black retaining tabs (circled red) and push the sensor in from the outside (i.e. the sensor is removed from the engine bay side).
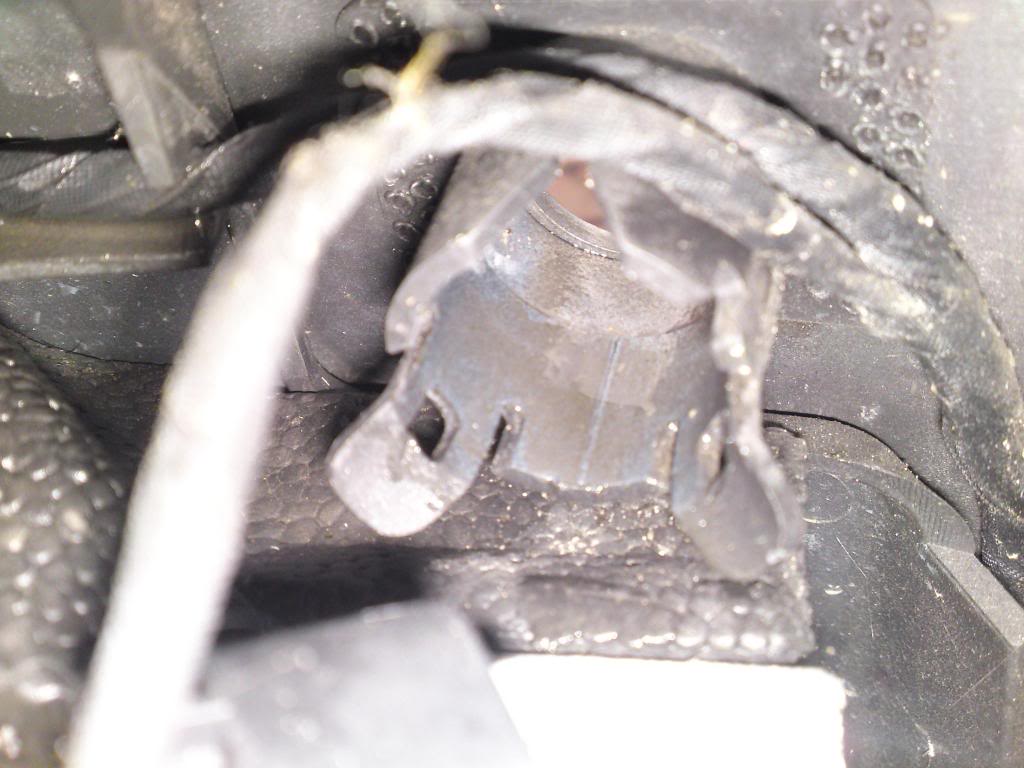
Close up of the sensor housing and retaining clips with sensor removed:
- Inspect/replace the sensor/connector as required. I cleaned mine with a rag, applied a bit of WD40 and dried using a hair dryer to remove the moisture that was apparent. The connectors and wiring harness were dry with no evidence of corrosion - I therefore assume it was the moisture causing a problem.
Note that now is a good time to test fit the sensor and check the PDC system - you can disregard the check control messages about the missing lights. - To put your car back together, it is basically the reverse of the above, noting:
- As circled in the image below, the 9mm bolts you removed locate in a slot (not a hole). I found it easier with the left-hand bolt to insert it a couple of turns before sliding in the headlamp module so the inserted bolt locates in the slot.
- The bolt highlighted blue in image 2 above and red below is longer than the others and also locates off-centre - check with the opposite headlamp to confirm.
- When replacing the 2 covers, be cognisant of the order the bolts go back in! Also, make sure the bonnet retaining catch hole on the lower plate sits above the upper plate (see below).
- Don't forget to replace the headlamp unit screw-on cover!
- As circled in the image below, the 9mm bolts you removed locate in a slot (not a hole). I found it easier with the left-hand bolt to insert it a couple of turns before sliding in the headlamp module so the inserted bolt locates in the slot.
Total time taken about 30 minutes, seems to have done the trick with my PDC system so fingers crossed...
If your inner front sensors are suspect, you will probably have to remove the central grille at least - the inner sensors are inaccessible when just removing the headlamp.
Last edited by francelife23; 01-03-2014 at 02:50 AM. Reason: Typo
 07-04-2016, 12:16 AM
#2
New Members

Join Date: Jul 2016
Location: Spain
Posts: 4
Likes: 0
Received 0 Likes
on
0 Posts
My Ride: 2003 E60 530IA Exclusive
Excellent and detailed how to,u save me time and money,keep up the good work 
Last edited by Bl4ckH4wk; 07-04-2016 at 12:17 AM. Reason: misstype
10-30-2016, 09:51 AM
#3
New Members

Join Date: Oct 2016
Location: NC
Posts: 1
Likes: 0
Received 0 Likes
on
0 Posts
My Ride: '06 530XiT
The post was great and super simple. my sensor had been bumped and no longer flush in the bumper, rather partially inside the bumper. When i pulled out the headlamp the bracket that holds the sensor had come off the inside of the bumper. Looks like some sort of epoxy. Even if i try to hold in place, I can not get the sensor to re-seat correctly in the bumper. When i removed the sensor from the bracket if fits nicely. Any thoughts on epoxying the bracket back on? if i can't get the sensor to seat right in the bumper should i just use small amount on the sensor to get it to stay in the bumper?
Thanks.
Thanks.

Thread
Thread Starter
Forum
Replies
Last Post