DIY: Rear Brake Replacement; Removing the Rotors Can Be Tricky
 09-27-2009, 04:08 PM
#1
Members
Thread Starter

Join Date: May 2009
Location: Minneapolis, MN
Posts: 178
Likes: 0
Received 0 Likes
on
0 Posts
My Ride: 545i/6spd
I previously changed the front brakes and painted my calipers here:
https://5series.net/forums/index.php?showto...3&hl=brakes
So to continue, this is for the rear.
iDrive was telling me my rear pads were almost due for replacement. The pads looked plenty thick so I went ahead and reset the service indicator. This was a mistake. If you're nearing replacement and you do this, your iDrive will give you -15000 miles or the equivalent km.
Annoyingly, I was told my brakes need to be replaced every time I started the car, as well as the brake indicator was lit at all times. Because I can't stand the warnings, and more importantly, my old rotors were warped I decided to go ahead and replace everything.
You know your rotors are warped for 2 obvious reasons. The first is by looking at the rotor you'll see some darker lines perpendicular to the path of travel of your pads. The 2nd is pulsation felt through the brake pedal (for your fronts your steering wheel as well) under hard braking.
Some general tips:
Take your time - if your in a rush or gotta be somewhere your bound to break or screw something up and get frustrated.
Always use the right tool for the job. If you don't you will break or screw something up. If you need a 6mm and only have a standard 3/16, go to the store and get the right tool.
I add these as from my experience over the years these two tips have saved me many hours and a lot of frustration (see link in my sig about building a car).
The tools required:
6mm allen socket
17mm 6 point socket
Extention and Ratchet
18mm 6 point socket (because 12 point means you'll probably strip something)
Jack and stands
Rubber mallet
Parts and Supplies:
Brake Rotors and Pads as needed. I got these from R1Concepts
Pad sensor - one per axle, you'll just need one for your right rear
WD40 or JB80
Latex Gloves are good to keep your hands clean from chemicals and nasty brake dust.
What you might need:
1/2 COBALT Drill Bit
Drill
2 rotor bolts - $1.50 each at your local dealer
Begin:
Lift the car and remove the wheels:
To begin, break loose your lug bolts with a 17mm or 11/16. Now you can jack the car up and remove the lugs and wheels completely. Make sure you've put something in front of your front tires so the car doesn't try to roll away.
I just jacked from the differential and put stands under each side in front of the wheel on the block points.
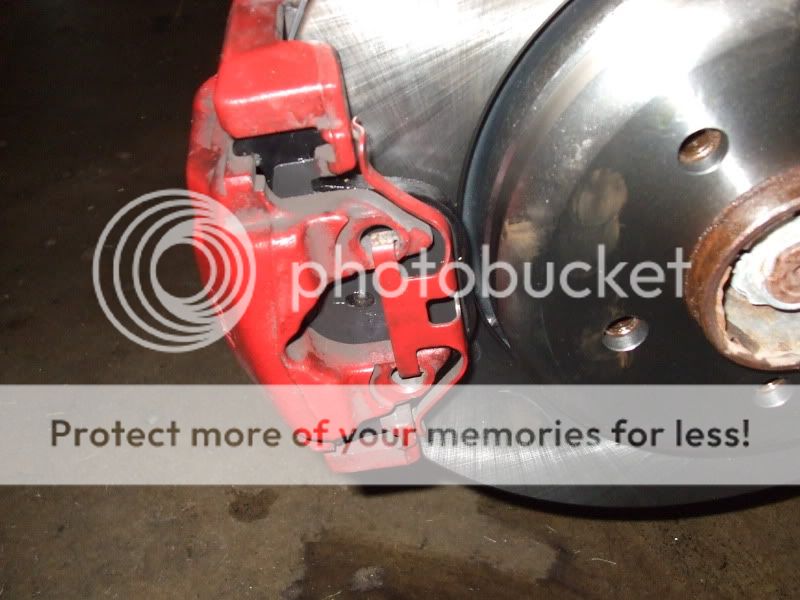
Remove your calipers:
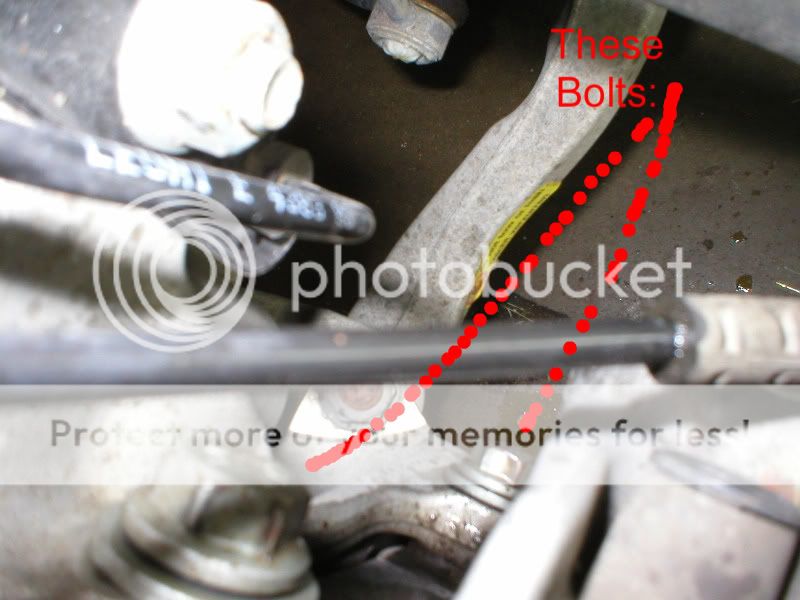
With the 18mm 6 point socket you can now loosen the 2 rear bolts holding the caliper on (see above). For the lower of the 2, you'll need a deep 18mm, or standard 18 and small extention. You'll want to either get a lot of leverage with a long ratchet driver, pipe, impact gun or you can do what I did and use a rubber mallet. Just be careful the socket doesn't slip or grab the bolt at a weird angle or you'll strip it.
Once you've removed the bolts you can tap the caliper off with the rubber mallet. Make sure to have something handy to rest it on so you don't pinch the brake lines. I just used a very large coffee can.
Remove the rotors:

With the 6mm allen on a socket driver you can remove the small bolt holding your rotor on. These are easy to strip - if you've read my DIY for the front's I stripped them badly and had to drill them out. If you do strip them refer to that thread on drilling them out. I think the rear's are far less corroded though as these came off much easier with no issue on either side. Ideally, if you have an impact gun that makes this much easier to get the right pressure without stripping. I just used a small socket driver on the rears though.
Now remove your rotors. This is where I, and from some searching, others ran into some trouble. On our car, the emergency brake is inside the rotor acting as a drum brake. Even though you just turned the e-brake off, over time the shoes have worn away and created a small lip on the inside of the drum. This just means it's difficult to get the rotor off.
From searching the technical way to do this is to loosen the e-brake cables. I didn't want to go through that procedure so I did what most others have done. Take your WD-40 or JB-80 and spray inside each bolt hole and around the hub ring where your rotor makes contact. Let this soak and repeat a few times so the lubricant can do it's work. Then with your rubber mallet bang on the rotor from the back side. Hit it a few times, turn the rotor 45-90 degrees and repeat. Eventually with the JB-80 or WD-40 and doing this they came off. Please be careful not to overdo this as hitting things too hard can be damaging to wheel bearings etc. I don't fully condone doing it this way, but I did and have on other cars numerous times.
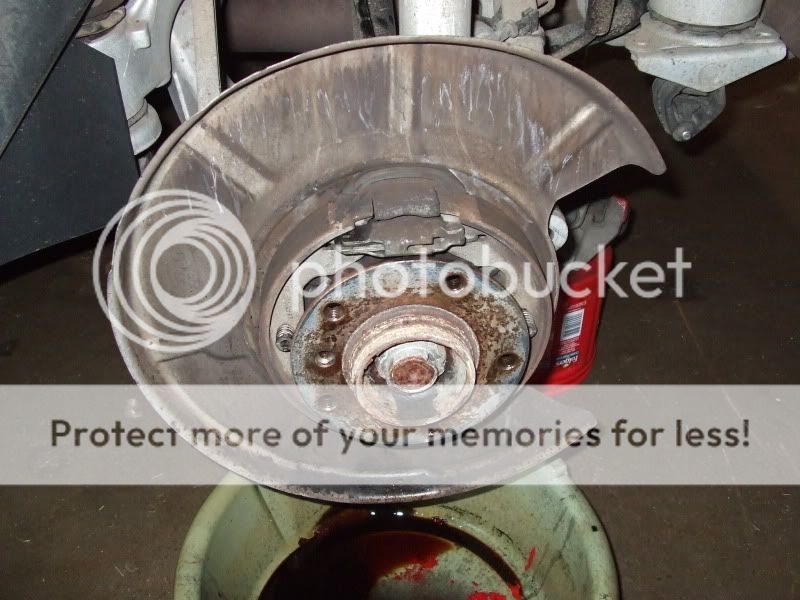
At this point it won't hurt to spray your brake cleaner all over what you see here.
Install New Rotors, and disassemble old Pads from the Calipers:
Now simply place your new rotors on and put your rotor bolt in.
To remove the old pads, you'll quickly realize your brake caliper is 2 separate pieces which you can move around. On the right side remove the pad sensor. Then take your old pads out (outer pad first) and remove the caliper clip. A screw driver helps get things apart.
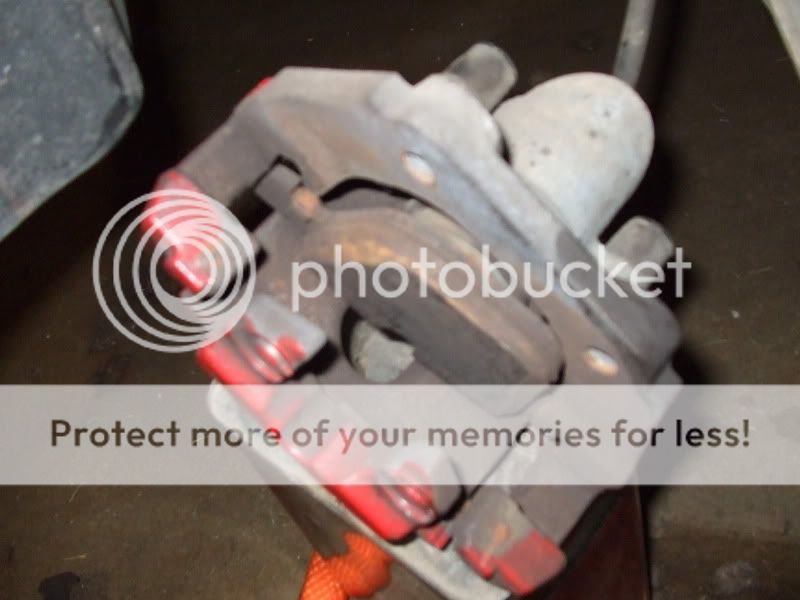

Now you'll want to push the piston in so your new pads and rotors will fit together. I just used a large C-Clamp and pushed the piston in fairly easily:
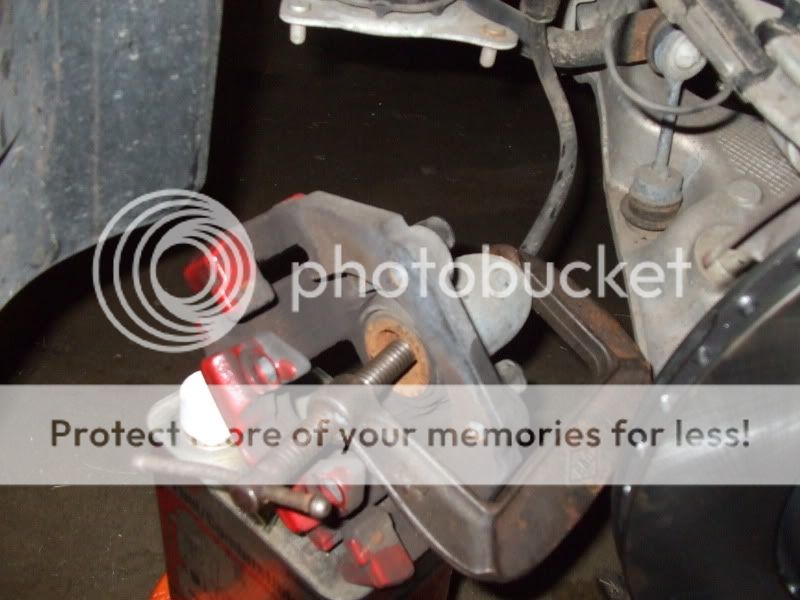
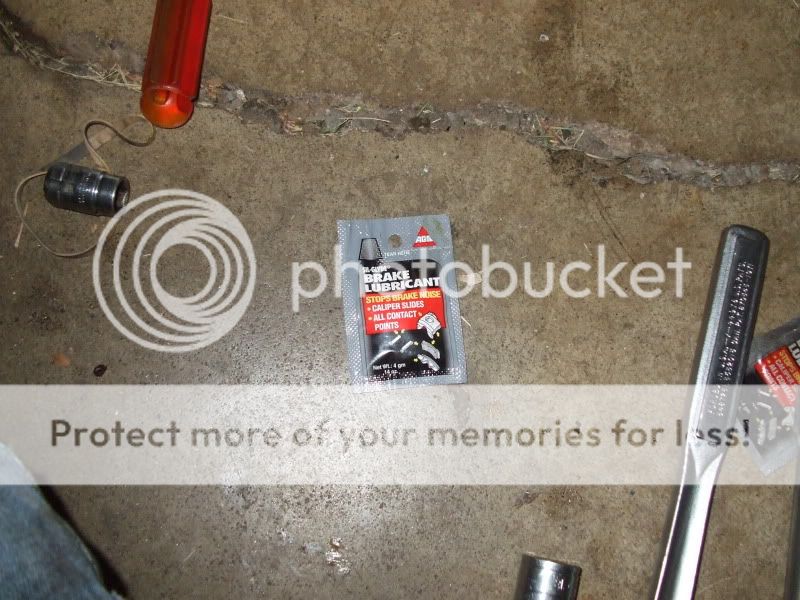
Next, use some brake pad grease as seen above. Put this all over the rear side of your pads and the edges - basically everywhere that isn't actual pad material. This prevents squeaks.
Install New Pads and Calipers:
Start with the pad thats against the piston. Slide it all the way in, then you can put the other pad on.
Now place your caliper onto the rotor. If you're having trouble you may not have pushed the piston in far enough. If things are going on part way, just tap the caliper on with a rubber mallet. Get it in place and install your caliper bolts entirely. I don't have exact torque specs so just tighten them really good and even.
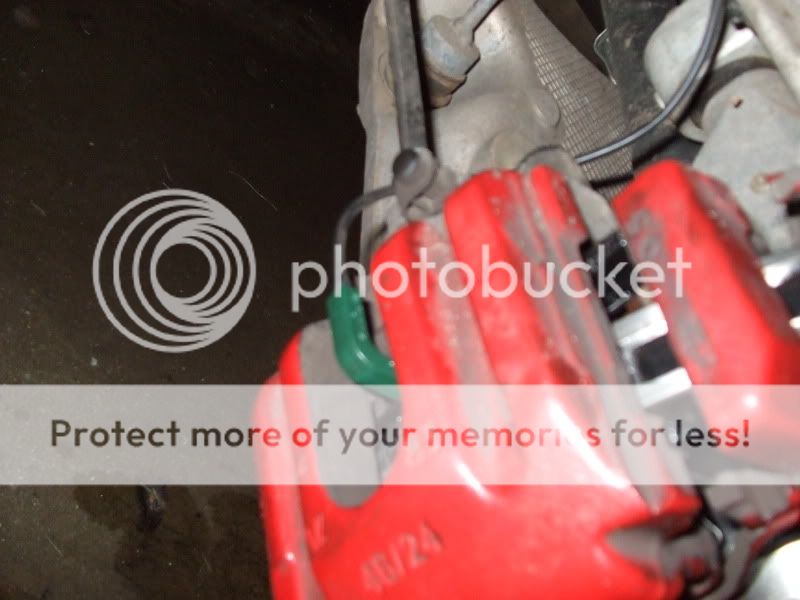
Now you can reinstall the caliper clip. The job for this part is to keep the caliper from basically shaking and causing annoying rattles. If you drive without it, you'll hear metal chattering from the brakes over bumps.
Install the Pad Sensor:
Now simply install the new sensor over the groove in the pad. You can route the cable as it should have been through a few clips and up to the connector box. Open the connector box, disconnect the old sensor, put your new one on and in the box. Close it up and everything should look complete.
Finish:
Now just double check that everything is tight, reinstall your wheels and lower the car. Once the car is on the ground you can actually fully tighten the lug bolts. Go in a star pattern at first, then clockwise around the bolts.
The last step is to reset the service indicator. There are some write-ups but it's pretty simple. I always turn the ignition to the start position and reset the trip. Then just hold the trip button until a picture of the rear of your car and brake comes up. Let go and hold it again unit it says, "RESET?" Then let go and hold it again. Once the "----" comes up I let go and press it once more briefly (or maybe you hold I can't remember). It should then go to 31000 miles or the equivalent km. Mine went to the negative number again at first for some reason. Per some other thread I tried driving several miles and doing the process again. Not sure if this actually matters but then after 2 tries I got it to work.
https://5series.net/forums/index.php?showto...3&hl=brakes
So to continue, this is for the rear.
iDrive was telling me my rear pads were almost due for replacement. The pads looked plenty thick so I went ahead and reset the service indicator. This was a mistake. If you're nearing replacement and you do this, your iDrive will give you -15000 miles or the equivalent km.
Annoyingly, I was told my brakes need to be replaced every time I started the car, as well as the brake indicator was lit at all times. Because I can't stand the warnings, and more importantly, my old rotors were warped I decided to go ahead and replace everything.
You know your rotors are warped for 2 obvious reasons. The first is by looking at the rotor you'll see some darker lines perpendicular to the path of travel of your pads. The 2nd is pulsation felt through the brake pedal (for your fronts your steering wheel as well) under hard braking.
Some general tips:
Take your time - if your in a rush or gotta be somewhere your bound to break or screw something up and get frustrated.
Always use the right tool for the job. If you don't you will break or screw something up. If you need a 6mm and only have a standard 3/16, go to the store and get the right tool.
I add these as from my experience over the years these two tips have saved me many hours and a lot of frustration (see link in my sig about building a car).
The tools required:
6mm allen socket
17mm 6 point socket
Extention and Ratchet
18mm 6 point socket (because 12 point means you'll probably strip something)
Jack and stands
Rubber mallet
Parts and Supplies:
Brake Rotors and Pads as needed. I got these from R1Concepts
Pad sensor - one per axle, you'll just need one for your right rear
WD40 or JB80
Latex Gloves are good to keep your hands clean from chemicals and nasty brake dust.
What you might need:
1/2 COBALT Drill Bit
Drill
2 rotor bolts - $1.50 each at your local dealer
Begin:
Lift the car and remove the wheels:
To begin, break loose your lug bolts with a 17mm or 11/16. Now you can jack the car up and remove the lugs and wheels completely. Make sure you've put something in front of your front tires so the car doesn't try to roll away.
I just jacked from the differential and put stands under each side in front of the wheel on the block points.
Remove your calipers:
With the 18mm 6 point socket you can now loosen the 2 rear bolts holding the caliper on (see above). For the lower of the 2, you'll need a deep 18mm, or standard 18 and small extention. You'll want to either get a lot of leverage with a long ratchet driver, pipe, impact gun or you can do what I did and use a rubber mallet. Just be careful the socket doesn't slip or grab the bolt at a weird angle or you'll strip it.
Once you've removed the bolts you can tap the caliper off with the rubber mallet. Make sure to have something handy to rest it on so you don't pinch the brake lines. I just used a very large coffee can.
Remove the rotors:
With the 6mm allen on a socket driver you can remove the small bolt holding your rotor on. These are easy to strip - if you've read my DIY for the front's I stripped them badly and had to drill them out. If you do strip them refer to that thread on drilling them out. I think the rear's are far less corroded though as these came off much easier with no issue on either side. Ideally, if you have an impact gun that makes this much easier to get the right pressure without stripping. I just used a small socket driver on the rears though.
Now remove your rotors. This is where I, and from some searching, others ran into some trouble. On our car, the emergency brake is inside the rotor acting as a drum brake. Even though you just turned the e-brake off, over time the shoes have worn away and created a small lip on the inside of the drum. This just means it's difficult to get the rotor off.
From searching the technical way to do this is to loosen the e-brake cables. I didn't want to go through that procedure so I did what most others have done. Take your WD-40 or JB-80 and spray inside each bolt hole and around the hub ring where your rotor makes contact. Let this soak and repeat a few times so the lubricant can do it's work. Then with your rubber mallet bang on the rotor from the back side. Hit it a few times, turn the rotor 45-90 degrees and repeat. Eventually with the JB-80 or WD-40 and doing this they came off. Please be careful not to overdo this as hitting things too hard can be damaging to wheel bearings etc. I don't fully condone doing it this way, but I did and have on other cars numerous times.
At this point it won't hurt to spray your brake cleaner all over what you see here.
Install New Rotors, and disassemble old Pads from the Calipers:
Now simply place your new rotors on and put your rotor bolt in.
To remove the old pads, you'll quickly realize your brake caliper is 2 separate pieces which you can move around. On the right side remove the pad sensor. Then take your old pads out (outer pad first) and remove the caliper clip. A screw driver helps get things apart.
Now you'll want to push the piston in so your new pads and rotors will fit together. I just used a large C-Clamp and pushed the piston in fairly easily:
Next, use some brake pad grease as seen above. Put this all over the rear side of your pads and the edges - basically everywhere that isn't actual pad material. This prevents squeaks.
Install New Pads and Calipers:
Start with the pad thats against the piston. Slide it all the way in, then you can put the other pad on.
Now place your caliper onto the rotor. If you're having trouble you may not have pushed the piston in far enough. If things are going on part way, just tap the caliper on with a rubber mallet. Get it in place and install your caliper bolts entirely. I don't have exact torque specs so just tighten them really good and even.
Now you can reinstall the caliper clip. The job for this part is to keep the caliper from basically shaking and causing annoying rattles. If you drive without it, you'll hear metal chattering from the brakes over bumps.
Install the Pad Sensor:
Now simply install the new sensor over the groove in the pad. You can route the cable as it should have been through a few clips and up to the connector box. Open the connector box, disconnect the old sensor, put your new one on and in the box. Close it up and everything should look complete.
Finish:
Now just double check that everything is tight, reinstall your wheels and lower the car. Once the car is on the ground you can actually fully tighten the lug bolts. Go in a star pattern at first, then clockwise around the bolts.
The last step is to reset the service indicator. There are some write-ups but it's pretty simple. I always turn the ignition to the start position and reset the trip. Then just hold the trip button until a picture of the rear of your car and brake comes up. Let go and hold it again unit it says, "RESET?" Then let go and hold it again. Once the "----" comes up I let go and press it once more briefly (or maybe you hold I can't remember). It should then go to 31000 miles or the equivalent km. Mine went to the negative number again at first for some reason. Per some other thread I tried driving several miles and doing the process again. Not sure if this actually matters but then after 2 tries I got it to work.
 09-27-2009, 05:07 PM
#2
Contributors
Join Date: Dec 2007
Location: The State of Southern NJ!
Posts: 5,972
Likes: 0
Received 0 Likes
on
0 Posts
Very good DIY for R&R of rear brakes. The tips about tools are well advised ... as is time and focus! Those brake disc hex screws can be a bear. I always soak them with WD-40 or similar a couple of days beforehand - especially on a car that has a lot of miles on the brake set. And I also have found that a couple of sharp raps with a hammer before hand help too. If that fails, heating it carefully with a propane torch also helps. Just don't strip that screw or you will be screwed!
09-27-2009, 05:26 PM
#3
Contributors
Join Date: May 2009
Location: SoCal
Posts: 10,496
Likes: 0
Received 2 Likes
on
2 Posts
My Ride: 2008 550I LOADED, all options except HUD and NV
+1 great write up, I have always done my own brakes (which is why it's a little weird having the extended maint.) so it good to see detailed write ups like this one. Every car has quirks and the tips are always helpful. Thanks 
09-27-2009, 06:59 PM
#4
Members
Join Date: Jul 2009
Location: The Great PNW
Posts: 124
Likes: 0
Received 0 Likes
on
0 Posts
My Ride: 2005 545i, Silber-grau/grau. Vanilla flavored except for cold WX pkg.
Great DIY Mike! Thanks for being as thorough as you were for the front. This will go into my keeper file along with your first one. 

Thread
Thread Starter
Forum
Replies
Last Post
socale39
Complete Car Sales
9
09-05-2023 08:30 AM