
Angel Eyes Upgrade for Adaptive Xenon e60

Thread Starter
Members
Joined: Mar 2005
Posts: 104
Likes: 0
I have done very extensive research on what our possibilities are for upgrading our Angel Eyes for Adaptive Xenon e60?s. I have even tried changing out my bulbs already with new 10w Ba9s (twice actually) and my color is now white instead of yellow, but I have always wanted more ?POP? in the light output. So far, there have been only Non-US solutions for the bulb change and from the looks of the brightness is not what I was looking for (plus NONE of those companies ship into the USA). The other option was to send my headlights to be cut apart and have a major overhaul done, but that solution only worked for ONE ring per side and I would not have my headlights for an extended period of time. Not to mention, if there was a more serious problem with the headlight it poses another issue (because their process cuts open the seal and removes the lens our warranties would no longer be valid on that part). I decided to spend the $350 for AngeliBright's from Custom Angel Eyes. After I priced out ever other option, I would have wound up spending an equal amount or more money and the other solutions seemed like the wrong way for me to go. Below is my DIY for installing this upgrade.
Tools required ? Torx Driver (Preferably a Ratchet style) with 2 tips, Extension (to reach Lower Screws) & a Flashlight

Step One: Look at your lights and memorize the exact fitment on the seal of your hood to your lights (this will be important for reinstall of Headlight).

Step Two: Loosen and Remove the 3 top Screws (Do NOT drop screws down below the light, it may get lost or in a particularly difficult spot to retrieve).
Step Three: Loosen, but DO NOT REMOVE the 2 lower Screws behind the Headlight (maybe 2 turns to loosen). Here us where you will need an extension on your screwdriver.

Step Four: Remove the back cover & gently push and wiggle your Headlight forward, your Headlight is now completely free to remove. You will have to gently wiggle it out, but it is pretty basic. (Important: twist off the Back Light cover, as it will catch when removing headlight).
Step Five: Rest Headlight on Engine Bay.

Step Six: If you look inside the headlight you will see it is a very tight workspace. This is the reason for removing the headlight; you will have more leverage this way. Twist out the High Beam bulb (quarter turn). Reach in and Gently Twist out the Angel Eye Light Housing. Remove the Plug and view the Cheap OEM bulb that BMW graced our beautiful cars with (FYI if you choose you can send these back to Custom Angel Eyes for a $25 credit, at least for now).


Step Seven: Custom Angel Eyes kept the same OEM seal to ensure the fitment back into the housing. The trick is there are 3 notches on the light housing, 2 are angled and one is not. The odd notch goes on top when inserted back into the Headlight and you are re-centering back into the Angel Eye hole. You can either plug in the new wiring harness before or after the re-insertion of the new Light.
All that is left is to reinsert the headlight back into place, again Gently
Be sure to align the 2 lower screw holders as they need to go in place first.
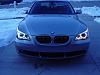
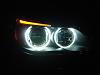
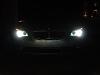
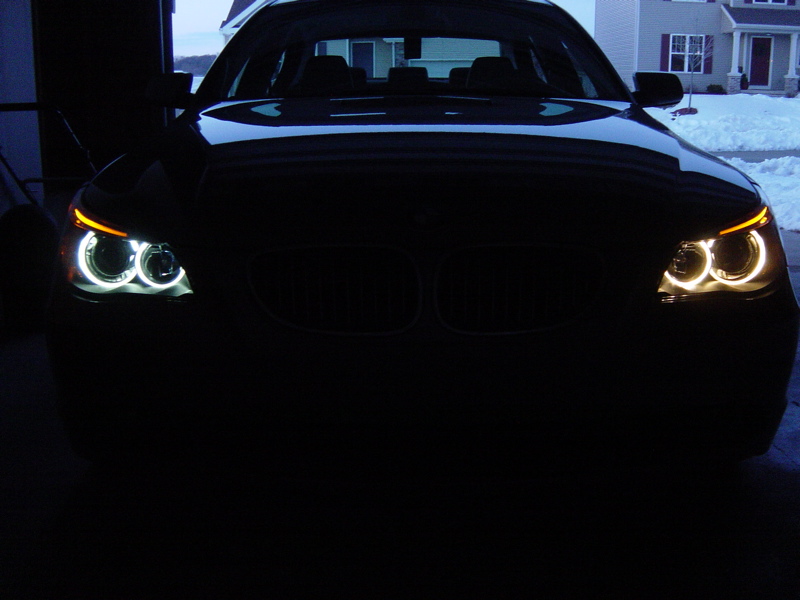
Align and adjust the fitment back to where you started and tighten all 4 screws. Now repeat on the opposite side and enjoy your new Custom Bright White 4200k Angel Eyes.
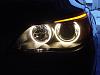
Old White Polarg Bulb Upgrade:

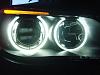
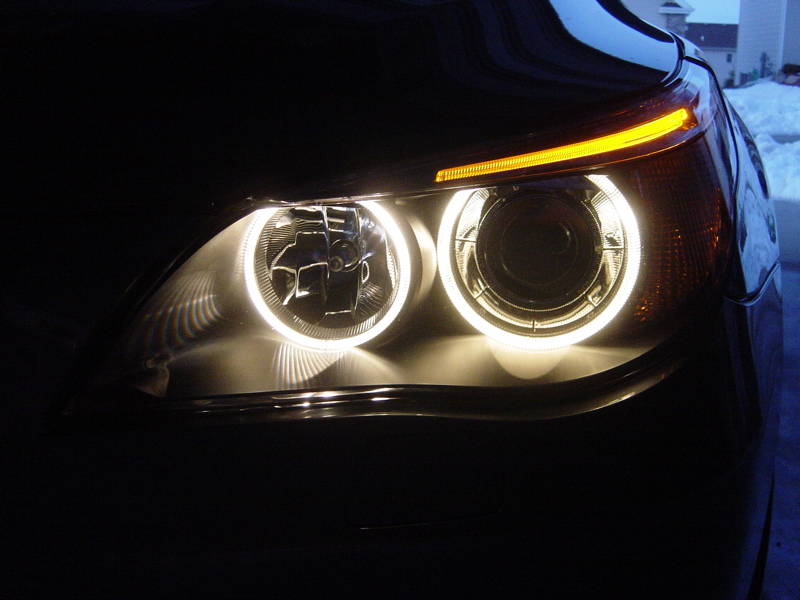
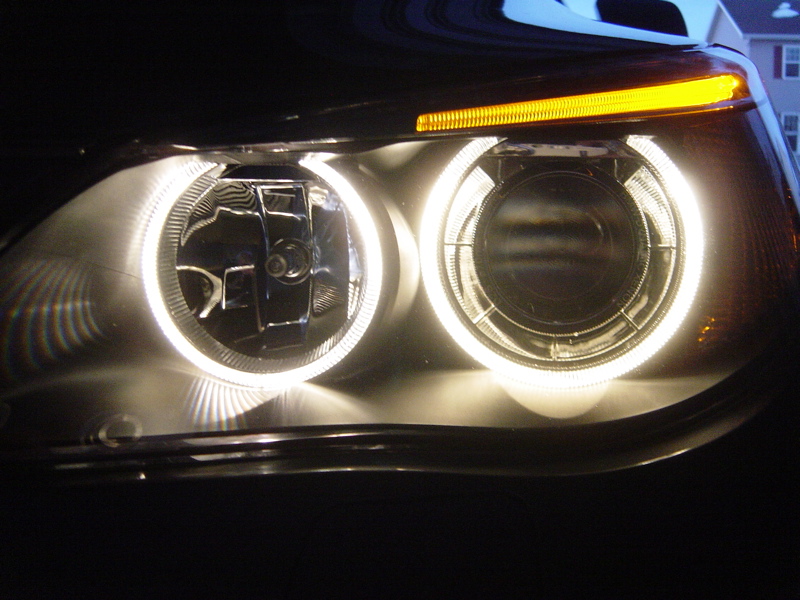
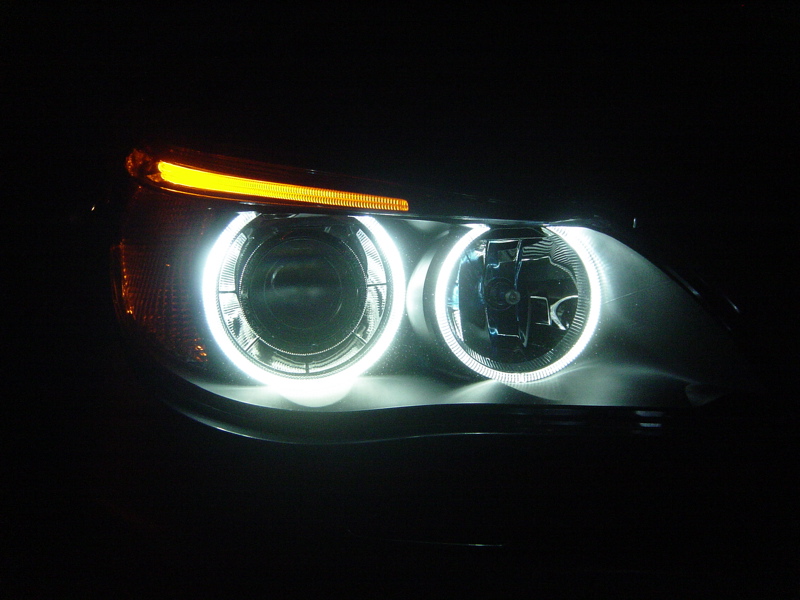
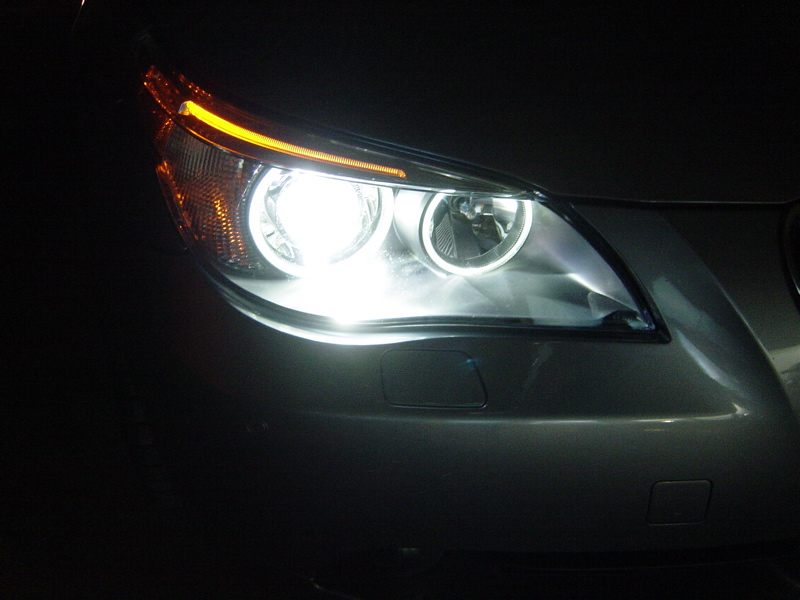
New AngeliBright Upgrade. No Question it was worth the $$$$$!!! It really sets off the Front end.

Tools required ? Torx Driver (Preferably a Ratchet style) with 2 tips, Extension (to reach Lower Screws) & a Flashlight
Step One: Look at your lights and memorize the exact fitment on the seal of your hood to your lights (this will be important for reinstall of Headlight).
Step Two: Loosen and Remove the 3 top Screws (Do NOT drop screws down below the light, it may get lost or in a particularly difficult spot to retrieve).
Step Three: Loosen, but DO NOT REMOVE the 2 lower Screws behind the Headlight (maybe 2 turns to loosen). Here us where you will need an extension on your screwdriver.
Step Four: Remove the back cover & gently push and wiggle your Headlight forward, your Headlight is now completely free to remove. You will have to gently wiggle it out, but it is pretty basic. (Important: twist off the Back Light cover, as it will catch when removing headlight).
Step Five: Rest Headlight on Engine Bay.
Step Six: If you look inside the headlight you will see it is a very tight workspace. This is the reason for removing the headlight; you will have more leverage this way. Twist out the High Beam bulb (quarter turn). Reach in and Gently Twist out the Angel Eye Light Housing. Remove the Plug and view the Cheap OEM bulb that BMW graced our beautiful cars with (FYI if you choose you can send these back to Custom Angel Eyes for a $25 credit, at least for now).
Step Seven: Custom Angel Eyes kept the same OEM seal to ensure the fitment back into the housing. The trick is there are 3 notches on the light housing, 2 are angled and one is not. The odd notch goes on top when inserted back into the Headlight and you are re-centering back into the Angel Eye hole. You can either plug in the new wiring harness before or after the re-insertion of the new Light.
All that is left is to reinsert the headlight back into place, again Gently
Be sure to align the 2 lower screw holders as they need to go in place first.
Align and adjust the fitment back to where you started and tighten all 4 screws. Now repeat on the opposite side and enjoy your new Custom Bright White 4200k Angel Eyes.
Old White Polarg Bulb Upgrade:
New AngeliBright Upgrade. No Question it was worth the $$$$$!!! It really sets off the Front end.

Banned
Joined: Jan 2005
Posts: 2,882
Likes: 0
From: San Francisco Bay area
My Ride: '05 545i, silver gray, black leather with anthracite maple wood, sport package, premium sound, navigation, cold weather package, electric rear sunshade, folding rear seat, satellite radio prep, PIAA 4150K fogs, red rear reflectors, hardwired Valentine One
Nice DIY--thanks for sharing! 
Could you post a pic with the headlights on?
Could you post a pic with the headlights on?

Contributors
Joined: Jan 2005
Posts: 1,675
Likes: 0
From: Thugged out since Cub Scouts
My Ride: 2007 E63 M6: Silverstone Metallic... Fully loaded2005 DINAN5 (545i): Jet Black... Fully loaded1955 Chevy: Custom
Wow! Awesome DYI write up and the result is superb  My kit will ship overnight tomorrow per Dave at CustomAngelEyes
  I can't wait!!!
My kit will ship overnight tomorrow per Dave at CustomAngelEyes I can't wait!!!
Contributors
Joined: Aug 2005
Posts: 11,432
Likes: 1
From: San Jose, CA
My Ride: E60 M5, F85 X5M
Originally Posted by stream' post='243982' date='Feb 21 2006, 07:36 PM
Nice DIY--thanks for sharing!
Could you post a pic with the headlights on?
Could you post a pic with the headlights on?
How would you rate the brightness vs your other aftermarket bulbs and vs stock? 50% brighter? 100% brighter?
Great DIY instructions by the way.
Thanks for the write up.

Members
Joined: Feb 2006
Posts: 198
Likes: 0
My Ride: 06 Z4 Montego Blue, 07 530i Monaco Blue
Originally Posted by Redstradic' post='244165' date='Feb 22 2006, 09:40 AM
Would you mind posting the contact info on where we can order these from. Thank you!
Thanks for posting the install for the e60, glad you like the results!
The website is still under construction, but it is www.AngeliBright.com or CustomAngelEyes
Cotact: sales@customangeleyes.com
To order: Paypal to Dave@customangeleyes.com
Dave


Members
Joined: Nov 2004
Posts: 54
Likes: 0
From: Detroit, Michigan (MOTOR CITY)
My Ride: 545 Silver Grey, Grey, Sports Package, Preimium, Cold Weather, Shades, PDC, Logic 7, Fold Down Back Seats, AUX, Carputer
My order shipped today, I will post pictures ones i do the install. Great "how to do " post. Judging by the pictures its worth the money.
Site Founders
Joined: Jun 2003
Posts: 969
Likes: 3
From: Madison, WI, USA
My Ride: 2021 F93 M8 Competition
I ordered my set of Angel iBright angel eye lamp upgrades yesterday from Dave at CustomAngelEyes.com and they arrived today.
Because of the location of the angel eye lamp socket on E60, the upgrade isn't as simple as, e.g., E39 or E53. Removal of the headlamp is required, and the job takes about 30-45 minutes per side. The instructions above are quite good, so I don't have much to add other than to say it's a bit of work to get the headlamp assembly out; just take your time. The outer part of the lamp needs to come out first, but you're kind of working it around from both ends. There are some electronics on the bottom of the headlamp assembly that hang up on the bumper a little bit. When you put them back in, the part of the headlamp closest to the center of the car goes in first.
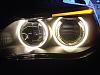
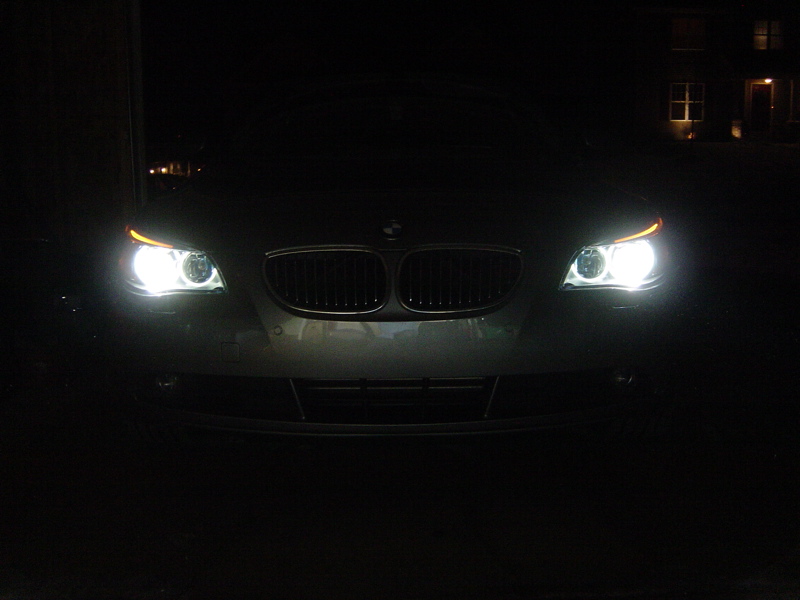
The Angel iBright upgrade is amazingly pure white. It is brighter than the OEM 10W halogen lamp, but the whiteness makes it appear a bit brighter still.
That said, here's the pictures. I'm sure you'll be able to tell the difference.


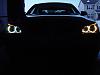

And here's the job complete:


At over $350, the Angel iBright upgrade may be a bit pricey for some. Similar upgrades from PIAA and Brex are under US$200 in Japan. However, the PIAA product is dimmer and bluer, and neither the PIAA nor Brex products are available in the US or Europe. Angel iBright is currently available worldwide. A big plus for those of us not in Japan.
This is an easy installation for DIYers, and I recommend it for anyone who wants to get rid of the ugly yellowish angel eyes, and set your BMW apart from the rest!
Because of the location of the angel eye lamp socket on E60, the upgrade isn't as simple as, e.g., E39 or E53. Removal of the headlamp is required, and the job takes about 30-45 minutes per side. The instructions above are quite good, so I don't have much to add other than to say it's a bit of work to get the headlamp assembly out; just take your time. The outer part of the lamp needs to come out first, but you're kind of working it around from both ends. There are some electronics on the bottom of the headlamp assembly that hang up on the bumper a little bit. When you put them back in, the part of the headlamp closest to the center of the car goes in first.
The Angel iBright upgrade is amazingly pure white. It is brighter than the OEM 10W halogen lamp, but the whiteness makes it appear a bit brighter still.
That said, here's the pictures. I'm sure you'll be able to tell the difference.


And here's the job complete:

At over $350, the Angel iBright upgrade may be a bit pricey for some. Similar upgrades from PIAA and Brex are under US$200 in Japan. However, the PIAA product is dimmer and bluer, and neither the PIAA nor Brex products are available in the US or Europe. Angel iBright is currently available worldwide. A big plus for those of us not in Japan.
This is an easy installation for DIYers, and I recommend it for anyone who wants to get rid of the ugly yellowish angel eyes, and set your BMW apart from the rest!