
And so it begins......2006 530xi awd money pit.

Thread Starter
New Members
Joined: Jul 2015
Posts: 23
Likes: 0
From: Down South
My Ride: 2006 530xi
So I have put about 4K miles on these things, including a 1600 mile round trip with 2 adults, 2 kids a dog and a full roof box and I am happy with them. I have been messing with the damping and went from 10 clicks on the + side to 15 to 20, all resulting in a very hard bottoming out in the strut on very big bumps or holes front and rear. While the ride was nice I needed to go a little stiffer so now the front and rear are both set at +25 which made the ride a little stiffer but not annoying and bouncy and more importantly got rid of the violent bottoming out on big bumps. The rear is set at it's lowest point and while I am going to bump up to 19 or 20 inch wheels eventually, I still wish that they had just another 1/2 inch adjustment back there. The front goes plenty low.
After having to take the inside of the back of the wagon almost completely apart just to access the top of the strut, I decided to make a little access panel and save myself some time since I know I will want to adjust it a few more times in the future.
Anyone that has done this knows how annoying it is that you have to remove almost everything else in the rear just to get this plastic cover off.
<a href="http://s18.photobucket.com/user/boogieboy01/media/Photo%20Dec%2002%2010%2051%2001%20AM_zpsv0dh4fes.j pg.html" target="_blank"><img src="http://i18.photobucket.com/albums/b106/boogieboy01/Photo%20Dec%2002%2010%2051%2001%20AM_zpsv0dh4fes.j pg" border="0" alt=" photo Photo Dec 02 10 51 01 AM_zpsv0dh4fes.jpg"/></a>
<a href="http://s18.photobucket.com/user/boogieboy01/media/IMG_2806_zpsns0qajfi.jpg.html" target="_blank"><img src="http://i18.photobucket.com/albums/b106/boogieboy01/IMG_2806_zpsns0qajfi.jpg" border="0" alt=" photo IMG_2806_zpsns0qajfi.jpg"/></a>
So I took some shears and cut a clean line the thinner part of the plastic and made a little access panel.
<a href="http://s18.photobucket.com/user/boogieboy01/media/IMG_2810_zpsso8xlzyw.jpg.html" target="_blank"><img src="http://i18.photobucket.com/albums/b106/boogieboy01/IMG_2810_zpsso8xlzyw.jpg" border="0" alt=" photo IMG_2810_zpsso8xlzyw.jpg"/></a>
It doesn't look that bad when its closed, not that anyone can see this anyway.
<a href="http://s18.photobucket.com/user/boogieboy01/media/IMG_2811_zpskhbdzy28.jpg.html" target="_blank"><img src="http://i18.photobucket.com/albums/b106/boogieboy01/IMG_2811_zpskhbdzy28.jpg" border="0" alt=" photo IMG_2811_zpskhbdzy28.jpg"/></a>
Now when I go to do this again, I can simply open the forward tray, remove the side cover and remove the one push clip.
<a href="http://s18.photobucket.com/user/boogieboy01/media/IMG_2826_zpsqopnax6c.jpg.html" target="_blank"><img src="http://i18.photobucket.com/albums/b106/boogieboy01/IMG_2826_zpsqopnax6c.jpg" border="0" alt=" photo IMG_2826_zpsqopnax6c.jpg"/></a>
Then you can just carefully pry back the second panel just enough to get your hand in there and open the newly cut access panel to reach the top of the strut. You have to do it by feel though because it's tight, but it is better than taking everything apart in my humble opinion.
<a href="http://s18.photobucket.com/user/boogieboy01/media/IMG_2816_zpsqq9iiusf.jpg.html" target="_blank"><img src="http://i18.photobucket.com/albums/b106/boogieboy01/IMG_2816_zpsqq9iiusf.jpg" border="0" alt=" photo IMG_2816_zpsqq9iiusf.jpg"/></a>
<a href="http://s18.photobucket.com/user/boogieboy01/media/IMG_2815_zpsdbxy5hbn.jpg.html" target="_blank"><img src="http://i18.photobucket.com/albums/b106/boogieboy01/IMG_2815_zpsdbxy5hbn.jpg" border="0" alt=" photo IMG_2815_zpsdbxy5hbn.jpg"/></a>
Then adjust.
<a href="http://s18.photobucket.com/user/boogieboy01/media/IMG_2805_zpsocgu3uii.jpg.html" target="_blank"><img src="http://i18.photobucket.com/albums/b106/boogieboy01/IMG_2805_zpsocgu3uii.jpg" border="0" alt=" photo IMG_2805_zpsocgu3uii.jpg"/></a>
Last edited by ROCKITMAN; Feb 9, 2016 at 08:31 AM.
Thread Starter
New Members
Joined: Jul 2015
Posts: 23
Likes: 0
From: Down South
My Ride: 2006 530xi
This is how it sits for now. New wheels are coming soon enough, along with new lights and a few other things just for maintenance.
<a href="http://s18.photobucket.com/user/boogieboy01/media/IMG_2004_zpslh2cxu25.jpg.html" target="_blank"><img src="http://i18.photobucket.com/albums/b106/boogieboy01/IMG_2004_zpslh2cxu25.jpg" border="0" alt=" photo IMG_2004_zpslh2cxu25.jpg"/></a>
<a href="http://s18.photobucket.com/user/boogieboy01/media/IMG_1964_zpsmn8gv46s.jpg.html" target="_blank"><img src="http://i18.photobucket.com/albums/b106/boogieboy01/IMG_1964_zpsmn8gv46s.jpg" border="0" alt=" photo IMG_1964_zpsmn8gv46s.jpg"/></a>
<a href="http://s18.photobucket.com/user/boogieboy01/media/IMG_1963_zpswxivevbh.jpg.html" target="_blank"><img src="http://i18.photobucket.com/albums/b106/boogieboy01/IMG_1963_zpswxivevbh.jpg" border="0" alt=" photo IMG_1963_zpswxivevbh.jpg"/></a>
<a href="http://s18.photobucket.com/user/boogieboy01/media/IMG_1853_zpsoczjbijg.jpg.html" target="_blank"><img src="http://i18.photobucket.com/albums/b106/boogieboy01/IMG_1853_zpsoczjbijg.jpg" border="0" alt=" photo IMG_1853_zpsoczjbijg.jpg"/></a>
<a href="http://s18.photobucket.com/user/boogieboy01/media/IMG_2291_zpsdnfdmsih.jpg.html" target="_blank"><img src="http://i18.photobucket.com/albums/b106/boogieboy01/IMG_2291_zpsdnfdmsih.jpg" border="0" alt=" photo IMG_2291_zpsdnfdmsih.jpg"/></a>

New Members
Joined: Nov 2014
Posts: 351
Likes: 0
From: Chicago
My Ride: 2010, E61, 535i xDrive
Model Year: 2010
Nice, thanks for the update, great idea to cut an access to adjusting dampening. Love the looks on your lowered ride!
I haven't lowered mine because of snow right now, but can't wait to lower and install the rears in the Spring.
My front springs used to bottom out a lot, I had ISC change them, they went from 135mm 10K strenght to 140mm 12k, huge difference, no bottoming out anymore. I am a little concern for the rears as they are the same as yours 180mm 10k. Does it only botton out on big bumps, or small ones too? The fronts used to bottom out on EVERYTHING, that's why I complained to them.
Thread Starter
New Members
Joined: Jul 2015
Posts: 23
Likes: 0
From: Down South
My Ride: 2006 530xi
Nice, thanks for the update, great idea to cut an access to adjusting dampening. Love the looks on your lowered ride!
I haven't lowered mine because of snow right now, but can't wait to lower and install the rears in the Spring.
My front springs used to bottom out a lot, I had ISC change them, they went from 135mm 10K strenght to 140mm 12k, huge difference, no bottoming out anymore. I am a little concern for the rears as they are the same as yours 180mm 10k. Does it only botton out on big bumps, or small ones too? The fronts used to bottom out on EVERYTHING, that's why I complained to them.
I haven't lowered mine because of snow right now, but can't wait to lower and install the rears in the Spring.
My front springs used to bottom out a lot, I had ISC change them, they went from 135mm 10K strenght to 140mm 12k, huge difference, no bottoming out anymore. I am a little concern for the rears as they are the same as yours 180mm 10k. Does it only botton out on big bumps, or small ones too? The fronts used to bottom out on EVERYTHING, that's why I complained to them.
Everything has been sorted out for the most part as far as maintenance is concerned, she runs good!
Finally got some wheels!

Both of the rears would not hold air because the wheel guy raped the seals when mounting them, I had to have the tires removed, so I could reseal the wheels myself. After remounting the tires everything is perfect.
I still have a long way to go with this wagon, but I am enjoying it so far.


New Members
Joined: Dec 2015
Posts: 92
Likes: 1
From: Windy City
My Ride: e30
Model Year: 2008
Looks great. What are the specs of the wheels/tires?
You guys got me concerned now. I ordered the "comfort" ISC setup and I think it comes with the 10k front springs. I'll have to double check it.
Been waiting for 3 weeks now and no product yet from ISC. They did say 15 business days wait so we'll see, however Andrew at ISC hasn't really been responsive with his emails.
Senior Members
Joined: May 2011
Posts: 1,169
Likes: 0
From: Canada
My Ride: 2010 535 xi - M Sport Pkg & other goodies
After having to take the inside of the back of the wagon almost completely apart just to access the top of the strut, I decided to make a little access panel and save myself some time since I know I will want to adjust it a few more times in the future.
Anyone that has done this knows how annoying it is that you have to remove almost everything else in the rear just to get this plastic cover off.
Anyone that has done this knows how annoying it is that you have to remove almost everything else in the rear just to get this plastic cover off.
Might want to look into them. They are described as:Make your rear dampening adjusters easily accessible without cutting a hole in your rear carpet or taking out your back seats to fish down in to turn a knob. These extensions allow for quick and easy adjustments to your ISC Suspension coilovers. These are universal for all ISC coilovers.
BMW Suspension/Coilovers E30-E90 & Z3/Z4 Solutions - ISC Suspension
New Members
Joined: Nov 2014
Posts: 351
Likes: 0
From: Chicago
My Ride: 2010, E61, 535i xDrive
Model Year: 2010
Looks great. What are the specs of the wheels/tires?
You guys got me concerned now. I ordered the "comfort" ISC setup and I think it comes with the 10k front springs. I'll have to double check it.
Been waiting for 3 weeks now and no product yet from ISC. They did say 15 business days wait so we'll see, however Andrew at ISC hasn't really been responsive with his emails.
You guys got me concerned now. I ordered the "comfort" ISC setup and I think it comes with the 10k front springs. I'll have to double check it.
Been waiting for 3 weeks now and no product yet from ISC. They did say 15 business days wait so we'll see, however Andrew at ISC hasn't really been responsive with his emails.
You need to discount July 5th, and any other holiday in the past. I would say 4 weeks should be a better estimate...that might not include shipping time ;-)
New Members
Joined: Nov 2014
Posts: 351
Likes: 0
From: Chicago
My Ride: 2010, E61, 535i xDrive
Model Year: 2010
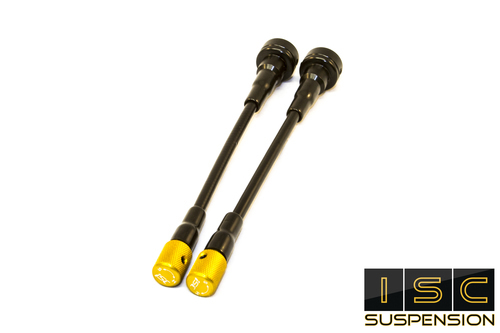
Well done. Adjusting the rears is a PITA, for sure. But did you know ISC makes rear extenders for that very reason? Might want to look into them. They are described as:
Make your rear dampening adjusters easily accessible without cutting a hole in your rear carpet or taking out your back seats to fish down in to turn a knob. These extensions allow for quick and easy adjustments to your ISC Suspension coilovers. These are universal for all ISC coilovers.
BMW Suspension/Coilovers E30-E90 & Z3/Z4 Solutions - ISC Suspension
Might want to look into them. They are described as:Make your rear dampening adjusters easily accessible without cutting a hole in your rear carpet or taking out your back seats to fish down in to turn a knob. These extensions allow for quick and easy adjustments to your ISC Suspension coilovers. These are universal for all ISC coilovers.
BMW Suspension/Coilovers E30-E90 & Z3/Z4 Solutions - ISC Suspension

