
Tons of Mods Completed | Detroit Photo Shoot


 07-13-2011, 10:00 AM
#15
Contributors
Join Date: Jun 2009
Location: CA
Posts: 5,781
Likes: 0
Received 2 Likes
on
2 Posts
My Ride: BMW E60
Model Year: 2016
the LED fog lights...def for aesthetics only lol
for the puddle lights...i measured 3 times and cut once haha. i used blue masking tape to outline where to drill with the dremel tool and took my time. it didnt need to be 100% exact since its the underside of the mirror and no one will ever see it. i love how the car lights up when i unlock it....and i didnt want to lose that with these NVD reps. to be honest, after looking at it for 15 minutes and figuring out my gameplan....i think everyone who goes the NVD route should do this as well. after all, you already have to fully disassemble your OEM mirrors to get the motors out anyway....i just grabbed the LED puddle light as well while i was at it and re-wired that part too. no biggie.
here are some pics of the hole i measured and cut, a pic with them inserted before i cleaned them up with a nail file and some black touch-up paint and then an after shoot with them lit at night...
Attachment 123197
Attachment 123198
Attachment 123199
As for the puddle light LEDs, is that possible to purchase separately?
07-13-2011, 11:09 AM
#18
Senior Members
Join Date: May 2011
Location: West Covina, CA
Posts: 401
Likes: 0
Received 2 Likes
on
2 Posts
My Ride: 08 528i TiAg Premium/Cold Weather Pkg, 20% Tint, Technic Harness, JL Audio 12W7, JL HD 750/1 and LOTS of lighting mods!!!!!
Nice looking car...question...how much did that rear split seat retrofit cost? Is there a DIY with that?
AND!! Do you have pics of your trunk/sub setup?
AND!! Do you have pics of your trunk/sub setup?
07-13-2011, 11:12 AM
#19
Members
Join Date: Jan 2010
Location: Oxford, UK
Posts: 193
Likes: 0
Received 0 Likes
on
0 Posts
My Ride: BMW
07-13-2011, 11:52 AM
#20
Senior Members
Thread Starter
Join Date: Oct 2010
Location: Los Angeles, CA
Posts: 2,163
Likes: 0
Received 2 Likes
on
2 Posts
My Ride: ///M5 BEAST
Model Year: 2006
well, i actually found someone local who didnt mind swapping rear seats with me....so it cost me $0 to be honest. But i bought them dinner afterwards lol.
as far as a DIY....im pretty adventurous so i just started taking apart the rear seat slowly and carefully. i took pictures so i could remember where things went. here's the kicker though, you have to do an entire rear seat swap out....not just the back portion but the bottom seat as well as the split folding section. the reason is that in order for the split folding portion to work, it needs the hinge mechanism included in the seat portion.
attached are some pics of the process mid-way through. there were only about 10 screws total to remove it all. total install time is about an hour if u know how to do it going in....but since i was experimenting it took me an entire afternoon.
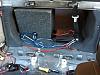
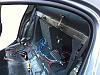

