
M5 Rear Question

Thread Starter
Contributors
Joined: Apr 2008
Posts: 3,573
Likes: 0
From: Houston,TX
My Ride: Original E60 Spec:
530i - Silver Grey Out, Black Dakota Leather In, Navigation Pro, Voice Command, HiFi Audio, Sports Package, Premium Package, Cold Weather Package w/ Heated Seats, Style# 123 Alloy Track Wheels, Auto AC, Power Front Seats, Active Turn Xennon Headlights,
Mods:
OEM M-Tech Front Bumper, OEM M Side Skirts, OEM M5 Rear Bumper, M5 Trunk Lid Finisher, M5 Style Mirrors, Custom Hamann Style Splitter, Custom Hartge Style Diffuser, RD Sport Boot Spoiler, LCI Taillights, Bruce Miranda's V4 LCI Retro Cables, 6000K Xenon light Bulbs, Xenon White LED License Plate Lights, 8000K HID 9006 Fog Lights, Akalius� Front Headlight Euro Overlays, Matte Black Kidney Grilles, E60.Net Clings, Debadged, Llumar Tinting "Micro Edged, 15% Rear 35% Sides,
Engine Mods:
Custom Magnaflow Quad Exhaust w/ Eisenmann Stamped 3� Tips, RPI Scoop (Red)
Added Electronics:
V1 Equipped (Hardwired), OEM Alpine CD Changer Retrofit,
Shoes:
SOLD-20" Staggered Vertini Hennesey Rims, Falcon 452's Tires-SOLD
New Shoes:
19" VMR 710 Hyper Silver, General Exclaim UHP 245/35/19 Front-275/30/19 Rear, Gloss Silver Caliper Paint Job DIY
^_____________
Retired
______________
Took Delivery 10/26/2009: LOADED! E60 M5 Silverstone II/Black, Active Seats, Comfort Ventilated/Heated Seats, HUD, Brushed Aluminum Trim,
Ok fellas, I got 2 questions.
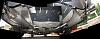
Question 1.) Can anyone point me to what this piece is called or the part number? Its the black piece that covers the spare tire area inside of the opening.
It's the piece in the upper part of the opening. As you can see it covers the spare tire compartment.
Question 2.) You can see there is also a support bracket that mounts under the spare tire area (with the 5 vertical slats in it) and it connects to the rear bumper for support. I can not figure out how to attach this bracket to the bumper. It seems that it is meant to attach to the reinforcment ring that goes around the edges inside of the opening, but for some reason the tabs do not match up. I know this sounds confusing, but any help is greatly appreciated.
Thanks in advance,
Phi
Question 1.) Can anyone point me to what this piece is called or the part number? Its the black piece that covers the spare tire area inside of the opening.

It's the piece in the upper part of the opening. As you can see it covers the spare tire compartment.
Question 2.) You can see there is also a support bracket that mounts under the spare tire area (with the 5 vertical slats in it) and it connects to the rear bumper for support. I can not figure out how to attach this bracket to the bumper. It seems that it is meant to attach to the reinforcment ring that goes around the edges inside of the opening, but for some reason the tabs do not match up. I know this sounds confusing, but any help is greatly appreciated.
Thanks in advance,
Phi
Thread Starter
Contributors
Joined: Apr 2008
Posts: 3,573
Likes: 0
From: Houston,TX
My Ride: Original E60 Spec:
530i - Silver Grey Out, Black Dakota Leather In, Navigation Pro, Voice Command, HiFi Audio, Sports Package, Premium Package, Cold Weather Package w/ Heated Seats, Style# 123 Alloy Track Wheels, Auto AC, Power Front Seats, Active Turn Xennon Headlights,
Mods:
OEM M-Tech Front Bumper, OEM M Side Skirts, OEM M5 Rear Bumper, M5 Trunk Lid Finisher, M5 Style Mirrors, Custom Hamann Style Splitter, Custom Hartge Style Diffuser, RD Sport Boot Spoiler, LCI Taillights, Bruce Miranda's V4 LCI Retro Cables, 6000K Xenon light Bulbs, Xenon White LED License Plate Lights, 8000K HID 9006 Fog Lights, Akalius� Front Headlight Euro Overlays, Matte Black Kidney Grilles, E60.Net Clings, Debadged, Llumar Tinting "Micro Edged, 15% Rear 35% Sides,
Engine Mods:
Custom Magnaflow Quad Exhaust w/ Eisenmann Stamped 3� Tips, RPI Scoop (Red)
Added Electronics:
V1 Equipped (Hardwired), OEM Alpine CD Changer Retrofit,
Shoes:
SOLD-20" Staggered Vertini Hennesey Rims, Falcon 452's Tires-SOLD
New Shoes:
19" VMR 710 Hyper Silver, General Exclaim UHP 245/35/19 Front-275/30/19 Rear, Gloss Silver Caliper Paint Job DIY
^_____________
Retired
______________
Took Delivery 10/26/2009: LOADED! E60 M5 Silverstone II/Black, Active Seats, Comfort Ventilated/Heated Seats, HUD, Brushed Aluminum Trim,
Originally Posted by AKAlius' post='718662' date='Nov 11 2008, 10:22 PM
Ok fellas, I got 2 questions.
Question 1.) Can anyone point me to what this piece is called or the part number? Its the black piece that covers the spare tire area inside of the opening.
Attachment 64523
It's the piece in the upper part of the opening. As you can see it covers the spare tire compartment.
Question 2.) You can see there is also a support bracket that mounts under the spare tire area (with the 5 vertical slats in it) and it connects to the rear bumper for support. I can not figure out how to attach this bracket to the bumper. It seems that it is meant to attach to the reinforcment ring that goes around the edges inside of the opening, but for some reason the tabs do not match up. I know this sounds confusing, but any help is greatly appreciated.
Thanks in advance,
Phi

Is it number 07?
01 CARRIER, BUMPER REAR 1 51127050405 $239.94 +core
02 DEFORMATION ELEMENT, REAR LEFT 1 51127163197 $42.97
02 DEFORMATION ELEMENT, REAR RIGHT 1 51127163198 $42.97
04 HEX NUT WITH PLATE M10 4 07147117776 $1.45
05 HEX BOLT 8 07119903035 $0.61
06 BRACKET, MOUNT REAR LEFT 1 51127061251 $11.17
06 BRACKET, MOUNT REAR RIGHT M 1 51127896880 $27.62 +core
07 MOUNT, BUMPER, REAR CENTER 1 51127056343 $31.81 +core
08 HEX NUT WITH PLATE M6 4 07147155614
09 MOUNT, BUMPER REAR LEFT M 1 51127895751 $25.67
09 MOUNT, BUMPER REAR RIGHT M 1 51127895752 $25.67
10 PLUG 4 51127004445 $0.22
11 HEX HEAD SCREW 8 51117070199 $1.40
12 BODY NUT ST4,8-9-ZNS3 6 07129904150 $0.22
13 BODY NUT 2 07146951655 $0.18
14 GUIDE, BOTTOM CENTER M 1 51127896847 $25.67
FOR VEHICLES WITH
TOWING HITCH, DETACHABLE
S235A=YES
15 GUIDE, BOTTOM CENTER M 1 51127898123 $25.67
16 HEX BOLT TS5X14.4 4 51112257140 $0.45
17 BODY NUT 2 46632307022
18 BODY NUT ST4,8-9-ZNS 2 07129901656
18 BODY NUT ST4,8-9-ZNS3 2 07129904150 $0.22
FOR VEHICLES WITH
TOWING HITCH, DETACHABLE = NO
S235A=NO
19 HEX BOLT M10X12 8 07147117789 $1.84
20 SELF-LOCKING HEX NUT M6 8 51128400432 $0.41
21 FILLISTER HEAD SCREW WITH WASHER M6 2 51127070181 $0.84
22 BODY NUT D=18 3 51481954067 ENDED
23 PLUG-IN NUT 8 51437001566 $0.45
24 TORX-BOLT WITH WASHER ISA ST4.8X20 6 07147075519 $0.39
Thread Starter
Contributors
Joined: Apr 2008
Posts: 3,573
Likes: 0
From: Houston,TX
My Ride: Original E60 Spec:
530i - Silver Grey Out, Black Dakota Leather In, Navigation Pro, Voice Command, HiFi Audio, Sports Package, Premium Package, Cold Weather Package w/ Heated Seats, Style# 123 Alloy Track Wheels, Auto AC, Power Front Seats, Active Turn Xennon Headlights,
Mods:
OEM M-Tech Front Bumper, OEM M Side Skirts, OEM M5 Rear Bumper, M5 Trunk Lid Finisher, M5 Style Mirrors, Custom Hamann Style Splitter, Custom Hartge Style Diffuser, RD Sport Boot Spoiler, LCI Taillights, Bruce Miranda's V4 LCI Retro Cables, 6000K Xenon light Bulbs, Xenon White LED License Plate Lights, 8000K HID 9006 Fog Lights, Akalius� Front Headlight Euro Overlays, Matte Black Kidney Grilles, E60.Net Clings, Debadged, Llumar Tinting "Micro Edged, 15% Rear 35% Sides,
Engine Mods:
Custom Magnaflow Quad Exhaust w/ Eisenmann Stamped 3� Tips, RPI Scoop (Red)
Added Electronics:
V1 Equipped (Hardwired), OEM Alpine CD Changer Retrofit,
Shoes:
SOLD-20" Staggered Vertini Hennesey Rims, Falcon 452's Tires-SOLD
New Shoes:
19" VMR 710 Hyper Silver, General Exclaim UHP 245/35/19 Front-275/30/19 Rear, Gloss Silver Caliper Paint Job DIY
^_____________
Retired
______________
Took Delivery 10/26/2009: LOADED! E60 M5 Silverstone II/Black, Active Seats, Comfort Ventilated/Heated Seats, HUD, Brushed Aluminum Trim,
Originally Posted by mrfva' post='718673' date='Nov 11 2008, 10:36 PM
Oops.
Contributors
Joined: Sep 2007
Posts: 8,199
Likes: 0
From: .
My Ride: .
Model Year: .
Originally Posted by AKAlius' post='718675' date='Nov 11 2008, 09:36 PM
Is it number 07?
07 MOUNT, BUMPER, REAR CENTER 1 51127056343 $31.81 +core
07 MOUNT, BUMPER, REAR CENTER 1 51127056343 $31.81 +core
Thread Starter
Contributors
Joined: Apr 2008
Posts: 3,573
Likes: 0
From: Houston,TX
My Ride: Original E60 Spec:
530i - Silver Grey Out, Black Dakota Leather In, Navigation Pro, Voice Command, HiFi Audio, Sports Package, Premium Package, Cold Weather Package w/ Heated Seats, Style# 123 Alloy Track Wheels, Auto AC, Power Front Seats, Active Turn Xennon Headlights,
Mods:
OEM M-Tech Front Bumper, OEM M Side Skirts, OEM M5 Rear Bumper, M5 Trunk Lid Finisher, M5 Style Mirrors, Custom Hamann Style Splitter, Custom Hartge Style Diffuser, RD Sport Boot Spoiler, LCI Taillights, Bruce Miranda's V4 LCI Retro Cables, 6000K Xenon light Bulbs, Xenon White LED License Plate Lights, 8000K HID 9006 Fog Lights, Akalius� Front Headlight Euro Overlays, Matte Black Kidney Grilles, E60.Net Clings, Debadged, Llumar Tinting "Micro Edged, 15% Rear 35% Sides,
Engine Mods:
Custom Magnaflow Quad Exhaust w/ Eisenmann Stamped 3� Tips, RPI Scoop (Red)
Added Electronics:
V1 Equipped (Hardwired), OEM Alpine CD Changer Retrofit,
Shoes:
SOLD-20" Staggered Vertini Hennesey Rims, Falcon 452's Tires-SOLD
New Shoes:
19" VMR 710 Hyper Silver, General Exclaim UHP 245/35/19 Front-275/30/19 Rear, Gloss Silver Caliper Paint Job DIY
^_____________
Retired
______________
Took Delivery 10/26/2009: LOADED! E60 M5 Silverstone II/Black, Active Seats, Comfort Ventilated/Heated Seats, HUD, Brushed Aluminum Trim,
Originally Posted by mrfva' post='718686' date='Nov 11 2008, 10:41 PM
Not sure if it would be #7. That part looks like the other undercarriage piece following the one with 5 slats.

Contributors
Joined: Mar 2007
Posts: 5,434
Likes: 0
From: NYC, Rego Park, Queens
My Ride: 2004 E60 530i, 2012 E70 X5 35i
Model Year: 2004
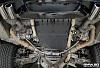
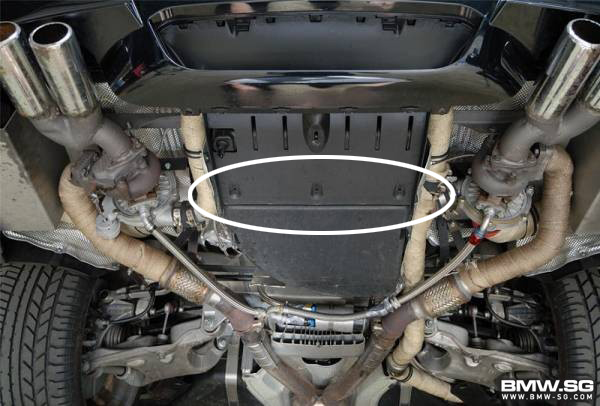
Alright Phi, let me help you,
This photo, is where the plastic piece attaches under the spare tire and you drill three holes into the spare tire area.
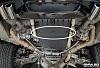
This is the pieces that connects with the long plastic piece I spoke about / above picture.
This pictures is Ed (JordanJunkee23's) car.
you see how that plastic piece is drilled into the spare tire, that is how you do it.
And I believe that plastic piece is #14 or #15 in that realoem.com diagram.
I'll try to take pics tomorrow so it can be more clear, but the long plastic piece (14/15) attaches to the opening piece and clicks in. You will also need some screws for it to go stay on.
Let me know if you need more help.
This photo, is where the plastic piece attaches under the spare tire and you drill three holes into the spare tire area.
This is the pieces that connects with the long plastic piece I spoke about / above picture.
This pictures is Ed (JordanJunkee23's) car.

you see how that plastic piece is drilled into the spare tire, that is how you do it.
And I believe that plastic piece is #14 or #15 in that realoem.com diagram.
I'll try to take pics tomorrow so it can be more clear, but the long plastic piece (14/15) attaches to the opening piece and clicks in. You will also need some screws for it to go stay on.
Let me know if you need more help.
Contributors
Joined: Mar 2007
Posts: 5,434
Likes: 0
From: NYC, Rego Park, Queens
My Ride: 2004 E60 530i, 2012 E70 X5 35i
Model Year: 2004
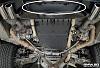
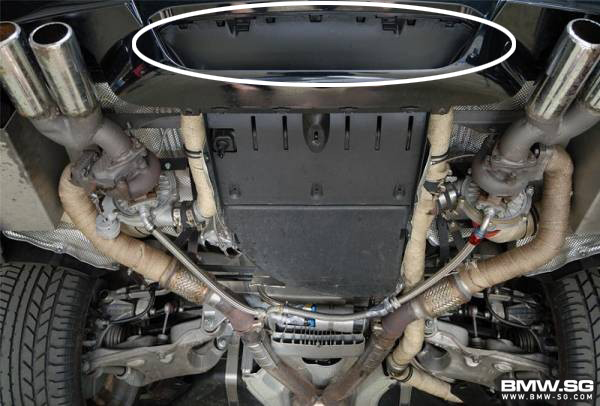
Last thing,
The pic below / circled, I broke this off so that there are no clearance issues because it sticks out under the spare tire area.
The pic below / circled, I broke this off so that there are no clearance issues because it sticks out under the spare tire area.

Thread Starter
Contributors
Joined: Apr 2008
Posts: 3,573
Likes: 0
From: Houston,TX
My Ride: Original E60 Spec:
530i - Silver Grey Out, Black Dakota Leather In, Navigation Pro, Voice Command, HiFi Audio, Sports Package, Premium Package, Cold Weather Package w/ Heated Seats, Style# 123 Alloy Track Wheels, Auto AC, Power Front Seats, Active Turn Xennon Headlights,
Mods:
OEM M-Tech Front Bumper, OEM M Side Skirts, OEM M5 Rear Bumper, M5 Trunk Lid Finisher, M5 Style Mirrors, Custom Hamann Style Splitter, Custom Hartge Style Diffuser, RD Sport Boot Spoiler, LCI Taillights, Bruce Miranda's V4 LCI Retro Cables, 6000K Xenon light Bulbs, Xenon White LED License Plate Lights, 8000K HID 9006 Fog Lights, Akalius� Front Headlight Euro Overlays, Matte Black Kidney Grilles, E60.Net Clings, Debadged, Llumar Tinting "Micro Edged, 15% Rear 35% Sides,
Engine Mods:
Custom Magnaflow Quad Exhaust w/ Eisenmann Stamped 3� Tips, RPI Scoop (Red)
Added Electronics:
V1 Equipped (Hardwired), OEM Alpine CD Changer Retrofit,
Shoes:
SOLD-20" Staggered Vertini Hennesey Rims, Falcon 452's Tires-SOLD
New Shoes:
19" VMR 710 Hyper Silver, General Exclaim UHP 245/35/19 Front-275/30/19 Rear, Gloss Silver Caliper Paint Job DIY
^_____________
Retired
______________
Took Delivery 10/26/2009: LOADED! E60 M5 Silverstone II/Black, Active Seats, Comfort Ventilated/Heated Seats, HUD, Brushed Aluminum Trim,
Originally Posted by nigxdoof' post='718703' date='Nov 11 2008, 10:53 PM
Alright Phi, let me help you,
Attachment 64526
This photo, is where the plastic piece attaches under the spare tire and you drill three holes into the spare tire area.
Attachment 64527
This is the pieces that connects with the long plastic piece I spoke about / above picture.
This pictures is Ed (JordanJunkee23's) car.
Attachment 64528
you see how that plastic piece is drilled into the spare tire, that is how you do it.
And I believe that plastic piece is #14 or #15 in that realoem.com diagram.
I'll try to take pics tomorrow so it can be more clear, but the long plastic piece (14/15) attaches to the opening piece and clicks in. You will also need some screws for it to go stay on.
Let me know if you need more help.
Is 14 and 15 the same pieces? Just that ones for tow and the other is not?