
LCI Cornering Lights/Turning Lamps
 10-29-2008 | 06:19 PM
#21
Thread Starter
Super Moderator
Joined: Jan 2008
Posts: 17,508
Likes: 3
From: So. Cal (SFV)
My Ride: 2011.5 Alpine White E90 M3 | Black Novillo Leather | Carbon Fiber Leather Trim | ZCP | ZP2 | M-DCT | Navigation | Moonroof | 6FL Mods: TMS 12.5mm spacers all around l Hawk HPS Brake Pads l OEM M3 Edition Grills l Paint Matched Side Gills l Key Hole D
Had a few pm's about how to change this H3 bulb...so...
***these pics are for the driver/Right lamp
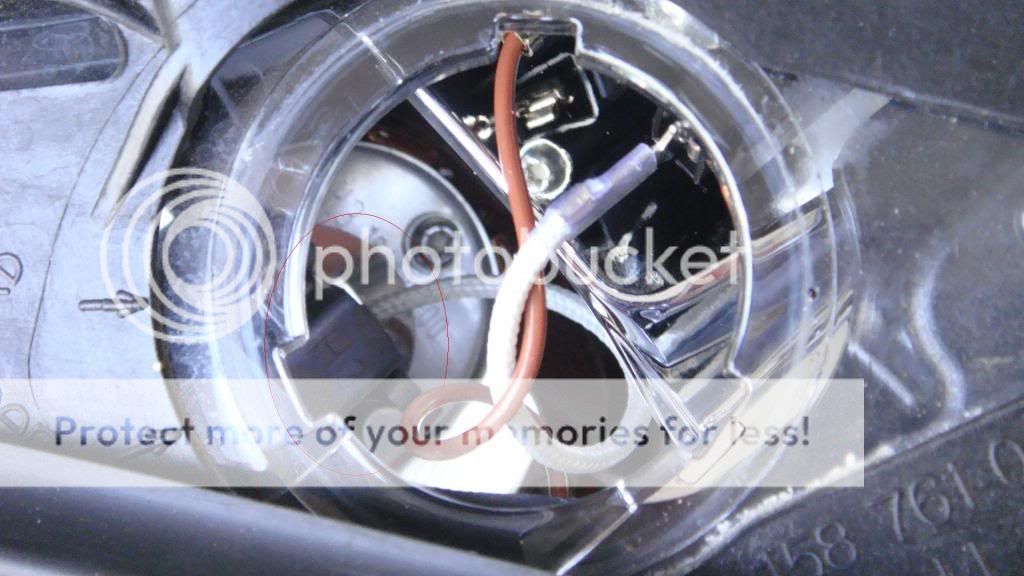
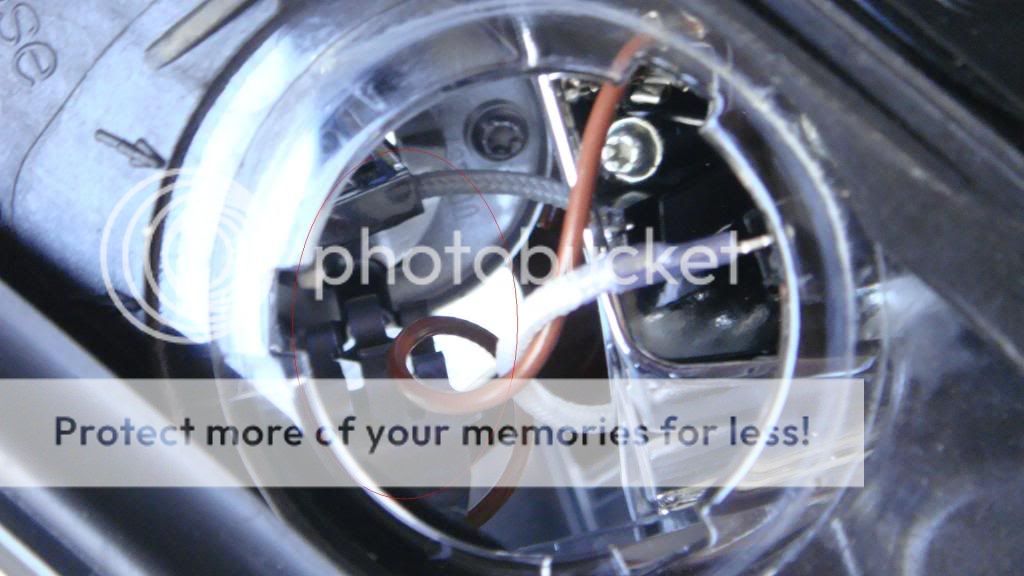
Pop the cap off to see the bulb harness. The locking pin is dark gray, stamped "H3".

Push the locking pin away from the vehicle/forward and lift up/back/right (if facing the vehicle). It's kind of like a "7" shape, so you need to move it accordingly. Take a look into the area, you'll see how it's locked into position. Now the base of the bulb is exposed. Rectangular shaped and chrome. An easy way to find it is to follow the white wire down. Unplug the upper part of the white wire (***not the end that attaches to the chrome rectangular part). This gives you some room to insert the needle nose pliers.

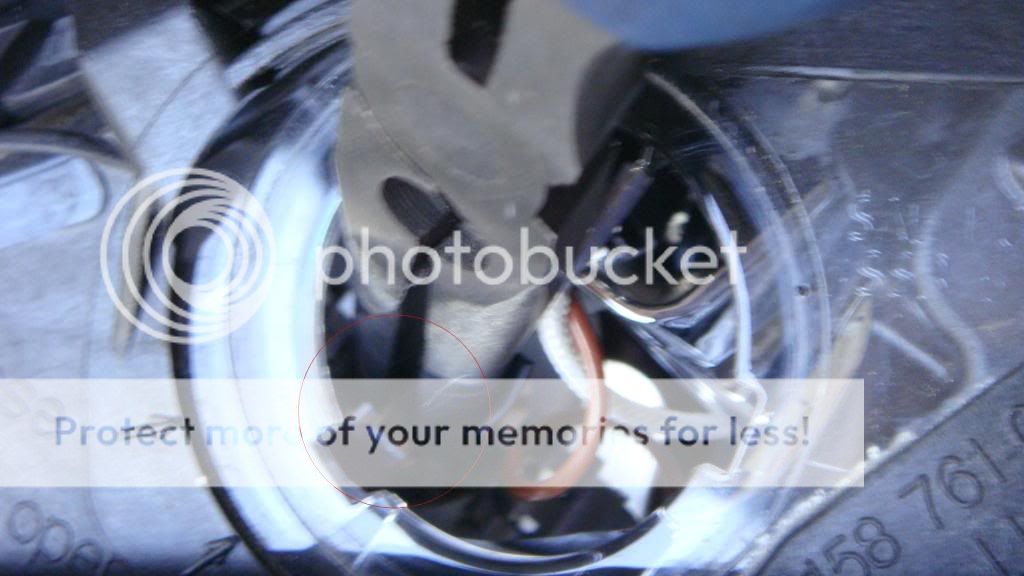
Take a pair of needle nose pliers and grab that chrome rectangular base of the bulb and pull the bulb out (takes a bit of a wiggle+pull, but mostly straight up)

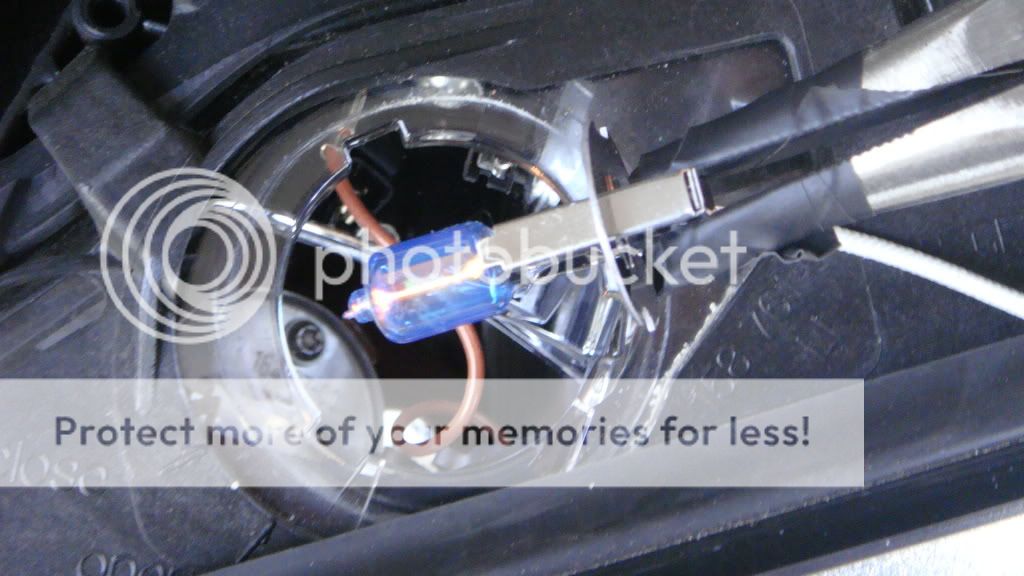
Now replace the bulb and put the bulb back in, plug the white wire back into the socket, place the locking pin back into position...

***these pics are for the driver/Right lamp
Pop the cap off to see the bulb harness. The locking pin is dark gray, stamped "H3".
Push the locking pin away from the vehicle/forward and lift up/back/right (if facing the vehicle). It's kind of like a "7" shape, so you need to move it accordingly. Take a look into the area, you'll see how it's locked into position. Now the base of the bulb is exposed. Rectangular shaped and chrome. An easy way to find it is to follow the white wire down. Unplug the upper part of the white wire (***not the end that attaches to the chrome rectangular part). This gives you some room to insert the needle nose pliers.
Take a pair of needle nose pliers and grab that chrome rectangular base of the bulb and pull the bulb out (takes a bit of a wiggle+pull, but mostly straight up)
Now replace the bulb and put the bulb back in, plug the white wire back into the socket, place the locking pin back into position...
10-29-2008 | 08:08 PM
#23
Thread Starter
Super Moderator
Joined: Jan 2008
Posts: 17,508
Likes: 3
From: So. Cal (SFV)
My Ride: 2011.5 Alpine White E90 M3 | Black Novillo Leather | Carbon Fiber Leather Trim | ZCP | ZP2 | M-DCT | Navigation | Moonroof | 6FL Mods: TMS 12.5mm spacers all around l Hawk HPS Brake Pads l OEM M3 Edition Grills l Paint Matched Side Gills l Key Hole D
Originally Posted by alexf9496' post='707233' date='Oct 29 2008, 09:07 PM
Thanks! This is just what I was looking for 
 11-04-2008 | 01:20 PM
#25
Thread Starter
Super Moderator
Joined: Jan 2008
Posts: 17,508
Likes: 3
From: So. Cal (SFV)
My Ride: 2011.5 Alpine White E90 M3 | Black Novillo Leather | Carbon Fiber Leather Trim | ZCP | ZP2 | M-DCT | Navigation | Moonroof | 6FL Mods: TMS 12.5mm spacers all around l Hawk HPS Brake Pads l OEM M3 Edition Grills l Paint Matched Side Gills l Key Hole D
Originally Posted by NobleForums' post='712193' date='Nov 4 2008, 01:22 PM
GENEaTALS:
What happened to your photobucket account?
What happened to your photobucket account?
***these pics are for the driver/Right lamp
Pop the cap off to see the bulb harness. The locking pin is dark gray, stamped "H3".
Push the locking pin away from the vehicle/forward and lift up/back/right (if facing the vehicle). It's kind of like a "7" shape, so you need to move it accordingly. Take a look into the area, you'll see how it's locked into position. Now the base of the bulb is exposed. Rectangular shaped and chrome. An easy way to find it is to follow the white wire down. Unplug the upper part of the white wire (***not the end that attaches to the chrome rectangular part). This gives you some room to insert the needle nose pliers.
Take a pair of needle nose pliers and grab that chrome rectangular base of the bulb and pull the bulb out (takes a bit of a wiggle+pull, but mostly straight up)
Now replace the bulb and put the bulb back in, plug the white wire back into the socket, place the locking pin back into position...
 11-04-2008 | 07:01 PM
#28
Thread Starter
Super Moderator
Joined: Jan 2008
Posts: 17,508
Likes: 3
From: So. Cal (SFV)
My Ride: 2011.5 Alpine White E90 M3 | Black Novillo Leather | Carbon Fiber Leather Trim | ZCP | ZP2 | M-DCT | Navigation | Moonroof | 6FL Mods: TMS 12.5mm spacers all around l Hawk HPS Brake Pads l OEM M3 Edition Grills l Paint Matched Side Gills l Key Hole D
Originally Posted by NobleForums' post='712442' date='Nov 4 2008, 06:57 PM
BTW, how do you get it to turn on so you can take a picture?
turn your light switch to the left (i think that's position 3) to activate your adaptive xenons. Then push and hold the blinker all the way up or down , turn your steering wheel to the corresponding side of the blinker....light will come on, snap the picture...
11-04-2008 | 09:25 PM
#29
Senior Members
Joined: Feb 2007
Posts: 461
Likes: 0
Originally Posted by GENEaTALS' post='712524' date='Nov 4 2008, 08:01 PM
ha, you'll need someone else to help you with that...
turn your light switch to the left (i think that's position 3) to activate your adaptive xenons. Then push and hold the blinker all the way up or down , turn your steering wheel to the corresponding side of the blinker....light will come on, snap the picture...
turn your light switch to the left (i think that's position 3) to activate your adaptive xenons. Then push and hold the blinker all the way up or down , turn your steering wheel to the corresponding side of the blinker....light will come on, snap the picture...
LOL, figures it would be difficult.
 Thanks again.
07-22-2013 | 07:21 AM
Thanks again.
07-22-2013 | 07:21 AM
#30
New Members
Joined: Dec 2011
Posts: 52
Likes: 0
From: Essex
My Ride: 2008 535D
Hi,
I took my bulbs out and they both looked ok..?
should i still replace them both? they are �50 each!
could this issue be fuse related?
thanks
I took my bulbs out and they both looked ok..?
should i still replace them both? they are �50 each!
could this issue be fuse related?
thanks
Last edited by Samuk007; 07-25-2013 at 03:51 AM.

Thread
Thread Starter
Forum
Replies
Last Post
Germaniks
E60, E61 Parts, Accessories and Mods
11
08-09-2015 10:46 AM