Just replaced the amp in the trunk ...
 04-08-2007, 11:01 PM
#11
Contributors
Join Date: Jul 2004
Location: Costa Mesa, CA
Posts: 1,591
Likes: 0
Received 0 Likes
on
0 Posts
My Ride: Gone: 2004 525i Jet Black, Built 03/04, Premium Package, Black Dakota Leather, Halogen to Euro Spec Bi-Xenons Retrofit, Dark Poplar Wood Trim, Steptronic Breyton Spirit Reps 20x9F 20x10R - Nitto NT555 245/35/20F-275/30/20R, M5 Front Bumper, H&R Sport Springs, Chrome Grills, 20% Tint, Euro Reflectors, Debadged, Aux Input, CIP v19.x
Originally Posted by westal' post='411617' date='Apr 8 2007, 10:11 PM
If anyone wants to hear exactly what I did, I'll post a walk thru. After replacing this amp, I'm convinced that it's the very first thing anyone with the standard audio should do.
I was able to 1-for-1 put each wire going to the dinky amp to an MTX Thunder 280. It made a HUGE difference in the overall sound. Pretty easy to do, too. No more overheating
and bass cutting out. Rather awesome sound! Absolutely nothing destructive and totally reversible - so OK for leases.
- Wes
I was able to 1-for-1 put each wire going to the dinky amp to an MTX Thunder 280. It made a HUGE difference in the overall sound. Pretty easy to do, too. No more overheating
and bass cutting out. Rather awesome sound! Absolutely nothing destructive and totally reversible - so OK for leases.
- Wes
 04-09-2007, 12:09 AM
#12
Contributors
Join Date: Jun 2005
Location: Chalandri/Athina/Hellas
Posts: 2,799
Likes: 0
Received 1 Like
on
1 Post
Originally Posted by Busta' post='411635' date='Apr 9 2007, 10:01 AM
I'm interested in a write up.
I'm interested too, but I'm afraid that "standard audio" in the US is equal to "HI-FI" in Europe.
I don't have any amplifier in the trunk, where is it's location?
I don't have any speakers on the rear doors, do you?
I don't know also wheather there is an existing wireness or not, to fit speakers and HI-FI amplifier on it and re-code the car with them, so then to be able do the mod.
 04-09-2007, 10:48 AM
#13
Contributors
Join Date: Sep 2006
Location: Detroit
Posts: 470
Likes: 0
Received 0 Likes
on
0 Posts
A DIY (even if not really detailed) would be great! This sounds like a nice upgrade for those of us with the base (US) system.
It would be much easier for everyone else since you have already figured out which wire color goes where on the new amp.
It would be much easier for everyone else since you have already figured out which wire color goes where on the new amp.
04-09-2007, 11:53 AM
#14
Members
Thread Starter

Join Date: Apr 2007
Posts: 26
Likes: 0
Received 0 Likes
on
0 Posts
Yeah I'm not sure about the Euro model - I *think* it's a 6 speaker system?? I can say that the USA standard audio also has no speakers in the rear doors (and I think Logic7 premium does have speakers there).
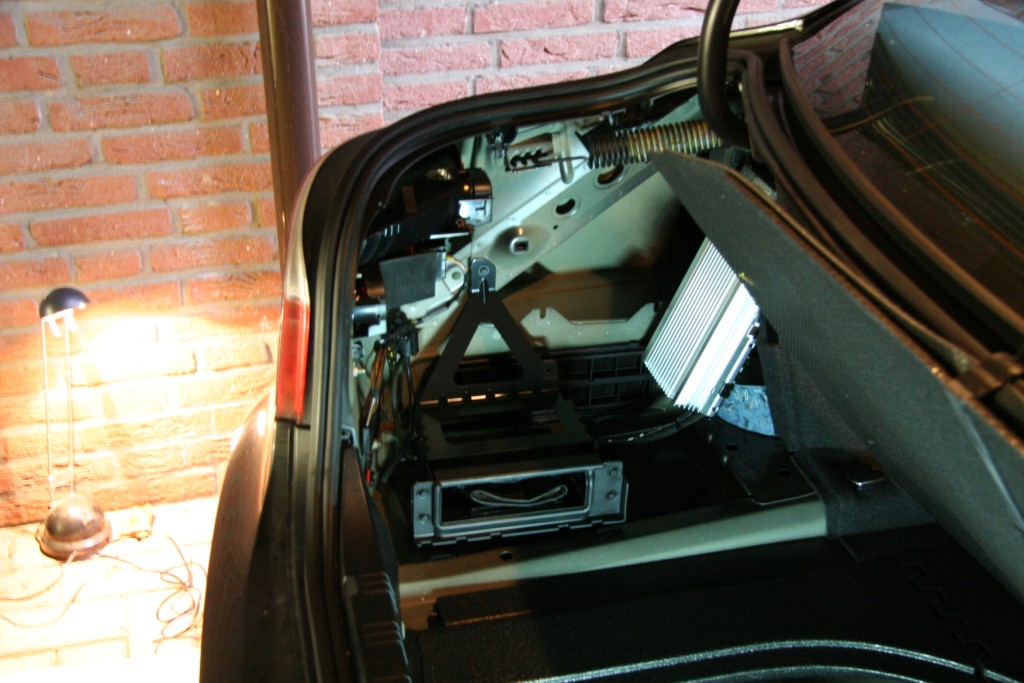
But if you have subs under the seats, I bet you will find the little amp (that I replaced) in the trunk/boot, just behind the removable left rear liner. It's mounted on a plate with a connector harness going to the little amp.
But if you have subs under the seats, I bet you will find the little amp (that I replaced) in the trunk/boot, just behind the removable left rear liner. It's mounted on a plate with a connector harness going to the little amp.
04-09-2007, 12:04 PM
#15
Contributors
Join Date: Sep 2006
Location: Detroit
Posts: 470
Likes: 0
Received 0 Likes
on
0 Posts
Originally Posted by westal' post='411802' date='Apr 9 2007, 02:53 PM
But if you have subs under the seats, I bet you will find the little amp (that I replaced) in the trunk/boot, just behind the removable left rear liner. It's mounted on a plate with a connector harness going to the little amp.
04-09-2007, 12:09 PM
#16
Members
Thread Starter
Join Date: Apr 2007
Posts: 26
Likes: 0
Received 0 Likes
on
0 Posts
Not enough room there for my amp. It *might* could be done, but I'm thinking a decent enough amp would be
too big for the space. My amp does fit neatly into the corner-space in that removable liner, though. It's just
velcro'd in place by 2 strips. Nice and reversible.
I used cable ties to mount the harness (with the new cables coming out of it) to the plate where the little amp was mounted.
too big for the space. My amp does fit neatly into the corner-space in that removable liner, though. It's just
velcro'd in place by 2 strips. Nice and reversible.
I used cable ties to mount the harness (with the new cables coming out of it) to the plate where the little amp was mounted.
04-09-2007, 12:13 PM
#17
Contributors
Join Date: Jul 2004
Location: expat in The Netherlands
Posts: 3,486
Likes: 0
Received 0 Likes
on
0 Posts
My Ride: BMW 545iA Black Sapphire
Model Year: 2005
Engine: 545i
Originally Posted by nicke60gre' post='411644' date='Apr 9 2007, 10:09 AM
I'm interested too, but I'm afraid that "standard audio" in the US is equal to "HI-FI" in Europe.
I don't have any amplifier in the trunk, where is it's location?
I don't have any speakers on the rear doors, do you?
I don't know also wheather there is an existing wireness or not, to fit speakers and HI-FI amplifier on it and re-code the car with them, so then to be able do the mod.
I don't have any amplifier in the trunk, where is it's location?
I don't have any speakers on the rear doors, do you?
I don't know also wheather there is an existing wireness or not, to fit speakers and HI-FI amplifier on it and re-code the car with them, so then to be able do the mod.
 04-10-2007, 10:56 AM
#18
Members
Thread Starter
Join Date: Apr 2007
Posts: 26
Likes: 0
Received 0 Likes
on
0 Posts
Originally Posted by JPJ' post='411782' date='Apr 9 2007, 01:48 PM
A DIY (even if not really detailed) would be great! This sounds like a nice upgrade for those of us with the base (US) system.
It would be much easier for everyone else since you have already figured out which wire color goes where on the new amp.
It would be much easier for everyone else since you have already figured out which wire color goes where on the new amp.
***********************
Materials
An amp^
14 gauge wire (power wires)
16 gauge wire (most of the other wires)
22 gauge wire (RCA cable hack)
standard stereo RCA cable pair
tinpins^^
insulated spade disconnects
large "c" connectors (power connections)
small c connectors (amp connections)
velcro strips (fasten to trunk carpet)
^the amp - I used an MTX Thunder 280, but just get any decent amp that has
RCA ins, a gain control and a remote turn-on lead.
^^tinpins - this is just what I call them because I don't know what they're
really called. At radio shack you can buy the molex-looking connectors.
They have a housing and pins, and you will need only the pins to interface
with the original amp harness.
*******************************
There are 11 wires going to the harness:
+12V power
ground
remote turn-on
4 line outputs (post xover/EQ)
4 speaker leads
Looking at the harness as a wide (not tall) thing, at one end are power and
ground (biggest wires). At the other end are the 4 line level outputs (smallest
wires). In the middle are the 4 speaker leads (L/R +/-). The remote
turn-on lead is the remaining wire, down there by the power and ground.
*******************************
Custom Cables
For main power and ground, use the + battery terminal and chassis ground - you
won't use those 2 terminals on the harness.
So that leaves 9 wires that you will tap into at the harness.
* Make 9 "interface cables", each about 8 inches long or so. 16 gauge wire.
On one end of each
cable, solder a tinpin, and on the other end crimp on a female insulated spade
disconnect.
Use needlenose to firmly plunge one of these cables into one of the receptacles on the harness. Note the depth of the plunge (roughly), and then wrap it and
all
the other cables with electrical tape - you're wrapping the part
of the tinpin that sticks out from the harness. They probably wouldn't touch,
anyway, but this is added safety.
Use long cable ties to "mount" the harness to the plate where the little amp
used to be mounted.
* Make 9 connector cables about 3 feet or so. 16 gauge wire
On one end crimp a
male insulated spade disconnect, and at the other end do whatever you need to
connect them to your amp.
* Make 2 power/ground cables about the width of the car. 14 gauge
On one end, crimp a large "c" connector.
* Make 2 custom RCA cables. For each, cut off the RCA plug at one end, then
strip the inner conductor. Twist both the inner and outer conductors to make
each like a solid strand. Solder a 4-inch length of 22 gauge wire to each
conductor. Crimp a male insulated spade disconnect on each end of the 22 wire.
*******************************
Amp Hookup
You now have your "tap points" in the car harness to run to the amp.
Leave main power and ground for last. Hook up all the other cables - don't
worry right now about correct phase (+/-) of the hookups, or even correct
L/R can be ignored for now.
Note: the harness wires for speaker leads and line outs are in vertical pairs
(NOT horizontal pairs), again looking at the harness of as a wide (not tall) thing.
i.e. one of the sub's positive lead is ABOVE its negative lead.
Now hookup the main power leads to the amp. Do +12V straight to the battery
terminal, and then run ground to some big nut on the car chassis.
*******************************
Testing and Tuning
Turn the amp gain to minimum and set your head unit EQ flat for bass.
Turn the system on and increase the gain on the amp until you can hear the
subs working.
Verify the L/R speaker lead polarity:
Disconnect the left speaker at the amp. Did the correct sub "turn off"?
If not, swap your speaker leads at the amp.
Verify the relative phase of the subs (+/-):
Note how the system sounds. Lean your head into the middle of the car and see
if the bass seems to "drop out" in that spot. Now, for JUST ONE of the
speaker leads at the amp, reverse the +/- connection. Did things improve?
If so, leave it be, if not, revert.
Verify the L/R source polarity (RCA leads):
Kinda tricky. But if you can somehow create a disc that has only 1 channel
of the stereo image of a song, play it in the car and turn balance all the
way to that side. Are you getting the full range sound as expected? If not, reverse the RCA plugs at the amp.
Now that all is hooked up correctly, increase the gain on the amp until
things sound pretty good. Now you can tweak and fine-tune with the head
unit EQ.
*******************************
04-10-2007, 11:15 AM
#20
Members
Thread Starter
Join Date: Apr 2007
Posts: 26
Likes: 0
Received 0 Likes
on
0 Posts
I can take some pics, just not sure when I'll have time to do it. I posted the above because I think at least some will read it
and know exactly how to get it done. There can be variances - e.g. if your amp has terminal posts (+/-) for line level ins, then
the RCA cable hack is not necessary. I used 22 gauge wire for the remote turn on lead. Some may want to bolt down their
amp instead of velcro, etc.
and know exactly how to get it done. There can be variances - e.g. if your amp has terminal posts (+/-) for line level ins, then
the RCA cable hack is not necessary. I used 22 gauge wire for the remote turn on lead. Some may want to bolt down their
amp instead of velcro, etc.