Anzafin's "SPRING RENOVATION" - Part 7
 05-17-2009, 12:05 PM
#1
Contributors
Thread Starter
Join Date: Apr 2007
Location: Kajaani, Finland
Posts: 5,851
Likes: 0
Received 3 Likes
on
3 Posts
My Ride: Bmw 530d 2004
At first I would like to say that I really don't know how they will last in everyday use, and I haven't even installed them yet. Actually the DIY process isn't even finished yet  . But here's what I have got myself in to!
I decided to try to paint the exhaust tips black by myself, since PraiseTheLowered encouraged me to do so. I'm sure the powdercoating would be the best method to paint them, but I bet that would have cost a lot more than my attempt. And thanks to member gildagjg giving instructions how to unmount the tips .
.
So, I don't know how this will end when the tips get installed and after they have seen some true life, but for now everything looks promising! And sure I can get them powdercoated if this fails.
This is what I've done so far.
The material:
- different sanding papers

- a bottle of turpentine

- heat resistant paint

-----------------------------------------------------------------------------------------------------------
1) At first I unmounted the tips by placing a wood block behind the edge and then hammering the block. There are clips inside that push the tip tight when putting them back on.
2) Sanded the chrome off using several different sanding papers: 60 -> 80 -> 320 -> 400 -> 800
3) Cleaned the tip with turpentine.
4) Painted several (5-6) thin layers waiting 5 minutes between them.
5) Let the tips dry for 30mins as the instructions in the can say.
6) Heated the tips in the oven (Yes, in our kitchen !) as the paint can says: in 200?C for 20mins
7) Sanded again with 800
8) Another coat of paint (repeated 4,5,6)
Now the tips have got two coats of paint, and I'm going to give them at least one coat still. The install will happen later, two weeks from this (I'll be out of town).
-----------------------------------------------------------------------------------------------------------
Couple of pics taken on different work phases:
1) At first I unmounted the tips by placing a wood block behind the edge and then hammering the block. There are clips inside that push the tip tight when putting them back on.

2) Sanded the chrome off using several different sanding papers: 60 -> 80 -> 320 -> 400 -> 800

4) Painted several (5-6) thin layers waiting 5 minutes between them.

This is how they look now. I've done some fingernail tests to the paint and it seems to hold quite well different sharp impacts .


. But here's what I have got myself in to!I decided to try to paint the exhaust tips black by myself, since PraiseTheLowered encouraged me to do so. I'm sure the powdercoating would be the best method to paint them, but I bet that would have cost a lot more than my attempt. And thanks to member gildagjg giving instructions how to unmount the tips
. So, I don't know how this will end when the tips get installed and after they have seen some true life, but for now everything looks promising! And sure I can get them powdercoated if this fails.
This is what I've done so far.
The material:
- different sanding papers
- a bottle of turpentine
- heat resistant paint
-----------------------------------------------------------------------------------------------------------
1) At first I unmounted the tips by placing a wood block behind the edge and then hammering the block. There are clips inside that push the tip tight when putting them back on.
2) Sanded the chrome off using several different sanding papers: 60 -> 80 -> 320 -> 400 -> 800
3) Cleaned the tip with turpentine.
4) Painted several (5-6) thin layers waiting 5 minutes between them.
5) Let the tips dry for 30mins as the instructions in the can say.
6) Heated the tips in the oven (Yes, in our kitchen
!) as the paint can says: in 200?C for 20mins7) Sanded again with 800
8) Another coat of paint (repeated 4,5,6)
Now the tips have got two coats of paint, and I'm going to give them at least one coat still. The install will happen later, two weeks from this (I'll be out of town).
-----------------------------------------------------------------------------------------------------------
Couple of pics taken on different work phases:
1) At first I unmounted the tips by placing a wood block behind the edge and then hammering the block. There are clips inside that push the tip tight when putting them back on.
2) Sanded the chrome off using several different sanding papers: 60 -> 80 -> 320 -> 400 -> 800
4) Painted several (5-6) thin layers waiting 5 minutes between them.
This is how they look now. I've done some fingernail tests to the paint and it seems to hold quite well different sharp impacts
.
 05-17-2009, 12:07 PM
#2
Contributors

Join Date: Jun 2008
Location: Tacoma, WA
Posts: 5,501
Likes: 0
Received 0 Likes
on
0 Posts
YES!!!

good job man, looks awesome. Now you need to get that matte black badge and trunk finisher with m5 spoiler and youll be set
once again you made me proud good job!
good job man, looks awesome. Now you need to get that matte black badge and trunk finisher with m5 spoiler and youll be set
once again you made me proud good job!
05-17-2009, 12:09 PM
#3
Contributors
Thread Starter
Join Date: Apr 2007
Location: Kajaani, Finland
Posts: 5,851
Likes: 0
Received 3 Likes
on
3 Posts
My Ride: Bmw 530d 2004
Originally Posted by PraiseTheLowered' post='881186' date='May 17 2009, 11:07 PM
YES!!!
good job man, looks awesome. Now you need to get that matte black badge and trunk finisher with m5 spoiler and youll be set
once again you made me proud good job!
good job man, looks awesome. Now you need to get that matte black badge and trunk finisher with m5 spoiler and youll be set
once again you made me proud good job!
!
05-17-2009, 12:11 PM
#4
Contributors
Join Date: Jun 2008
Location: Tacoma, WA
Posts: 5,501
Likes: 0
Received 0 Likes
on
0 Posts
Originally Posted by Anzafin' post='881189' date='May 17 2009, 01:09 PM
Thanks for giving me the confidence in the first place !
!no problem man
this is a great DIY for those who want the black tips only
anyone who gets an exhaust I would say have it PC or high temp painted
black exhausts are the new thing C and I are doing lol
05-17-2009, 04:28 PM
#6
Contributors
Join Date: May 2007
Location: Pittsburgh, PA
Posts: 3,987
Likes: 0
Received 0 Likes
on
0 Posts
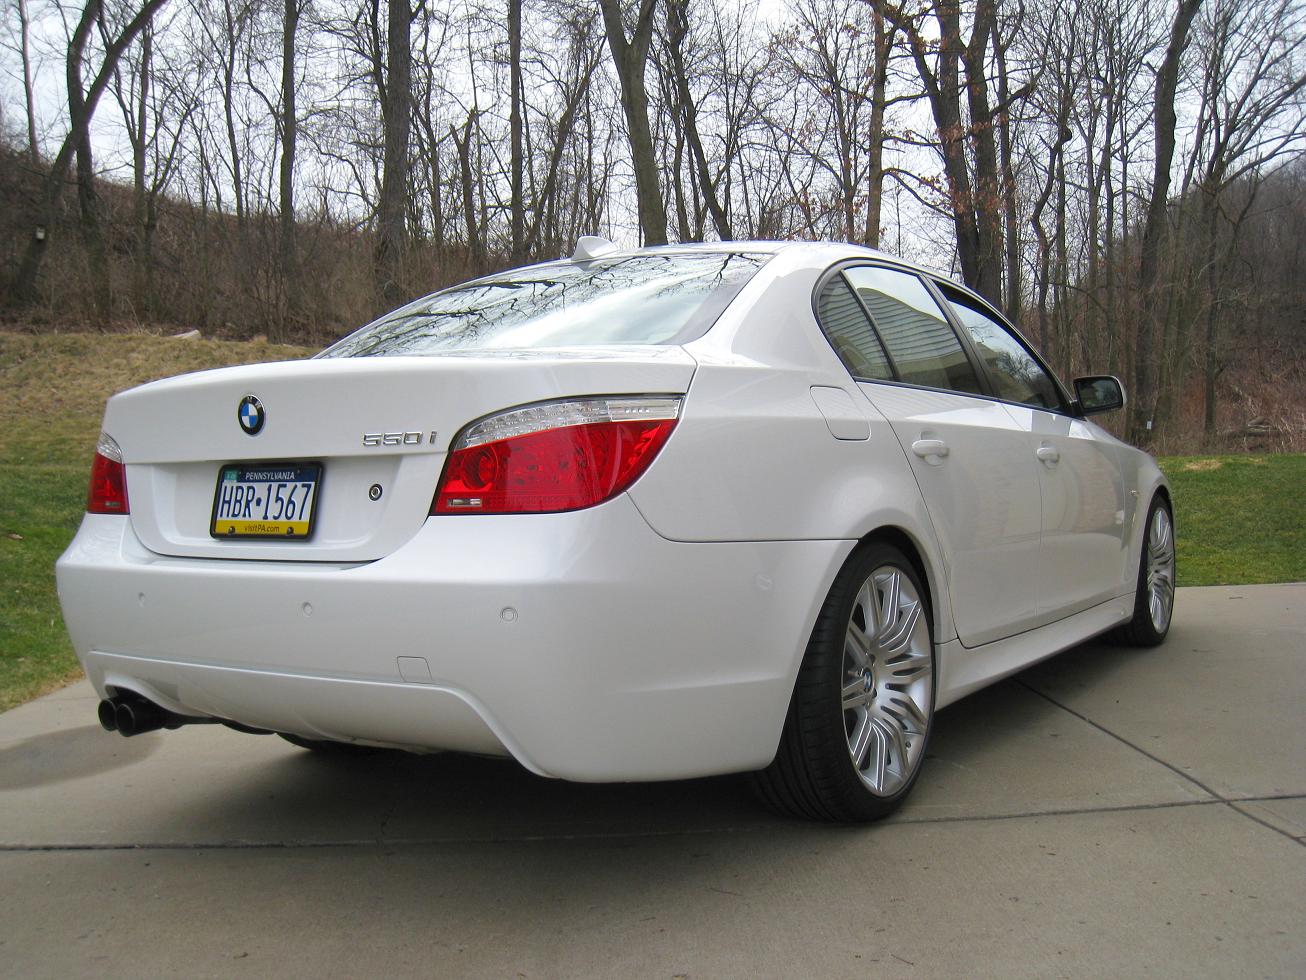
My Ride: 2008 Alpine White 550i Sport, Cream Beige Interior, 6-Sp Manual - retired 9/2011
Originally Posted by PraiseTheLowered' post='881192' date='May 17 2009, 04:11 PM
black exhausts are the new thing C and I are doing lol
 05-17-2009, 04:31 PM
#7
Contributors
Join Date: Jun 2008
Location: Tacoma, WA
Posts: 5,501
Likes: 0
Received 0 Likes
on
0 Posts
Originally Posted by DrLev99' post='881442' date='May 17 2009, 05:28 PM
as far as im concerned that picture simply doesnt exist lol