Oil Filter Housing Gaskets Replacement
 01-30-2012, 02:29 PM
#31
Members
Thread Starter
Join Date: Jan 2011
Location: Long Beach, SoCal.
Posts: 221
Likes: 0
Received 0 Likes
on
0 Posts
My Ride: 2006 Titanium Silver BMW 530iA, Sport & Premium Package, Active Steering, Anti-Roll-Suspension, Adaptive Headlight, Navigation, OEM M-Tech Kit, Authentic RD Trunk Spoiler, VIP Modular Wheels: 245/35/20; 275/30/20, OEM M Trunk Finisher.
Hi,
There are no "moving", mechanical parts that you can damage if you choose to replace the gaskets by yourself. As long as you don't over torque and break any of the bolts( I highly doubt you will do that), you should be fine!
The tools you will need to do the job is the proper size sockets, socket wrench and socket extension to get around tight spots. In addition, it would make the job a lot easier if you use this exact wrench to unscrew the "one" screw under manifold part: http://www.harborfre...ench-97261.html
Here is my advice: Read this thread throughly, gather the aforementioned tools, make sure they will fit; and determine if you are capable of using the tools to unscrew all the necessary bolts (I believe there are only six bolts for you to unscrew). If you think you have enough room to turn those wrenches, go for it! It's not that complicated.
Also, spray some simple green solution to clean and rise off the oil and coolant mess. You don't want any oil or coolant to deteriate your belts.
To complete the task, you just need to have patience and focus on what you will need to do; and not dropping the bolts anywhere you can't reach and retrieve.
P.S: If three DIY shops thought they already fixed it, perhaps the oil filter housing gaskets are not your problem. Maybe, your head cover gasket is leaking or something else...
This is exactly whats been going on with my car for months now! I have taken it to 3 different indy shops and they all thought they fixed it, and none of them did! Only problem, I have zero experience doing anything to the engine of a car, and am terrified of screwing something up with my car.
I read one of the earlier posts and the guy said his shop quoted him at $300 for parts. Do any of you think a regular mechanics shop would be able to do it for much less/is it worth trying it myself? And how damaging is this to a car?
My alternator belt just slipped off my car, and I don't know if it has anything to do with this, but there's A LOT of oil down there
Any help is appreciated
Thanks
 06-26-2012, 06:40 AM
#32
Senior Members
Join Date: Nov 2008
Location: Houston, TX
Posts: 670
Likes: 0
Received 0 Likes
on
0 Posts
My Ride: 2006 530i, Jet Black, Tan, Premium, Steptronic
Did you replace the bolts as well?
07-02-2012, 03:11 AM
#35
Members

Join Date: Jun 2012
Location: NY
Posts: 8
Likes: 0
Received 0 Likes
on
0 Posts
I did these just the other day using this DIY and it was pretty straight forward. Both of mine were leaking massively. The only thing Id add to this is using a universal and a 10" extension for the one behind the oil filter housing. Thanks.
07-15-2012, 04:01 AM
#36
Senior Members
Join Date: Nov 2008
Location: Houston, TX
Posts: 670
Likes: 0
Received 0 Likes
on
0 Posts
My Ride: 2006 530i, Jet Black, Tan, Premium, Steptronic
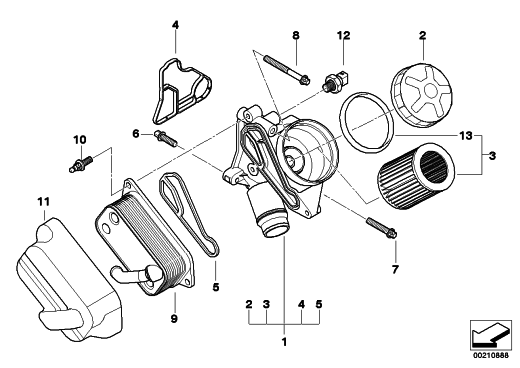
I finally did this repair, too. If you don't have a 1/4 drive E10 external Torx socket then it is very difficult to get the bolt under the intake manifold (#7).
Snap-on TLE100A
I also found that a 1/4" drive, 12-point 5/16" socket and 10" extension with a universal worked. (Thank you Handsome_Rob!) I also used a 12-point 5/16" ratcheting wrench to get to bolt #6. The bolts are not on very tightly so they were not damaged by using the SAE tools.
The bolts holding the cooler to the filter housing (#10) need an E12 socket.
11-16-2012, 11:41 AM
#37
New Members

Join Date: Nov 2012
Posts: 2
Likes: 0
Received 0 Likes
on
0 Posts
I replaced my oil cooler gasket only this morning. I had planned on replacing both the oil filter housing and oil cooler gasket but when I removed the plastic cover/oil cooler unit, there was obvious leaking from the cooler. Gasket was hard and brittle.
Yes, 12mm torx deep socket required as there is a plastic cover attaching to holding nipples which won't allow the short socket to fit. I bet the stealers make a killing on this one as it took 5 minutes....super easy but if you have a leak, check this first before going deaper into the housing gasket replacement.
If the leak persists, then I'm ready to change the oil filter housing and refresh the oil cooler gasket again as well. Both gaskets purchased through Bavarian Autosport")
11 42 7 525 335 GASKET - OIL FILTER HOUSING TO OIL COOLER $14.95
11 42 7 537 293 GASKET - OIL FILTER HOUSING TO ENGINE BLOCK $14.95
Yes, 12mm torx deep socket required as there is a plastic cover attaching to holding nipples which won't allow the short socket to fit. I bet the stealers make a killing on this one as it took 5 minutes....super easy but if you have a leak, check this first before going deaper into the housing gasket replacement.
If the leak persists, then I'm ready to change the oil filter housing and refresh the oil cooler gasket again as well. Both gaskets purchased through Bavarian Autosport
11 42 7 525 335 GASKET - OIL FILTER HOUSING TO OIL COOLER $14.95
11 42 7 537 293 GASKET - OIL FILTER HOUSING TO ENGINE BLOCK $14.95
Last edited by silvergrey06; 11-16-2012 at 11:43 AM.
11-26-2012, 06:07 PM
#38
New Members

Join Date: Nov 2012
Posts: 1
Likes: 0
Received 0 Likes
on
0 Posts
I am able to remove the two upper bolts of the heat exchange but cannot remove the 3rd bolt. It is blocked by two lines that appear to be A/C lines. What is the process for either working around these lines or do I need to reclaim the A/C and remove the lines to access that bolt?
Any help is much appreciated!
Any help is much appreciated!
1. Drain 1/2 the coolant in the system from the red drain plug or drain the whole system if you want to do a full refill which i reccommend.
2. Loosen the oil filter cap so the oil goes out of the filter and doesn't make a mess. You can remove the cap and then reinstall it.
2. Disconnect the upper radiator hose where is attaches to the heat exchanger. There will be some coolant which still spills from here so have a pan ready.
3. Remove the 3 inverted torx bolts that mount the heat exchanger to the oil filter housing. Then let the heat exchanger rest forward against the fan shroud.
4. Remove the 3 inverted torx bolts that mount the oil filter housing to the engine.
5. Remove both old gaskets and clean the surface with brake clean and a rag and/or a razor blade.
6. Install both new gaskets and reinstall all parts back together.
7. Fill the coolant reservoir until full.
8. Connect a battery charger @ 2 amps while performing the bleeding procedure and top up coolant as needed until full.
11-27-2012, 06:12 AM
#39
Senior Members
Join Date: Nov 2008
Location: Houston, TX
Posts: 670
Likes: 0
Received 0 Likes
on
0 Posts
My Ride: 2006 530i, Jet Black, Tan, Premium, Steptronic
You should be able to reach it with a box-end wrench. This is where a ratcheting wrench comes in handy! If you don't have an E-Torx wrench then you can either use a 12-point 5/16" wrench or go to Sears and buy one of their "universal" 5/16" wrenches.
12-03-2012, 03:57 AM
#40
New Members
Join Date: Nov 2012
Posts: 2
Likes: 0
Received 0 Likes
on
0 Posts
I found the outer oil cooler to be the culprit for my aggressive leak. When I removed the unit, I found an obvious leak in the outer cooler seal. Takes 5 minutes to change this seal. Seal was hard and replaced first. After cleaning with engine degreaser and monitoring, I couldn't believe the oil FILTER O ring was leaking as well. Replaced oil filter and new gaskets, which come with the unit and all is good now. If I find additional leaking, I'm all the way into the housing gasket which I purchased when I purchased the cooler gasket which was suggested.
I love my beamer but hate leaks. My got to the point where the oil light was going on every three weeks.
Yes, I was experiencing the splatter oil on the air box. If the oil filter O ring is leaking, you will observe oil on top of the housing just below the filter cap. I cleaned mine out and the next day, the two valleys were full of oil again. Very easy way to diagnose the filter as leaking.
I never had to get into the complete housing removal but good luck and it's just a matter of time before I'm into mine.
I understand the transmission electrical coupling and also culprit leak point on these E60 N52 style cars.
Another observation I found was when I removed the radiator top plate for a Serpentine belt replacement and found leaves packed between my radiator and AC rad unit. I couldn't believe the leaves were half way up the radiator from the bottom and the impact to possible engine cooling. Used a three foot stick and carefully vacuumed the leaves out from the bottom and top. You can loosen the rad and lift it up 2 inches for ease of reach from the bottom. Sorry, just had to add that little tid-bit on info for my fellow Bimmer lovers.