
How to replace O2 (Oxygen) sensors on a 545i


Thread Starter
New Members
Joined: Jan 2013
Posts: 228
Likes: 0
From: atlanta
My Ride: 2005 545i Sport
This was a difficult job due to the very tight/limited access to the sensors and their wiring harnesses. It took me 8 hours, but hopefully this write-up can cut a couple hours off of that for you.
I could not locate an article on the 545i in sufficient enough detail to be usable.
Tools:
1. 22mm combination (box/open end) wrench; I bought a Craftsmen for about $14.00
Craftsman 22mm Wrench, 12 pt. Combination - Tools - Wrenches - All Open Stock Wrenches
2. Allen wrench, phillips head screw driver,
very long pair of straight needle nose pliers 11" Long Reach Needlenose Pliers with Straight Jaws
very long pair of angled needle nose pliers 2 Piece 11" 20� Offset & 45� Angle Long Reach Needle Plier Set
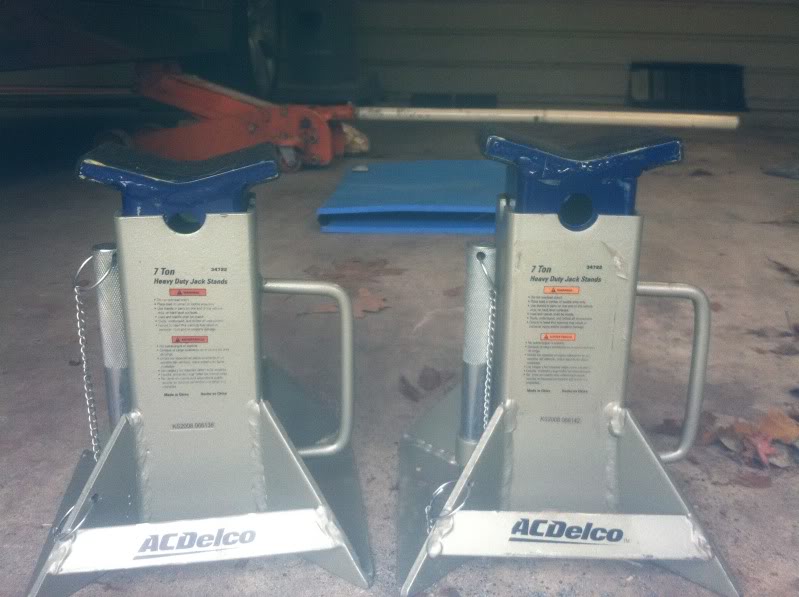
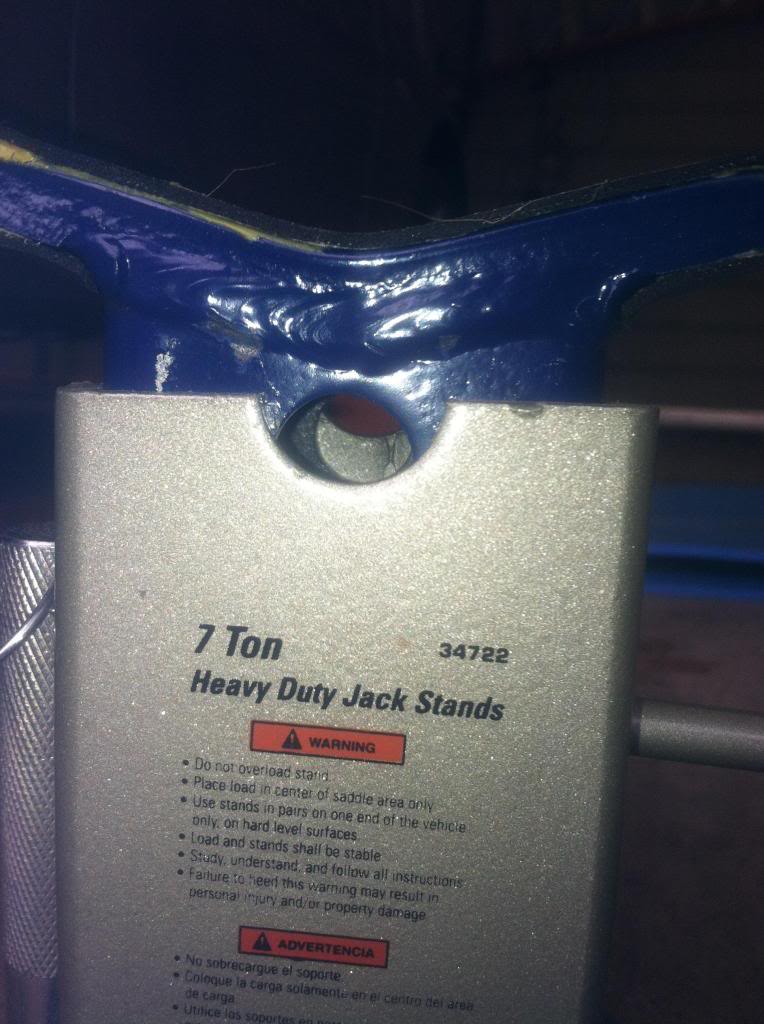
3. 7 ton AC Delco jack stands
ACDelco 34722 - Jack Stands | O'Reilly Auto Parts
4. 4x Bosch Premium O2 sensors
Bosch Oxygen Sensors
5. Extended 17mm socket + 1/2 torque wrench for tire lugs.
6. Homemade 2" x 12" wooden ramps to slightly raise the front of the car.

7. 4x rubber wheel chocks
Buyers Rubber Wheel Chock — 5in.W, Model# WC1467A | Wheel Chocks| Northern Tool + Equipment
8. Superbright, small, Creee flashlight like this one: Google Image Result for http://handledare.org/2010_misc/L2Px2.jpg
9. Hammer, 3/8" torque wrench
10. O2 Sensor socket kit
OEM 27110 Oxygen Sensor Socket - Amazon.com
11. Cheap, exercise type, foam pad to lie on while under the car (behind the jack stands)
================================================== ===============
Procedure for replacing 4x O2 sensors Pre and Post catalytic converter):
1. Drive front wheels onto the home made (2" x 12") wooden ramps. (1 st level is 26" long, the 2nd level is 20" long and the stop is 1.5" sq stock.) Apply a tight parking brake.
2. Use 4 rubber chocks to block the rear wheels. (1 fore and 1 aft on each tire)
3. Slightly Loosen the lug nuts on the front wheels.
4. If you have an older hydraulic floor jack, remove the lift plate and place a small piece of rubber mating (like what is found in a tool chest liner)

5. Locate the center jack point which is about 23" back from the very bottom edge of the front bumper and centered on the vehicle. It's a rectangular shaped plastic pad.
Jack the car up from this point
6. Bring it to a height suitable for you to work under the car and place 2x jack stands on the BMW approved jack points under the passenger and drivers doors.
7. Lower the car very gently onto these jack stands. Remove the hydraulic jack and place a ratchet style jack stand under the center point pad and fill the small gap (1/4")with a rubber type mating material to prevent your foot from accidently moving the jack stand while working.

8. Now remove both wheels and clean the inner portion of the wheel with soap & water; set aside.
9. Panel Removal. Begin at the front of the car and remove the under engine panel by turning the quick release screws about 1/4 turn. Set the panel aside and clean with soap/water.

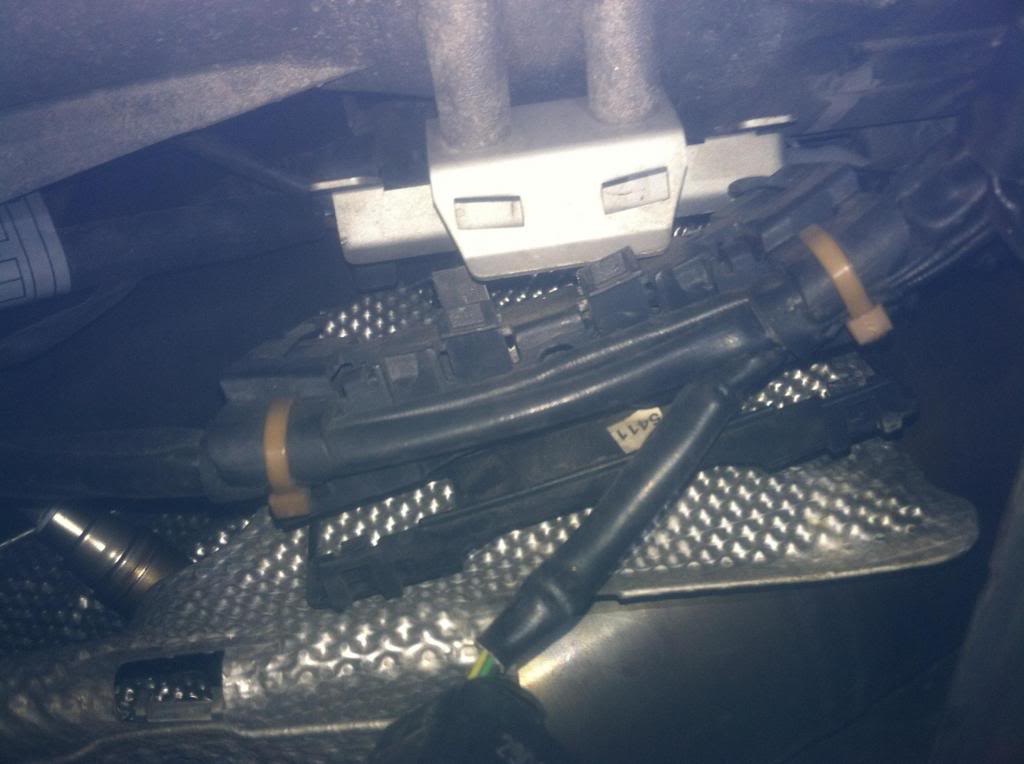
10. Now remove the next major panel that extends to the rear of the transmission. It's held in place with hex head screws so be careful to place them well away from your footpath and body movements. (The heat shield on either side of the transmission has 4 special screws with wider flanges make sure they return to this same position.

11. Now the 2 (rear) post-cat sensors and their wiring paths are visible. The sensors are in easy reach, but the wiring paths are very tight. They run up near the top of the transmission and parallel to it. Use your long reach angled needle nose pliers and grab onto the connector mating area and remove from their spring clips and bring it down into your reach.
11b. You may need to remove one of the heat shileds running parallel to the transmission if the pliers cannot reach without damaging them.
12. Disconnect the sensor plug watching for tabs the hold it in place. They are a very tight fit so some force is needed to remove them. (Do not use the wiring itself to pull them apart; keep your fingers on the connector bases only).
13. Once released, take a pair of wire cutters and cutoff the wire near the O2 sensor. Otherwise thie wiring cable begins to twist upon itself as you loosen the sensor, so it's better to get it out of the way.
14. Now place the box end of the wrench over the sensor and tap with a hammer to loosen. They are not tight, as only 33lbs of torque was applied at the factory. Use your fingers or the long extension O2 socket to remove.
15. Now using the offset O2 sensor socket and torque wrench install the new sensor (make sure to double check part numbers and cable wiring harness length to the original; they should be an exact match). Torque to the correct amount.
16. Now tightly mate the connector to the vehicles wiring putting it back to its original path which can by tight and difficult. But use the original path exactly, as the wirre must be kept away from the exhaust pipes. Use your extended angled needle nose to get it back into its clip holders. Be patient and keep trying
17. Now the precat (front) sensors are in a very tight place and the passenger wiring path is tight and a bit difficult.
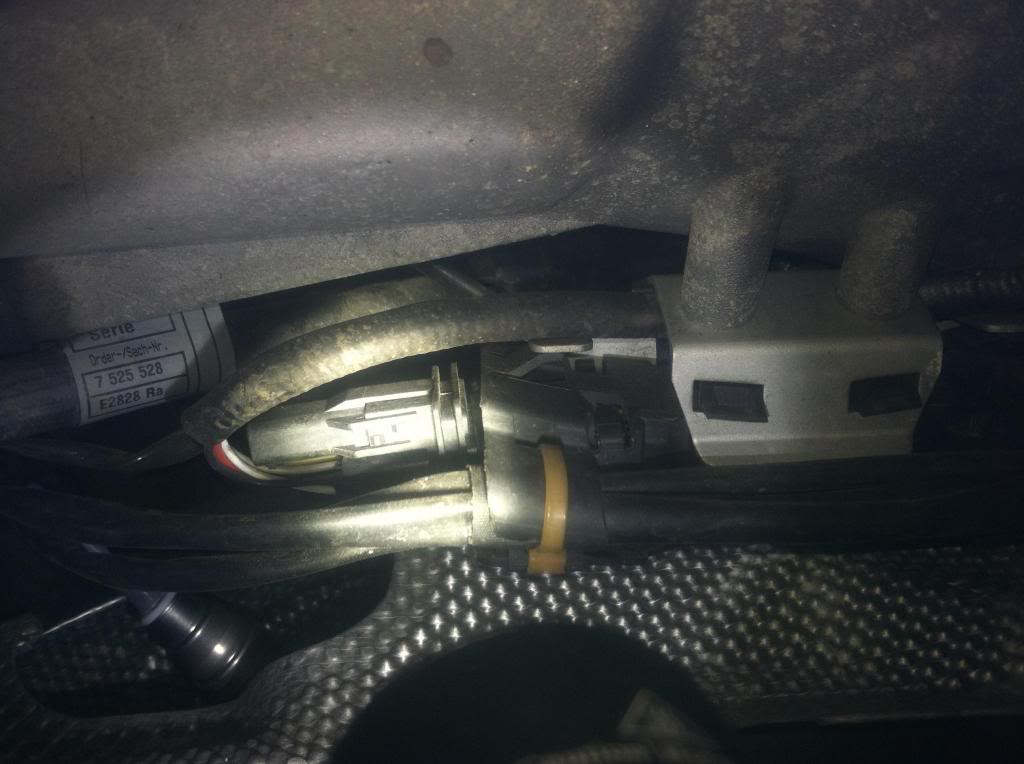
18. The junction box for the two precat sensors is off center of the vehicle to the drivers side and just behind the engine area. (Trying to follow the wiring path from the sensors can be tricky, so look at your new sensors and the design of their connectors.)
Now find them under the vehicle and open the junction box (tabs hold it together) and remove the passenger side connnector. It is mated very tightly to the cars connector so push the release tab and pull them apart.

18b Now release the junction box from the underside of the car by depressing the two large tabs holding it in place
19. Follow it along under the transmission bell housing releasing it as you go from any wire holders. You'll come to a metal tab on the passenger side of the transmission housing that is holding only the sensor cable. Use your extended angle needle nose pliers to release.
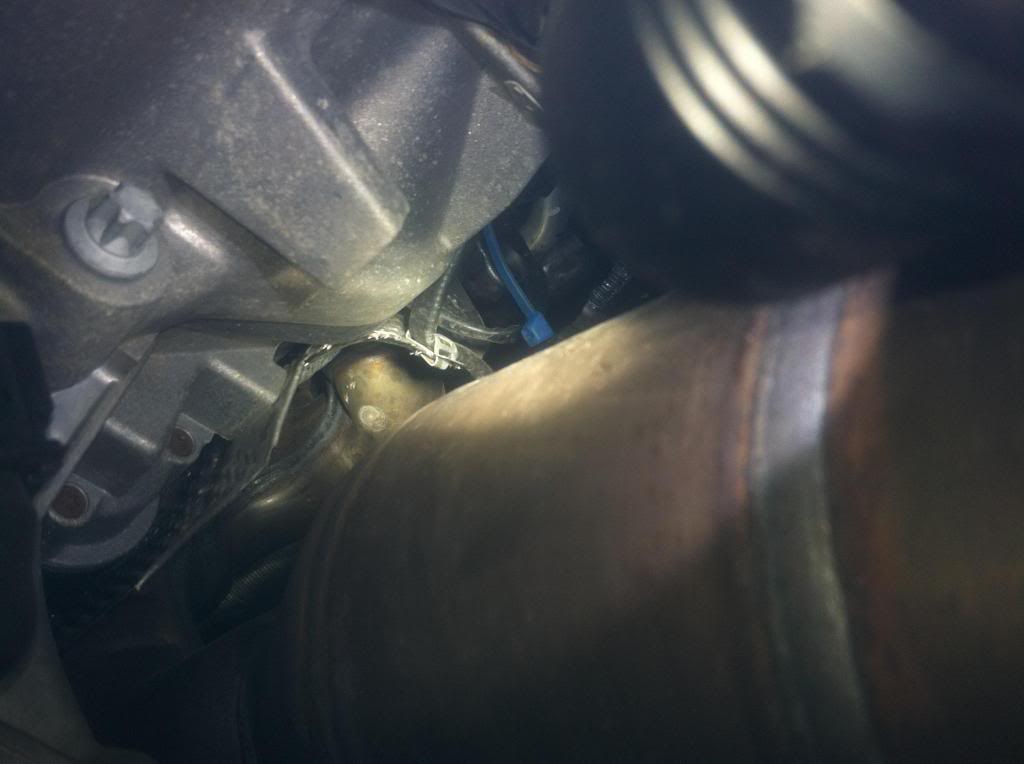
20. Bring down the sensor cable from the metal clip and cut the cable nearest the sensor as possible.
21. So get out from under the car and move to the passenger wheel area. Facing the rotor look behind it and you'll see two hex head screws holding a panel to the back wall. Remove them and bring the panel down away from the back wall.

22. Using your flashlight look inside of this area (behind the removed panel) look for the sensor installed into the exhaust pipe. Tight, isn't it?
23. You'll notice two hydraulic lines that are held to the back wall with an allen screw. Remove it as the affords you some additional play in the tubes. But remember that these are rigid tubes so they can only be moved so much before you can kink them.
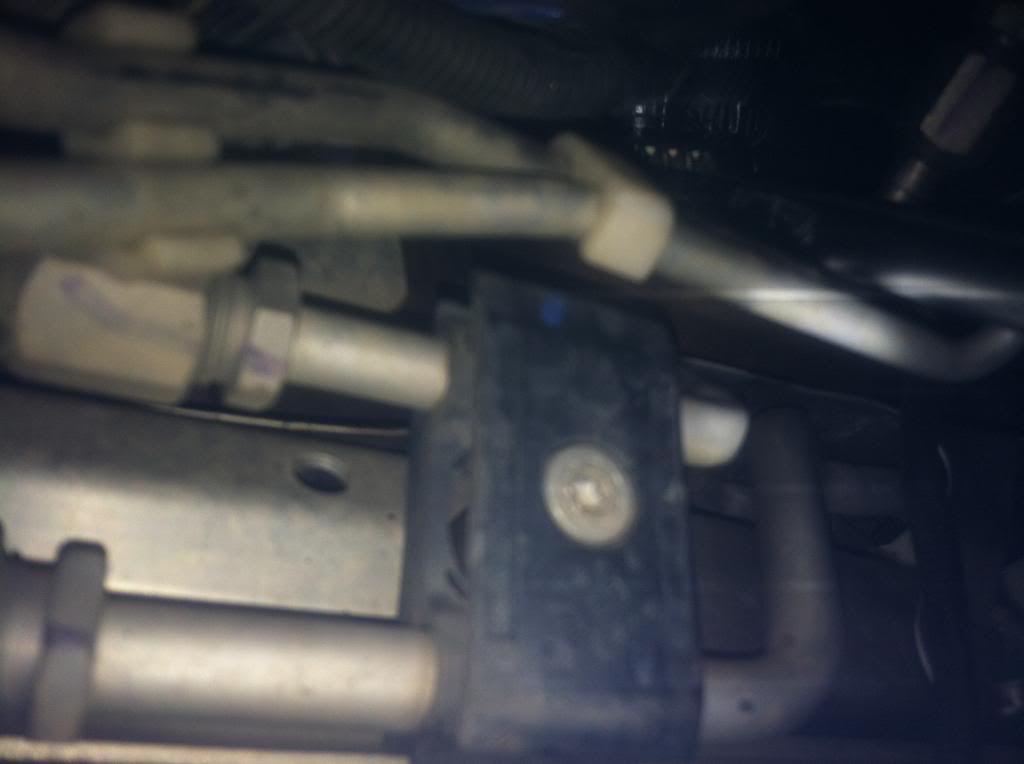
24. Now work the open ended portion of your combination wrench onto the sensor and tap with a hammer to loosen. If you can, work the box portion of your wrench over the sensor going through the cut wire lead and remove the sensor by manipulating the wrench in the limited space until it's free.
25. Installing the new sensor requires preventing the wiring harness cable from wrapping itself as you tighten into place the new sensor. I fed my sensor down from the engine compartment (with the protective cap in place) keeping the wiring cable loose but as straight as possible.
26. Using your hands/fingers work the new sensor into place keeping your finger off of the sensor tip now that you've removed the protective cap. Tighten as much as possible with your hands/fingers. Keep checking that your wiring harness is not twisting too much while tightening the sensor into place.
27. place your open ended combination wrench onto the sensor and tighten snuggly. I couldn't use the torque wrench given the tight space. But only 33lbs of torque is needed.
28. Feed the wiring harness down and route into place reinstalling along the way back into the OEM position. The metal clip for the cable is critical as the cable runs very near the exaust pipe. Use your needle nose to crimp as tightly as passible.
29. Run the cable back to the cars connector (do not join yet) and leave it outside of the junction box for now.
30. Reinstall the allen screw and panel back into position.
31. Move to the drivers side wheel area and remove the back panel plus look behind the primary wheel well panel and remove the styrofoam panel held in place with three hex head screws. I did not remove the primary panel from the lip of the fender as the plastic pins were just too tight.

32. behind the back wall panel is a flexible hose held in place with a simple plastic catch. Release the hose and move aside.
33. Once again, the sensor is in a very tight spot but the wiring cable/harness is much shorter and easier to release than on the passenger side. Follow it back ot he junction box releasing as you go.
34. Release the sensor connector from the vehicles connector. Very tight fit so be careful to not pull on the vehicles wiring while releasing.
35. Cut the sensor cable as near the sensor as possible.
36. Now wiggle the open ended positon of the wrench onto the sensor and tap with a hammer. Use either the wrench or your fingers to remove from the exhaust pipe.
37. Feed the new sensor down from above keeping the cable staight as possible.
38. Remove the protective cap from the sensor and using either fingers or the wrench tighten into place. Very tight and difficult. What I did that helped, was that I twisted the sensor cable in a clockwise direction (not too much) and locked it into place wirthin the engie compartment to prevent it from uncoiling. This provided for some needed torque as you attempt to get the sensor to tighten into place

39. Once I got the sensor tightened into place (couldn't use the torque wrench) I ran the wiring cable back to the junction box and reinstalled both mated sensor connectors into the box. It is a tight fit so take your time and the junction box will close properly if you put everything back correctly.
40. Back at the drivers wheel area; reinstall the foam block, reattach the hose to its strap, reinstall the the back panel.
41. Reinstall the rear, under carriage panel with the hex head screws that you kept out of the way of your footpath and body movements so that none of them are lost.
42. Reinstall the front under carriage panel turning the screws a quarter turn.
43. Look around your work area and make sure that nothing has been left off and that the area under the car is 100% free of all tools, etc.
44. Reinstall the tires and torque as close to 88 lbs/ft as possible by holding the tire with your foot and providing quick burst from your lug wrench. Now tighten on the locking lug as well.
45. No need for the homemade ramps (unless you jack cannot fit under the car) to be in place as you're simply allow the car to return without any further need for the jack handle
46. Jack the car up using the center jacking point bringing the jack handle near the ground and remove both jack stands. Slowly bring the car back down standing to one side of the hydraulic jack and not over the extension handle of the jack.
47. Check the torque of your wheel lugs
48. Remove the wheel chocks.
49. You're done.
I could not locate an article on the 545i in sufficient enough detail to be usable.
Tools:
1. 22mm combination (box/open end) wrench; I bought a Craftsmen for about $14.00
Craftsman 22mm Wrench, 12 pt. Combination - Tools - Wrenches - All Open Stock Wrenches
2. Allen wrench, phillips head screw driver,
very long pair of straight needle nose pliers 11" Long Reach Needlenose Pliers with Straight Jaws
very long pair of angled needle nose pliers 2 Piece 11" 20� Offset & 45� Angle Long Reach Needle Plier Set
3. 7 ton AC Delco jack stands
ACDelco 34722 - Jack Stands | O'Reilly Auto Parts
4. 4x Bosch Premium O2 sensors
Bosch Oxygen Sensors
5. Extended 17mm socket + 1/2 torque wrench for tire lugs.
6. Homemade 2" x 12" wooden ramps to slightly raise the front of the car.
7. 4x rubber wheel chocks
Buyers Rubber Wheel Chock — 5in.W, Model# WC1467A | Wheel Chocks| Northern Tool + Equipment
8. Superbright, small, Creee flashlight like this one: Google Image Result for http://handledare.org/2010_misc/L2Px2.jpg
9. Hammer, 3/8" torque wrench
10. O2 Sensor socket kit
OEM 27110 Oxygen Sensor Socket - Amazon.com
11. Cheap, exercise type, foam pad to lie on while under the car (behind the jack stands)
================================================== ===============
Procedure for replacing 4x O2 sensors Pre and Post catalytic converter):
1. Drive front wheels onto the home made (2" x 12") wooden ramps. (1 st level is 26" long, the 2nd level is 20" long and the stop is 1.5" sq stock.) Apply a tight parking brake.
2. Use 4 rubber chocks to block the rear wheels. (1 fore and 1 aft on each tire)
3. Slightly Loosen the lug nuts on the front wheels.
4. If you have an older hydraulic floor jack, remove the lift plate and place a small piece of rubber mating (like what is found in a tool chest liner)
5. Locate the center jack point which is about 23" back from the very bottom edge of the front bumper and centered on the vehicle. It's a rectangular shaped plastic pad.
Jack the car up from this point
6. Bring it to a height suitable for you to work under the car and place 2x jack stands on the BMW approved jack points under the passenger and drivers doors.
7. Lower the car very gently onto these jack stands. Remove the hydraulic jack and place a ratchet style jack stand under the center point pad and fill the small gap (1/4")with a rubber type mating material to prevent your foot from accidently moving the jack stand while working.
8. Now remove both wheels and clean the inner portion of the wheel with soap & water; set aside.
9. Panel Removal. Begin at the front of the car and remove the under engine panel by turning the quick release screws about 1/4 turn. Set the panel aside and clean with soap/water.
10. Now remove the next major panel that extends to the rear of the transmission. It's held in place with hex head screws so be careful to place them well away from your footpath and body movements. (The heat shield on either side of the transmission has 4 special screws with wider flanges make sure they return to this same position.
11. Now the 2 (rear) post-cat sensors and their wiring paths are visible. The sensors are in easy reach, but the wiring paths are very tight. They run up near the top of the transmission and parallel to it. Use your long reach angled needle nose pliers and grab onto the connector mating area and remove from their spring clips and bring it down into your reach.
11b. You may need to remove one of the heat shileds running parallel to the transmission if the pliers cannot reach without damaging them.
12. Disconnect the sensor plug watching for tabs the hold it in place. They are a very tight fit so some force is needed to remove them. (Do not use the wiring itself to pull them apart; keep your fingers on the connector bases only).
13. Once released, take a pair of wire cutters and cutoff the wire near the O2 sensor. Otherwise thie wiring cable begins to twist upon itself as you loosen the sensor, so it's better to get it out of the way.
14. Now place the box end of the wrench over the sensor and tap with a hammer to loosen. They are not tight, as only 33lbs of torque was applied at the factory. Use your fingers or the long extension O2 socket to remove.
15. Now using the offset O2 sensor socket and torque wrench install the new sensor (make sure to double check part numbers and cable wiring harness length to the original; they should be an exact match). Torque to the correct amount.
16. Now tightly mate the connector to the vehicles wiring putting it back to its original path which can by tight and difficult. But use the original path exactly, as the wirre must be kept away from the exhaust pipes. Use your extended angled needle nose to get it back into its clip holders. Be patient and keep trying
17. Now the precat (front) sensors are in a very tight place and the passenger wiring path is tight and a bit difficult.
18. The junction box for the two precat sensors is off center of the vehicle to the drivers side and just behind the engine area. (Trying to follow the wiring path from the sensors can be tricky, so look at your new sensors and the design of their connectors.)
Now find them under the vehicle and open the junction box (tabs hold it together) and remove the passenger side connnector. It is mated very tightly to the cars connector so push the release tab and pull them apart.
18b Now release the junction box from the underside of the car by depressing the two large tabs holding it in place
19. Follow it along under the transmission bell housing releasing it as you go from any wire holders. You'll come to a metal tab on the passenger side of the transmission housing that is holding only the sensor cable. Use your extended angle needle nose pliers to release.
20. Bring down the sensor cable from the metal clip and cut the cable nearest the sensor as possible.
21. So get out from under the car and move to the passenger wheel area. Facing the rotor look behind it and you'll see two hex head screws holding a panel to the back wall. Remove them and bring the panel down away from the back wall.
22. Using your flashlight look inside of this area (behind the removed panel) look for the sensor installed into the exhaust pipe. Tight, isn't it?
23. You'll notice two hydraulic lines that are held to the back wall with an allen screw. Remove it as the affords you some additional play in the tubes. But remember that these are rigid tubes so they can only be moved so much before you can kink them.
24. Now work the open ended portion of your combination wrench onto the sensor and tap with a hammer to loosen. If you can, work the box portion of your wrench over the sensor going through the cut wire lead and remove the sensor by manipulating the wrench in the limited space until it's free.
25. Installing the new sensor requires preventing the wiring harness cable from wrapping itself as you tighten into place the new sensor. I fed my sensor down from the engine compartment (with the protective cap in place) keeping the wiring cable loose but as straight as possible.
26. Using your hands/fingers work the new sensor into place keeping your finger off of the sensor tip now that you've removed the protective cap. Tighten as much as possible with your hands/fingers. Keep checking that your wiring harness is not twisting too much while tightening the sensor into place.
27. place your open ended combination wrench onto the sensor and tighten snuggly. I couldn't use the torque wrench given the tight space. But only 33lbs of torque is needed.
28. Feed the wiring harness down and route into place reinstalling along the way back into the OEM position. The metal clip for the cable is critical as the cable runs very near the exaust pipe. Use your needle nose to crimp as tightly as passible.
29. Run the cable back to the cars connector (do not join yet) and leave it outside of the junction box for now.
30. Reinstall the allen screw and panel back into position.
31. Move to the drivers side wheel area and remove the back panel plus look behind the primary wheel well panel and remove the styrofoam panel held in place with three hex head screws. I did not remove the primary panel from the lip of the fender as the plastic pins were just too tight.
32. behind the back wall panel is a flexible hose held in place with a simple plastic catch. Release the hose and move aside.
33. Once again, the sensor is in a very tight spot but the wiring cable/harness is much shorter and easier to release than on the passenger side. Follow it back ot he junction box releasing as you go.
34. Release the sensor connector from the vehicles connector. Very tight fit so be careful to not pull on the vehicles wiring while releasing.
35. Cut the sensor cable as near the sensor as possible.
36. Now wiggle the open ended positon of the wrench onto the sensor and tap with a hammer. Use either the wrench or your fingers to remove from the exhaust pipe.
37. Feed the new sensor down from above keeping the cable staight as possible.
38. Remove the protective cap from the sensor and using either fingers or the wrench tighten into place. Very tight and difficult. What I did that helped, was that I twisted the sensor cable in a clockwise direction (not too much) and locked it into place wirthin the engie compartment to prevent it from uncoiling. This provided for some needed torque as you attempt to get the sensor to tighten into place
39. Once I got the sensor tightened into place (couldn't use the torque wrench) I ran the wiring cable back to the junction box and reinstalled both mated sensor connectors into the box. It is a tight fit so take your time and the junction box will close properly if you put everything back correctly.
40. Back at the drivers wheel area; reinstall the foam block, reattach the hose to its strap, reinstall the the back panel.
41. Reinstall the rear, under carriage panel with the hex head screws that you kept out of the way of your footpath and body movements so that none of them are lost.
42. Reinstall the front under carriage panel turning the screws a quarter turn.
43. Look around your work area and make sure that nothing has been left off and that the area under the car is 100% free of all tools, etc.
44. Reinstall the tires and torque as close to 88 lbs/ft as possible by holding the tire with your foot and providing quick burst from your lug wrench. Now tighten on the locking lug as well.
45. No need for the homemade ramps (unless you jack cannot fit under the car) to be in place as you're simply allow the car to return without any further need for the jack handle
46. Jack the car up using the center jacking point bringing the jack handle near the ground and remove both jack stands. Slowly bring the car back down standing to one side of the hydraulic jack and not over the extension handle of the jack.
47. Check the torque of your wheel lugs
48. Remove the wheel chocks.
49. You're done.
Last edited by paran; Feb 7, 2013 at 11:18 AM.

Senior Members
Joined: Mar 2011
Posts: 1,198
Likes: 3
From: Boston
My Ride: '06 530i, '07 C280 4matic, '98 ML320
Excellent detailed write-up. Thank you for your time and effort in putting this write-up.
How many miles on the car? Why were you replacing all 4? Were there any codes set?
How many miles on the car? Why were you replacing all 4? Were there any codes set?
Thread Starter
New Members
Joined: Jan 2013
Posts: 228
Likes: 0
From: atlanta
My Ride: 2005 545i Sport
Car has 98,950 miles on it. BMW recommends replacement at 100K on the 545i.
I replaced all 4 according to BMW recommendation at 100K
No code issues before or after the install; preventive/recommended only.
I detailed this repair because there is so much variation from model to model on O2 sensors. I was shooting in the dark at times, and I hope this write up will prevent other people from going through that learning curve all over again.
The 545i is a beast, but that engine is tightly packed into that car, and that affects the precat sensors in particular.
So much of what I wrote will have little bearing on non 545i owners but perhaps some information can be gleaned from it.

Thread Starter
New Members
Joined: Jan 2013
Posts: 228
Likes: 0
From: atlanta
My Ride: 2005 545i Sport
Check out this photo of the 4 sensors that I replaced on my 2005 545i:
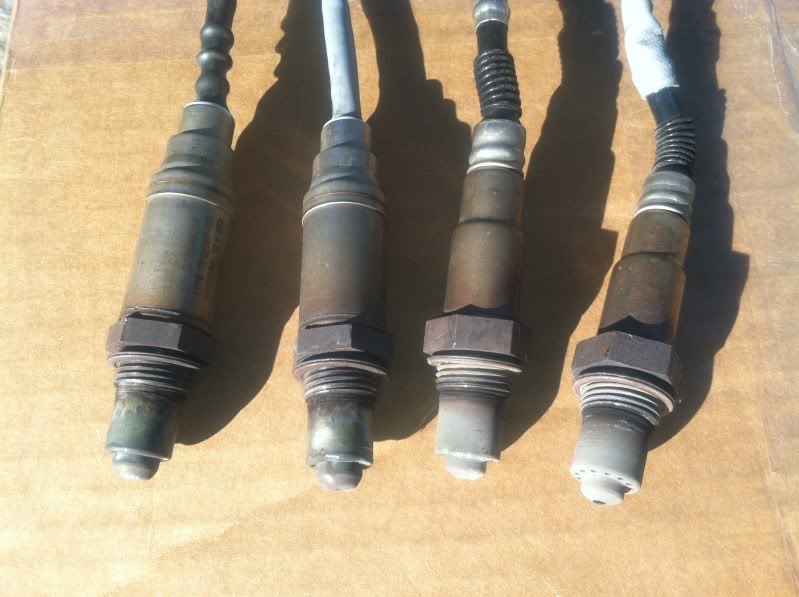
The two on the right have Bosch only part numbers (Pre-cat sensors).
The two on the left have OEM BMW and Bosch part numbers (Post-cat sensors).
So, I assume that the two on the right were replaced at some time in the past and the other two are original to the car at 98,950 miles but I'm not sure. The wiring path clips/connectors looked original on all four and that path is a little involved.
I have a complete BMW maintenance record since new and it doesn't show any O2 sensor replacement. Perhaps an indy shop but I think they're all OEM original to the car.
In any case, the pre cat sensors clearly have more deposits on them than the post cat sensors. So, if you hit the 100K mark on your 545i, perhaps the precat should be replaced and hold off on the post cat sensors.
Last edited by paran; Feb 6, 2013 at 01:27 PM.
Thread Starter
New Members
Joined: Jan 2013
Posts: 228
Likes: 0
From: atlanta
My Ride: 2005 545i Sport
The two on the right are pre-cat sensors and the ones with the most deposits.
I'm no expert, but it "appears" that the post cat (behind the catalytic converter could have gone a lot further than 100k while the pre-cat may have needed to be replaced.
But that's only going by a visual inspection and your mileage may vary.
I'm no expert, but it "appears" that the post cat (behind the catalytic converter could have gone a lot further than 100k while the pre-cat may have needed to be replaced.
But that's only going by a visual inspection and your mileage may vary.
Members
Joined: Aug 2011
Posts: 127
Likes: 0
From: Austin, TX
My Ride: 2004 545i Sport
1998 M3
I did this job about a month ago. Talk about tight spaces! I had to remove the steering tube from the splined shaft on the driver's side to get enough access to the sensor, I'm surprised you didn't have to. I guess my hands are too big.
Thread Starter
New Members
Joined: Jan 2013
Posts: 228
Likes: 0
From: atlanta
My Ride: 2005 545i Sport
Thought about it, but I wound the cable clockwise and locked into place from above. Then I managed to use my combination wrench coupled with the torque from the twisted cable to get it started. Took about 30 - 45 minutes to figure out this trick but it worked.