
How to change the Low Pressure Fuel Sensor on N54

Thread Starter
New Members
Joined: Jun 2012
Posts: 2
Likes: 1
From: PA
My Ride: 2010 535i XDrive
JB4
 REPLACING THE LOW PRESSURE FUEL SENSOR ON AN N54
 I searched everywhere and could not find a procedure to change the low pressure fuel sensor on my 2010 535i (E60, N54), so hopefully someone finds this useful...
STEP 1. There are already several step-by-step instructions for removing the micro filter and cowl, so I won't waste time repeating what someone else has already done. (You only have to remove the drivers side.)
STEP 2. Same thing for the air box.
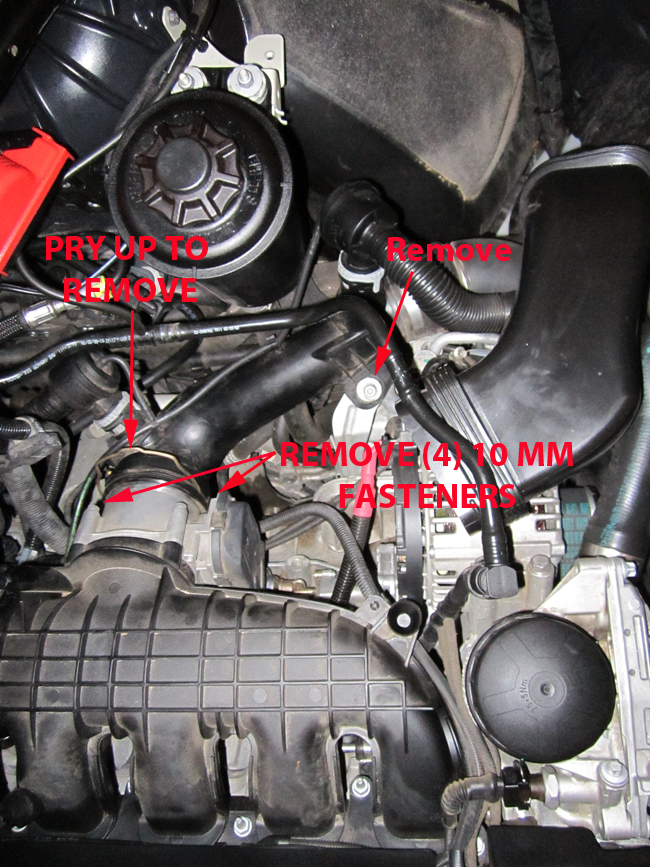
STEP 3. Next, remove the throttle body. To do this, remove the torx fastener located at the opposite end of the pipe, and then pry up on the clip holding the pipe to the throttle body with a flat head screwdriver and pull the hose off. Remove the (4) x 10mm fasteners holding the throttle body to the intake manifold (FYI - torque the fasteners to 8nm when you put it back on.) There is also a vacuum line leading out of the back of the throttle body, squeeze and rotate to remove it. Finally, unplug the electrical connector and you will be able to move the throttle body to the side and out of the way. Cover it with a rag so that nothing nasty gets in there. You might also want to take this opportunity to clean it with carb cleaner if it looks like mine did!

STEP 4.
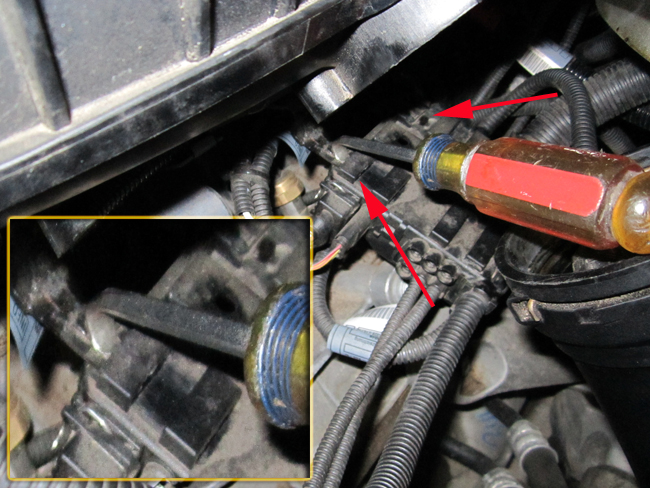
 The #&^%ing Wiring Harness Junction Box! - I suggest you save yourself a piece of sanity and make this tool. It requires ruining a screwdriver, but believe me - it is worth it. Wedge the tip of the special screwdriver under the plastic slot so that the tip is wedged between the Wiring Harness Junction Box and the metal bracket that is holding it in place. Gently pry up so as to bend the plastic upward so that you can slide the junction box over the metal catch while pulling towards you at the same time. After you get one side, do the same thing to the other. When prying up, be careful not to damage the surface of the intake manifold where the throttle body mounts - you need that surface to stay nice and smooth so that the throttle body o-ring seals.
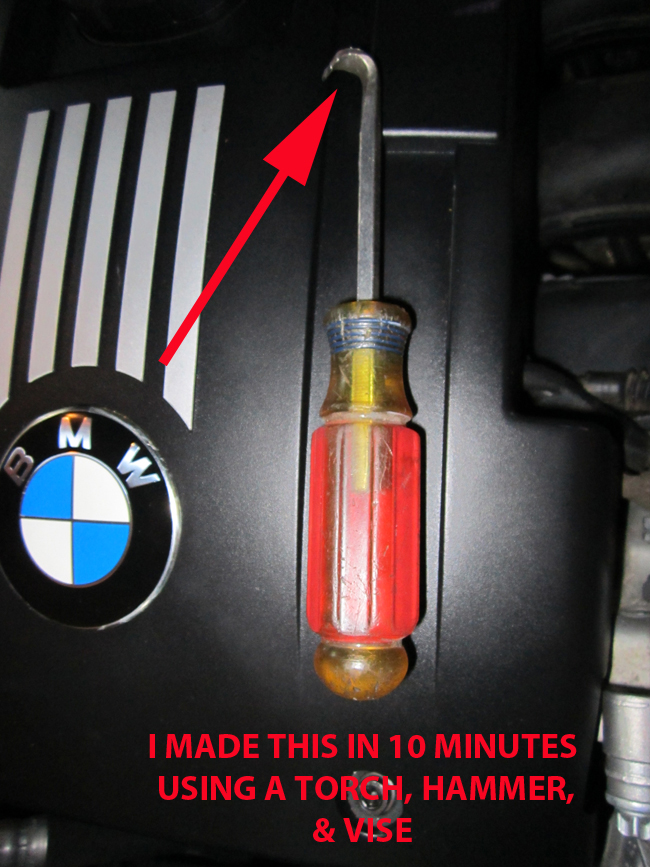
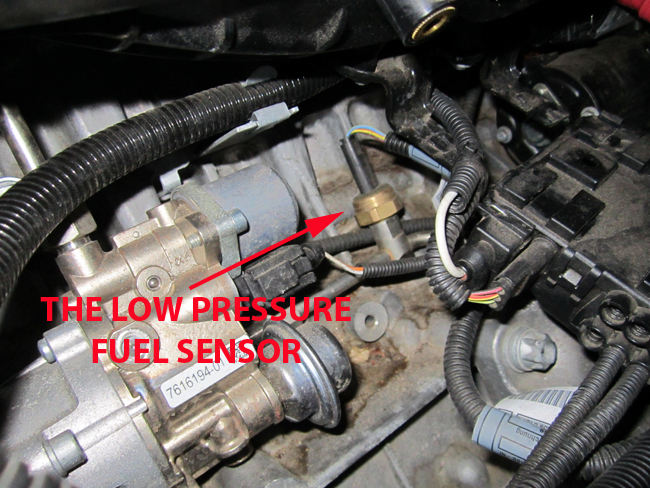
STEP 5. With the Wiring Harness Junction Box removed, we can finally see the Low Pressure Fuel Sensor. Using a small flat head terminal screwdriver, pry the clip on the electrical connector back, and pull up on the connector to unplug it.

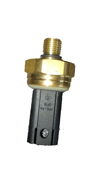
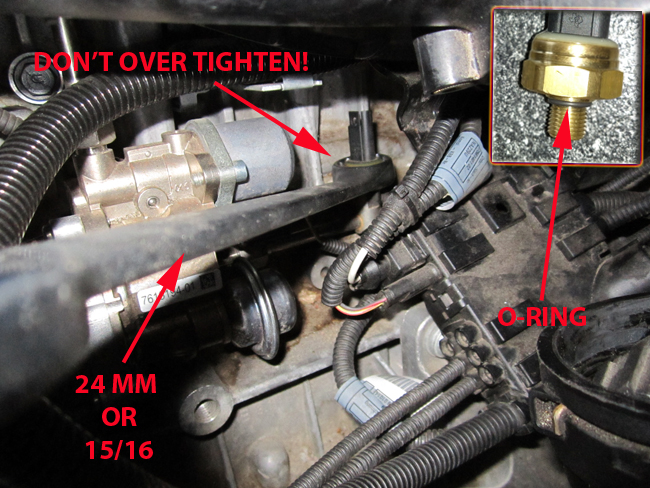
STEP 6. Using a 24mm (or 15/16) wrench, remove the sensor and replace with new one. Notice when you break the sensor loose that it is not super tight. Be careful when tightening the new sensor that you don't over tighten! It would be a real bummer if you snapped it off or stripped the threads. I couldn't find the torque spec for the sensor. If anyone knows what it is, let me know and I will add it.
STEP 7. Put everything back together in reverse order to how it was disassembled, and you're done!


New Members
Joined: Jul 2011
Posts: 5
Likes: 0
From: Dallas
My Ride: 2008 535i Black Metallic Sapphire
Attachment 133987 REPLACING THE LOW PRESSURE FUEL SENSOR ON AN N54 Attachment 133987
I searched everywhere and could not find a procedure to change the low pressure fuel sensor on my 2010 535i (E60, N54), so hopefully someone finds this useful...
STEP 1. There are already several step-by-step instructions for removing the micro filter and cowl, so I won't waste time repeating what someone else has already done. (You only have to remove the drivers side.)
BMW Microfilter & Housing Removal E60 5 series How to DIY: BMTroubleU - YouTube
STEP 2. Same thing for the air box.
YouTube
STEP 3. Next, remove the throttle body. To do this, remove the torx fastener located at the opposite end of the pipe, and then pry up on the clip holding the pipe to the throttle body with a flat head screwdriver and pull the hose off. Remove the (4) x 10mm fasteners holding the throttle body to the intake manifold (FYI - torque the fasteners to 8nm when you put it back on.) There is also a vacuum line leading out of the back of the throttle body, squeeze and rotate to remove it. Finally, unplug the electrical connector and you will be able to move the throttle body to the side and out of the way. Cover it with a rag so that nothing nasty gets in there. You might also want to take this opportunity to clean it with carb cleaner if it looks like mine did!
Attachment 133980 Attachment 133981
STEP 4. The #&^%ing Wiring Harness Junction Box! - I suggest you save yourself a piece of sanity and make this tool. It requires ruining a screwdriver, but believe me - it is worth it. Wedge the tip of the special screwdriver under the plastic slot so that the tip is wedged between the Wiring Harness Junction Box and the metal bracket that is holding it in place. Gently pry up so as to bend the plastic upward so that you can slide the junction box over the metal catch while pulling towards you at the same time. After you get one side, do the same thing to the other. When prying up, be careful not to damage the surface of the intake manifold where the throttle body mounts - you need that surface to stay nice and smooth so that the throttle body o-ring seals.
Attachment 133982 Attachment 133983
STEP 5. With the Wiring Harness Junction Box removed, we can finally see the Low Pressure Fuel Sensor. Using a small flat head terminal screwdriver, pry the clip on the electrical connector back, and pull up on the connector to unplug it.
Attachment 133984 Attachment 133985
STEP 6. Using a 24mm (or 15/16) wrench, remove the sensor and replace with new one. Notice when you break the sensor loose that it is not super tight. Be careful when tightening the new sensor that you don't over tighten! It would be a real bummer if you snapped it off or stripped the threads. I couldn't find the torque spec for the sensor. If anyone knows what it is, let me know and I will add it.
Attachment 133986
STEP 7. Put everything back together in reverse order to how it was disassembled, and you're done!
I searched everywhere and could not find a procedure to change the low pressure fuel sensor on my 2010 535i (E60, N54), so hopefully someone finds this useful...
STEP 1. There are already several step-by-step instructions for removing the micro filter and cowl, so I won't waste time repeating what someone else has already done. (You only have to remove the drivers side.)
BMW Microfilter & Housing Removal E60 5 series How to DIY: BMTroubleU - YouTube
STEP 2. Same thing for the air box.
YouTube
STEP 3. Next, remove the throttle body. To do this, remove the torx fastener located at the opposite end of the pipe, and then pry up on the clip holding the pipe to the throttle body with a flat head screwdriver and pull the hose off. Remove the (4) x 10mm fasteners holding the throttle body to the intake manifold (FYI - torque the fasteners to 8nm when you put it back on.) There is also a vacuum line leading out of the back of the throttle body, squeeze and rotate to remove it. Finally, unplug the electrical connector and you will be able to move the throttle body to the side and out of the way. Cover it with a rag so that nothing nasty gets in there. You might also want to take this opportunity to clean it with carb cleaner if it looks like mine did!
Attachment 133980 Attachment 133981
STEP 4.
The #&^%ing Wiring Harness Junction Box! - I suggest you save yourself a piece of sanity and make this tool. It requires ruining a screwdriver, but believe me - it is worth it. Wedge the tip of the special screwdriver under the plastic slot so that the tip is wedged between the Wiring Harness Junction Box and the metal bracket that is holding it in place. Gently pry up so as to bend the plastic upward so that you can slide the junction box over the metal catch while pulling towards you at the same time. After you get one side, do the same thing to the other. When prying up, be careful not to damage the surface of the intake manifold where the throttle body mounts - you need that surface to stay nice and smooth so that the throttle body o-ring seals.Attachment 133982 Attachment 133983
STEP 5. With the Wiring Harness Junction Box removed, we can finally see the Low Pressure Fuel Sensor. Using a small flat head terminal screwdriver, pry the clip on the electrical connector back, and pull up on the connector to unplug it.
Attachment 133984 Attachment 133985
STEP 6. Using a 24mm (or 15/16) wrench, remove the sensor and replace with new one. Notice when you break the sensor loose that it is not super tight. Be careful when tightening the new sensor that you don't over tighten! It would be a real bummer if you snapped it off or stripped the threads. I couldn't find the torque spec for the sensor. If anyone knows what it is, let me know and I will add it.
Attachment 133986
STEP 7. Put everything back together in reverse order to how it was disassembled, and you're done!
Thank for the DIY. Can you re-up the videos?

New Members
Joined: Aug 2015
Posts: 1
Likes: 0
From: California
My Ride: 2010 535xi E60 N54
STEP 6. Using a 24mm (or 15/16) wrench, remove the sensor and replace with new one. Notice when you break the sensor loose that it is not super tight. Be careful when tightening the new sensor that you don't over tighten! It would be a real bummer if you snapped it off or stripped the threads. I couldn't find the torque spec for the sensor. If anyone knows what it is, let me know and I will add it.
N54, N53
M10
20 - 3 Nm

New Members
Joined: Jan 2021
Posts: 2
Likes: 0
From: The Hague
My Ride: BMW E92
Model Year: 2007
Engine: N53
High there, the torque specs are 20 - 3 NM , that’s what TIS BMW says. So what I understand of it, is about 20 NM , I don’t know what the -3 means!
greetings Ren�
greetings Ren�
New Members
Joined: Jan 2021
Posts: 2
Likes: 0
From: The Hague
My Ride: BMW E92
Model Year: 2007
Engine: N53
Sorry, I didn’t see the reply about the torque specs, so now you have it twice! ;-)
I don’t own a 5 serie, but a 3 serie, I do a lot of maintenance or repairs by myself, so if anyone needs some info or advise, I will be happy to give it!
I don’t own a 5 serie, but a 3 serie, I do a lot of maintenance or repairs by myself, so if anyone needs some info or advise, I will be happy to give it!

Thread
Thread Starter
Forum
Replies
Last Post