
Front Wood Trim Install DIY
 10-17-2006, 11:19 PM
#51
Contributors
Join Date: Sep 2006
Location: Hong Kong
Posts: 21,274
Likes: 0
Received 0 Likes
on
0 Posts
My Ride: Mini Cooper
I have installed the doors but not the center 1 and the dash 1.
I will try and install the other 2 parts. mys self.
do you have any pics for the center 1?
I will post some pic once all parts installed this weekend.
I will try and install the other 2 parts. mys self.
do you have any pics for the center 1?
I will post some pic once all parts installed this weekend.
 01-08-2007, 01:48 AM
#52
Senior Members
Join Date: Feb 2006
Location: Bahrain
Posts: 751
Likes: 0
Received 0 Likes
on
0 Posts
My Ride: 2005 525i : Alpine White, Steptronic, Black Interior with Amethyst Leather & Popular Grain Brown, 17" 122-Style Rims, Adaptive Bi-Xenon Headlights, Auto Dimming & Folding Mirrors, Advanced A/C, Sports Steering Wheel, Electrically Adjustable Steering Column, Extended Lighting Package, PDC, Sliding Armrest, Bus Navi, Hi-Fi Sound System (MP3 DVDs), CD Changer, Rear Sunshades..
MODS:M-tech front bumper, Painted Grill, Installed Aux-In, Garage Door Opener (Overhead Compartement), ///M Steering wheel, Wood hand brake trim, Wood gear-shift lever. 35% Tint all around..
Got, ACS Roof Spoiler, but not installed..
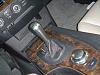
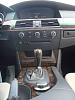
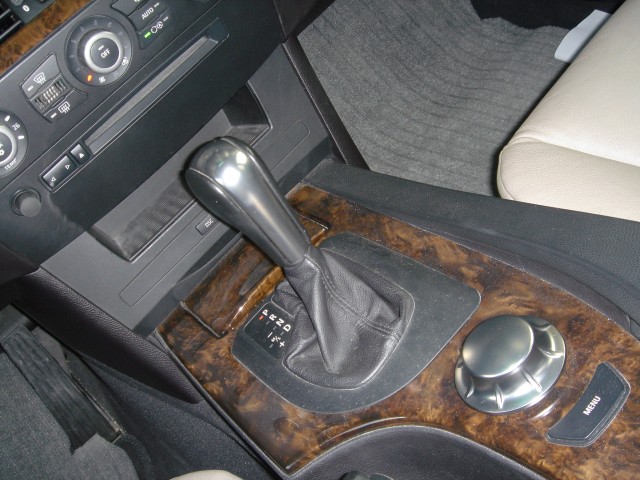
i have finally installed the front wood trim.. also i have installed a wood shift knob.. it doesnt show in the picture but the front wood looks a little darker than the rest of my trim... thats the way it is with wood you never know what you design/color you will get... its really nice..i like it so much better... looks like im gonna buy the parking brake wood lever..... here are some pics to show the improvement...


 01-14-2008, 10:54 AM
#55
Members

Join Date: Jun 2007
Location: Italy
Posts: 72
Likes: 0
Received 0 Likes
on
0 Posts
08-30-2008, 11:16 AM
#57
Members
Join Date: Jul 2007
Location: Seattle WA, USA
Posts: 143
Likes: 0
Received 0 Likes
on
0 Posts
My Ride: 2004 530i, Silver Gray, Premium Pkg, Cold Weather package, Black Leather seats with lumbar support, Poplar wood finish.
Mods: M6 19" wheels with 245/35/19 Front Tires 275/30/19 Rear Tires, K&N Filter, H&R Sway bars, Magnaflow Muffler, Sprint Booster, Black front grill, M-tech front bumper, Debadged
Originally Posted by Lomag' post='71260' date='Dec 21 2004, 04:06 PM
Here's a quick DIY of the front console wood trim install for us MY2004 owners. It's fairly simple but you need to be careful not to scratch up the trim or other plastic parts. I messed up the strip of switches with the dsc, pdc buttoms a little bit by scratching it but it can barely be seen.
So to begin, I'd do this with the car off since you have to unplug things. There's some PDF's on this site somehwere from TIS which show pictures too but I think the below are good.
First you just need to pop out the door lock switch from the top and bottom and unplug it to get it out of the way:
Attachment 4171
Attachment 4172
Next, start from the right side there and pop out the long strip of trim. It's a little scarey but trust me, you won't break it. Work your way to the left slowly prying it out.
Attachment 4173
Here's the nakid dash and the trim I put in the back along with the new piece. You'll see those white clips, you may rip some of them out and they'll be attached to the long trim. Just pry them off and put them back in their slot. When the long trim piece is re-installed you have to rotate them diagonally so they look like a diamond rather than a square. I forgot to take a picture of that.
Attachment 4175
Attachment 4174
Next, there's two screws which need to be removed that hold in the plastic center trim. There's some clips on the left and right side which snap out fairly easily. The two clips on the bottom though are a little harder to snap out. I stuck the screwdriver in from the underside and they came out.
Attachment 4176
The center piece should now be loose but the AC and DSC button strips still attached. They need to be popped out, you'll see the little notches on top and bottom. I suggest popping out the bottom side first, then the top will come out easy for the AC controls. The DSC button strip again was a little harder to pop out since it's hard to reach the bottom but I got it out. Here's the nakid dash again:
Attachment 4177
That's basically it. The old trim will be out. You can pop the DSC and AC controls back in their respective spots. Snap in the new trim and screw it back in and put the long trim piece back on (after rotating those white clips like I said before). Don't forget to put the door lock button back in and don't loose that wire! The final result:
Attachment 4178
I love it, looks much, much, much better!! I'll admit like I said above I damaged that strip of buttons with the DSC, PDC, heater buttons. It's not noticable really but I'm looking for a replacement anyway. It should only be a few bucks for the button cover.
Just be careful and good luck!
Just followed this thread and completed the trim install..it was easy and as described. The only new observation was that at one point ALL my AC lights came on (in spiete of not having the key in) and would nt go away. I tapped the wires behind the AC controls and some how it was fixed after a while...dont know what happened there .. but all's well that end's well ..
thanks much for this thread!
~ V
02-02-2009, 03:18 PM
#59
Contributors
Join Date: Sep 2007
Location: .
Posts: 8,199
Likes: 0
Received 0 Likes
on
0 Posts
My Ride: .
Model Year: .
Originally Posted by Lomag' post='71260' date='Dec 21 2004, 05:06 PM
...
Next, start from the right side there and pop out the long strip of trim. It's a little scarey but trust me, you won't break it. Work your way to the left slowly prying it out.
Attachment 4173
Next, start from the right side there and pop out the long strip of trim. It's a little scarey but trust me, you won't break it. Work your way to the left slowly prying it out.
Attachment 4173
Is it the same procedure in removing the left-side, as in the pic above?
Thanks!
