
Fixed the gap between hood and M-Kit Bumper

Thread Starter
Contributors
Joined: Sep 2003
Posts: 1,623
Likes: 0
From: Los Angeles, CA USA
I finally fixed the gap that I had between the hood and the top of the M-Tech bumper in my car. I know there were a couple of people here who had the same problem and wanted to know how to fix it.
There are two metal brackets that are needed for mounting the M bumper to the bumper carrier. When I first did my installation I noticed that those brackets were being pushed down by the black styrofoam on the bumper carrier and thought about making cutouts in the foam so that the bottom of the brackets sit flush to the bottom of the foam, but then I decided to try it that way first. I did and noticed a bigger than usual gap above the bumper. Later on I noticed that on some of the installation pictures on this board it looked like some people had done the same thing that I was thinking of doing (makeing a cutout in the foam). I decided to try this but did not have time until today. It ended up getting rid of most of the extra gap, but there was still a bit more than I liked, so I tried to use some thick washers as spacers or shims under the mounting points at the top of the bumper. This helped get rid of the rest of the extra gap. I have directions and pics of both methods that I am posting below. I will call the foam cutout "Method 1" and post it here, and I will call the washer/spacer method "Method 2" and post it in a reply below. If anyone has this gap and wants to get rid of it I would suggest trying the second method first since it is MUCH easier and it works quite well. If that does not solve it completely then try Method 1 as well.
<span style='font-size:14pt;line-height:100%'>Method 1</span>
First of all notice how in the picture below the bracket is sitting below the big black foam on the bumper carrier. It does not even look that bad in the picture but once the bumper is put on it pushes down on the black foam which in turn pushes down on the bracket. This makes it very difficult to fit the bumper, and it is physically forced down, hence the big gap above the bmper. The foam needs to be cut out to a slightly larger dimension that the bracket so that the bracket sits inside the foam and the bottom of the bracket is flush with the bottom of the foam. You can see all these in the pictures below:
Thread Starter
Contributors
Joined: Sep 2003
Posts: 1,623
Likes: 0
From: Los Angeles, CA USA
<span style='font-size:14pt;line-height:100%'>Method 2</span>
The second method that I used (which I recommend trying first) was to use washers as spacers or shims. The washers were approximately 2mm thick and were placed under the mounting points at the top of the bumper so that they would keep the top of the bumper a bit lifted from it's usual position. You should probably buy 2, 3, and 4mm thick washers and experiment with them until you get the gap to a point where you like it. Here are the pics and directions for Method 2:


The second method that I used (which I recommend trying first) was to use washers as spacers or shims. The washers were approximately 2mm thick and were placed under the mounting points at the top of the bumper so that they would keep the top of the bumper a bit lifted from it's usual position. You should probably buy 2, 3, and 4mm thick washers and experiment with them until you get the gap to a point where you like it. Here are the pics and directions for Method 2:


Banned
Joined: Jan 2005
Posts: 2,882
Likes: 0
From: San Francisco Bay area
My Ride: '05 545i, silver gray, black leather with anthracite maple wood, sport package, premium sound, navigation, cold weather package, electric rear sunshade, folding rear seat, satellite radio prep, PIAA 4150K fogs, red rear reflectors, hardwired Valentine One
Nice write-up. Looks good now!

 ! you need a new sig pic now
  .
.
Thread Starter
Contributors
Joined: Sep 2003
Posts: 1,623
Likes: 0
From: Los Angeles, CA USA
Originally Posted by coolguy' post='528490' date='Feb 7 2008, 10:52 AM
Does this still apply for latest Mtech kits? or only ones in 2005?
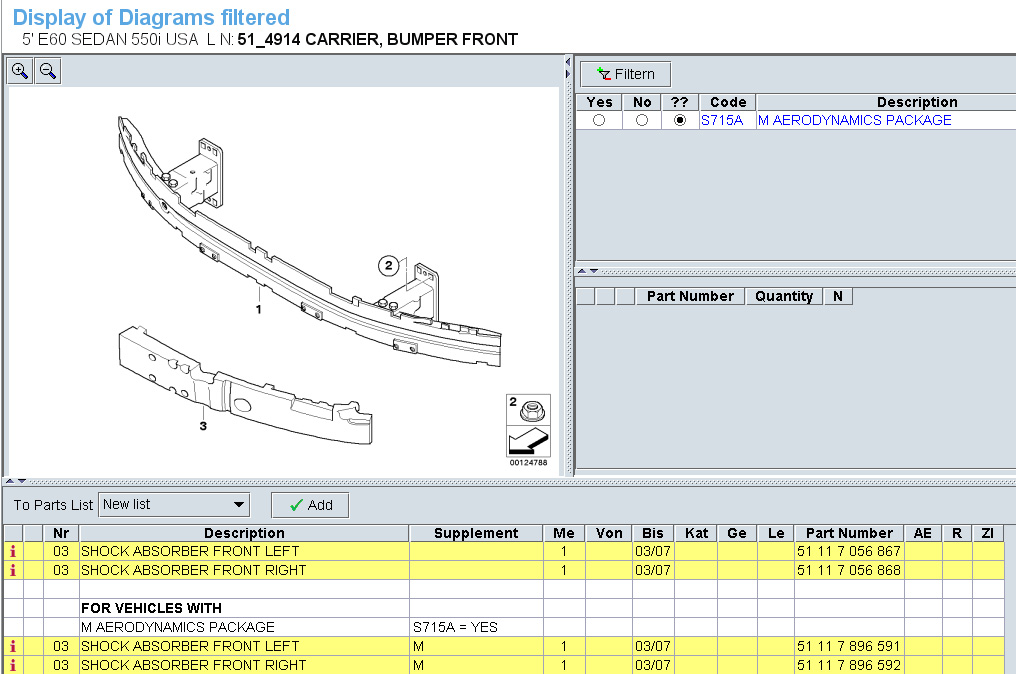
Here's the ETK page and part numbers for both the foam shock absorbers for the standard bumper and for the M-Tech Bumper. This ETK page is for the Pre-LCI E60..........However, the pre-LCI E60 and the LCI E60 use the same foam pieces for the M-Tech bumpers (same part numbers), even though the foam pieces are different on the pre-LCI and LCI's with the standard bumpers.

Senior Members
Joined: Jan 2007
Posts: 1,315
Likes: 0
From: NJ, USA
My Ride: 2006 525i, Premium,Cold,Xenon Packages
So, is the correct foam pieces included from quad_m ? I am having mine installed this weekend.. So I want to be sure this problem don't exist. Since I am paying a installer to do this Mtech install 
If not, I guess I have to advise the installer to go with Washers route to fill the gap.. provided he can buy them from somewhere
If not, I guess I have to advise the installer to go with Washers route to fill the gap.. provided he can buy them from somewhere
Thread Starter
Contributors
Joined: Sep 2003
Posts: 1,623
Likes: 0
From: Los Angeles, CA USA
Originally Posted by coolguy' post='528719' date='Feb 7 2008, 08:41 PM
So, is the correct foam pieces included from quad_m ? I am having mine installed this weekend.. So I want to be sure this problem don't exist. Since I am paying a installer to do this Mtech install
If not, I guess I have to advise the installer to go with Washers route to fill the gap.. provided he can buy them from somewhere
If not, I guess I have to advise the installer to go with Washers route to fill the gap.. provided he can buy them from somewhere