
DIY: E60 PROcede and PWM Meth Supplemental
 09-05-2011, 05:31 PM
#1
Senior Members
Thread Starter
Join Date: Oct 2009
Location: Indiana, USA
Posts: 1,380
Likes: 0
Received 3 Likes
on
3 Posts
My Ride: 2007 530xi: Sport, NAV, PDC, HUD, Cold Wthr, CA, Logic 7, HD Radio, SAT, Custom NCS coded options 2008 535xi: Sport, Night Vision, NAV, PDC, HUD, Cold Wthr, CA, Logic 7, SAT, Custom NCS coded options, Rear Seat Heat Retrofit, Passport 9500ci
Model Year: 2008
Engine: N54
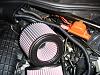
The Vishnu PROcede and PWM Methanol Injection system will give your 535 ~410whp when combined with an intake that allows more air such as a dual cone intake.
For more info: http://www.procedetu...MW/n54/n54.html
The instructions and kit are for the N54 engine found in the 335 and 535 but the kit was specifically designed and tested on the 335. There are some changes that are required to adapt it fully to the 535.
These notes show how I adapted the kit to my 535xi but you still need the original installation instructions
I) The PROcede was previously installed on my car and is not documented here. Vishnu's install intructions work fine for the 535.
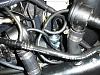
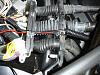
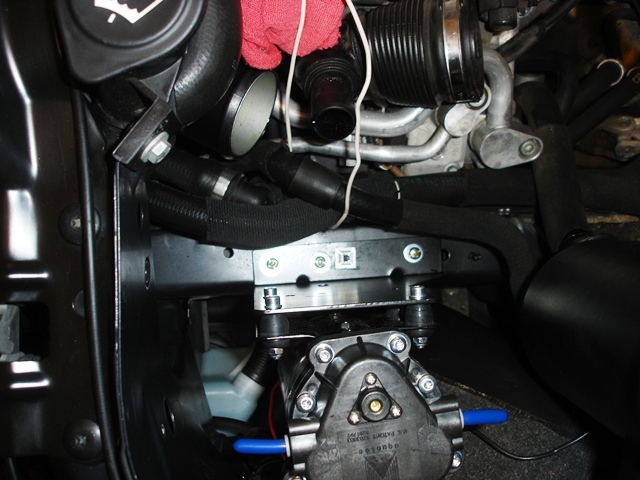
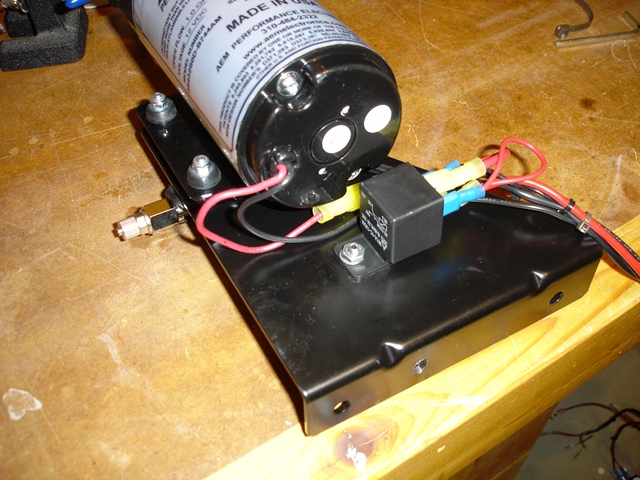
II) The pump mount
The bracket is designed to fit on 2 stock bolts that are on 335 frame rail. The 535 frame rail has these two bolts - but they have the different spacing and location and the bracket does not fit. I drilled 2 new holes in the bracket and drilled and tapped 3 new holes in the frame rail. One of the bracket holes I made large enough to fit around the welded frame bolt so that it would sit nice and flat.
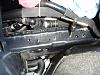
Here you can see the frame bolt sticking through. I stuck a plastic bolt over the stud to keep it from hitting the hoses. (The hose keeper was attached to this stud)
The relay comes attached to the top of the pump bracket with a zip-tie. I decided I liked the looks better by moving it to the bottom and bolted to the bracket.

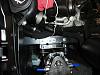
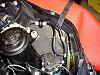
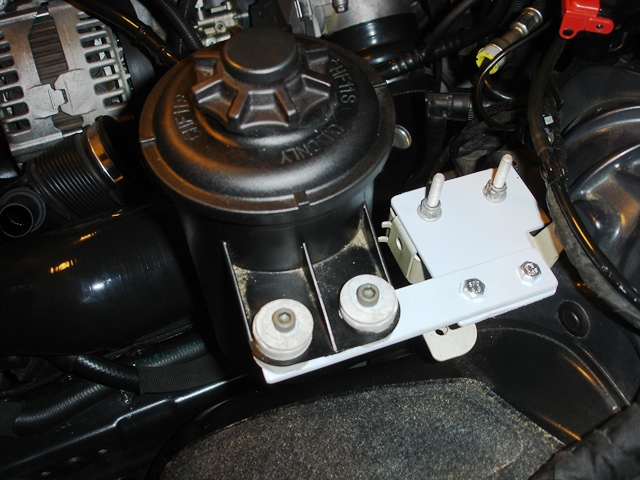
III) The Power Steering Reservoir
The kit comes with a bracket for relocating the Power Steering reservoir for the 335. The 535 needs to be relocated also but I had to make a new bracket.
This shows the reservoir with the provided bracket indicating that it won't work

This pic shows the bracket I made in primer grey
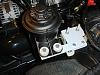
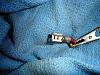
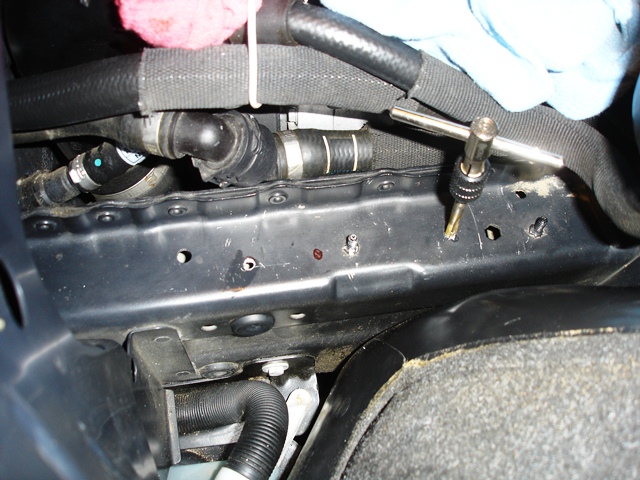
IV) The Boost Switch
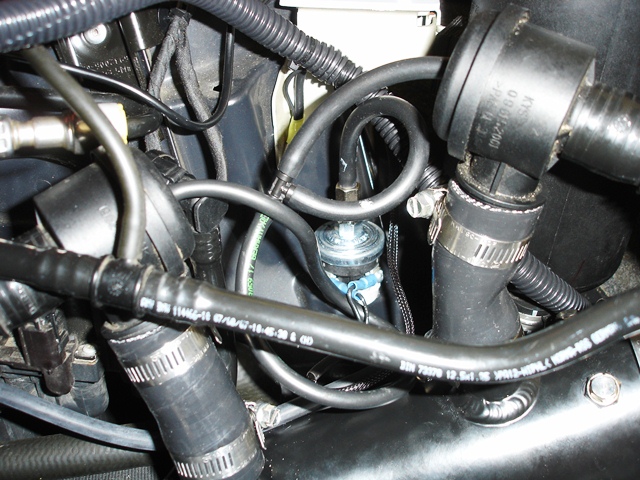
The boost switch works as provided. But I added cable sheathing and replaced the provided ring terminals with spade terminals with a better fit. I don;t like to rely on crimped connections so I soldered the spade terminals. Instead of zip tieing the switch to something, I inserted it into the rubber grommet that was left open after moving the power steering reservoir. In the pic you can also see the divertor valve hose coupling is a little too snug causing a slight kink in the hose. I will look for something better probably after I replace the stock units with some forge valves.
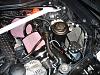
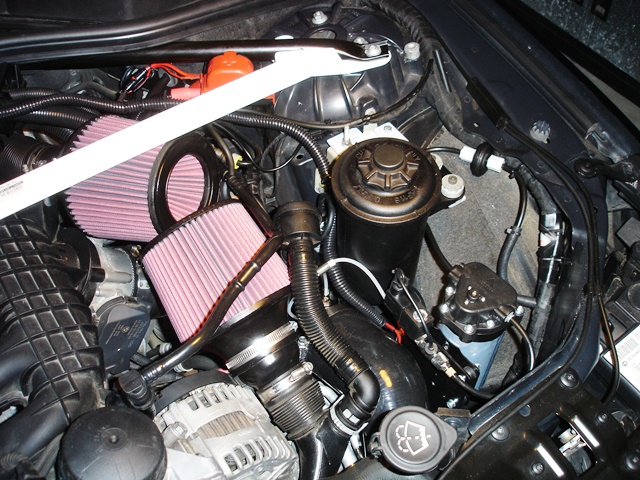
V) The Charge Pipe
Our Air Conditioner unit causes the Charge Pipe to have very tight fitment - but it will work. Here you can see I addedd a piece of very dense rubber to the bottom of the charge pipe where it rests against a sharp edge of the AC unit. It causes some alignment difficulties with the charge pipe but mine is attached and has handled ~16 psi of boost.
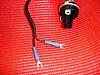
VI) The Electric
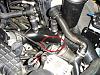
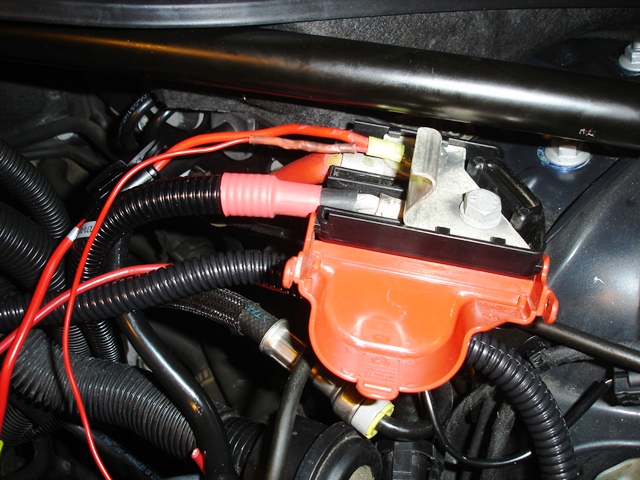
The supplied harness for the 335 uses the positive battery connection on the passenger side. The 535 has it on the driver side so the harness needs modified to be shorter. Similary, the power wire for the procede relay needs to be lengthened to reach from the driver side back to the ECU box.
Here you can see how I made my connection to the positive side
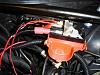
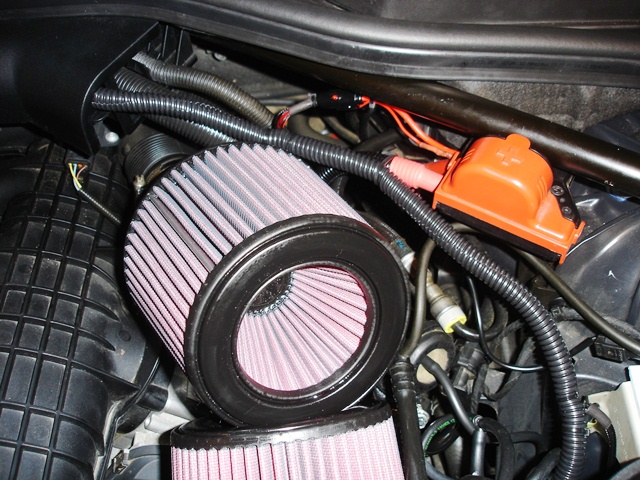
In the this finished pic you can see the new 30amp fuse next to the red positive terminal cover and the new corregated pastic cable sheathing that runs from the pump to the postive supply then under the plastic cable holder then over to the ECU box.
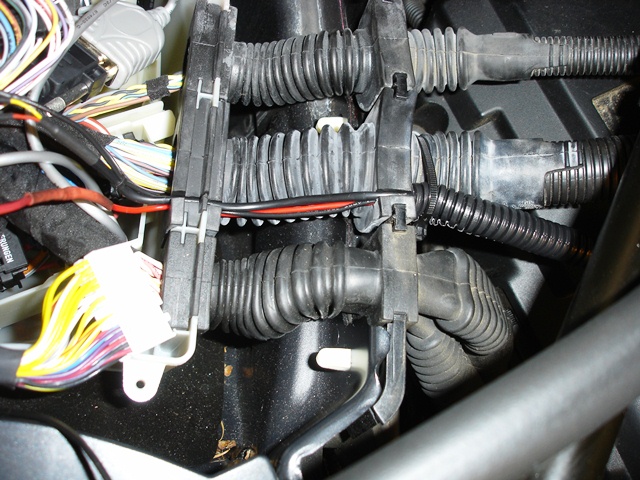
Here you can see how I inserted the wires into the ECU box. For easier removal for delaer service visits, I decided not to run the wires through the factory grommets. Instead I slit the rubber grommets and slid the wires into the slit
Adding a new relay for a better power source is included in the instructions. The instructions shows crimping 2 new spade connectors to existing wires which connect to the relay. I think these wires are much too small to rely on a crimp so here you can see I again soldered on my crimp on spade connectors.
VI) The Meth Plumbing
The 335 has the window washer tanl on the passenger side whereas the 535 it is on the driver side right next to the pump. This pic shows where I inserted the T into the washer tank hose and the check valve and filter
Finished:
For more info: http://www.procedetu...MW/n54/n54.html
The instructions and kit are for the N54 engine found in the 335 and 535 but the kit was specifically designed and tested on the 335. There are some changes that are required to adapt it fully to the 535.
These notes show how I adapted the kit to my 535xi but you still need the original installation instructions
I) The PROcede was previously installed on my car and is not documented here. Vishnu's install intructions work fine for the 535.
II) The pump mount
The bracket is designed to fit on 2 stock bolts that are on 335 frame rail. The 535 frame rail has these two bolts - but they have the different spacing and location and the bracket does not fit. I drilled 2 new holes in the bracket and drilled and tapped 3 new holes in the frame rail. One of the bracket holes I made large enough to fit around the welded frame bolt so that it would sit nice and flat.
Here you can see the frame bolt sticking through. I stuck a plastic bolt over the stud to keep it from hitting the hoses. (The hose keeper was attached to this stud)
The relay comes attached to the top of the pump bracket with a zip-tie. I decided I liked the looks better by moving it to the bottom and bolted to the bracket.
III) The Power Steering Reservoir
The kit comes with a bracket for relocating the Power Steering reservoir for the 335. The 535 needs to be relocated also but I had to make a new bracket.
This shows the reservoir with the provided bracket indicating that it won't work

This pic shows the bracket I made in primer grey
IV) The Boost Switch
The boost switch works as provided. But I added cable sheathing and replaced the provided ring terminals with spade terminals with a better fit. I don;t like to rely on crimped connections so I soldered the spade terminals. Instead of zip tieing the switch to something, I inserted it into the rubber grommet that was left open after moving the power steering reservoir. In the pic you can also see the divertor valve hose coupling is a little too snug causing a slight kink in the hose. I will look for something better probably after I replace the stock units with some forge valves.

V) The Charge Pipe
Our Air Conditioner unit causes the Charge Pipe to have very tight fitment - but it will work. Here you can see I addedd a piece of very dense rubber to the bottom of the charge pipe where it rests against a sharp edge of the AC unit. It causes some alignment difficulties with the charge pipe but mine is attached and has handled ~16 psi of boost.

VI) The Electric
The supplied harness for the 335 uses the positive battery connection on the passenger side. The 535 has it on the driver side so the harness needs modified to be shorter. Similary, the power wire for the procede relay needs to be lengthened to reach from the driver side back to the ECU box.
Here you can see how I made my connection to the positive side
In the this finished pic you can see the new 30amp fuse next to the red positive terminal cover and the new corregated pastic cable sheathing that runs from the pump to the postive supply then under the plastic cable holder then over to the ECU box.
Here you can see how I inserted the wires into the ECU box. For easier removal for delaer service visits, I decided not to run the wires through the factory grommets. Instead I slit the rubber grommets and slid the wires into the slit
Adding a new relay for a better power source is included in the instructions. The instructions shows crimping 2 new spade connectors to existing wires which connect to the relay. I think these wires are much too small to rely on a crimp so here you can see I again soldered on my crimp on spade connectors.

VI) The Meth Plumbing
The 335 has the window washer tanl on the passenger side whereas the 535 it is on the driver side right next to the pump. This pic shows where I inserted the T into the washer tank hose and the check valve and filter

Finished:
 09-06-2011, 06:31 AM
#2
Contributors
Join Date: May 2009
Location: SoCal
Posts: 10,496
Likes: 0
Received 2 Likes
on
2 Posts
My Ride: 2008 550I LOADED, all options except HUD and NV
BAD.....A.......S.........S.........S!!!!!!
You're amazing at these modifications, nice work Bro. Too bad a meth kit doesn't do crap for a NA I6
You're amazing at these modifications, nice work Bro. Too bad a meth kit doesn't do crap for a NA I6
 09-06-2011, 04:15 PM
#4
Senior Members
Thread Starter
Join Date: Oct 2009
Location: Indiana, USA
Posts: 1,380
Likes: 0
Received 3 Likes
on
3 Posts
My Ride: 2007 530xi: Sport, NAV, PDC, HUD, Cold Wthr, CA, Logic 7, HD Radio, SAT, Custom NCS coded options 2008 535xi: Sport, Night Vision, NAV, PDC, HUD, Cold Wthr, CA, Logic 7, SAT, Custom NCS coded options, Rear Seat Heat Retrofit, Passport 9500ci
Model Year: 2008
Engine: N54
 09-06-2011, 04:20 PM
#5
Senior Members
Thread Starter
Join Date: Oct 2009
Location: Indiana, USA
Posts: 1,380
Likes: 0
Received 3 Likes
on
3 Posts
My Ride: 2007 530xi: Sport, NAV, PDC, HUD, Cold Wthr, CA, Logic 7, HD Radio, SAT, Custom NCS coded options 2008 535xi: Sport, Night Vision, NAV, PDC, HUD, Cold Wthr, CA, Logic 7, SAT, Custom NCS coded options, Rear Seat Heat Retrofit, Passport 9500ci
Model Year: 2008
Engine: N54
Stock boost is 5-8PSI. Some guys are running 18 and a few more even higher. 16 is a pretty safe amount. I think i will work on timing for even more power before I up the boost any further.
09-08-2011, 06:10 AM
#6
New Members

Join Date: Mar 2011
Location: US
Posts: 3
Likes: 0
Received 0 Likes
on
0 Posts
Hey man, great pics and great install/mods on your car. I'm trying to install my meth kit too but I can't find a good place to mount the 2.2 gal meth tank. Are you running the WW meth tank or did you buy a separate tank? If you bought a separate tank, can you post up pics of your tank mount solution. I would greatly appreciate it man. Thanks!
09-08-2011, 06:28 AM
#7
Super Moderator
Join Date: Jan 2008
Location: So. Cal (SFV)
Posts: 17,508
Likes: 0
Received 3 Likes
on
3 Posts
My Ride: 2011.5 Alpine White E90 M3 | Black Novillo Leather | Carbon Fiber Leather Trim | ZCP | ZP2 | M-DCT | Navigation | Moonroof | 6FL Mods: TMS 12.5mm spacers all around l Hawk HPS Brake Pads l OEM M3 Edition Grills l Paint Matched Side Gills l Key Hole D
well done, nice to see the e60 n54 engine mod'ing pick up a bit around here 
09-08-2011, 06:45 AM
#8
Senior Members
Thread Starter
Join Date: Oct 2009
Location: Indiana, USA
Posts: 1,380
Likes: 0
Received 3 Likes
on
3 Posts
My Ride: 2007 530xi: Sport, NAV, PDC, HUD, Cold Wthr, CA, Logic 7, HD Radio, SAT, Custom NCS coded options 2008 535xi: Sport, Night Vision, NAV, PDC, HUD, Cold Wthr, CA, Logic 7, SAT, Custom NCS coded options, Rear Seat Heat Retrofit, Passport 9500ci
Model Year: 2008
Engine: N54
Hey man, great pics and great install/mods on your car. I'm trying to install my meth kit too but I can't find a good place to mount the 2.2 gal meth tank. Are you running the WW meth tank or did you buy a separate tank? If you bought a separate tank, can you post up pics of your tank mount solution. I would greatly appreciate it man. Thanks!
I am using the window washer tank. It is located right next to the meth pump and holds 1.3 gal. With a 50/50 mixture I would use it on my windshield if I had to.
09-12-2011, 01:13 PM
#10
Senior Members
Join Date: May 2009
Location: UK
Posts: 817
Likes: 0
Received 0 Likes
on
0 Posts
My Ride: E60 530d
[font="'Comic Sans MS"]Hmmm. Can the transmission take that much of a power increase though? Also, have you done anything to increase stock cooling of the engine?[/font]