Rear Entertainment Retrofit
 08-21-2010, 02:27 PM
#1
Contributors
Thread Starter

Good day all,
As promised, here is the DIY for OEM look rare entertainment system retrofit
(Sorry for the language since it is my second language and this is my first DIY topic)
My ride is BMW E60 530i 2004 model (4/2003) with sport package and comfort seats
Due to the fact that, having ?2 years baby boy and 1 year baby girl? setting next to each other for long journeys is difficult, very annoying, disturbing and not safe. It was necessary to put a limit to this problem. So, I decided to solve this issue by retrofitting this system")
First of all, there are several options to have rear entertainment system; however, you will lose the ?OEM LOOK? (which I cannot sacrifice) and the headrest neck protection feature especially when you have the expensive comfort seats (invision headrest does not match comfort seats? headrest). In addition to that, I wanted to link rear monitors with front screen and control the DVD player from the front.
I already retrofitted mentholguy rear view cam + Multimedia Interface kit and I have 3 AV sources to the front screen, I used one of them to control DVD player through remote control. For more details about the interface, see the link: (https://5series.net/forums/topic/900...7#entry1065397)
Moreover, I don?t have power supply in the trunk and I don?t have AUX connection for the sound! So I retrofitted them also.
This system is available in BMW retrofit catalog, but if you retrofit it by them, it will cost you a fortune and you will never get the flexibility to enhance it with other systems.
So, I did intensive search to find what BMW is using to build this system then I started collecting parts.
Single Line Diagram:

Required parts:
1-Monitors:
Alpine PKG-M780
Dual 7? Headrest Monitor Package
It cost me $519 from eBay
(BMW is using 6.5? monitors)


2-Monitors Trim:
Part No. 65120407250
Cost: $140 each = $280


3-DVD Player:
Performance Teknique ICBM-DIN
Cost: $99.99 from eBay
http://www.sonicelectronix.com/item_...+ICBM-DIN.html

4-AV Source (optional-for play station in the future):
Part No. 61316930560
Cost: $32
Connector part No.61136909058
Cost: $1.2

5-Power cables + RCA cables + connectors
Aux Retrofit (will be in separate DIY) (not required, FM modulator can be used)
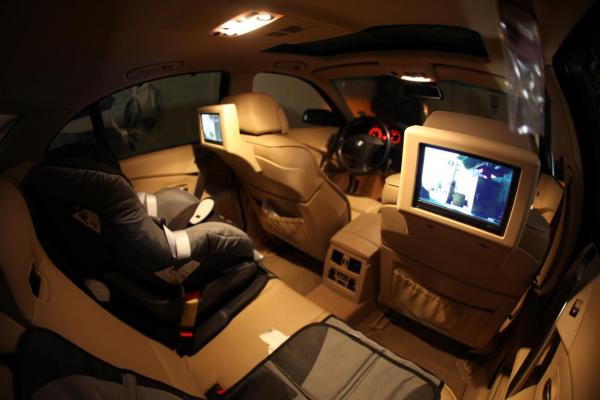
Fitment:
The alpine monitors fit OEM trim perfectly with little modification as below picture


dont reply!
As promised, here is the DIY for OEM look rare entertainment system retrofit
(Sorry for the language since it is my second language and this is my first DIY topic)
My ride is BMW E60 530i 2004 model (4/2003) with sport package and comfort seats
Due to the fact that, having ?2 years baby boy and 1 year baby girl? setting next to each other for long journeys is difficult, very annoying, disturbing and not safe. It was necessary to put a limit to this problem. So, I decided to solve this issue by retrofitting this system
First of all, there are several options to have rear entertainment system; however, you will lose the ?OEM LOOK? (which I cannot sacrifice) and the headrest neck protection feature especially when you have the expensive comfort seats (invision headrest does not match comfort seats? headrest). In addition to that, I wanted to link rear monitors with front screen and control the DVD player from the front.
I already retrofitted mentholguy rear view cam + Multimedia Interface kit and I have 3 AV sources to the front screen, I used one of them to control DVD player through remote control. For more details about the interface, see the link: (https://5series.net/forums/topic/900...7#entry1065397)
Moreover, I don?t have power supply in the trunk and I don?t have AUX connection for the sound! So I retrofitted them also.
This system is available in BMW retrofit catalog, but if you retrofit it by them, it will cost you a fortune and you will never get the flexibility to enhance it with other systems.
So, I did intensive search to find what BMW is using to build this system then I started collecting parts.
Single Line Diagram:
Required parts:
1-Monitors:
Alpine PKG-M780
Dual 7? Headrest Monitor Package
It cost me $519 from eBay
(BMW is using 6.5? monitors)
2-Monitors Trim:
Part No. 65120407250
Cost: $140 each = $280
3-DVD Player:
Performance Teknique ICBM-DIN
Cost: $99.99 from eBay
http://www.sonicelectronix.com/item_...+ICBM-DIN.html
4-AV Source (optional-for play station in the future):
Part No. 61316930560
Cost: $32
Connector part No.61136909058
Cost: $1.2
5-Power cables + RCA cables + connectors
Aux Retrofit (will be in separate DIY) (not required, FM modulator can be used)
Fitment:
The alpine monitors fit OEM trim perfectly with little modification as below picture
dont reply!
 08-21-2010, 02:43 PM
#2
Contributors
Thread Starter
Fabricating support for monitor base to be fixed to the trim tightly

It can be done in several ways (with metal, glow, ..etc)
Make holes in seat back trim

Install the trim into seat trim and frame (you will find holes ready for this trim in the seat frame) using similar to this nut


Pull the wire inside the seat to close to rear console and install back sear trim
Install the monitor with front trim

Do the same for other seat!
Fixing monitors module:
I decided to install monitor module and DVD player in the trunk so I pulled the cables (2wires for monitors+3 RCA cables+AUX cable+DVD remote control receiver+1RCA video cable to front screen) to the trunk through this rout

I installed monitors module and DVD player in the trunk

I installed the module to the metal frame and DVD player into plastic box using fastening tap


Because of high temp in Saudi Arabia I added CPU Fan to cool down DVD player and monitors module just in case!
Dont reply
It can be done in several ways (with metal, glow, ..etc)
Make holes in seat back trim
Install the trim into seat trim and frame (you will find holes ready for this trim in the seat frame) using similar to this nut
Pull the wire inside the seat to close to rear console and install back sear trim
Install the monitor with front trim
Do the same for other seat!
Fixing monitors module:
I decided to install monitor module and DVD player in the trunk so I pulled the cables (2wires for monitors+3 RCA cables+AUX cable+DVD remote control receiver+1RCA video cable to front screen) to the trunk through this rout
I installed monitors module and DVD player in the trunk
I installed the module to the metal frame and DVD player into plastic box using fastening tap
Because of high temp in Saudi Arabia I added CPU Fan to cool down DVD player and monitors module just in case!
Dont reply


 08-30-2011, 07:20 AM
#9
New Members

Join Date: Aug 2011
Posts: 3
Likes: 0
Received 0 Likes
on
0 Posts
Great job!!! I am VERY interested in doing this for a US spec 2008 528i. Do you have more details on the install? For example:
1) How did you route the wiring in the seat? Did you have to remove the seatback trim to fish the wire from the hole you drilled towards the top?
2) How did you route the power for the monitor module and dvd player to the trunk? Is there a power tap in the trunk to work with?
3) It looks like you drilled holes in the top of the back seat for the monitor trim. Do you have more detail about how you did this? Where exactly are those holes in the seat frame?
4) Do you think my US spec 2008 528i has the same mounting holes in the seat trim?
5) It looks like you used a piece of sheet metal or aluminum to secure the monitors to the trim - was this the purpose of using that piece of metal or was there another purpose?
If you have any additional pictures you could post, it would be great! If you'd like to email me any further info, please use hd54321 @ gmail . com
Thanks!!