Retrofitting Xenons to Pre-LCI Halogens
 09-17-2009, 11:56 AM
#1
Members
Thread Starter

Join Date: Jan 2009
Posts: 122
Likes: 0
Received 0 Likes
on
0 Posts
Let's agree on one thing, Halogens lights look crappy. I know there were a few threads about upgrading halogens but the instructions weren't very clear, so this is a thread of how I successful fitted Xenons onto an E60 with original came with halogens.
You will need:
1. A pair of E60 Xenons, Non-Adaptive.
2. 06-08 D2S E60 Ballasts
3. Pair of D2S Bulbs
4. Angel Eyes
5. Pliers
6. HID Error Canceller
7. Wire Taps
8. LED Resistors
1. Open the headlights, you should see a bunch of colored wires and a bunch of blue wires (ignore the blue) being held in place by tabs and brackets. You will need the pliers to snap and break these in order to gain access to the wires. Once you have freed these cables, take some of these wire taps:

And do the following:
a ) Find the two fattest brown wires, within the bunch, One is seemingly paired with a fat yellow wire. The other fat brown wire is the earth. Splice these together with one of the blue wire taps. This will ground your ballast.
b ) Now cut the green wire in half, this is the Xenon beam adjust-feed. So now you should have two half. The important step here is, splice the end coming from the headlight socket to the gray wire (Angel Eyes). This ensures your high-beams and bi-xenon will work.
c ) Now get your Error Canceller, and cut one side off, as per the picture below. Now you have a plug, where you are going to splice onto the the Fat Brown/Fat Yellow pair of wires. The black goes onto the brown, and red onto the yellow. Once this is done, connect the Error Canceller onto the plug you just spliced. This gets rid of any strobing and Low-beam errors. (Some threads recommend using 4700uf 35V capacitors, but these are extremely messy and a bitch to install. The eBay error cancellers should do just fine.

d ) Install you ballasts, bulbs/ignitors, and new Angel Eyes is you have them. And you're ready to test out your headlights. Remove your existing Halogen headlights, (you can find Tutorials on 5series.net on how to do this without scratching your bumper). And connect the headlights up first. But do not install/secure them just yet. Turn your car on, and make sure the Angel Eye and Xenons are on, and there is no strobbing. Turn the car off.
e ) Leave the key in the ignition, in position 2, and ensure the xenon and angel eyes are still on. Wait 2-3 minutes and keep checking iDrive. If there are no errors then you are good to go. BUT, there's a 80% chance you will get a Parking Light Failure error. If this occurs, disconnect the headlights. And splice on the resistors to the angel eyes.
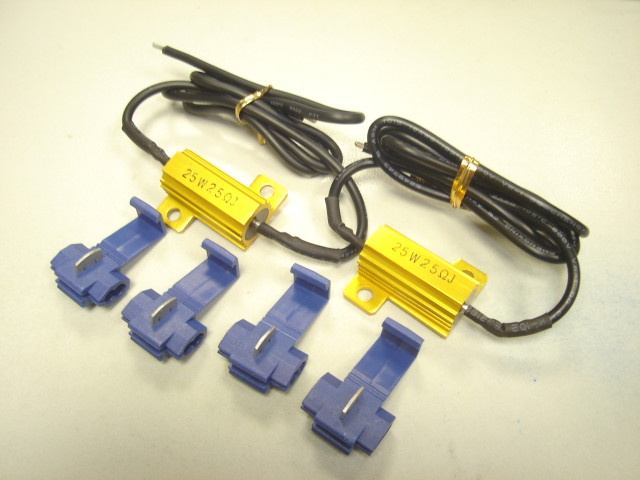
The original halogen headlights uses 2x 3W Halogen bulbs to power the Angel eyes. Since the newer Xenon angel eyes are just 1 single 3W LED, the computer is essentially sensing a missing/failed Angel Eye. Once you are happy that there is no more errors, close the headlight covers, (make sure ballast is secured with screws, and that the resistors are appropriately placed so they don't melt anything.
Total Estimated Cost of Parts:
$1,899
Time to Install:
About 5 Hours
A fun experience indeed.
-
You will need:
1. A pair of E60 Xenons, Non-Adaptive.
2. 06-08 D2S E60 Ballasts
3. Pair of D2S Bulbs
4. Angel Eyes
5. Pliers
6. HID Error Canceller
7. Wire Taps
8. LED Resistors
1. Open the headlights, you should see a bunch of colored wires and a bunch of blue wires (ignore the blue) being held in place by tabs and brackets. You will need the pliers to snap and break these in order to gain access to the wires. Once you have freed these cables, take some of these wire taps:
And do the following:
a ) Find the two fattest brown wires, within the bunch, One is seemingly paired with a fat yellow wire. The other fat brown wire is the earth. Splice these together with one of the blue wire taps. This will ground your ballast.
b ) Now cut the green wire in half, this is the Xenon beam adjust-feed. So now you should have two half. The important step here is, splice the end coming from the headlight socket to the gray wire (Angel Eyes). This ensures your high-beams and bi-xenon will work.
c ) Now get your Error Canceller, and cut one side off, as per the picture below. Now you have a plug, where you are going to splice onto the the Fat Brown/Fat Yellow pair of wires. The black goes onto the brown, and red onto the yellow. Once this is done, connect the Error Canceller onto the plug you just spliced. This gets rid of any strobing and Low-beam errors. (Some threads recommend using 4700uf 35V capacitors, but these are extremely messy and a bitch to install. The eBay error cancellers should do just fine.
d ) Install you ballasts, bulbs/ignitors, and new Angel Eyes is you have them. And you're ready to test out your headlights. Remove your existing Halogen headlights, (you can find Tutorials on 5series.net on how to do this without scratching your bumper). And connect the headlights up first. But do not install/secure them just yet. Turn your car on, and make sure the Angel Eye and Xenons are on, and there is no strobbing. Turn the car off.
e ) Leave the key in the ignition, in position 2, and ensure the xenon and angel eyes are still on. Wait 2-3 minutes and keep checking iDrive. If there are no errors then you are good to go. BUT, there's a 80% chance you will get a Parking Light Failure error. If this occurs, disconnect the headlights. And splice on the resistors to the angel eyes.
The original halogen headlights uses 2x 3W Halogen bulbs to power the Angel eyes. Since the newer Xenon angel eyes are just 1 single 3W LED, the computer is essentially sensing a missing/failed Angel Eye. Once you are happy that there is no more errors, close the headlight covers, (make sure ballast is secured with screws, and that the resistors are appropriately placed so they don't melt anything.
Total Estimated Cost of Parts:
$1,899
Time to Install:
About 5 Hours
A fun experience indeed.
-

 09-18-2009, 02:29 AM
#4
Members

Join Date: Jul 2009
Posts: 9
Likes: 0
Received 0 Likes
on
0 Posts
I did exactly as you have written here except that the warning Canceller. I connect them, they did work but when I start the car the xenon start to blink. Only xenon starts blinking. please help
09-18-2009, 02:41 AM
#5
Contributors
Join Date: Aug 2008
Location: Zoo York
Posts: 9,986
Likes: 0
Received 0 Likes
on
0 Posts
My Ride: Alpine White 2006 530Xi (SLD)
 DON'T CUT THE GREEN WIIIIIREEEEEE!!!!!!!!!

(sorry)
Hey, that cost seems kinda high, what am I missing?
Otherwise, thanks for the write-up - lots of people will no doubt find this VERY helpful
 09-18-2009, 07:25 AM
#6
Members
Thread Starter
Join Date: Jan 2009
Posts: 122
Likes: 0
Received 0 Likes
on
0 Posts
That's about the maximum cost of parts if you get everything brand new, from the most expensive sources. Realistically, you'd be looking at closer to
$1500ish
DON'T CUT THE GREEN WIIIIIREEEEEE!!!!!!!!!
(sorry)
Hey, that cost seems kinda high, what am I missing?
Otherwise, thanks for the write-up - lots of people will no doubt find this VERY helpful
$1500ish
Originally Posted by v_therussian' post='1010901' date='Sep 18 2009, 05:41 AM
DON'T CUT THE GREEN WIIIIIREEEEEE!!!!!!!!! (sorry)
Hey, that cost seems kinda high, what am I missing?
Otherwise, thanks for the write-up - lots of people will no doubt find this VERY helpful
09-18-2009, 12:24 PM
#7
Senior Members

Join Date: Jul 2009
Location: S. Fla
Posts: 1,129
Likes: 0
Received 0 Likes
on
0 Posts
Great write up!!!
Where does the other end of the green wire go once you cut in in half? Isn't it suppose to splice into the white wire to make the bi-xenon highbeams work? What color wires are the resitors getting spliced into? Does the resistors HAVE to be 25W and 25 ohms?
Where does the other end of the green wire go once you cut in in half? Isn't it suppose to splice into the white wire to make the bi-xenon highbeams work? What color wires are the resitors getting spliced into? Does the resistors HAVE to be 25W and 25 ohms?
09-18-2009, 12:44 PM
#8
Senior Members
Join Date: Jul 2009
Location: S. Fla
Posts: 1,129
Likes: 0
Received 0 Likes
on
0 Posts
Originally Posted by haidoori' post='1010896' date='Sep 18 2009, 06:29 AM
I did exactly as you have written here except that the warning Canceller. I connect them, they did work but when I start the car the xenon start to blink. Only xenon starts blinking. please help
09-18-2009, 04:08 PM
#9
Members
Thread Starter
Join Date: Jan 2009
Posts: 122
Likes: 0
Received 0 Likes
on
0 Posts
Originally Posted by medik13' post='1011250' date='Sep 18 2009, 04:24 PM
Great write up!!!
Where does the other end of the green wire go once you cut in in half? Isn't it suppose to splice into the white wire to make the bi-xenon highbeams work? What color wires are the resitors getting spliced into? Does the resistors HAVE to be 25W and 25 ohms?
Where does the other end of the green wire go once you cut in in half? Isn't it suppose to splice into the white wire to make the bi-xenon highbeams work? What color wires are the resitors getting spliced into? Does the resistors HAVE to be 25W and 25 ohms?
With the resistors, it is spliced onto the Angel Eye wires (brown, yellow, in the HIGH BEAMS compartment).
09-29-2009, 04:57 PM
#10
Senior Members
Join Date: Jul 2009
Location: S. Fla
Posts: 1,129
Likes: 0
Received 0 Likes
on
0 Posts
I got the Parking light malfunction. Trying to find resistors. Is this just a sample picture or does the resistors have to be 25W and 25ohms. Please let me know where these can be purchased. Do you happen to have a pic or can you tell me where to mount so it doesn't melt anything? Thanks