Door Panel Removal
 08-12-2006, 09:09 PM
#1
Senior Members
Thread Starter
Join Date: Mar 2006
Location: Issaquah, WA
Posts: 903
Likes: 0
Received 0 Likes
on
0 Posts
As some of you may know, I decided to paint all my trim to match the body color and in response I've had a few people ask me how to remove the door panels. So if you don't want to pay the dealer to replace your trim, here is my little do it yourself for removing the door panels. I don't have Photoshop or anything so I couldn't circle where are the screws and clips are, but you should be able to see them in the pictures and when you're actually taking the panel off. Hope it helps. I would also like to thank Rudy, his TIS manuals helped a lot.
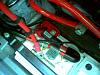
1.) Disconnect the battery.
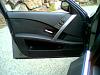
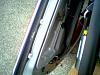
2.) Remove the screws holding the door in place and remove the track lighting.
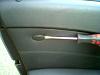
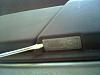
3.) Either use your hands, a plastic wedge, or a screwdriver wrapped in a cloth to get underneath the door panel in order to pull toward yourself and pop all of the clips holding the door in place. Be sure not to pull the door panel off more than 5-6 inches or you may break some of the wires. I would recommend using your hands to pull of the door panel and start at the clip underneath the tweeter, then work clockwise all the way around the door. This worked best for me. Otherwise, anywhere along the bottom is also a good starting point but you're probably going to need something to pry the door out.
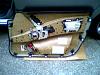
4.) Undo all of the electrical and mechanical connections.
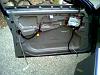
5.) Take door panel off
6.) Use something that will eat away the locktight that BMW put all over the trim nuts and bolts.
7.) Remove nuts.
8.) Slide trim upward and toward you.
9.) Slide in the new trim and do everything in reverse.
Sorry I don't have any pics of actually removing the trim, but that's the easy part, it's getting the door panel off that's a little tricky.
1.) Disconnect the battery.

2.) Remove the screws holding the door in place and remove the track lighting.


3.) Either use your hands, a plastic wedge, or a screwdriver wrapped in a cloth to get underneath the door panel in order to pull toward yourself and pop all of the clips holding the door in place. Be sure not to pull the door panel off more than 5-6 inches or you may break some of the wires. I would recommend using your hands to pull of the door panel and start at the clip underneath the tweeter, then work clockwise all the way around the door. This worked best for me. Otherwise, anywhere along the bottom is also a good starting point but you're probably going to need something to pry the door out.

4.) Undo all of the electrical and mechanical connections.
5.) Take door panel off
6.) Use something that will eat away the locktight that BMW put all over the trim nuts and bolts.
7.) Remove nuts.
8.) Slide trim upward and toward you.
9.) Slide in the new trim and do everything in reverse.
Sorry I don't have any pics of actually removing the trim, but that's the easy part, it's getting the door panel off that's a little tricky.
 08-13-2006, 11:35 PM
#3
Senior Members
Thread Starter
Join Date: Mar 2006
Location: Issaquah, WA
Posts: 903
Likes: 0
Received 0 Likes
on
0 Posts
No, and no. No airbag warnings and the stereo shop that installed everything glued them in place. I wasn't exaclty happy about that after finding out that's how they did it, but so far I've had no problems with the front speakers at all so I guess I'm ok with it. It's just the damn buzzing in the rear speakers when my headlights are on that is still annoying me. Although I'm dropping the car off tomorrow to try a few things regarding that, so hopefully they'll figure it out.
08-14-2006, 04:44 AM
#4
Contributors
Join Date: Aug 2004
Location: Quincy, MA, USA
Posts: 1,103
Likes: 0
Received 0 Likes
on
0 Posts
My Ride: E60 530i
Model Year: 2004
Engine: M54
Originally Posted by my530i' post='322342' date='Aug 14 2006, 12:58 AM
Now my question for you is "Is the airbag light on?", and did you use double-side tape to hold your crossover in the last picture?
Thanks,
08-14-2006, 04:44 AM
#5
Contributors
Join Date: Aug 2004
Location: Quincy, MA, USA
Posts: 1,103
Likes: 0
Received 0 Likes
on
0 Posts
My Ride: E60 530i
Model Year: 2004
Engine: M54
Originally Posted by Heiss5' post='322029' date='Aug 13 2006, 01:09 AM
As some of you may know, I decided to paint all my trim to match the body color and in response I've had a few people ask me how to remove the door panels. So if you don't want to pay the dealer to replace your trim, here is my little do it yourself for removing the door panels. I don't have Photoshop or anything so I couldn't circle where are the screws and clips are, but you should be able to see them in the pictures and when you're actually taking the panel off. Hope it helps. I would also like to thank Rudy, his TIS manuals helped a lot.
1.) Disconnect the battery.
Attachment 22745
2.) Remove the screws holding the door in place and remove the track lighting.
Attachment 22746
Attachment 22747
Attachment 22748
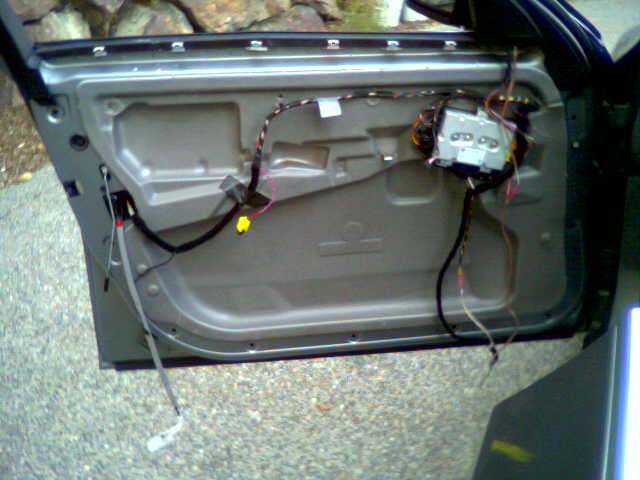
3.) Either use your hands, a plastic wedge, or a screwdriver wrapped in a cloth to get underneath the door panel in order to pull toward yourself and pop all of the clips holding the door in place. Be sure not to pull the door panel off more than 5-6 inches or you may break some of the wires. I would recommend using your hands to pull of the door panel and start at the clip underneath the tweeter, then work clockwise all the way around the door. This worked best for me. Otherwise, anywhere along the bottom is also a good starting point but you're probably going to need something to pry the door out.
Attachment 22749
4.) Undo all of the electrical and mechanical connections.
Attachment 22750
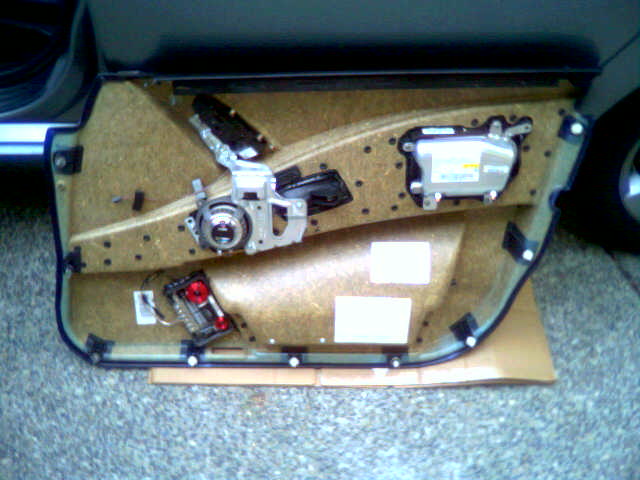
5.) Take door panel off
Attachment 22751
6.) Use something that will eat away the locktight that BMW put all over the trim nuts and bolts.
7.) Remove nuts.
8.) Slide trim upward and toward you.
9.) Slide in the new trim and do everything in reverse.
Sorry I don't have any pics of actually removing the trim, but that's the easy part, it's getting the door panel off that's a little tricky.
1.) Disconnect the battery.
Attachment 22745
2.) Remove the screws holding the door in place and remove the track lighting.
Attachment 22746
Attachment 22747
Attachment 22748
3.) Either use your hands, a plastic wedge, or a screwdriver wrapped in a cloth to get underneath the door panel in order to pull toward yourself and pop all of the clips holding the door in place. Be sure not to pull the door panel off more than 5-6 inches or you may break some of the wires. I would recommend using your hands to pull of the door panel and start at the clip underneath the tweeter, then work clockwise all the way around the door. This worked best for me. Otherwise, anywhere along the bottom is also a good starting point but you're probably going to need something to pry the door out.
Attachment 22749
4.) Undo all of the electrical and mechanical connections.
Attachment 22750
5.) Take door panel off
Attachment 22751
6.) Use something that will eat away the locktight that BMW put all over the trim nuts and bolts.
7.) Remove nuts.
8.) Slide trim upward and toward you.
9.) Slide in the new trim and do everything in reverse.
Sorry I don't have any pics of actually removing the trim, but that's the easy part, it's getting the door panel off that's a little tricky.
08-14-2006, 07:53 AM
#6
Senior Members
Thread Starter
Join Date: Mar 2006
Location: Issaquah, WA
Posts: 903
Likes: 0
Received 0 Likes
on
0 Posts
Originally Posted by lcc014' post='322422' date='Aug 14 2006, 05:44 AM
Is the Air Bag light supposed to be ON when doing the door panel removal ?
Thanks,
Thanks,
08-14-2006, 12:01 PM
#7
Members
Join Date: Jun 2006
Location: Austria, near Vienna
Posts: 33
Likes: 0
Received 0 Likes
on
0 Posts
My Ride: 2005 E60 525dA, black sapphire, m-tech-aero-kit, oem m-tech 167 wheels w. 245/35/19ET12 + 275/30/19ET17, eibach pro-kit 30/30mm, black leather w. heating front+rear, folding rear seats w/ski bag, sun-roof (glas), pdc, adaptive bi-xenon, ext. clima-automatic, ext. lights-package, nav.busines, bluetooth, aftermarket hifi-amps + sub, paddle-shift!!
Hello,
do you have after-marked-speakers in your front-door-panels or do you just have crossovers and additional tweeters?
Which installation depth are the speakers in you panels? - my garage told me that my GZRC10 (which have 60mm depth) don't fit. The OEM have 46mm.
Thanks, Cu Lanikus
do you have after-marked-speakers in your front-door-panels or do you just have crossovers and additional tweeters?
Which installation depth are the speakers in you panels? - my garage told me that my GZRC10 (which have 60mm depth) don't fit. The OEM have 46mm.
Thanks, Cu Lanikus
08-14-2006, 12:49 PM
#8
Senior Members
Thread Starter
Join Date: Mar 2006
Location: Issaquah, WA
Posts: 903
Likes: 0
Received 0 Likes
on
0 Posts
Originally Posted by lanikus' post='322539' date='Aug 14 2006, 01:01 PM
Hello,
do you have after-marked-speakers in your front-door-panels or do you just have crossovers and additional tweeters?
Which installation depth are the speakers in you panels? - my garage told me that my GZRC10 (which have 60mm depth) don't fit. The OEM have 46mm.
Thanks, Cu Lanikus
do you have after-marked-speakers in your front-door-panels or do you just have crossovers and additional tweeters?
Which installation depth are the speakers in you panels? - my garage told me that my GZRC10 (which have 60mm depth) don't fit. The OEM have 46mm.
Thanks, Cu Lanikus
08-14-2006, 01:43 PM
#9
Contributors
Join Date: Mar 2005
Location: Germany
Posts: 244
Likes: 0
Received 0 Likes
on
0 Posts
My Ride: BMW E60 9/04
BMW E46 / 3
Great! That helps a lot! Never seen a naked door so I have an idea when retrofitting the mirror lamps.
Painting a round the screws and clips would be make this pics perfect
Painting a round the screws and clips would be make this pics perfect
