Balbs' CIC Retrofit w\Combox +6NR, PnP
#1
Thread Starter
Contributors
Joined: Mar 2010
Posts: 3,098
Likes: 4
From: Los Angeles, CA
My Ride: BMW
Model Year: 2006
I recently bought the CIC Navigation Retrofit w\Combox, 6NR , and PnP activation.
My car is a pre-LCI 2006 525i.
It currently has no navigation and standard hi-fi audio
To be honest, I don?t know when I?ll have time to work on getting the retrofit in due to schedule conflicts. I also plan to do it myself. In the meantime, I did some research and work on it on my downtime during late nights and a couple of weekends if I have a couple of hours to spare. Work, kids, and their activities keep me busy.
First of all, member brosken?s CIC Retrofit Compilation document should prove helpful to anybody doing the retrofit.
https://5series.net/forums/topic/109...t-compilation/
Also, I found this picture showing how everything hooks up. It?s in Deutsch but I?m sure anybody here confident enough to try the DIY themselves would be able to ascertain what the diagram labels mean.

And of course, I can't leave out nelson29's CIC Retrofit log:
https://5series.net/forums/topic/994...tallation-log/
My car is a pre-LCI 2006 525i.
It currently has no navigation and standard hi-fi audio
To be honest, I don?t know when I?ll have time to work on getting the retrofit in due to schedule conflicts. I also plan to do it myself. In the meantime, I did some research and work on it on my downtime during late nights and a couple of weekends if I have a couple of hours to spare. Work, kids, and their activities keep me busy.
First of all, member brosken?s CIC Retrofit Compilation document should prove helpful to anybody doing the retrofit.
https://5series.net/forums/topic/109...t-compilation/
Also, I found this picture showing how everything hooks up. It?s in Deutsch but I?m sure anybody here confident enough to try the DIY themselves would be able to ascertain what the diagram labels mean.

And of course, I can't leave out nelson29's CIC Retrofit log:
https://5series.net/forums/topic/994...tallation-log/
#2
Thread Starter
Contributors
Joined: Mar 2010
Posts: 3,098
Likes: 4
From: Los Angeles, CA
My Ride: BMW
Model Year: 2006
Since I have the regular hi-fi, it seems that you will lose more bass when moving to the CIC. A work around for the Woofer fix wiring is found on this page:
https://5series.net/forums/topic/119...-cic-retrofit/
I also did GeorgieB's wiring job from nelson29's log:
https://5series.net/forums/topic/994...8#entry1234488
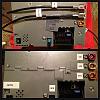
However, since I have the PnP option, rather than doing the wiring tweak on the actual plugs, I decided to do Woofer fix on the PnP module instead:

By doing it on the PnP activation module, I can accomplish at least 2 things.
1. It would speed up the CIC retrofit process when I actually get a chance to do it. Making it easier to Plug-n-play the CIC unit.
2. If for some reason I have to switch back to the original unit, I don't have to un-do the woofer fix because I didn't do it on the car's original wiring harness.
Note how I labeled the Pin wires. This is so I don't get confused.
https://5series.net/forums/topic/119...-cic-retrofit/
I also did GeorgieB's wiring job from nelson29's log:
https://5series.net/forums/topic/994...8#entry1234488
However, since I have the PnP option, rather than doing the wiring tweak on the actual plugs, I decided to do Woofer fix on the PnP module instead:

By doing it on the PnP activation module, I can accomplish at least 2 things.
1. It would speed up the CIC retrofit process when I actually get a chance to do it. Making it easier to Plug-n-play the CIC unit.
2. If for some reason I have to switch back to the original unit, I don't have to un-do the woofer fix because I didn't do it on the car's original wiring harness.
Note how I labeled the Pin wires. This is so I don't get confused.

#4
Thread Starter
Contributors
Joined: Mar 2010
Posts: 3,098
Likes: 4
From: Los Angeles, CA
My Ride: BMW
Model Year: 2006
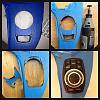
I started to mod my shadow aluminum trim to make room for the new idrive controller. Here's what it looked like a few days ago:

While doing the mod, I temporarily put the original wood trim center trim in place.
Here's the process of doing the mod.
1. I first covered the whole thing with painters tape. Do at least 2 layers especially around where you would be cutting. This serves as an extra layer of protection just incase the dremel tool runs away from you.
2. Use the bezel trim from the retrofit kit to trace a pencil mark for the outer edge and inner edge.
3. I then used a dremel to start cutting along the lines. I actually cut about 1-2 mm from the outside edge so that the bezel could fit through the whole and not fall through. Might be hard to see that in the pictures.
BTW...Make sure you have a steady hand and safety goggles. I shattered a couple of dremel bits doing this.

Finally, the test fit:

I used some Gorilla glue to glue the bezel onto the trim. Gorilla glue expands to form a hardened "foam" that also helps to "shim" the bezel in place.

While doing the mod, I temporarily put the original wood trim center trim in place.
Here's the process of doing the mod.
1. I first covered the whole thing with painters tape. Do at least 2 layers especially around where you would be cutting. This serves as an extra layer of protection just incase the dremel tool runs away from you.
2. Use the bezel trim from the retrofit kit to trace a pencil mark for the outer edge and inner edge.
3. I then used a dremel to start cutting along the lines. I actually cut about 1-2 mm from the outside edge so that the bezel could fit through the whole and not fall through. Might be hard to see that in the pictures.
BTW...Make sure you have a steady hand and safety goggles. I shattered a couple of dremel bits doing this.

Finally, the test fit:

I used some Gorilla glue to glue the bezel onto the trim. Gorilla glue expands to form a hardened "foam" that also helps to "shim" the bezel in place.
#7
Thread Starter
Contributors
Joined: Mar 2010
Posts: 3,098
Likes: 4
From: Los Angeles, CA
My Ride: BMW
Model Year: 2006
It looks a little nasty, but here's a pic of the underside of the idrive controller. You can see how the Gorilla glue's foaming process fills in the gaps so it makes a tight fit.
Be careful. It can expand to the upper external side as well so keep wiping it up but at the same time let some of it seep through so it can have some added grip.
Also, I used some Scotch brand Adhesive Wall Mounting Tabs to fill in the other gaps. The tabs have some sort of doublesided sticky foam. It's used to hang posters on walls. Since it's sticky, I figure I can roll up the sticky end and use it as a gap filler so it won't fall out.


