
*AIB* Angel iBright BRIGHT WHITE Group Buy for E60.net Members ONLY
 06-15-2006, 09:33 AM
#241
Members

Join Date: Nov 2004
Location: Houston, TX
Posts: 53
Likes: 0
Received 0 Likes
on
0 Posts
My Ride: 2010 E60 SMG Interlagos Blue
Silverstone II Full Merino Perforated w/ Individual Piano Black Trim
All options except for fold down rear seats
1330 miles 02/12/10
2008 E92 DCT M3 Arctic White
Silver Novillo Extended w/ Carbon Fiber Trim
Pretty much all options
10k miles 09/09
135 E82 Black Sapphire Metallic
Coral Red w/ Gloss Black Trim
Pretty much all options
7k miles 09/09
“please tell us how hard or easy it was to install them. ... Please tell us any tip and tricks so we do not repeat your mistakes.”
It was easy for me. I have already posted my reaction of “piece of cake” in this thread and another one.
Oh, yeah - what “mistakes?”
The pictures on the AIB website are excellent. The directions are pretty good. The only way I can see any “problems” with the installation would be from a first-time effort that doesn’t know what to expect.
First, take off the round cover on the headlight box assembly. This is stated in the instructions and is REALLY easy - the cover is round with some low “fins” that is rotated counterclockwise. If you have a problem with this part, then you should quit right now.
I was able to use the "Version 1" process. In order to get an easier view of and reach at the OEM Angel Eye bulb housing I removed the High-Beam bulb assembly to provide better access. The housing looks like the rear end of a fish. You just turn the weird thing counterclockwise and it easily comes loose. Tuck it away to keep it safe and out of the way.
I attacked the AE housing next. At first I found it difficult and awkward when I tried to stick my hand all the way into the housing to get a grip on the OEM bulb assembly. I believed that it would be hard to remove, and did not know exactly how the removal would happen - unscrew, unscrew and pull, turn and drop, turn and pull, any “spring” action, any special end of turn movements, etc.
The problem was exacerbated by the fact that this was new to me. I did not want to break, damage, or severely weaken anything, or unknowingly knock anything out of adjustment. I also did not know how much force would be needed, in what directions(s) and how strong or weak the materials are. I didn’t know what I could do or not do because I didn’t know what might or might not happen.
As it turns out the concerns are based upon inexperience and ignorance.
After about ten unsuccessful minutes I decided to reduce my level of caution. Based upon years of similar work around audio/video components, and my houses, I decided to just press straight down on the right fin of the two “fins” on the OEM bulb holder/fixture, attempting to get a counterclockwise movement out of the bulb holder. No movement. So I pushed harder. Seemed like maybe a very slight, soft yield. Pushed down again - yep, definitely some movement. One more push and **poof** it’s clearly loose and eager to be freed from the hole.
Hey - that wasn't hard. It’s only about a 3/16" turn. Duh ...
It’s all so clear, now - there’s simply three male nubs on the bulb housing that fit into three female doglegs around the housing hole on the headlight box. It is a very snug and secure friction fit, but not one that clicks into place or has any other kind of end-of-travel mechanism that would make removal tricky. Removal simply involves overcoming the friction, and not any sort of serious or difficult force that would be impossible to apply if you had to get your hand into the box.
Instead of your fingers you could also just get a short length of 1" x 1" wood, or something similar, or even a good-sized flat-blade screwdriver to push down on the fin to start the rotation.
After that it’s about as scary and difficult as changing a light bulb in a house lamp - remove a plug by pulling it out of its socket, insert the AIB plug into the socket, and install the light by reversing the above description. Reinstall the cover.
The one thing I added/changed has to do with the ballast and plug/socket. I did not want the parts left free to bang around on bumps so I stuck a piece of Velcro on the back of each item, with a longer piece stuck inside on the side of the headlight box, and secured the two items inside the box before reattaching the round box cover.
So you (and I) are still concerned, right? That’s when you put your key in the ignition. Turn to “1” or “2” and then turn the Headlamp switch clockwise one click, to turn on the Parking Lights. Go out to the front of your ride and ...
WOW - COOL!!!
... and, “Boy, that looks a LOT better than the other side.”
As I said - piece of cake.
Good luck. If I can do it ...
If you have any questions send an email with your telephone number.
Best regards,
- Hunter
hlm3@att.net
 06-15-2006, 09:44 AM
#242
Contributors
Join Date: Apr 2005
Location: San Diego, CA
Posts: 7,363
Likes: 0
Received 0 Likes
on
0 Posts
My Ride: 2007 E63 AMG | Obsidian Black | Schwarzes Nappa | Black BirdEye Maple | Premium II Package | Electronic Trunk Closer | Parktronic
Engine: RPi/Powerchips custom ECU tune, RPi Ram Air Kit (BMC filter, scoops), RennTech Sport exhaust, secondary cats, charcoal and resonator delete, custom AAA x-pipe
Exterior: 50% side windows / 35% rear window Formula One Pinnacle Series | Flat AMG hood emblem
Suspension: Renntech Lowering Module
Wheels/Tires: Radenergie R10, Falken FK452 245/30/20, Yokohama ADVAN Sport 285/25/20
-----------------------------------------
2005 545i Sport SMG | Ti Grau | Schwarzes Dakota | Anthracite Maple | Logic 7 | Nav
Engine: Custom AFE CAI, Superchips ECU remap, Sprint Booster, RDSport Dual Exhaust Conversion with Quad Pipes and X-pipe, 3 resonators deleted, 90mm tips!
Exterior: M-Tech Aero kit | M5 Mirrors | M5 Rear Bumper | Trunk Lid Finisher | Vorsteiner decklid spoiler | 50% Formula One Pinnacle Tint
Suspension and Brakes: Bilstein PSS9 coilovers, JBT BBK: 16" cross-drilled rotors, 8 piston and 15" cross-drilled rotors, 4 piston
Wheels: VIP Modular VR 02 20x9F, 20x10R | Toyo T1R 245/30/20F, 285/25/20R
Lights: PIAA 4150K Xtreme White Plus fog lights, AIB v3
MOST IMPORTANT: Hardwired V1; =)
ED Date: 4/7/05, Re-delivery date: 5/21/05
Hlmii,
You've got some small hands. Well, I was the one that managed to "pop" free the OEM bulbs pressing down real hard on one side of the fin. The hard part was putting in the AIBs and the DRLs bulbs. What you are referring to as High-Beam bulbs are not the High-Beam bulbs b/c the Xenons act as both low and high beams (Bi-Xenons). My g/f was able to put the bulbs back in but they would not sit properly, thus I need to redo the whole install.
You've got some small hands. Well, I was the one that managed to "pop" free the OEM bulbs pressing down real hard on one side of the fin. The hard part was putting in the AIBs and the DRLs bulbs. What you are referring to as High-Beam bulbs are not the High-Beam bulbs b/c the Xenons act as both low and high beams (Bi-Xenons). My g/f was able to put the bulbs back in but they would not sit properly, thus I need to redo the whole install.
06-15-2006, 09:56 AM
#243
Members
Join Date: Nov 2004
Location: Houston, TX
Posts: 53
Likes: 0
Received 0 Likes
on
0 Posts
My Ride: 2010 E60 SMG Interlagos Blue
Silverstone II Full Merino Perforated w/ Individual Piano Black Trim
All options except for fold down rear seats
1330 miles 02/12/10
2008 E92 DCT M3 Arctic White
Silver Novillo Extended w/ Carbon Fiber Trim
Pretty much all options
10k miles 09/09
135 E82 Black Sapphire Metallic
Coral Red w/ Gloss Black Trim
Pretty much all options
7k miles 09/09
"You've got some small hands."
Well ... they may not be real thick, but I've got a larger-than-average reach. Fifteen years of piano lessons indicated that they were sufficient for most classical music.
I'm pretty sure that there IS a separate High-Beam bulb and housing - I removed the "fish tail" housing, it had a bulb in it, and it fits right above the Low-Beam housing. See -

from http://forums.e60.net/index.php?showtopic=22546
If I am incorrect in what I think the part does, no big deal. But I removed SOMETHING and it had a Xenon bulb.
I'm not trying to argue with you. I just don't want people scared off, as I did not have your problems navigating through the install. For me it was a matter of figuring out how to get the pieces to do what I needed them to do, rather than an inability to do it at all.
Best regards,
- Hunter
Well ... they may not be real thick, but I've got a larger-than-average reach. Fifteen years of piano lessons indicated that they were sufficient for most classical music.
I'm pretty sure that there IS a separate High-Beam bulb and housing - I removed the "fish tail" housing, it had a bulb in it, and it fits right above the Low-Beam housing. See -
from http://forums.e60.net/index.php?showtopic=22546
If I am incorrect in what I think the part does, no big deal. But I removed SOMETHING and it had a Xenon bulb.
I'm not trying to argue with you. I just don't want people scared off, as I did not have your problems navigating through the install. For me it was a matter of figuring out how to get the pieces to do what I needed them to do, rather than an inability to do it at all.
Best regards,
- Hunter
06-15-2006, 09:59 PM
#244
Contributors
Join Date: Apr 2005
Location: San Diego, CA
Posts: 7,363
Likes: 0
Received 0 Likes
on
0 Posts
My Ride: 2007 E63 AMG | Obsidian Black | Schwarzes Nappa | Black BirdEye Maple | Premium II Package | Electronic Trunk Closer | Parktronic
Engine: RPi/Powerchips custom ECU tune, RPi Ram Air Kit (BMC filter, scoops), RennTech Sport exhaust, secondary cats, charcoal and resonator delete, custom AAA x-pipe
Exterior: 50% side windows / 35% rear window Formula One Pinnacle Series | Flat AMG hood emblem
Suspension: Renntech Lowering Module
Wheels/Tires: Radenergie R10, Falken FK452 245/30/20, Yokohama ADVAN Sport 285/25/20
-----------------------------------------
2005 545i Sport SMG | Ti Grau | Schwarzes Dakota | Anthracite Maple | Logic 7 | Nav
Engine: Custom AFE CAI, Superchips ECU remap, Sprint Booster, RDSport Dual Exhaust Conversion with Quad Pipes and X-pipe, 3 resonators deleted, 90mm tips!
Exterior: M-Tech Aero kit | M5 Mirrors | M5 Rear Bumper | Trunk Lid Finisher | Vorsteiner decklid spoiler | 50% Formula One Pinnacle Tint
Suspension and Brakes: Bilstein PSS9 coilovers, JBT BBK: 16" cross-drilled rotors, 8 piston and 15" cross-drilled rotors, 4 piston
Wheels: VIP Modular VR 02 20x9F, 20x10R | Toyo T1R 245/30/20F, 285/25/20R
Lights: PIAA 4150K Xtreme White Plus fog lights, AIB v3
MOST IMPORTANT: Hardwired V1; =)
ED Date: 4/7/05, Re-delivery date: 5/21/05
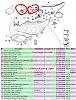
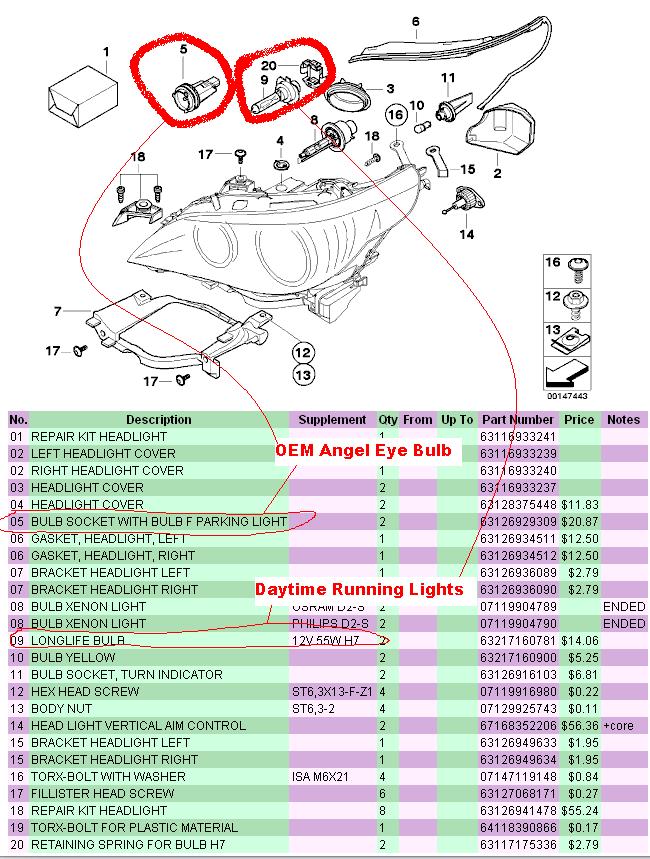
I'll try to clear up some confusion as to what bulb the high beams are emitted from. First and foremost, props to Chi-Town Racing for his DIY for the AngeliBright instructions. It is my opinion that the High Beam in the top picture is mislabeled.
There are four lamps on the e60. The two outside lamps are Xenon while the two inside are halogen. The two outside Xenons are used for both low and high beam. Switching between low and high beam is with the use of a mechanical shutter. Reason for this design is that it takes to long for the Xenon to come on if it were used for high beam. The inside lamps are primarily used as a FLASH beam. The bulbs for the inside lamps are H7.
What Chi-Town has labeled as High Beam Bulb is actually the Long Life Bulb aka Daytime Running Lights (#9 in the bottom picture). It is the bulb that needs to be removed before you can access the OEM Angel Eyes (#5 in the bottom picture). The Xenon bulb is #8. It is unlikely that the Xenon bulb was removed during the installation of the AngeliBright bulb. I hope this really clears things up. Here is a great link about Xenons: http://forums.e60.net/index.php?showtopic=4622&hl
This picture is from RealOEM: http://realoem.com/bmw/showparts.do?model=...799&hg=63&fg=05
There are four lamps on the e60. The two outside lamps are Xenon while the two inside are halogen. The two outside Xenons are used for both low and high beam. Switching between low and high beam is with the use of a mechanical shutter. Reason for this design is that it takes to long for the Xenon to come on if it were used for high beam. The inside lamps are primarily used as a FLASH beam. The bulbs for the inside lamps are H7.
What Chi-Town has labeled as High Beam Bulb is actually the Long Life Bulb aka Daytime Running Lights (#9 in the bottom picture). It is the bulb that needs to be removed before you can access the OEM Angel Eyes (#5 in the bottom picture). The Xenon bulb is #8. It is unlikely that the Xenon bulb was removed during the installation of the AngeliBright bulb. I hope this really clears things up. Here is a great link about Xenons: http://forums.e60.net/index.php?showtopic=4622&hl

This picture is from RealOEM: http://realoem.com/bmw/showparts.do?model=...799&hg=63&fg=05
 06-16-2006, 09:19 AM
#245
Members
Join Date: Nov 2004
Location: Houston, TX
Posts: 53
Likes: 0
Received 0 Likes
on
0 Posts
My Ride: 2010 E60 SMG Interlagos Blue
Silverstone II Full Merino Perforated w/ Individual Piano Black Trim
All options except for fold down rear seats
1330 miles 02/12/10
2008 E92 DCT M3 Arctic White
Silver Novillo Extended w/ Carbon Fiber Trim
Pretty much all options
10k miles 09/09
135 E82 Black Sapphire Metallic
Coral Red w/ Gloss Black Trim
Pretty much all options
7k miles 09/09
Great - thanks for the details.
Whatever I though about it then and whatever it really is, I twisted it and pulled it out!
Whatever I though about it then and whatever it really is, I twisted it and pulled it out!
06-16-2006, 09:28 AM
#246
Contributors
Join Date: Apr 2005
Location: San Diego, CA
Posts: 7,363
Likes: 0
Received 0 Likes
on
0 Posts
My Ride: 2007 E63 AMG | Obsidian Black | Schwarzes Nappa | Black BirdEye Maple | Premium II Package | Electronic Trunk Closer | Parktronic
Engine: RPi/Powerchips custom ECU tune, RPi Ram Air Kit (BMC filter, scoops), RennTech Sport exhaust, secondary cats, charcoal and resonator delete, custom AAA x-pipe
Exterior: 50% side windows / 35% rear window Formula One Pinnacle Series | Flat AMG hood emblem
Suspension: Renntech Lowering Module
Wheels/Tires: Radenergie R10, Falken FK452 245/30/20, Yokohama ADVAN Sport 285/25/20
-----------------------------------------
2005 545i Sport SMG | Ti Grau | Schwarzes Dakota | Anthracite Maple | Logic 7 | Nav
Engine: Custom AFE CAI, Superchips ECU remap, Sprint Booster, RDSport Dual Exhaust Conversion with Quad Pipes and X-pipe, 3 resonators deleted, 90mm tips!
Exterior: M-Tech Aero kit | M5 Mirrors | M5 Rear Bumper | Trunk Lid Finisher | Vorsteiner decklid spoiler | 50% Formula One Pinnacle Tint
Suspension and Brakes: Bilstein PSS9 coilovers, JBT BBK: 16" cross-drilled rotors, 8 piston and 15" cross-drilled rotors, 4 piston
Wheels: VIP Modular VR 02 20x9F, 20x10R | Toyo T1R 245/30/20F, 285/25/20R
Lights: PIAA 4150K Xtreme White Plus fog lights, AIB v3
MOST IMPORTANT: Hardwired V1; =)
ED Date: 4/7/05, Re-delivery date: 5/21/05
Originally Posted by hlmiii' post='298543' date='Jun 16 2006, 10:19 AM
Great - thanks for the details.
Whatever I though about it then and whatever it really is, I twisted it and pulled it out!
Whatever I though about it then and whatever it really is, I twisted it and pulled it out!
 06-16-2006, 07:54 PM
#247
Contributors
Join Date: Feb 2006
Location: So. Cal 626
Posts: 1,626
Likes: 0
Received 0 Likes
on
0 Posts
My Ride: 2007 550i White/Black, SMG, Sports Pkg, Comfort Access, Nav, HUD, Satellite Radio, Anthracite Maple Trim
2006 X5 3.0, Black/Black, Sports Pkg, Premium Pkg, Xenon Adaptive Headlight, NAV, Rear Climate Pkg, Anthracite Trim
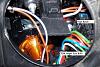
Finally installed my AngeliBrights it was pretty easy I must say.. But I think my right side is brighter then my left side.. what do you guys think?
06-16-2006, 08:05 PM
#249
Contributors
Join Date: Apr 2005
Location: San Diego, CA
Posts: 7,363
Likes: 0
Received 0 Likes
on
0 Posts
My Ride: 2007 E63 AMG | Obsidian Black | Schwarzes Nappa | Black BirdEye Maple | Premium II Package | Electronic Trunk Closer | Parktronic
Engine: RPi/Powerchips custom ECU tune, RPi Ram Air Kit (BMC filter, scoops), RennTech Sport exhaust, secondary cats, charcoal and resonator delete, custom AAA x-pipe
Exterior: 50% side windows / 35% rear window Formula One Pinnacle Series | Flat AMG hood emblem
Suspension: Renntech Lowering Module
Wheels/Tires: Radenergie R10, Falken FK452 245/30/20, Yokohama ADVAN Sport 285/25/20
-----------------------------------------
2005 545i Sport SMG | Ti Grau | Schwarzes Dakota | Anthracite Maple | Logic 7 | Nav
Engine: Custom AFE CAI, Superchips ECU remap, Sprint Booster, RDSport Dual Exhaust Conversion with Quad Pipes and X-pipe, 3 resonators deleted, 90mm tips!
Exterior: M-Tech Aero kit | M5 Mirrors | M5 Rear Bumper | Trunk Lid Finisher | Vorsteiner decklid spoiler | 50% Formula One Pinnacle Tint
Suspension and Brakes: Bilstein PSS9 coilovers, JBT BBK: 16" cross-drilled rotors, 8 piston and 15" cross-drilled rotors, 4 piston
Wheels: VIP Modular VR 02 20x9F, 20x10R | Toyo T1R 245/30/20F, 285/25/20R
Lights: PIAA 4150K Xtreme White Plus fog lights, AIB v3
MOST IMPORTANT: Hardwired V1; =)
ED Date: 4/7/05, Re-delivery date: 5/21/05
Originally Posted by iceman316' post='298763' date='Jun 16 2006, 08:54 PM
Finally installed my AngeliBrights it was pretty easy I must say.. But I think my right side is brighter then my left side.. what do you guys think?
 06-16-2006, 10:19 PM
#250
Contributors
Join Date: Feb 2006
Location: So. Cal 626
Posts: 1,626
Likes: 0
Received 0 Likes
on
0 Posts
My Ride: 2007 550i White/Black, SMG, Sports Pkg, Comfort Access, Nav, HUD, Satellite Radio, Anthracite Maple Trim
2006 X5 3.0, Black/Black, Sports Pkg, Premium Pkg, Xenon Adaptive Headlight, NAV, Rear Climate Pkg, Anthracite Trim
Originally Posted by jiio' post='298771' date='Jun 16 2006, 09:05 PM
Hey..... That's how mine look too!!! What's up with that???? That is the reason why I'm redoing the installation b/c the left inside ring is not as bright as the right.