Hobi's Custom A/V System
 05-18-2005, 08:07 PM
#1
Contributors
Thread Starter
Join Date: Nov 2004
Location: UK & Europe
Posts: 572
Likes: 0
Received 0 Likes
on
0 Posts
My Ride: 2005 MY 545i Sport Saloon. 2006 MY Alpina B3S Convertible. 2006 MY Brabus Smart 42 Cabrio. 2006 MY AM DB9 Coupe.
Hi All
I am FINALLY ready to post details and images of my custom A/V install in my car.
The following info is all on my web site: bmw-ci.com : which has also been updated with the M5 gear knob retrofit for SMG cars - developed with Kigerka, his car and Andy545 for letting us use his garage at the recent Dutch meet!!! Thanks a lot Andy545!!!!
OK, now down to the details. People have been asking for images of an install using Dominic's (navwithtv.com) E60 iDrive interface. Well, here it is:
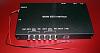
The labelling on the unit is self-explanatory - except for LVDS In/Out, which are the sockets for the widescreen display in the dashboard. Take care when handling the LVDS connectors because they can be somewhat fragile. Physically, this unit is bigger than the original but I still found space for it behind and inside the dashboard! Within the following pages, I will show you detailed pictures of my entire install, with descriptions of what I did and how I did it. At the very end, there is a list of all the components that make up my system.
=====================
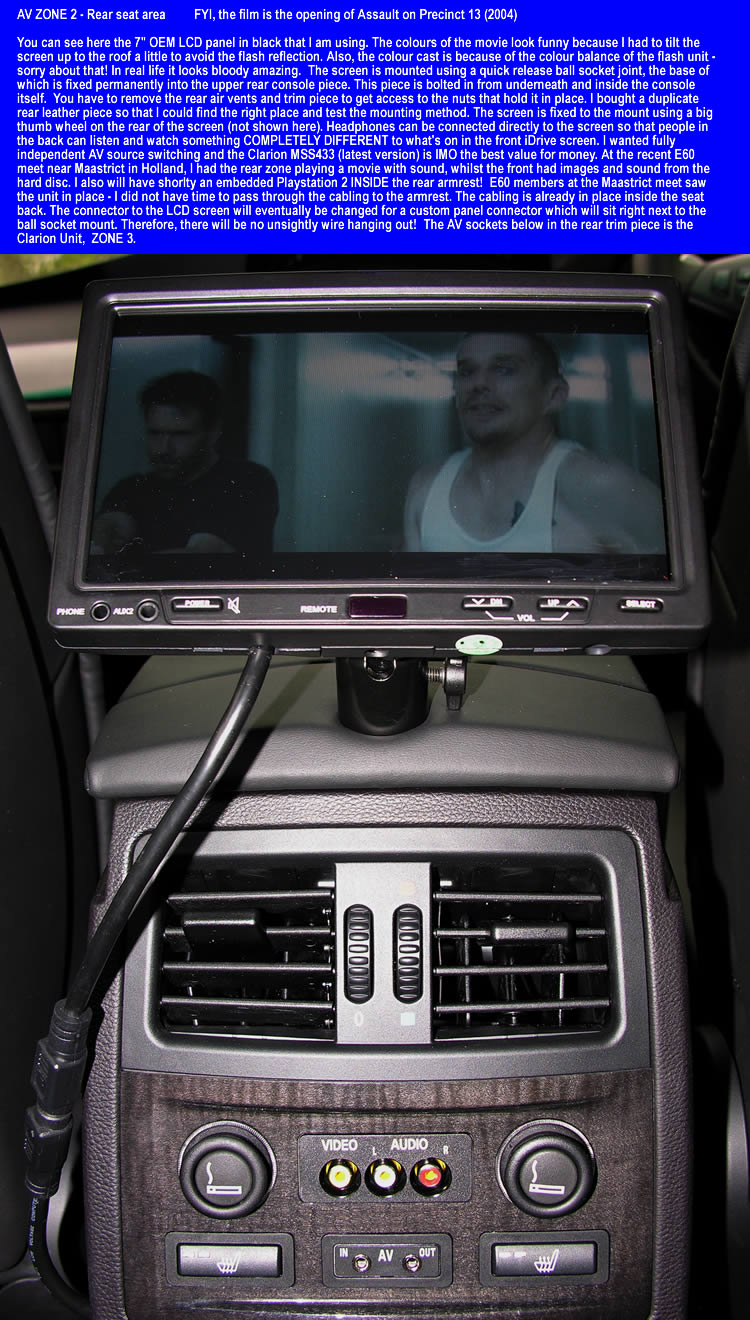
I think that for any in-car entertainment system to be good, it MUST have independent source switching for as many viewing zones as you need in a car. For most people, a car can be split into TWO zones: Zone 1 is defined as the front passanger and driver. Zone 2 can be considered the rear passengers. If you wanted the rear passengers to have entirely separate screens displaying totally different sources, then there would be a Zone 3. You can also have a Zone 4 for cars with a 3rd row of seats for instance.
For my purposes, I wanted a THREE zone system - Zone 1 (Front), Zone 2 (Rear), Zone 3 (Rear centre console sockets so that I COULD connect another screen and headphones or a camcorder etc..) I have selected the Clarion MSS433. It has 3 independent zones with independently controlled 12 volt switching and individual source selector conrol units. Each zone can independently switch up to 4 separate A/V sources.
Using this Clarion MSS433 means that each zone can "output" ANY source input independently of what is on any other zone.
In my car, Source Input 1 is a single deck DVD multi-region player, Source Input 2 is a hard-disc based DivX multimedia device (movies, sounds and images), Source Input 3 is the latest version of the Playstation 2 which is integrated INSIDE the rear armrest, and Source Input 4 is the iPod. Input 4 is going to be rather special because the iPod will now be mounted inside the left trunk area and there will be a tiny CCD camera that will point at the iPod screen. This means that whenever I want to listen to the iPod in my car, the iDrive screen will have a real-time video image of the actual iPod screen. At least I will be able to see what tracks I am selecting etc.. To preserve the orientation of this image, the CCD camera and iPod will be fixed within a container and that container will be fixed via dampers to the car.
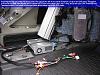
After location testing, I decided to mount the Clarion upside down on the ceiling of the trunk, towards the left side of the car. In my testing, I found this spot to be most free of RF interference. The right side of the car is a no-go area because the main engine power feed runs along the right side of the car! Don't even think about laying audio cables down the right side!
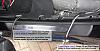
The Clarion is mounted using self tapping screws and felt pads for vibration insulation. The 12 volt supply that I will need for the entire A/V system is coming from the rear fuse carrier using my own cabling and fuses. The supply is called Terminal 30G and means that whilst the car is "awake" it is churning out 12 volts. As any E60 owner will know, the car goes into "sleep" mode after a certain time of car inactivity - this time can be as long as one hour if you have the professional bluetooth BMW telephone installed. In any case, as soon as the car "sleeps", there will be no current drain from the A/V System. This T30G feed is routed from the right rear trunk area to the left side where most of my equipment and modules reside.
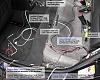
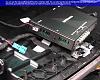
For the Japanese market, BMW E60s have the navigation system in the REAR LEFT of the car's trunk! Happily though, everyone else has a cubby hole instead, accessed via a plastic cover on the left rear trunk trim. BMW make a DIN-sized mounting bracket that fits this hole instead and this is where I have mounted my single disc DVD player. On my car, the BMW video module (factory fit TV option with Prof Nav option code 609a) sits next to the DIN mount bracket and I found that there is enough space between that and the interior trim panel for my hard-disc device which will play DivX movies as well as MP3s and image files. The next image shows this area.
As with any big A/V system, in the home or otherwise, the problem of remote controls always pops up! For my application, I decided to eventually use one programmable unit for the whole lot. I also elected to install a Xantech infrared repeater system like I had done for my home A/V setup. Basically, it consists of one centrally mounted infrared receiver that picks up all the remote control codes and relays them to individual infrared LEDs that are mounted on each piece of equipment that has a remote control sensor in it. In my case, this meant having a repeater LED for the DVD player, DivX device, iPod and iDrive interface. A bonus feature of the Xantech system is that it runs on 12 volts.
As with all car electronic equipment, you need to install in-line filters and suppressors to filter out the inevitable RF noise that manifests itself within any car today. The ultimate solution would be to have a fibre-optic system but the costs go up considerably.
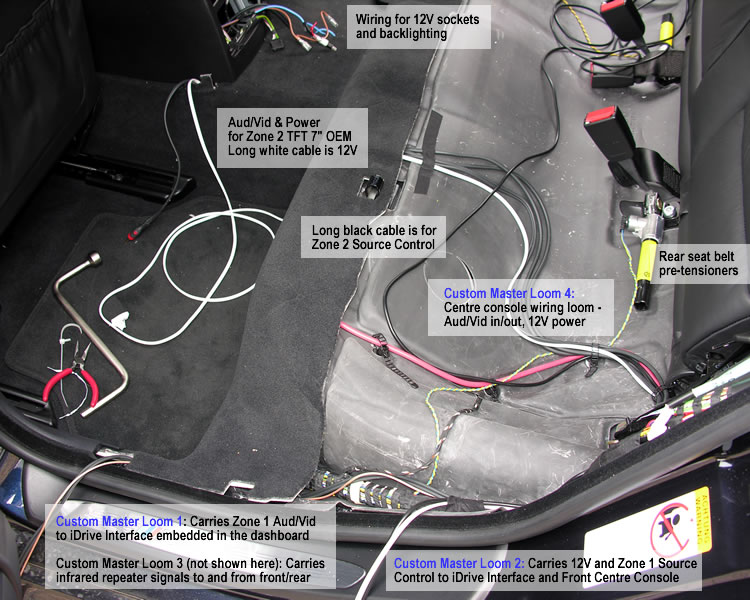
To be honest, I have actually installed my wiring looms TWICE in my car! The first time, I sent the looms down the centre line of the car, from the rear trunk to the front centre console. I removed the rear seat bench, both front seats, entire centre console and both sections of carpet in the process. I should have known better.... When you run such looms down the centre console of a rear-wheel drive car, you will pickup the RF noise generated from the centre drive shaft. It's a horrible variable noise that goes in tandem with how fast you are actually driving! I took out my wiring loom and manufactured a completely new one - this time running down the LEFT side of the car, all the way from the back to the front bulkhead. No noise problems now at all.
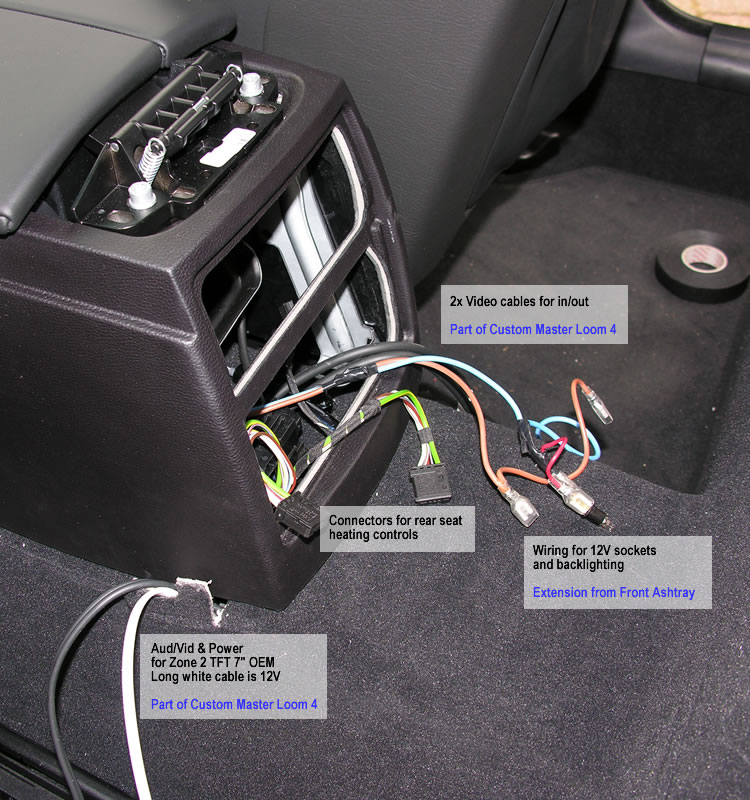
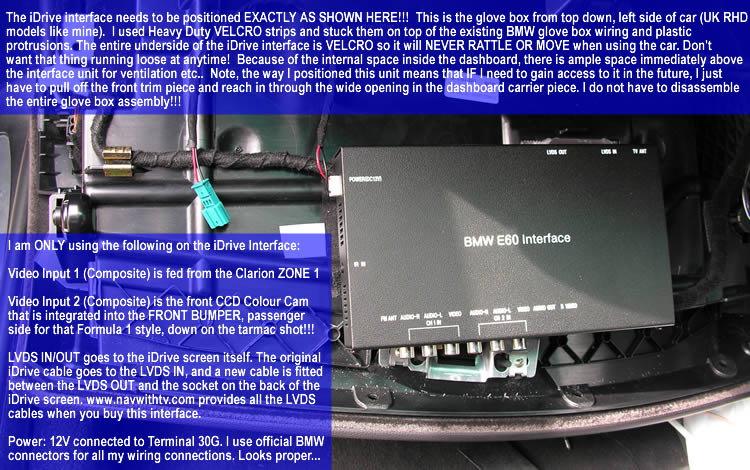
The wiring loom splits off in two places - the first is where the left trunk lid hinge is (this branch of the loom goes to the Clarion unit mounted "beneath" the rear sunblind; the second split point is underneath the rear seat bench (this branch goes to the rear centre console section via the rear "hump" in the floorpan. This rear section is defined as Zone 2. The rest of the wiring loom continues to the front passenger footwell (I have a RHD UK car) then crosses over underneath the glovebox fuse carrier ending up in the area behind the front centre dashboard. Having disassembled the dashboard a few times before, I knew that the iDrive interface would have to be located behind the dashboard trim, passenger side, and in front of the internal airbag unit. There is a lot of space there. Initially, I had thought that the interface could sit right behind the iDrive screen, but there is absolutely no room for anything there. Note, the passenger airbag deploys upwards and outwards, therefore the area inside the dashboard in front of it is safe to use.
The next sequence will show you the path of the wiring loom, rear seat area, front passenger area, glovebox and dashboard.
Continued on next post....
I am FINALLY ready to post details and images of my custom A/V install in my car.
The following info is all on my web site: bmw-ci.com : which has also been updated with the M5 gear knob retrofit for SMG cars - developed with Kigerka, his car and Andy545 for letting us use his garage at the recent Dutch meet!!! Thanks a lot Andy545!!!!
OK, now down to the details. People have been asking for images of an install using Dominic's (navwithtv.com) E60 iDrive interface. Well, here it is:

The labelling on the unit is self-explanatory - except for LVDS In/Out, which are the sockets for the widescreen display in the dashboard. Take care when handling the LVDS connectors because they can be somewhat fragile. Physically, this unit is bigger than the original but I still found space for it behind and inside the dashboard! Within the following pages, I will show you detailed pictures of my entire install, with descriptions of what I did and how I did it. At the very end, there is a list of all the components that make up my system.
=====================

I think that for any in-car entertainment system to be good, it MUST have independent source switching for as many viewing zones as you need in a car. For most people, a car can be split into TWO zones: Zone 1 is defined as the front passanger and driver. Zone 2 can be considered the rear passengers. If you wanted the rear passengers to have entirely separate screens displaying totally different sources, then there would be a Zone 3. You can also have a Zone 4 for cars with a 3rd row of seats for instance.
For my purposes, I wanted a THREE zone system - Zone 1 (Front), Zone 2 (Rear), Zone 3 (Rear centre console sockets so that I COULD connect another screen and headphones or a camcorder etc..) I have selected the Clarion MSS433. It has 3 independent zones with independently controlled 12 volt switching and individual source selector conrol units. Each zone can independently switch up to 4 separate A/V sources.
Using this Clarion MSS433 means that each zone can "output" ANY source input independently of what is on any other zone.
In my car, Source Input 1 is a single deck DVD multi-region player, Source Input 2 is a hard-disc based DivX multimedia device (movies, sounds and images), Source Input 3 is the latest version of the Playstation 2 which is integrated INSIDE the rear armrest, and Source Input 4 is the iPod. Input 4 is going to be rather special because the iPod will now be mounted inside the left trunk area and there will be a tiny CCD camera that will point at the iPod screen. This means that whenever I want to listen to the iPod in my car, the iDrive screen will have a real-time video image of the actual iPod screen. At least I will be able to see what tracks I am selecting etc.. To preserve the orientation of this image, the CCD camera and iPod will be fixed within a container and that container will be fixed via dampers to the car.
After location testing, I decided to mount the Clarion upside down on the ceiling of the trunk, towards the left side of the car. In my testing, I found this spot to be most free of RF interference. The right side of the car is a no-go area because the main engine power feed runs along the right side of the car! Don't even think about laying audio cables down the right side!
The Clarion is mounted using self tapping screws and felt pads for vibration insulation. The 12 volt supply that I will need for the entire A/V system is coming from the rear fuse carrier using my own cabling and fuses. The supply is called Terminal 30G and means that whilst the car is "awake" it is churning out 12 volts. As any E60 owner will know, the car goes into "sleep" mode after a certain time of car inactivity - this time can be as long as one hour if you have the professional bluetooth BMW telephone installed. In any case, as soon as the car "sleeps", there will be no current drain from the A/V System. This T30G feed is routed from the right rear trunk area to the left side where most of my equipment and modules reside.
For the Japanese market, BMW E60s have the navigation system in the REAR LEFT of the car's trunk! Happily though, everyone else has a cubby hole instead, accessed via a plastic cover on the left rear trunk trim. BMW make a DIN-sized mounting bracket that fits this hole instead and this is where I have mounted my single disc DVD player. On my car, the BMW video module (factory fit TV option with Prof Nav option code 609a) sits next to the DIN mount bracket and I found that there is enough space between that and the interior trim panel for my hard-disc device which will play DivX movies as well as MP3s and image files. The next image shows this area.

As with any big A/V system, in the home or otherwise, the problem of remote controls always pops up! For my application, I decided to eventually use one programmable unit for the whole lot. I also elected to install a Xantech infrared repeater system like I had done for my home A/V setup. Basically, it consists of one centrally mounted infrared receiver that picks up all the remote control codes and relays them to individual infrared LEDs that are mounted on each piece of equipment that has a remote control sensor in it. In my case, this meant having a repeater LED for the DVD player, DivX device, iPod and iDrive interface. A bonus feature of the Xantech system is that it runs on 12 volts.
As with all car electronic equipment, you need to install in-line filters and suppressors to filter out the inevitable RF noise that manifests itself within any car today. The ultimate solution would be to have a fibre-optic system but the costs go up considerably.
To be honest, I have actually installed my wiring looms TWICE in my car! The first time, I sent the looms down the centre line of the car, from the rear trunk to the front centre console. I removed the rear seat bench, both front seats, entire centre console and both sections of carpet in the process. I should have known better.... When you run such looms down the centre console of a rear-wheel drive car, you will pickup the RF noise generated from the centre drive shaft. It's a horrible variable noise that goes in tandem with how fast you are actually driving! I took out my wiring loom and manufactured a completely new one - this time running down the LEFT side of the car, all the way from the back to the front bulkhead. No noise problems now at all.
The wiring loom splits off in two places - the first is where the left trunk lid hinge is (this branch of the loom goes to the Clarion unit mounted "beneath" the rear sunblind; the second split point is underneath the rear seat bench (this branch goes to the rear centre console section via the rear "hump" in the floorpan. This rear section is defined as Zone 2. The rest of the wiring loom continues to the front passenger footwell (I have a RHD UK car) then crosses over underneath the glovebox fuse carrier ending up in the area behind the front centre dashboard. Having disassembled the dashboard a few times before, I knew that the iDrive interface would have to be located behind the dashboard trim, passenger side, and in front of the internal airbag unit. There is a lot of space there. Initially, I had thought that the interface could sit right behind the iDrive screen, but there is absolutely no room for anything there. Note, the passenger airbag deploys upwards and outwards, therefore the area inside the dashboard in front of it is safe to use.
The next sequence will show you the path of the wiring loom, rear seat area, front passenger area, glovebox and dashboard.


Continued on next post....
 05-18-2005, 08:20 PM
#2
Contributors
Thread Starter
Join Date: Nov 2004
Location: UK & Europe
Posts: 572
Likes: 0
Received 0 Likes
on
0 Posts
My Ride: 2005 MY 545i Sport Saloon. 2006 MY Alpina B3S Convertible. 2006 MY Brabus Smart 42 Cabrio. 2006 MY AM DB9 Coupe.
Continued from previous post....
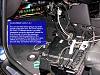
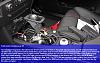
The iDrive interface is the unit from www.navwithtv.com. The chap there is called Dominic, and he is based in Brooklyn, New York, USA. The unit is approx US$ 550. The unit above is the iDrive interface WITH TV Tuner. There is a version of the interface WITHOUT the TV Tuner. CAUTION: the TV Tuner is NTSC ONLY! I shall be replacing my unit with the other one, since I have no need for a NTSC TV Tuner in Europe...
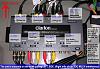
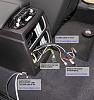
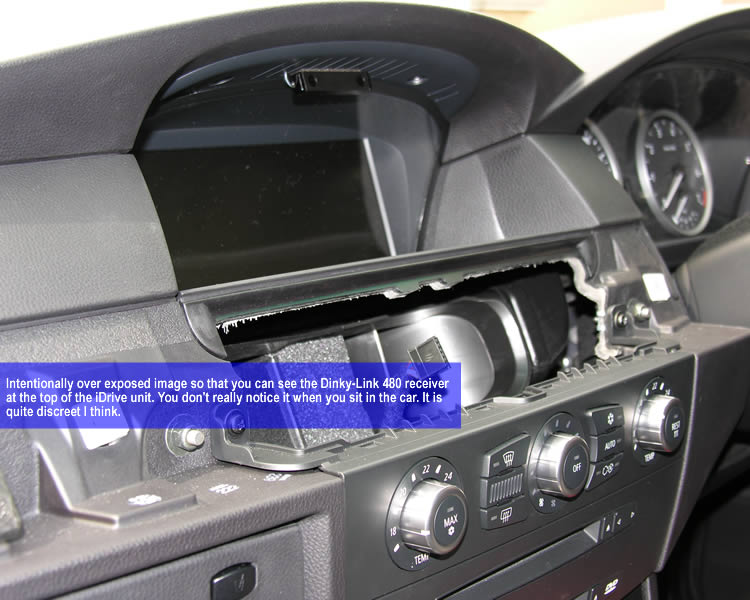
This interface can be mounted in the space BETWEEN the cupholders. Internally, the cupholders are inside plastic boxes which are mounted on the dashboard carrier. The horizontal gap between this internal boxes is about 1 cm wider than the interface metal casing. Perfect fit. No problems with height - there is at least 4 to 5 inches of vertical space there. You can see this position in the image above and in the next images.

In the image above, you can see one of the Xantech infrared repeaters directly attached to the infrared receiver that came with the iDrive interface. The control box for the Xantech system is located in the trunk immediately behind the DVD player. Once again, it is held in place with heavy duty velcro which eliminates any rattling noise.
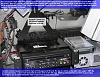
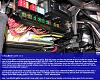
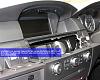
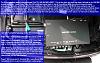
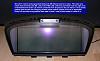
The image on the next page shows the relative position of the iDrive interface when viewed with the front dashboard trim REMOVED. Note the huge space created where the passenger air vent would normally reside when the trim is in place. This is very good for making any adjustments to the connections and any future "servicing" needed.

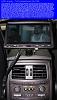
The Clarion control unit for Zone 1 is located in the front ashtray area. I am currently fabricating a custom insert that will completely replace the ashtray assembly (including front lighter socket) and will enable me to hide the control switches underneath the sliding ashtray cover. James Bond style!
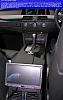
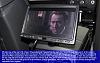
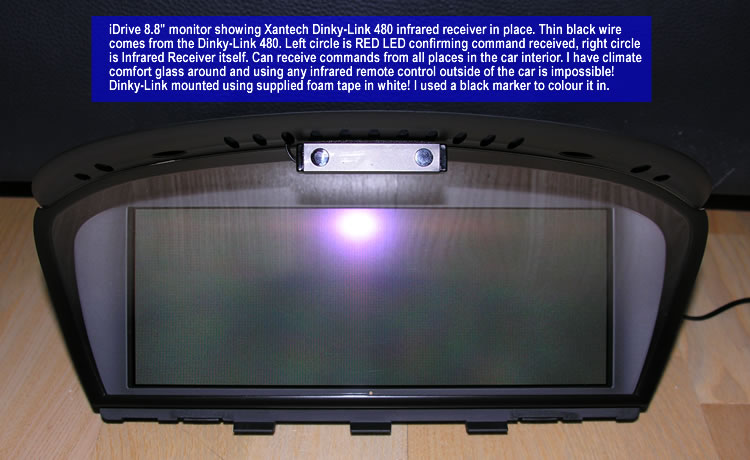
Next, you will see images of the iDrive screen taken out of the dashboard and showing the position of the Xantech Dinky-Link 480 infrared receiver, rear LCD screen and iDrive screens working!
On two of these pages, the images are about 280 Kb in size. I wanted to keep the detail of the images and I had to keep the JPEG compression as low as possible.
System Summary - List of components used:
Clarion MSS433 - Source Commander Multi-zone A/V Switcher
P&L Electronics E60 iDrive Interface - Full Version with TV Tuner and FM Modulator
Sony Playstation 2 - SCPH-70004 new, slim profile version
Logitech Cordless Action Controllers - Dual Analog Sticks, Vibration Feedback, 2.4GHz Cordless
LaCie Silverscreen - 80GB with BMW-Ci customised graphics and menus
Apple iPod 4G - 40GB
Veba AV2408 - DIN sized In-Dash DVD Player, Multi-region enabled
Veba AV700RV - 7.0" widescreen monitor, grade A TFT/LCD
Colour CCD Bullet Camera - Sony 1/4" CCD, 512x582 px, 380 TV Lines, weatherproof, black
Colour CCD Board Camera - 1/3" Interline CCD, 752x582 px, >450 TV Lines, sound
Ecovell 4x USB DC Car Power Adapter - produces regulated 5v USB power at 10W (2A)
Block SDC 60/30-12 - Step-Down DC/DC Converter
Xantech 789-44 - One zone connecting block (4 emitter outputs supporting max of 8 emitters)
Xantech 282M - Mouse Emitter
Xantech 284M - Dual Mouse Emitter
Xantech 480-00 - Dinky-Link Receiver, black
RS Video Cable 2406696 - Industry standard 75 Ohm cable for broadcast, 6.25mm nom. diameter
Filotex RG316DT Cable - High shield, double braid
RS Mains Cable 2192Y - BS6500 & CENELEC HD21.5 compliant, white
RS PTFE Equipment Wire to BS3G 210 Type B Size - 19/0.2mm, operating temp range -55C to +200C
BMW Original Terminals and Connectors as required - 2 pin, 3 pin, 6 pin
Notes:
The Veba AV2408 will shortly be replaced with the CKO DV2100 or DV MP8.3SE-PRO. The P&L Electronics E60 iDrive Interface will be replaced with the new version without TV Tuner. This version will support native PAL input as well as NTSC input.
Installation Summary:
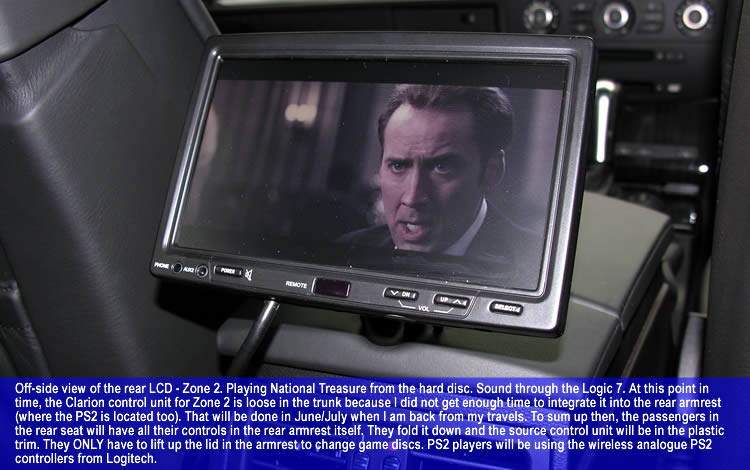
Total time for research estimated at > 200 hours. Installation and testing estimated at 10 hours. The system is easy to use, setup and maintain. A lot of thought has gone into the routing of the cables and the most difficult task will be to pass through the cables into the rear armrest for the PS2. The reason for this is likely to be the fact that it is very difficult to dismantle the actual armrest piece itself without damaging the leather etc.. More images of the system will be posted here in due course but not until I complete my trips overseas which is expected to last until the end of June. In the meantime, feel free to email questions, comments, gripes (!) etc..
The iDrive interface is the unit from www.navwithtv.com. The chap there is called Dominic, and he is based in Brooklyn, New York, USA. The unit is approx US$ 550. The unit above is the iDrive interface WITH TV Tuner. There is a version of the interface WITHOUT the TV Tuner. CAUTION: the TV Tuner is NTSC ONLY! I shall be replacing my unit with the other one, since I have no need for a NTSC TV Tuner in Europe...
This interface can be mounted in the space BETWEEN the cupholders. Internally, the cupholders are inside plastic boxes which are mounted on the dashboard carrier. The horizontal gap between this internal boxes is about 1 cm wider than the interface metal casing. Perfect fit. No problems with height - there is at least 4 to 5 inches of vertical space there. You can see this position in the image above and in the next images.


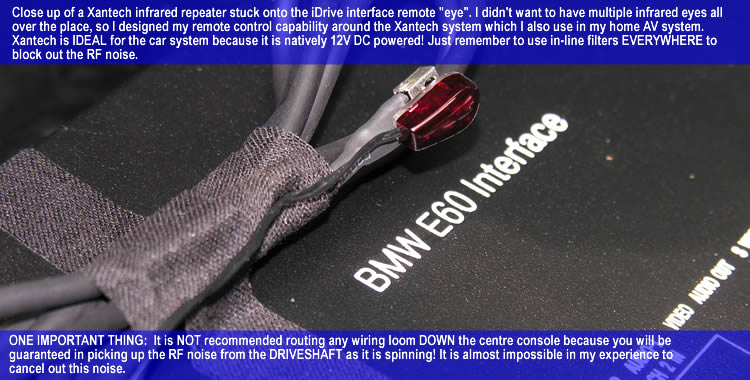
In the image above, you can see one of the Xantech infrared repeaters directly attached to the infrared receiver that came with the iDrive interface. The control box for the Xantech system is located in the trunk immediately behind the DVD player. Once again, it is held in place with heavy duty velcro which eliminates any rattling noise.
The image on the next page shows the relative position of the iDrive interface when viewed with the front dashboard trim REMOVED. Note the huge space created where the passenger air vent would normally reside when the trim is in place. This is very good for making any adjustments to the connections and any future "servicing" needed.


The Clarion control unit for Zone 1 is located in the front ashtray area. I am currently fabricating a custom insert that will completely replace the ashtray assembly (including front lighter socket) and will enable me to hide the control switches underneath the sliding ashtray cover. James Bond style!
Next, you will see images of the iDrive screen taken out of the dashboard and showing the position of the Xantech Dinky-Link 480 infrared receiver, rear LCD screen and iDrive screens working!
On two of these pages, the images are about 280 Kb in size. I wanted to keep the detail of the images and I had to keep the JPEG compression as low as possible.

System Summary - List of components used:
Clarion MSS433 - Source Commander Multi-zone A/V Switcher
P&L Electronics E60 iDrive Interface - Full Version with TV Tuner and FM Modulator
Sony Playstation 2 - SCPH-70004 new, slim profile version
Logitech Cordless Action Controllers - Dual Analog Sticks, Vibration Feedback, 2.4GHz Cordless
LaCie Silverscreen - 80GB with BMW-Ci customised graphics and menus
Apple iPod 4G - 40GB
Veba AV2408 - DIN sized In-Dash DVD Player, Multi-region enabled
Veba AV700RV - 7.0" widescreen monitor, grade A TFT/LCD
Colour CCD Bullet Camera - Sony 1/4" CCD, 512x582 px, 380 TV Lines, weatherproof, black
Colour CCD Board Camera - 1/3" Interline CCD, 752x582 px, >450 TV Lines, sound
Ecovell 4x USB DC Car Power Adapter - produces regulated 5v USB power at 10W (2A)
Block SDC 60/30-12 - Step-Down DC/DC Converter
Xantech 789-44 - One zone connecting block (4 emitter outputs supporting max of 8 emitters)
Xantech 282M - Mouse Emitter
Xantech 284M - Dual Mouse Emitter
Xantech 480-00 - Dinky-Link Receiver, black
RS Video Cable 2406696 - Industry standard 75 Ohm cable for broadcast, 6.25mm nom. diameter
Filotex RG316DT Cable - High shield, double braid
RS Mains Cable 2192Y - BS6500 & CENELEC HD21.5 compliant, white
RS PTFE Equipment Wire to BS3G 210 Type B Size - 19/0.2mm, operating temp range -55C to +200C
BMW Original Terminals and Connectors as required - 2 pin, 3 pin, 6 pin
Notes:
The Veba AV2408 will shortly be replaced with the CKO DV2100 or DV MP8.3SE-PRO. The P&L Electronics E60 iDrive Interface will be replaced with the new version without TV Tuner. This version will support native PAL input as well as NTSC input.
Installation Summary:
Total time for research estimated at > 200 hours. Installation and testing estimated at 10 hours. The system is easy to use, setup and maintain. A lot of thought has gone into the routing of the cables and the most difficult task will be to pass through the cables into the rear armrest for the PS2. The reason for this is likely to be the fact that it is very difficult to dismantle the actual armrest piece itself without damaging the leather etc.. More images of the system will be posted here in due course but not until I complete my trips overseas which is expected to last until the end of June. In the meantime, feel free to email questions, comments, gripes (!) etc..

 05-18-2005, 08:39 PM
#4
Contributors
Thread Starter
Join Date: Nov 2004
Location: UK & Europe
Posts: 572
Likes: 0
Received 0 Likes
on
0 Posts
My Ride: 2005 MY 545i Sport Saloon. 2006 MY Alpina B3S Convertible. 2006 MY Brabus Smart 42 Cabrio. 2006 MY AM DB9 Coupe.
Cheers Rudy!
You gotta have fun in life.....
You gotta have fun in life.....
05-18-2005, 08:43 PM
#5
Super Moderator
Join Date: Mar 2004
Location: Pittsburgh, PA USA
Posts: 17,310
Likes: 0
Received 2 Likes
on
2 Posts
My Ride: G30 M550i
Model Year: 2018
You remind me of me back when I had more time to tinker...I'm pretty anal about making things like wires neat and perfect. I know that these kind of things come down to good planning and it looks like you did a fantastic job laying everything out and double checking things.
My hat is off to you my friend...
My hat is off to you my friend...
05-18-2005, 08:52 PM
#6
Members

Join Date: Apr 2005
Posts: 61
Likes: 0
Received 0 Likes
on
0 Posts
how does one figure this shit out and learn how to do this... amazing my friend, absolutley amazing... i wish i had the knowledge to do thease tipe of self proects. If you ever come to southwest flrorida, stop by and please get me the m5 smg shifter.... i want that soooo bad
05-18-2005, 08:57 PM
#7
Contributors
Join Date: Dec 2004
Location: Springfield, Virginia
Posts: 483
Likes: 0
Received 0 Likes
on
0 Posts
Jesus Allah Jehova Buddha Christ!
I think I'll just get a DVD tablet.... Great job... Don't know if I have the balls to try this, but its good to know you've outline it all when I decide in a month or so.
I think I'll just get a DVD tablet....
Great job... Don't know if I have the balls to try this, but its good to know you've outline it all when I decide in a month or so.
05-18-2005, 09:36 PM
#8
Contributors
Join Date: Oct 2004
Location: Singapore
Posts: 2,926
Likes: 0
Received 0 Likes
on
0 Posts
My Ride: 530iA Silver Grey , black interior. Premium Package, Navigation System, Head-up Display, Radio Satellite, Adaptive Xenon Headlights. AC Schnitzer Front Lip, H&R springs, Rear red reflector, All season Floor mat,
Hobi, you're absolutely awesome! Geez.. i'm *speechless*


 05-18-2005, 10:26 PM
#10
Contributors

Join Date: Jan 2005
Location: Espoo, Finland
Posts: 70
Likes: 0
Received 0 Likes
on
0 Posts
My Ride: 2005 (born 11/04) 525i Touring: jet black, bi-xenons, sports suspension, extended air conditioning.
Retrofits: hinged cubby hole, AUX-input, generic I-Drive video interface (a.k.a. xbox-e60)
Warranty repairs:
software update, door seals replaced, loose aluminium trim fixed.
Repairs:
Self-levelling compressor.
Ok, I'm sold. Looks really awesome.
I could think myself to go a bit low-end solution
You mentioned about the power connector to be connected to terminal 30G, what is that ? standard place for standard connector. If you have that original BMW connector fixed to the "E60 Interface"'s power cables can it be just plugged in the terminal 30G. (I haven't checked yet what's that in my car). So basicly is it so ?
I would be just happy just to put the module in the cd changer space... and media devices in the glove compartment. Are the provided LVDS in/out cables long enough to reach the glove comparment ?
Anymore ideas to make the installation as simple as possible.
I'd just like to convince myself before I make an order