Installing AngeliBright AIB's
 03-02-2007, 12:05 PM
#1
Members
Senior Members
Thread Starter

Hey Guys,
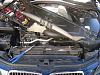
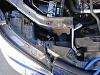
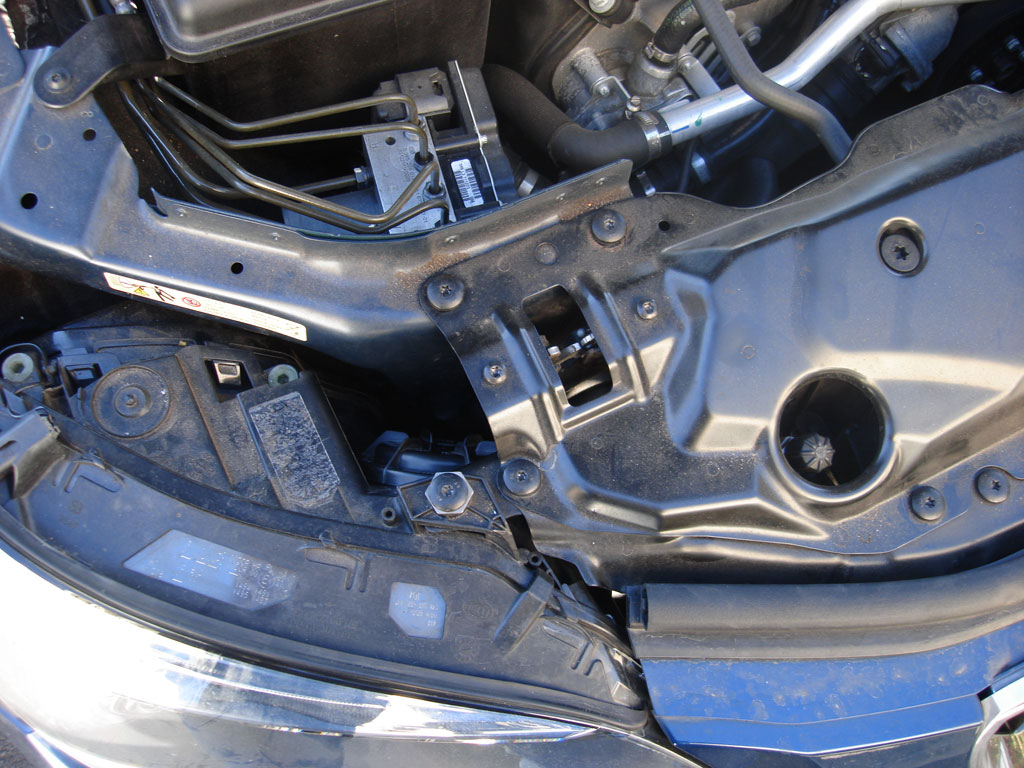
Like many here, the first time I installed the new original AngeliBright, now called AIB v1.0, I had to remove my headlights. It was a large and not a fun job at all. When the v2.0 upgrade came around for 100 bucks which fixed the FM issue and had many improvements I had to have it. Once again, like most here, I was rather upset that I had remove and send the old AIB's back first before receiving the new ones. They wouldn't even let the forum admin slide on this rule, I tried, believe me! Anyway, I managed to remove the old AIB's using 11" long needle nose plyers. I got the new AIB v2.0 a few days ago and struggled with the install. I was determined not to remove the headlights again. Maybe this was mentioned here before, but I instead removed that large metal support bracket which gave me enough side-side room to securely plug in the AIB's without having to remove the headlights. I breathed a huge sigh of relief when the AIB's fit in and I didn't have to remove the headlights again. Hopefully this helps someone! Pics below:
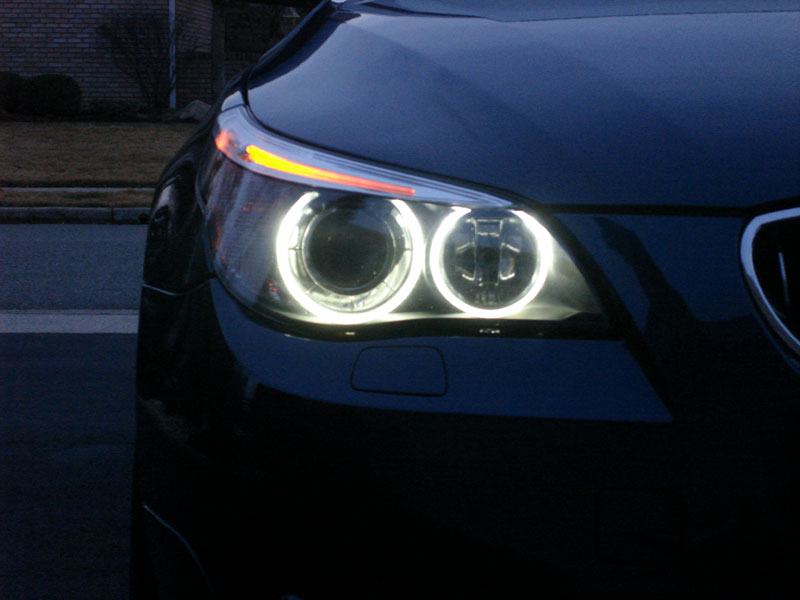
Very little space:

Bracket removed:
Just enough space to do the job now:
Like many here, the first time I installed the new original AngeliBright, now called AIB v1.0, I had to remove my headlights. It was a large and not a fun job at all. When the v2.0 upgrade came around for 100 bucks which fixed the FM issue and had many improvements I had to have it. Once again, like most here, I was rather upset that I had remove and send the old AIB's back first before receiving the new ones. They wouldn't even let the forum admin slide on this rule, I tried, believe me! Anyway, I managed to remove the old AIB's using 11" long needle nose plyers. I got the new AIB v2.0 a few days ago and struggled with the install. I was determined not to remove the headlights again. Maybe this was mentioned here before, but I instead removed that large metal support bracket which gave me enough side-side room to securely plug in the AIB's without having to remove the headlights. I breathed a huge sigh of relief when the AIB's fit in and I didn't have to remove the headlights again. Hopefully this helps someone!
Pics below:Very little space:
Bracket removed:

Just enough space to do the job now:

 03-02-2007, 02:00 PM
#2
Senior Members
Join Date: Jun 2004
Location: Copenhagen, Denmark
Posts: 1,229
Likes: 0
Received 0 Likes
on
0 Posts
Originally Posted by Lomag' post='397746' date='Mar 2 2007, 10:05 PM
Hey Guys,
Like many here, the first time I installed the new original AngeliBright, now called AIB v1.0, I had to remove my headlights. It was a large and not a fun job at all. When the v2.0 upgrade came around for 100 bucks which fixed the FM issue and had many improvements I had to have it. Once again, like most here, I was rather upset that I had remove and send the old AIB's back first before receiving the new ones. They wouldn't even let the forum admin slide on this rule, I tried, believe me! Anyway, I managed to remove the old AIB's using 11" long needle nose plyers. I got the new AIB v2.0 a few days ago and struggled with the install. I was determined not to remove the headlights again. Maybe this was mentioned here before, but I instead removed that large metal support bracket which gave me enough side-side room to securely plug in the AIB's without having to remove the headlights. I breathed a huge sigh of relief when the AIB's fit in and I didn't have to remove the headlights again. Hopefully this helps someone! Pics below:
Like many here, the first time I installed the new original AngeliBright, now called AIB v1.0, I had to remove my headlights. It was a large and not a fun job at all. When the v2.0 upgrade came around for 100 bucks which fixed the FM issue and had many improvements I had to have it. Once again, like most here, I was rather upset that I had remove and send the old AIB's back first before receiving the new ones. They wouldn't even let the forum admin slide on this rule, I tried, believe me! Anyway, I managed to remove the old AIB's using 11" long needle nose plyers. I got the new AIB v2.0 a few days ago and struggled with the install. I was determined not to remove the headlights again. Maybe this was mentioned here before, but I instead removed that large metal support bracket which gave me enough side-side room to securely plug in the AIB's without having to remove the headlights. I breathed a huge sigh of relief when the AIB's fit in and I didn't have to remove the headlights again. Hopefully this helps someone!
Pics below:I was able to change the angel eye bulb today, without removing anything! It was a PITA, but now it's done, and the eyes on the right hand side is on agian
03-02-2007, 02:25 PM
#3
Contributors
Join Date: Feb 2006
Location: NY
Posts: 14,646
Likes: 0
Received 0 Likes
on
0 Posts
My Ride: 2008 Silverstone II E60 M5 2012 E70 AW X5 50i Sport w/ LCI Aero Kit and Rocker Panels
Originally Posted by Lomag' post='397746' date='Mar 2 2007, 04:05 PM
Hey Guys,
Like many here, the first time I installed the new original AngeliBright, now called AIB v1.0, I had to remove my headlights. It was a large and not a fun job at all. When the v2.0 upgrade came around for 100 bucks which fixed the FM issue and had many improvements I had to have it. Once again, like most here, I was rather upset that I had remove and send the old AIB's back first before receiving the new ones. They wouldn't even let the forum admin slide on this rule, I tried, believe me! Anyway, I managed to remove the old AIB's using 11" long needle nose plyers. I got the new AIB v2.0 a few days ago and struggled with the install. I was determined not to remove the headlights again. Maybe this was mentioned here before, but I instead removed that large metal support bracket which gave me enough side-side room to securely plug in the AIB's without having to remove the headlights. I breathed a huge sigh of relief when the AIB's fit in and I didn't have to remove the headlights again. Hopefully this helps someone! Pics below:
Very little space:
Attachment 29110
Bracket removed:
Attachment 29111
Just enough space to do the job now:
Attachment 29112
Like many here, the first time I installed the new original AngeliBright, now called AIB v1.0, I had to remove my headlights. It was a large and not a fun job at all. When the v2.0 upgrade came around for 100 bucks which fixed the FM issue and had many improvements I had to have it. Once again, like most here, I was rather upset that I had remove and send the old AIB's back first before receiving the new ones. They wouldn't even let the forum admin slide on this rule, I tried, believe me! Anyway, I managed to remove the old AIB's using 11" long needle nose plyers. I got the new AIB v2.0 a few days ago and struggled with the install. I was determined not to remove the headlights again. Maybe this was mentioned here before, but I instead removed that large metal support bracket which gave me enough side-side room to securely plug in the AIB's without having to remove the headlights. I breathed a huge sigh of relief when the AIB's fit in and I didn't have to remove the headlights again. Hopefully this helps someone!
Pics below:Very little space:
Attachment 29110
Bracket removed:
Attachment 29111
Just enough space to do the job now:
Attachment 29112
 There's no way I could get in there. Congrats though!
 PS - How do you like the new ones? Are they any brighter?
 03-02-2007, 04:03 PM
#5
Senior Members
Join Date: Oct 2006
Location: OC
Posts: 771
Likes: 0
Received 0 Likes
on
0 Posts
Originally Posted by cmansbimmer' post='397795' date='Mar 2 2007, 06:25 PM
Mark - You must have hands the size of an ewok! There's no way I could get in there. Congrats though!
PS - How do you like the new ones? Are they any brighter?
There's no way I could get in there. Congrats though! PS - How do you like the new ones? Are they any brighter?
 03-03-2007, 02:21 PM
#7
Members
Senior Members
Thread Starter
I was able to unscrew the old AIB's with the long needlenose plyers although I guess if you remove that bracket you can just unscrew them by hand. I didn't think of the bracket until I was struggling to re-install the newer AIB's.
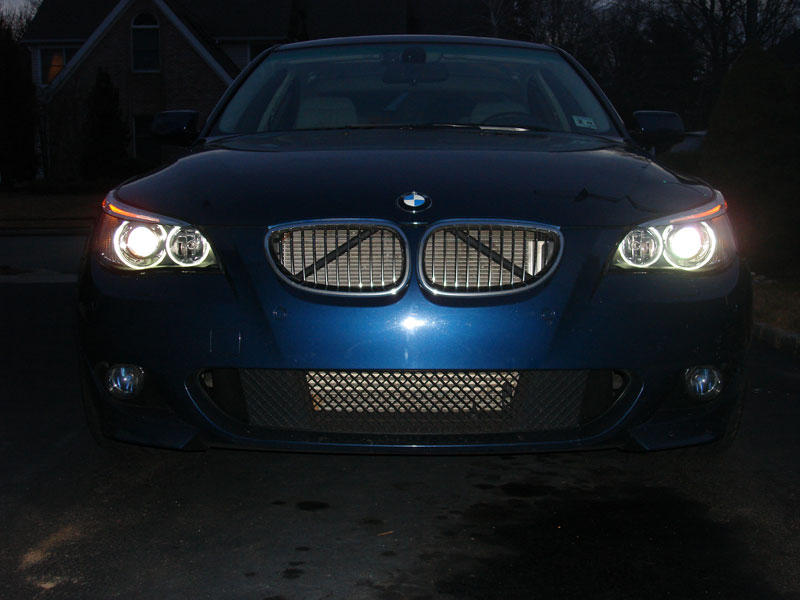
I'm not sure if the newer AIB's are really brighter or what-not. They look very nice to me both old and new revisions. They are hard to capture on camera. With camera flash you get a more accurate representation but they look dimmer. Without flash they look very very bright. In real life though they're perfect. I'd say the first picture below is the best representation.

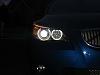
No flash on this one, see they look extra bright than the others:
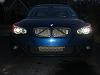

Thread
Thread Starter
Forum
Replies
Last Post
socale39
Complete Car Sales
9
09-05-2023 08:30 AM
umnitza
E60, E61 Parts, Accessories and Mods
6
06-23-2015 03:41 PM
DetailersDomain
Detailing Forum
0
05-29-2015 04:52 AM
snaprolll
DIY: Do It Yourself
0
05-05-2015 05:09 PM