You guys Rock!
 10-20-2011, 07:55 AM
#1
Members
Thread Starter
Join Date: Jun 2010
Location: Georgia, USA
Posts: 23
Likes: 0
Received 0 Likes
on
0 Posts
I've been reading this site for a few months now. I'm a big worry type dude so I PM (preventive maint.)the heck out of everything I own... even my wife 
E60 525i 103K miles.
I will now tell you my story about the excitement and pit falls experienced in changing my waterpump, thermostat, belts, sparkplugs, coil packs, and give you a rant about my car paint troubles.
Queso (ok-so)... I started with the coil packs and spark plugs. I purchsed the NGK Laser Spark plugs from some online store that specializes in only plugs... don't remember which. I went to the OEM guide on our car to get the part number, went to google, typed it in, clicked on shopping and looked for the cheapest i could get it. I mean, they're just sparkplugs right? Found em for about $5 a pop which i thought was good considereing the $15-30 they tried to charge at local shops lol. I didn't put anti seize on the plugs since some E-threads said the plugs come with special metal and to just torque to the dry settings.
The coil packs I bought from Bav Auto. I got worried when installing these because they didn't clip in easy. I had to use an abundance of equally distributed pressure to the bottom sides to get it to go in. I used my thumbs then followed up with some fat plyers. They clipped in easy after that. The Bav auto coils are cheap-ish and supposedly give better response etc. I do feel better response etc out of the car now, but that might be because it has fresh ignition. (the old plugs didn't look to bad, just normal wear).
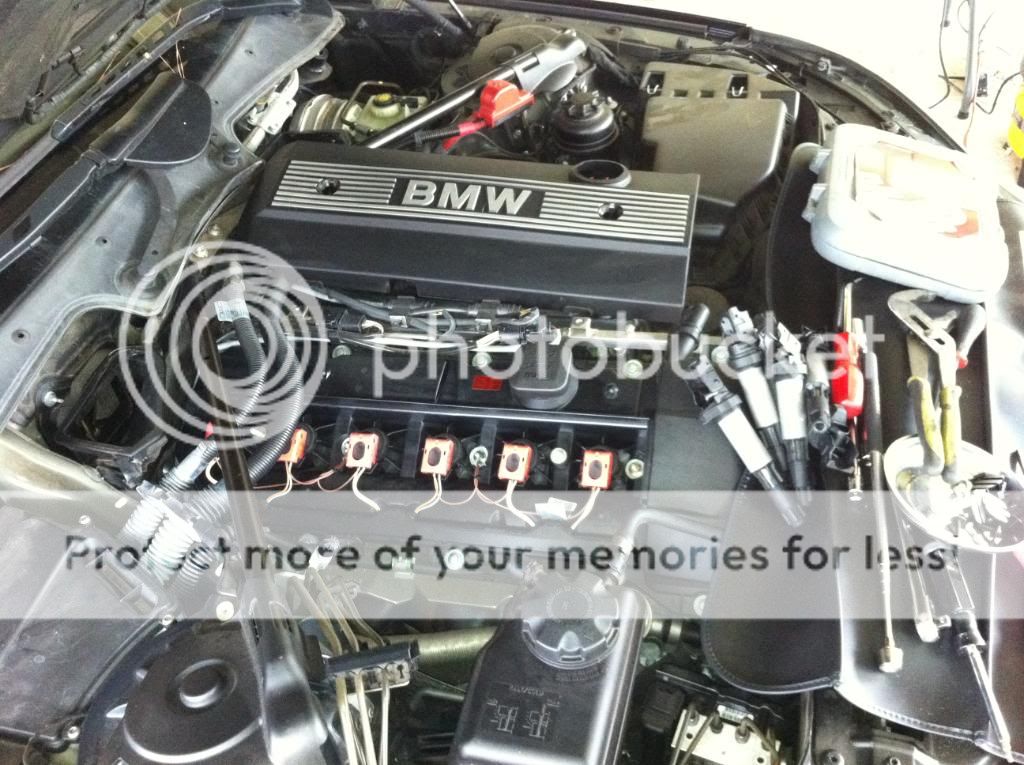
Annnnd deeeeeeeennnnnn (and then), I took off the top covering the radiator bay, took off the radiator cover, got under the car, took off the road shield, unclipped all of the hoses connected to the radiator fan, got back on top and unhooked the fan electronics, unhooked the overspill hose, removed the clip and hose coming off of the radiator and into the thermostat.
First snag: when i went to pull up on the fan, it wouldn't come straight up; however, after studying it for 5 minutes i noticed that on the US-passenger side of the radiator (your left if you're facing the radiator) the fin that holds the radiator in place has hinges. So you can swing it in and then it comes straight out!
I took the clamps off of the hoses going to the thermostat on both sides. Amazing how they just slip on and off... and just use a U clamp to hold them in place. I then pulled the two belts off... starting with the AC one.
I took the thermostat off without any problems (made sure to take electronics off first).
Then i go to take off the Waterpump pulley. 4 little bolts holding it on. They come off easy but the pulley didn't let go. I try a flat head, plyers, no go.
Second snag: I use both hands and equally distribute pressure to the back of the pulley. It jumps off and falls to the floor. i go to pick it up and notice that it shattered in a few spots. WHY I DIDNT BUY AN ALUMINUM ONE TO REPLACE IT BEFORE TAKING IT OFF I STILL DUNNO. and why did they use plastic for these??
Anyhow i get over it, take off the waterpump nuts and yank on the pump about 5 times. The O-ring lets loose and the pump comes out. (HA! plastic impellers. What's with plastic in these critical areas?)
I didn't take too many pics but here is my setup:
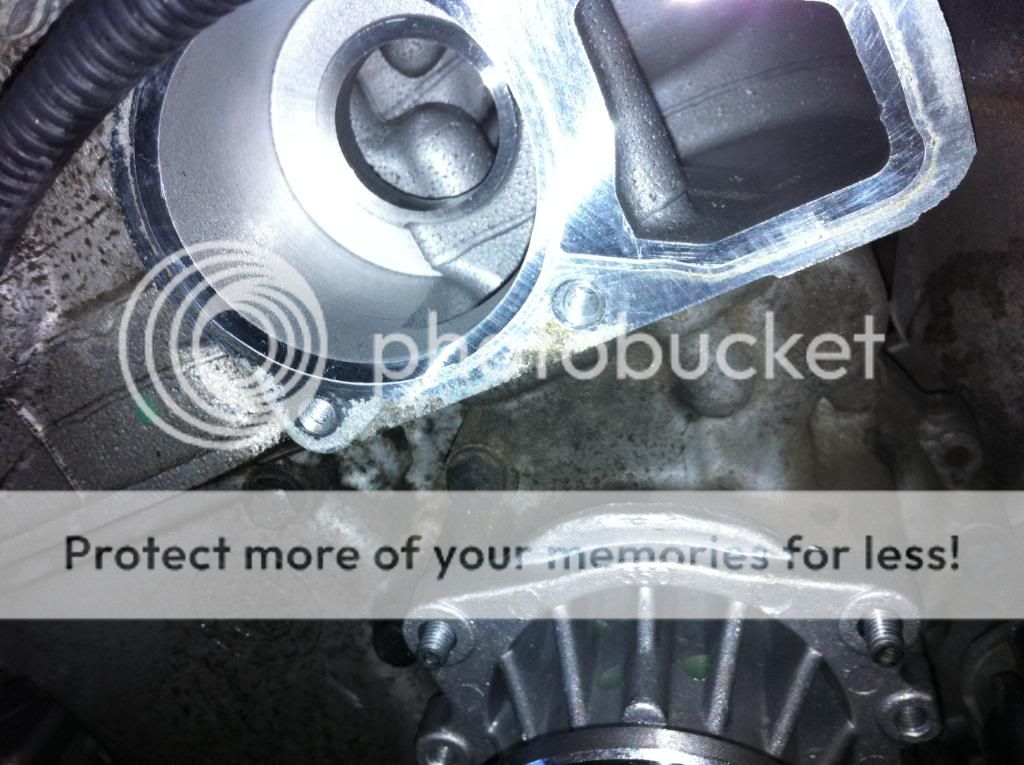
inside of the thermostat area...
REASSEMBLY-
I clean the areas around the holes with a rag and some antifreeze, lub up the seals on the thermostat and Waterpump O-ring (WITH METAL imellers).
The thermostat goes on pretty easy. I'm replacing it beacuse the car runs cold. There is pretty much no heat in the car so I assumed with both those warning signs that it failed (and when they fail, they fail in the open position.)
I put the new water pump on. It glides on to the studs and with a little force you can feel the O-ring pop in. I put the nuts back on.
THIRD SNAG!!!!: I go to torque the nuts on. I read somewhere that it would be about 20nm... which sounded a little much to me but what the heck. I'm torquing a bolt and getting worried about how much pressure i'm putting on. So i say to myself, ok just a little more and i'll leave it at that. Right then my arm drops and I start cussing up a storm in 5 different languages. THE STUD broke. I back everything out and THANK the GODS that there is about 1CM of stud still sticking out. I was able to take the stud out with some vice grips and a few prayers. I go to the local auto store and they don't have the stud... or a long enough bolt. So i went to the local Hardware store and they had some really long bolts. They didn't have aluminum or stainless, so i took a galvinized Zinc one. i used my dremmel and cut the head off (btw the stud is a M6 1.0 30mm).
I put the new stud on and it looks and works great. (if anyone knows or has heard of a bad story in using this type of metal on the car please clue me in.) Instead of using torque settings... i use the good ole german settings we all have built into our hands: G�tentight.
So i get the waterpump nuts in, new aluminum pulley goes on fine, belts go on fine, i fill up the resivoir with 50/50 antifreeze. I use the venting/bleeding procedures described in another post... twice just incase. I start the engine and no probs.
On the Tach side the little heat thingy used to read about 6-8 lines. Now it is about 3-4 lines. Heat feels great now. I put everything back and so far so good (this is the third day).
i haven't checked the temp in the secret menu... cuz i'm lazy. but will probably tonight.
Thanks everyone for your DIY posts and recommendations to eachother... this site helped me so much.
PS-
Waterpump with Metal Impellers purchased from ECS tunning
Thermostat-in-housing purchased from ECS tunning
Belts purchased from ECS tunning
Aluminum pulley purchased from ECS tunning
Sparkplugs purchased from the cheapest vendor I could find on google
Coil packs purchased from Bav Auto
5volution T-shirt purchased from Bav Auto
R A N T:
Oh and the paint thing. So my wife rear ended someone in the E60. Light damage to the paint in the front and cracked grills. The quote we got was for $1300!! The insurance company sent us the full bill so i took it to a cheap place, Maacos, and asked them if they could fix it on the cheap. They said "Heck, we will take out all of the dings around the car, and paint it for $999. Paint and clear coat." SOLD! I go to pick it up and i notice a few mosquitos in the paint, and a couple of over sprays. They fixed it and the car looked GREAT. I go to a frends house to see Clemson vs Wofford in Spartanburg SC (he's the Def. Coach so great seats). What my buddy didn't tell me, and what i failed to realize is that when I got there, I parked under a berry tree behind his house.
We went to the game all day and it was a bright and sunny day. Got back at night, went to sleep. I wake up the next day and go to get something out of the car and it is COVERED in berry stains. I spray it off and head back home (about 4 hour drive). I take it to get washed the next day and the stains don't come out My buddy who owns an M coupe, e39 M5, and R32 Skyline lol tells me of a trick he uses on his car. Buffer with speacial pads and speacial polish & goo gone where necessary. So I had my wife buff out the stuff while I was working under the hood. She got most of it out but there is still some spots AND you can see the cloudiness where she buffed. Guess i'm going to take it back in to the Maaco's guys to see if they can do anything on the cheap.
E60 525i 103K miles.
I will now tell you my story about the excitement and pit falls experienced in changing my waterpump, thermostat, belts, sparkplugs, coil packs, and give you a rant about my car paint troubles.
Queso (ok-so)... I started with the coil packs and spark plugs. I purchsed the NGK Laser Spark plugs from some online store that specializes in only plugs... don't remember which. I went to the OEM guide on our car to get the part number, went to google, typed it in, clicked on shopping and looked for the cheapest i could get it. I mean, they're just sparkplugs right? Found em for about $5 a pop which i thought was good considereing the $15-30 they tried to charge at local shops lol. I didn't put anti seize on the plugs since some E-threads said the plugs come with special metal and to just torque to the dry settings.
The coil packs I bought from Bav Auto. I got worried when installing these because they didn't clip in easy. I had to use an abundance of equally distributed pressure to the bottom sides to get it to go in. I used my thumbs then followed up with some fat plyers. They clipped in easy after that. The Bav auto coils are cheap-ish and supposedly give better response etc. I do feel better response etc out of the car now, but that might be because it has fresh ignition. (the old plugs didn't look to bad, just normal wear).
Annnnd deeeeeeeennnnnn (and then), I took off the top covering the radiator bay, took off the radiator cover, got under the car, took off the road shield, unclipped all of the hoses connected to the radiator fan, got back on top and unhooked the fan electronics, unhooked the overspill hose, removed the clip and hose coming off of the radiator and into the thermostat.
First snag: when i went to pull up on the fan, it wouldn't come straight up; however, after studying it for 5 minutes i noticed that on the US-passenger side of the radiator (your left if you're facing the radiator) the fin that holds the radiator in place has hinges. So you can swing it in and then it comes straight out!
I took the clamps off of the hoses going to the thermostat on both sides. Amazing how they just slip on and off... and just use a U clamp to hold them in place. I then pulled the two belts off... starting with the AC one.
I took the thermostat off without any problems (made sure to take electronics off first).
Then i go to take off the Waterpump pulley. 4 little bolts holding it on. They come off easy but the pulley didn't let go. I try a flat head, plyers, no go.
Second snag: I use both hands and equally distribute pressure to the back of the pulley. It jumps off and falls to the floor. i go to pick it up and notice that it shattered in a few spots. WHY I DIDNT BUY AN ALUMINUM ONE TO REPLACE IT BEFORE TAKING IT OFF I STILL DUNNO. and why did they use plastic for these??
Anyhow i get over it, take off the waterpump nuts and yank on the pump about 5 times. The O-ring lets loose and the pump comes out. (HA! plastic impellers. What's with plastic in these critical areas?)
I didn't take too many pics but here is my setup:
inside of the thermostat area...
REASSEMBLY-
I clean the areas around the holes with a rag and some antifreeze, lub up the seals on the thermostat and Waterpump O-ring (WITH METAL imellers).
The thermostat goes on pretty easy. I'm replacing it beacuse the car runs cold. There is pretty much no heat in the car so I assumed with both those warning signs that it failed (and when they fail, they fail in the open position.)
I put the new water pump on. It glides on to the studs and with a little force you can feel the O-ring pop in. I put the nuts back on.
THIRD SNAG!!!!: I go to torque the nuts on. I read somewhere that it would be about 20nm... which sounded a little much to me but what the heck. I'm torquing a bolt and getting worried about how much pressure i'm putting on. So i say to myself, ok just a little more and i'll leave it at that. Right then my arm drops and I start cussing up a storm in 5 different languages. THE STUD broke. I back everything out and THANK the GODS that there is about 1CM of stud still sticking out. I was able to take the stud out with some vice grips and a few prayers. I go to the local auto store and they don't have the stud... or a long enough bolt. So i went to the local Hardware store and they had some really long bolts. They didn't have aluminum or stainless, so i took a galvinized Zinc one. i used my dremmel and cut the head off (btw the stud is a M6 1.0 30mm).
I put the new stud on and it looks and works great. (if anyone knows or has heard of a bad story in using this type of metal on the car please clue me in.) Instead of using torque settings... i use the good ole german settings we all have built into our hands: G�tentight.
So i get the waterpump nuts in, new aluminum pulley goes on fine, belts go on fine, i fill up the resivoir with 50/50 antifreeze. I use the venting/bleeding procedures described in another post... twice just incase. I start the engine and no probs.
On the Tach side the little heat thingy used to read about 6-8 lines. Now it is about 3-4 lines. Heat feels great now. I put everything back and so far so good (this is the third day).
i haven't checked the temp in the secret menu... cuz i'm lazy. but will probably tonight.
Thanks everyone for your DIY posts and recommendations to eachother... this site helped me so much.
PS-
Waterpump with Metal Impellers purchased from ECS tunning
Thermostat-in-housing purchased from ECS tunning
Belts purchased from ECS tunning
Aluminum pulley purchased from ECS tunning
Sparkplugs purchased from the cheapest vendor I could find on google
Coil packs purchased from Bav Auto
5volution T-shirt purchased from Bav Auto
R A N T:
Oh and the paint thing. So my wife rear ended someone in the E60. Light damage to the paint in the front and cracked grills. The quote we got was for $1300!! The insurance company sent us the full bill so i took it to a cheap place, Maacos, and asked them if they could fix it on the cheap. They said "Heck, we will take out all of the dings around the car, and paint it for $999. Paint and clear coat." SOLD! I go to pick it up and i notice a few mosquitos in the paint, and a couple of over sprays. They fixed it and the car looked GREAT. I go to a frends house to see Clemson vs Wofford in Spartanburg SC (he's the Def. Coach so great seats). What my buddy didn't tell me, and what i failed to realize is that when I got there, I parked under a berry tree behind his house.
We went to the game all day and it was a bright and sunny day. Got back at night, went to sleep. I wake up the next day and go to get something out of the car and it is COVERED in berry stains. I spray it off and head back home (about 4 hour drive). I take it to get washed the next day and the stains don't come out
My buddy who owns an M coupe, e39 M5, and R32 Skyline lol tells me of a trick he uses on his car. Buffer with speacial pads and speacial polish & goo gone where necessary. So I had my wife buff out the stuff while I was working under the hood. She got most of it out but there is still some spots AND you can see the cloudiness where she buffed. Guess i'm going to take it back in to the Maaco's guys to see if they can do anything on the cheap.
 10-20-2011, 08:08 AM
#2
Members
Join Date: Jun 2009
Location: Austin
Posts: 96
Likes: 0
Received 0 Likes
on
0 Posts
My Ride: 05 jet black 545i ya...
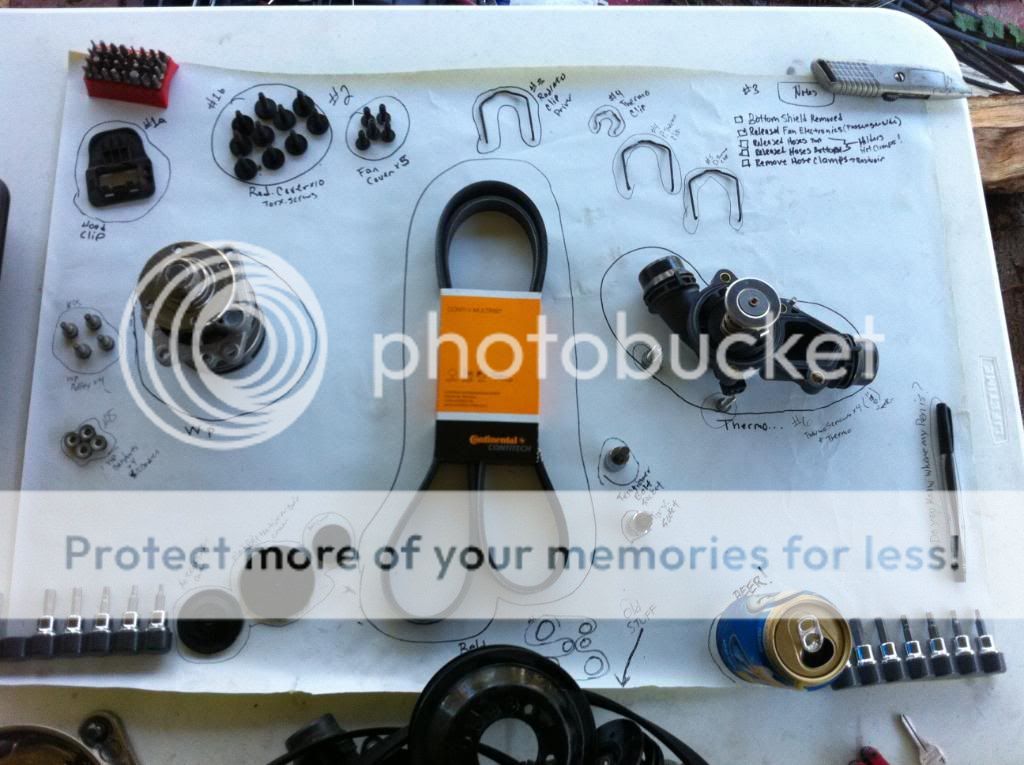
love this write up, I am going to use your idea of the paper with the permanent marker, never thought of that one. I do need to figure out how to replace the alternator without a headache too
10-20-2011, 08:19 AM
#3
Senior Members
Join Date: Feb 2007
Location: Socal-90601
Posts: 1,626
Likes: 0
Received 0 Likes
on
0 Posts
For the berry stains wash your car with a ph neutral soap and add some vinegar to it to make the soap acidic that should help. You and your car may smell like a salad for a short time but .Then rinse, Then after that use a claybar and some soapy solution rinse, then wash car again with normal car wash soap. good job on the overhaul
10-20-2011, 08:38 AM
#5
Members
Thread Starter
Join Date: Jun 2010
Location: Georgia, USA
Posts: 23
Likes: 0
Received 0 Likes
on
0 Posts
The white paper thing MUST HAVE A SPOT FOR BEER! Another thing you can use is a paper plate for the screws since you can pop them through and they don't go anywhere. I got the idea from a youtube video where they take apart an iphone 4 and replace the screen. Works so welll. none of the after everything is back on you notice a bolt and say "where did this go again?"
I tried the vinegar thing before buffing. hahah ur right i did smell like a salad all day. It didn't work though, i think it baked into paint since it was at the end of curing and it was such a hot day
I wish i had a clean room then i'd paint it myself! ACTUALLY... if i hung tarps down on all sides of my car port and blow everything out i might can make it work!
 10-20-2011, 08:44 AM
#7
Senior Members

Join Date: Jun 2007
Location: Atlanta, GA
Posts: 1,845
Likes: 0
Received 1 Like
on
1 Post
My Ride: 2008 535i:
(8/07 Build) Metallic Bronze, Beige NASCA Leather, Ventilated Seats, Sport Pkg, Cold Wxr Pkg, Logic-7 Sound, HUD, Night Vision, PDC, Split Rear Seats, NAV, Premium Pkg, Comfort Access, HD Radio, Sport Auto Trans
Current mods: M-Aero Kit, JB4, Motorcepts 6000k HID Foglamps
Umnitza ICE-Lite 10w LED 6000k AE's
1992 Camaro RS:
Fully Restored w/Custom Interior, 5.0L V8, T-tops, OEM Z28 Foglamps, Inst Cluster, & Spoiler, Custom Sound, Too many engine mods to list
Loved the story - up until the part where you went to MAACO. I have yet to hear a story where someone who used them got the job done right the first time - it always took several trips.
PAINT JOB and ON THE CHEAP don't go together. A full paint job if done properly can easily cost several grand.
PAINT JOB and ON THE CHEAP don't go together. A full paint job if done properly can easily cost several grand.
10-20-2011, 09:06 AM
#8
Members
Thread Starter
Join Date: Jun 2010
Location: Georgia, USA
Posts: 23
Likes: 0
Received 0 Likes
on
0 Posts
Loved the story - up until the part where you went to MAACO. I have yet to hear a story where someone who used them got the job done right the first time - it always took several trips.
PAINT JOB and ON THE CHEAP don't go together. A full paint job if done properly can easily cost several grand.
PAINT JOB and ON THE CHEAP don't go together. A full paint job if done properly can easily cost several grand.
I think Paint Job and on the Cheap CAN go together... it just inolves us learning it. I've never painted a car but i'm sure if I bought all the materials, practiced a little on other folks cheap cars, and got comfortable it would be even cheaper than Maacos.
IDK... anyone around here paint their own cars? i'm really considering this for future reference.
