Removing the swirl flaps in a diesel engine
 02-07-2009, 01:04 PM
#1
Contributors
Thread Starter
Join Date: Apr 2007
Location: Kajaani, Finland
Posts: 5,851
Likes: 0
Received 3 Likes
on
3 Posts
My Ride: Bmw 530d 2004
Hello everybody! 
Like most of people know, the BMW has a problem with intake manifolds in some diesel engines. The problem is actually the swirl flaps inside the intake manifold. If you want to know more about these bas...ds, just click the links below:
- Major diesel engine failure
- Cleaning the intake manifold in a diesel engine
- 530d - Broken Swirl flap = Broken Engine
So, I finally got time to take them out. I had already cleaned and checked their condition earlier, but after collecting some information all over the internet and after some discussion on this forum, I decided to remove them too (some members here had already done that).
During the project I found out my intake manifold was manufactured 4/2004, and it had the reinforced 4,5mm swirl flap axels. I'm not sure if there are any cases, where the reinforced axels were broken, but now I don't need to worry about them anymore. The axels were in good condition though...
This is a DIY guide to remove them (or just to remove stuff in an engine compartment ).
).
The tools needed:
- different sizes of box keys
- different sizes of screwdrivers
- different sizes of torx keys
- different sizes of open-end wrenches
- Dremel or some other tool for cutting
- sealing glue or similar
- M5 10mm screws (6 pieces)
- some fabric
The work phases:
1) Removing parts to access the intake manifold
2) Removing the intake manifold
3) Removing the swirl flaps
4) Putting everything back in one piece again
---------------------------------------------------------------------------
Detailed instructions:
1) Removing parts to access the intake manifold
- Disconnect the battery --> cover the minus pole and the cable to prevent a contact.

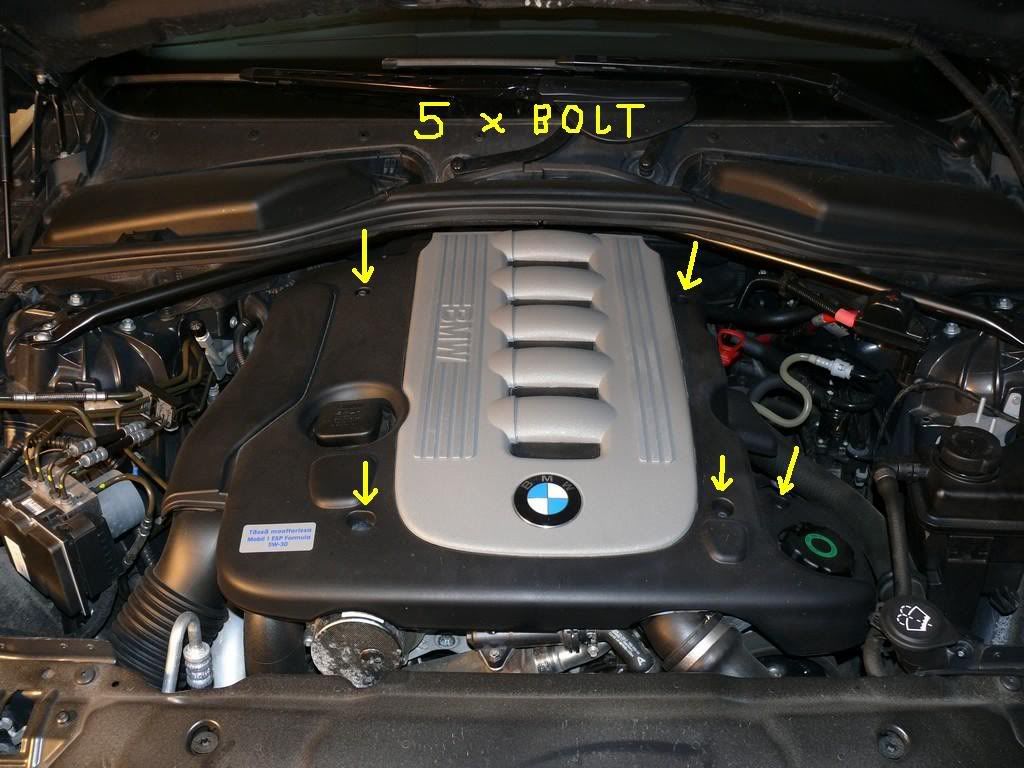
- Remove the acoustic cover plate by removing 5 bolts
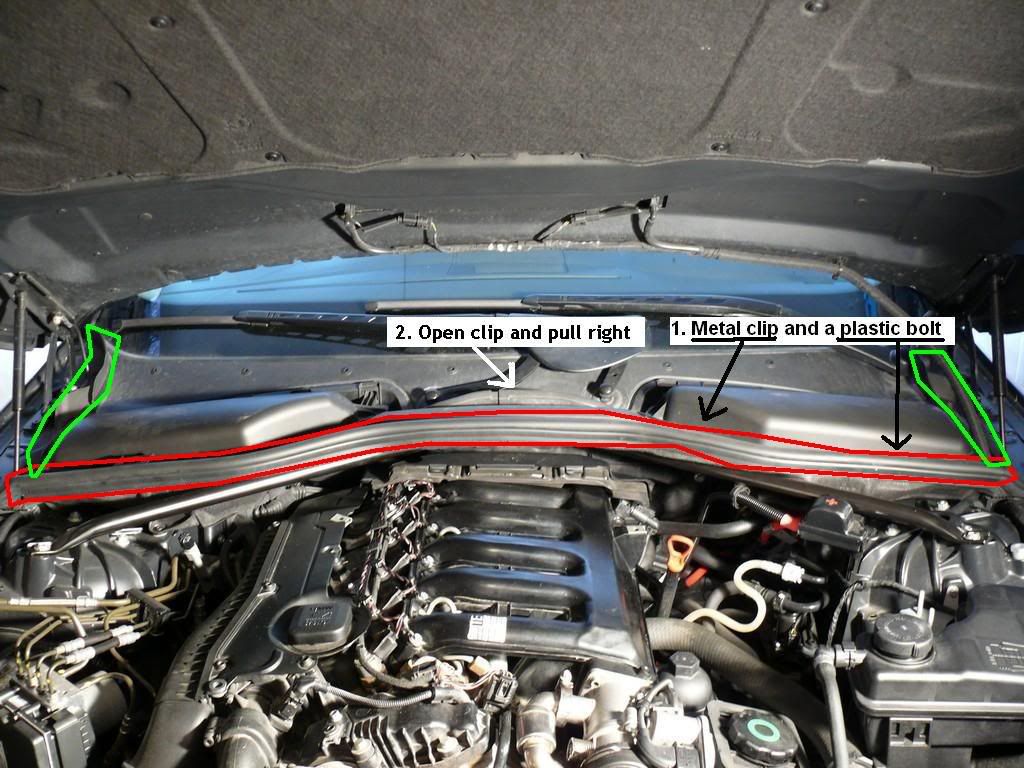
- Remove the particle filter on both sides by opening the wire clips and a plastic bolt
- Remove the long rubber seal (red) and plastic parts on the sides (green)
- Remove the plastic cover in the middle by opening a clip and pulling it to right
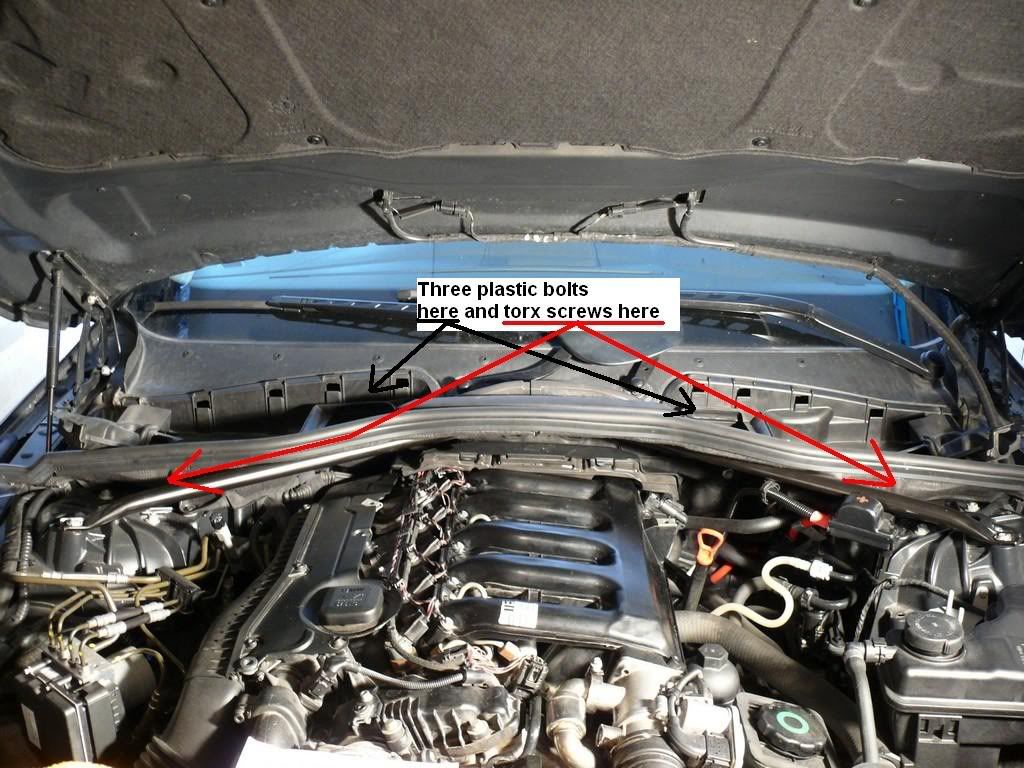
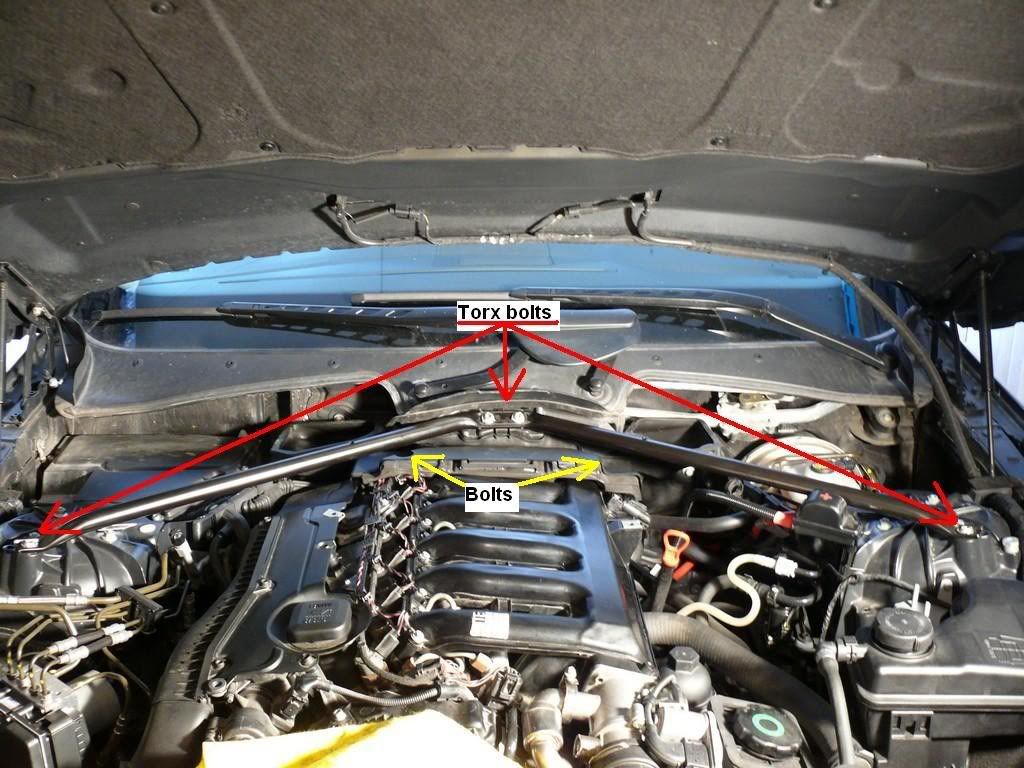
- Remove the base plastics (for particle filters) by opening three plastic bolts and a torx screw on both sides + a plastic bolt in the middle
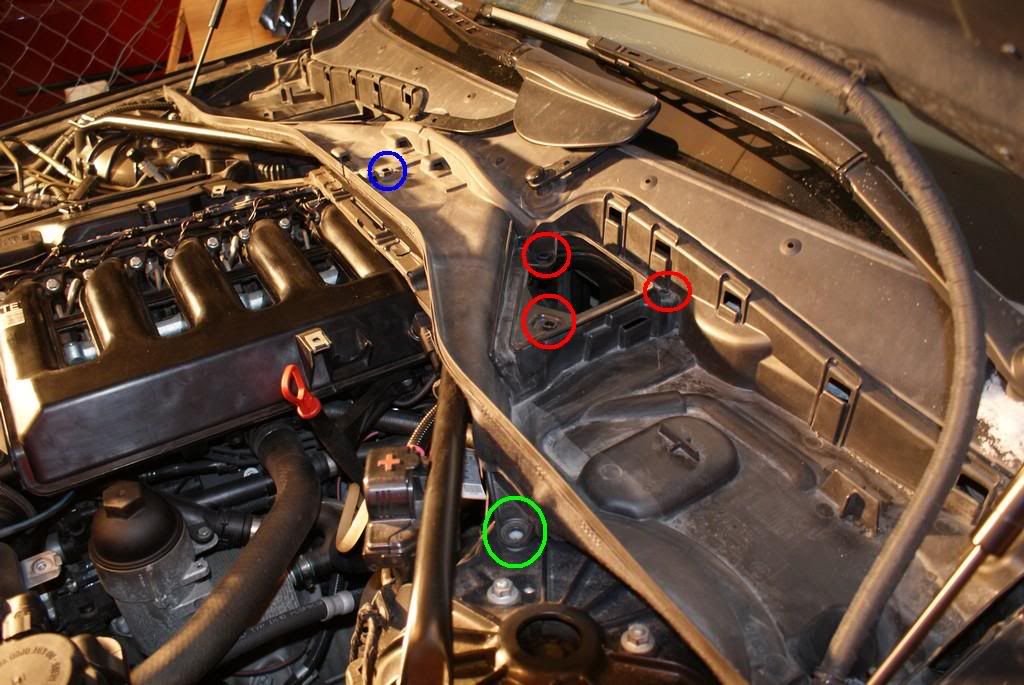
You can see those three bolts (red) and a screw (green) and the bolt in the middle (blue) here better
- Remove the tension strut by opening four torx bolts
- Remove the last part of acoustic cover by opening two bolts
---------------------------------------------------------------------------
2) Removing the intake manifold
- Before removing the manifold itself, some accessories must be disconnected
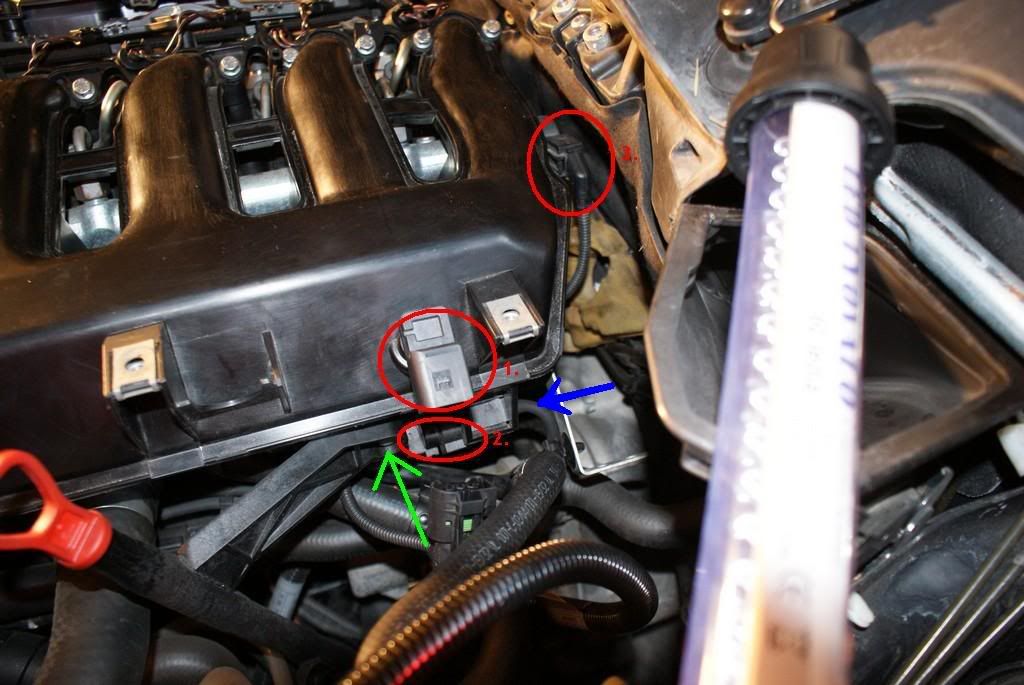
- In the back part of the intake manifold, disconnect three plugs (Note! Number 1 already disconnected in the pic and number 3 must be removed only to access the fastening bolts easier)
- Open the bolt holding the oil stick (green)
- Pull off the tube going into electric valve (blue). This valve controls the mechanism moving the flaps.
- More stuff to disconnect you can find in the front end of the intake manifold
- Unplug the cable connected to EGR valve and a tube going into it under the valve
- Open the torx bolt holding the cable (blue)
- Take off the wire clamp holding the intake air tube and clamp holding the EGR tube

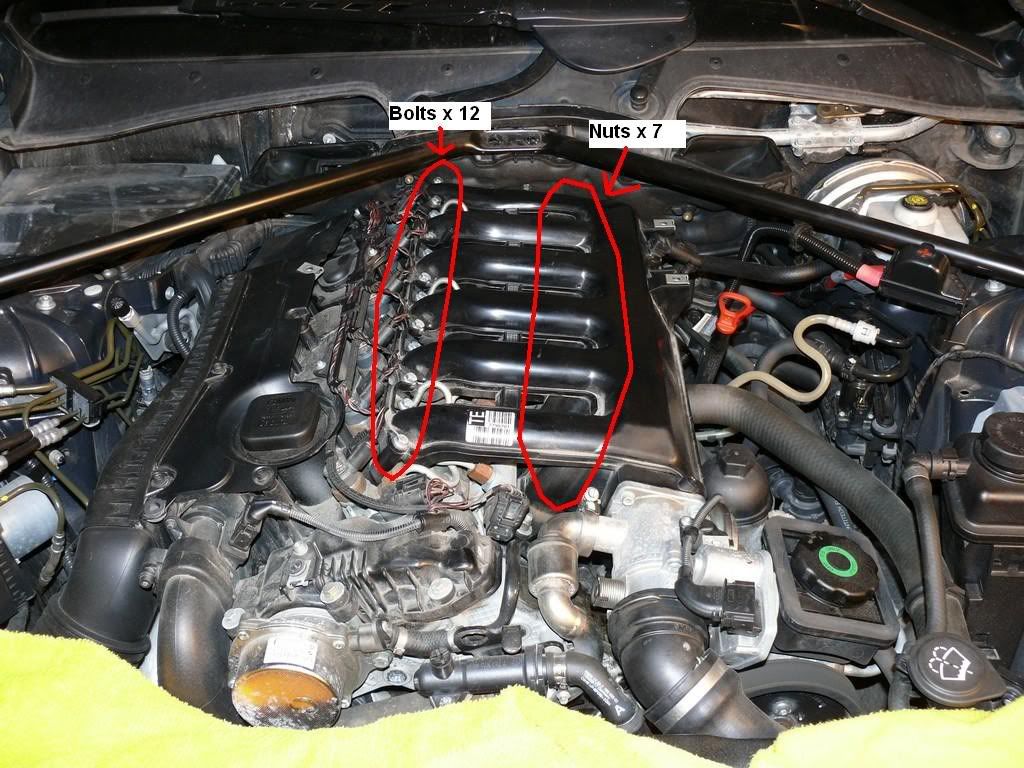
- Remove the intake manifold by opening 12 bolts (they don't come all off) and 7 nuts
- Lift the intake manifold carefully off
- Cover the air inlets with a towel or similar

- Now you can leave the car and start working with the intake manifold!
Like most of people know, the BMW has a problem with intake manifolds in some diesel engines. The problem is actually the swirl flaps inside the intake manifold. If you want to know more about these bas...ds, just click the links below:
- Major diesel engine failure
- Cleaning the intake manifold in a diesel engine
- 530d - Broken Swirl flap = Broken Engine
So, I finally got time to take them out. I had already cleaned and checked their condition earlier, but after collecting some information all over the internet and after some discussion on this forum, I decided to remove them too (some members here had already done that).
During the project I found out my intake manifold was manufactured 4/2004, and it had the reinforced 4,5mm swirl flap axels. I'm not sure if there are any cases, where the reinforced axels were broken, but now I don't need to worry about them anymore. The axels were in good condition though...
This is a DIY guide to remove them (or just to remove stuff in an engine compartment
).The tools needed:
- different sizes of box keys
- different sizes of screwdrivers
- different sizes of torx keys
- different sizes of open-end wrenches
- Dremel or some other tool for cutting
- sealing glue or similar
- M5 10mm screws (6 pieces)
- some fabric
The work phases:
1) Removing parts to access the intake manifold
2) Removing the intake manifold
3) Removing the swirl flaps
4) Putting everything back in one piece again
---------------------------------------------------------------------------
Detailed instructions:
1) Removing parts to access the intake manifold
- Disconnect the battery --> cover the minus pole and the cable to prevent a contact.
- Remove the acoustic cover plate by removing 5 bolts
- Remove the particle filter on both sides by opening the wire clips and a plastic bolt
- Remove the long rubber seal (red) and plastic parts on the sides (green)
- Remove the plastic cover in the middle by opening a clip and pulling it to right
- Remove the base plastics (for particle filters) by opening three plastic bolts and a torx screw on both sides + a plastic bolt in the middle
You can see those three bolts (red) and a screw (green) and the bolt in the middle (blue) here better
- Remove the tension strut by opening four torx bolts
- Remove the last part of acoustic cover by opening two bolts
---------------------------------------------------------------------------
2) Removing the intake manifold
- Before removing the manifold itself, some accessories must be disconnected
- In the back part of the intake manifold, disconnect three plugs (Note! Number 1 already disconnected in the pic and number 3 must be removed only to access the fastening bolts easier)
- Open the bolt holding the oil stick (green)
- Pull off the tube going into electric valve (blue). This valve controls the mechanism moving the flaps.
- More stuff to disconnect you can find in the front end of the intake manifold
- Unplug the cable connected to EGR valve and a tube going into it under the valve
- Open the torx bolt holding the cable (blue)
- Take off the wire clamp holding the intake air tube and clamp holding the EGR tube
- Remove the intake manifold by opening 12 bolts (they don't come all off) and 7 nuts
- Lift the intake manifold carefully off
- Cover the air inlets with a towel or similar
- Now you can leave the car and start working with the intake manifold!
Last edited by Anzafin; 12-15-2013 at 02:16 AM.

The following users liked this post:
Swanny_UK (07-21-2022)
02-07-2009, 01:09 PM
#2
Contributors
Thread Starter
Join Date: Apr 2007
Location: Kajaani, Finland
Posts: 5,851
Likes: 0
Received 3 Likes
on
3 Posts
My Ride: Bmw 530d 2004
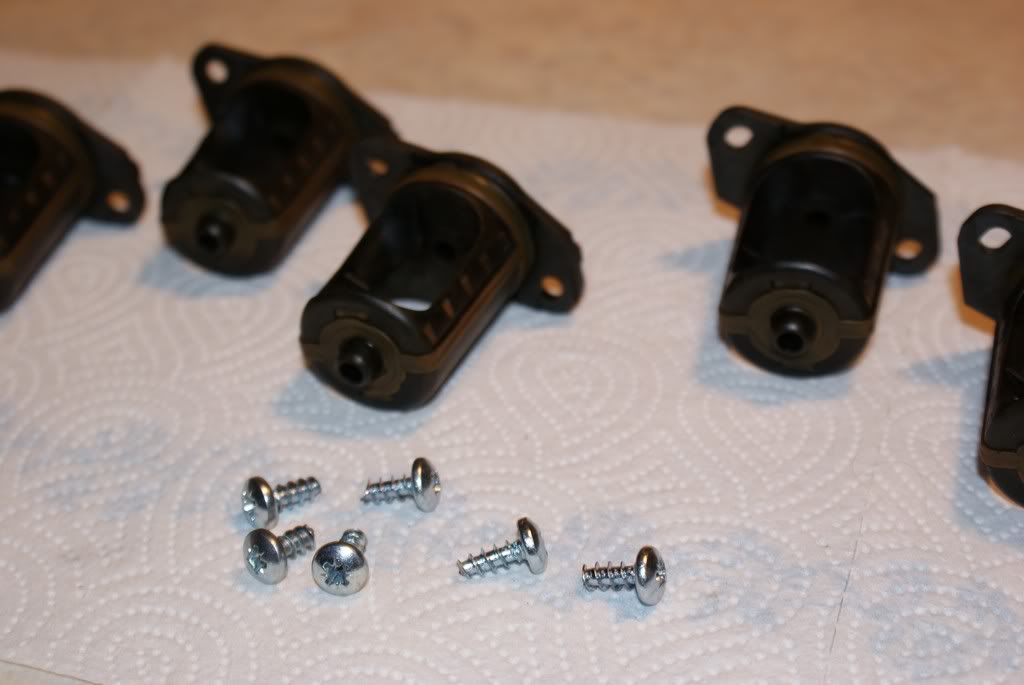
3) Removing the swirl flaps
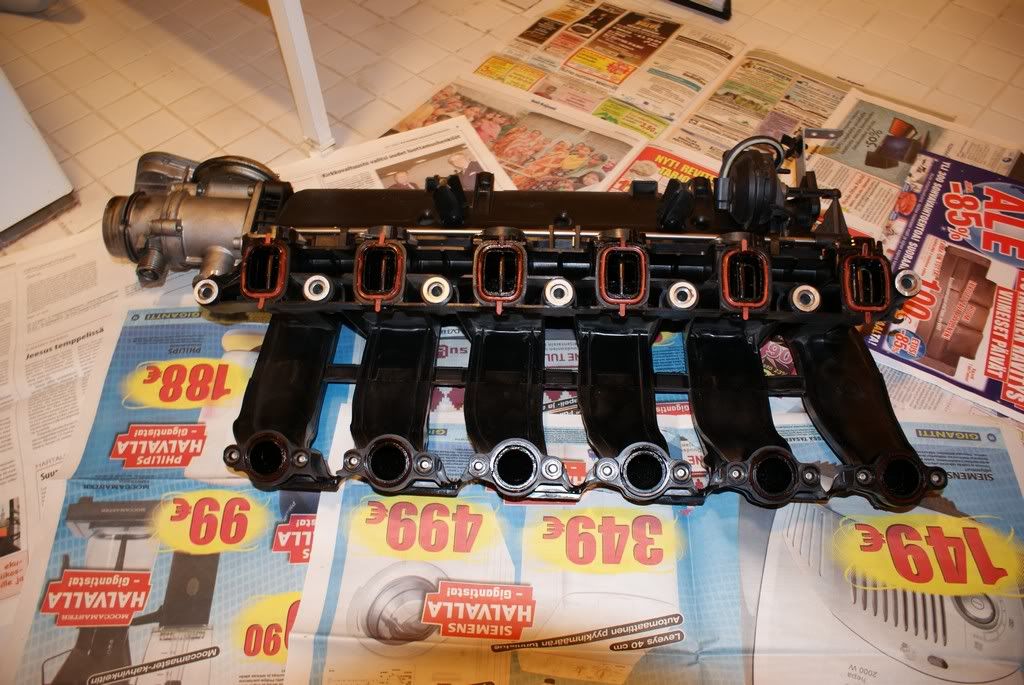
- Remove the red rectangle shaped rubber seals and clean them
- Pull the tube off from the electric valve
- Open two torx bolts holding the air pump

- Remove the rod (and the air pump) by twisting it out from it's holdings
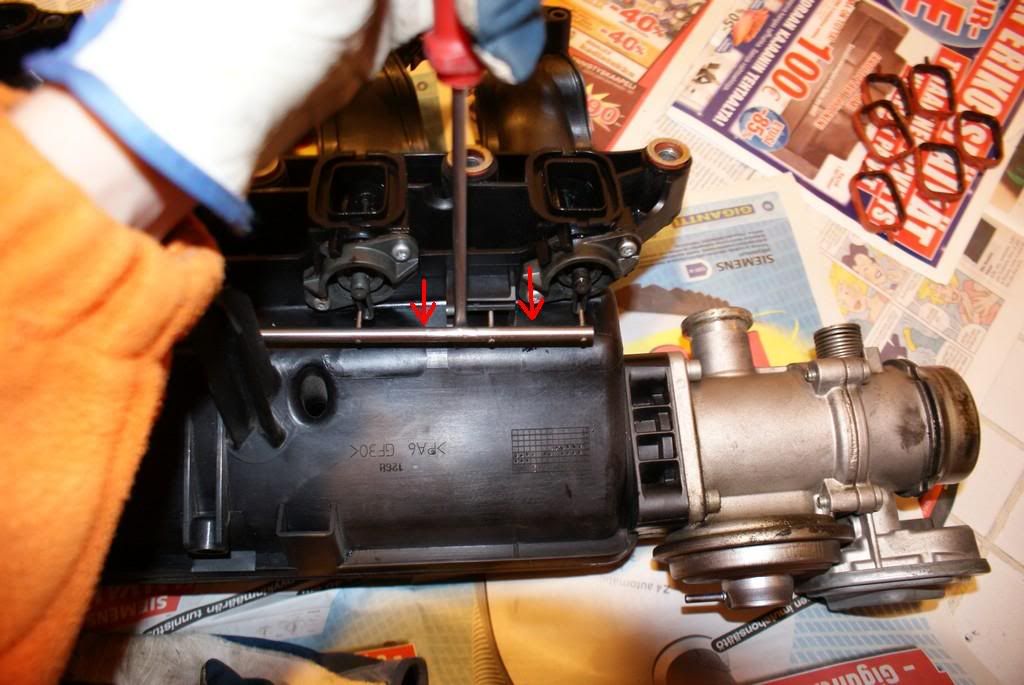
- Remove the swirl flap casings by opening the two torx bolts holding each one
- Pull the casing out
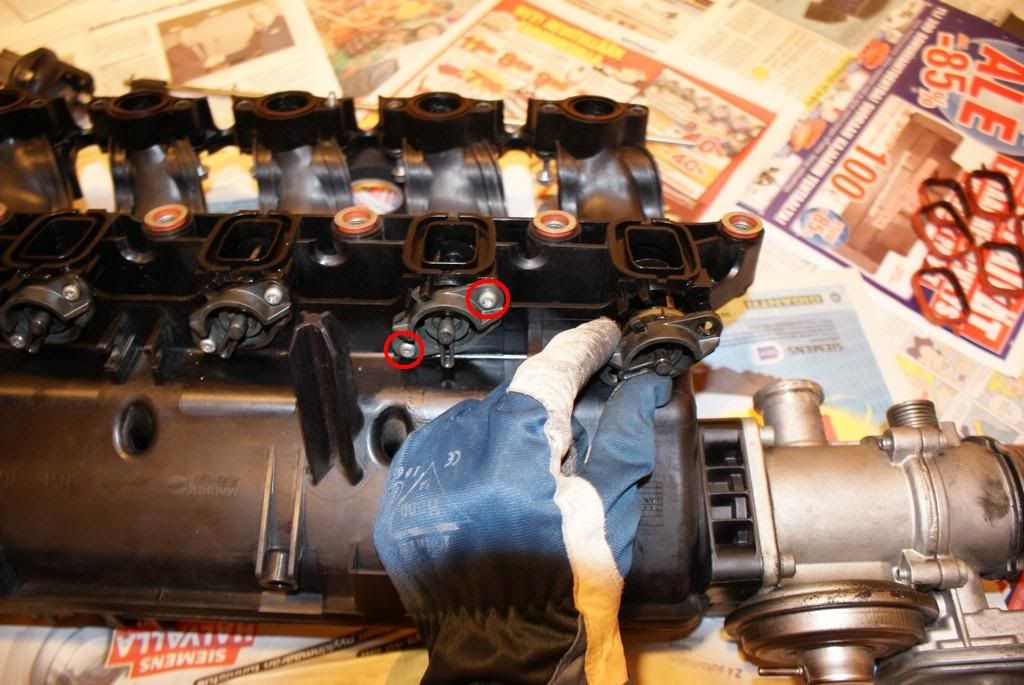
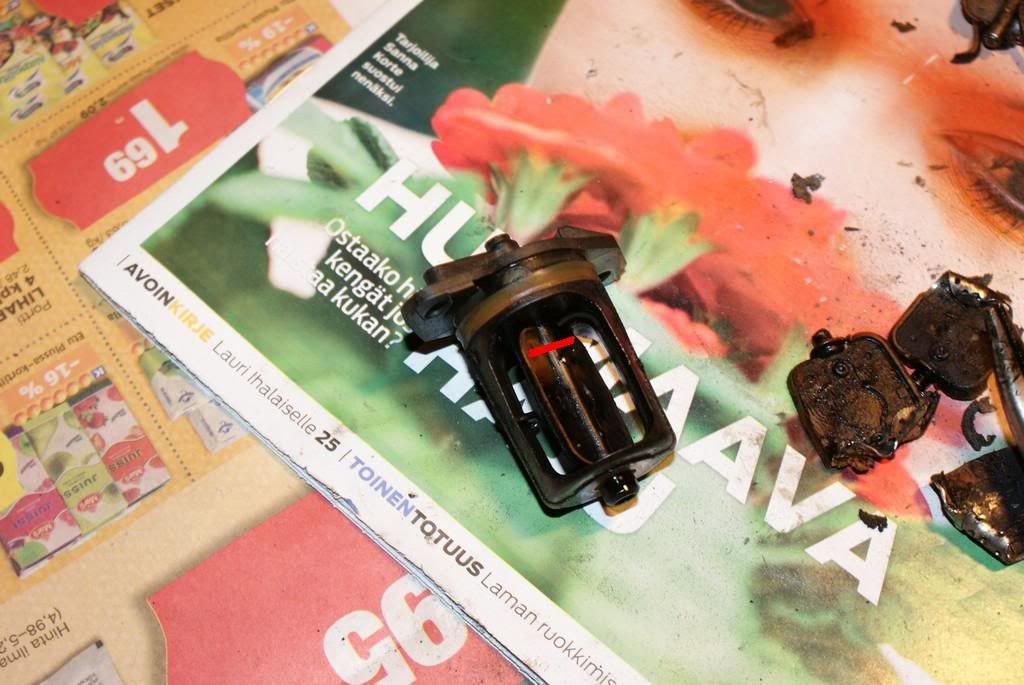
- Cut the axel with a Dremel (or similar tool) in the point indicated by red line
- Pull the parts out
- Note! Mine axels were the reinforced 4,5mm, and they were strong, so MAYBE they would have beared... But no need to worry anymore !
- The hole in the casing must be closed with a screw
- Twist the M5 10mm screws in to make threads
- Note! My screws were 16mm so I cut them a bit
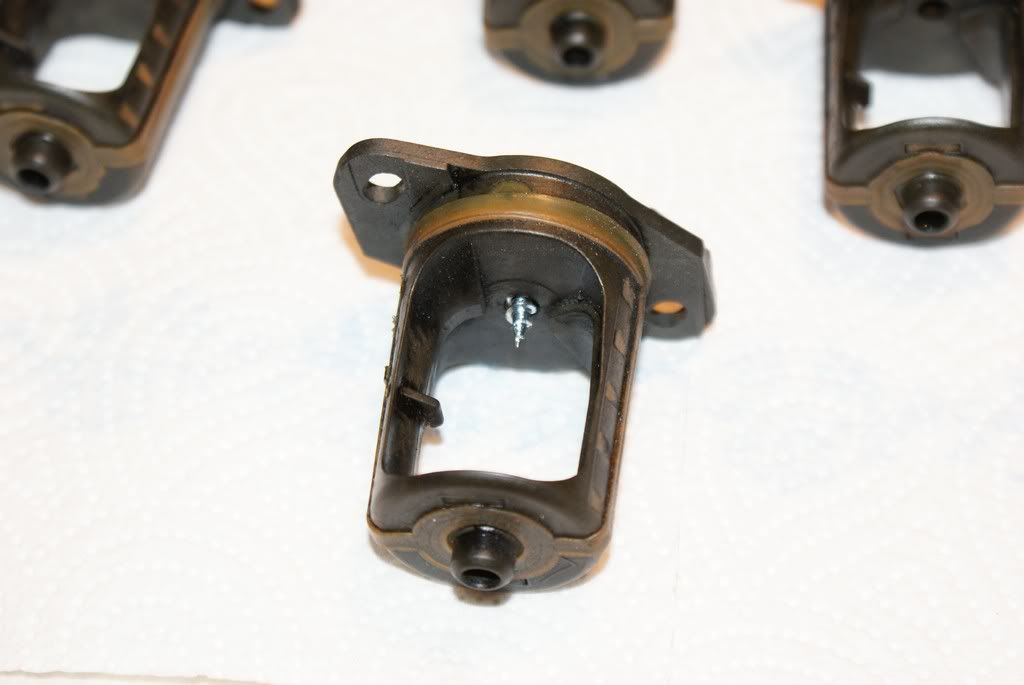
- The family picture before glueing
- Dip each screw in sealing glue (or similar)
- Note! I used the glue meant for tough conditions (-40?C to +100?C Casco Fix-it Construction glue)
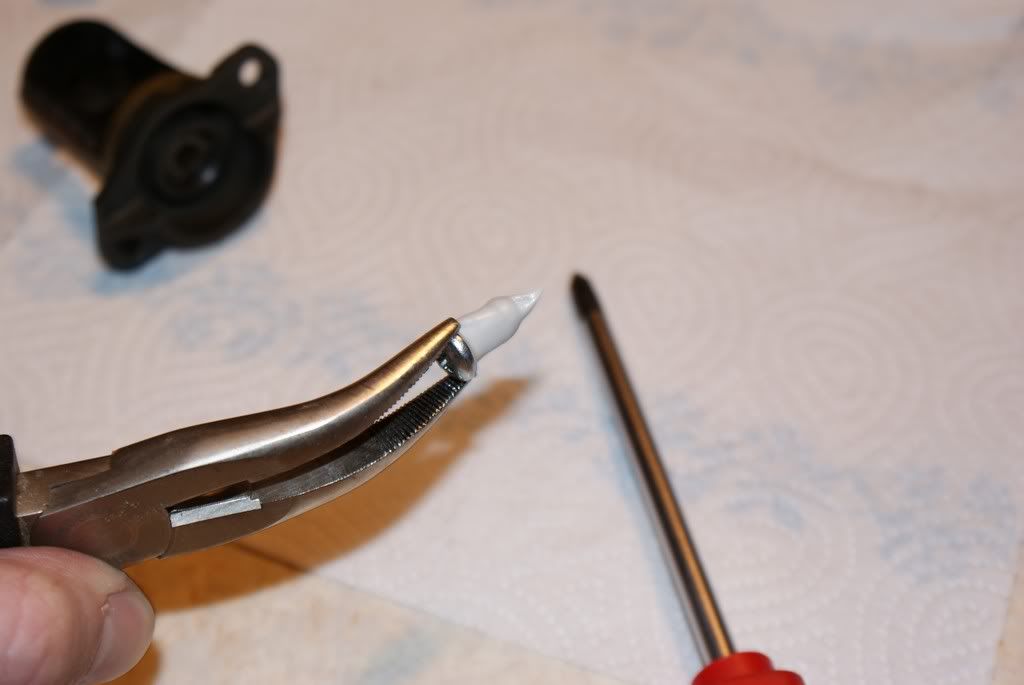
- Turn the screws into flap casings, let dry
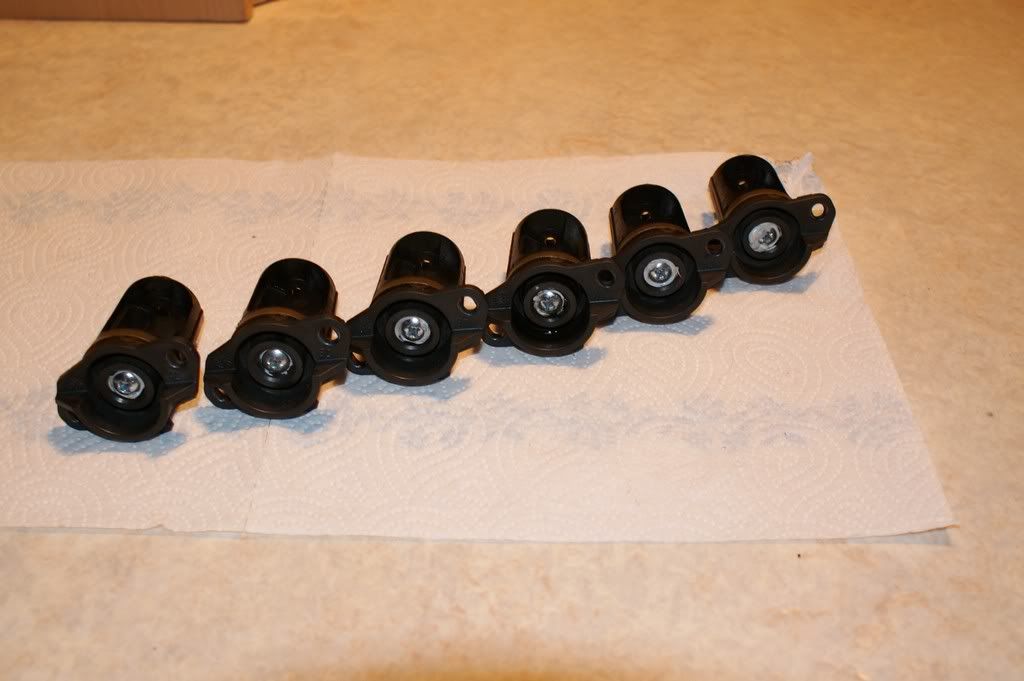
---------------------------------------------------------------------------
4) Putting everything back in one piece again
- Start putting everything back by acting in the opposite order!
- Note! I left the rod installed, but it can be removed too (it doesn't have anything to move anymore )
)
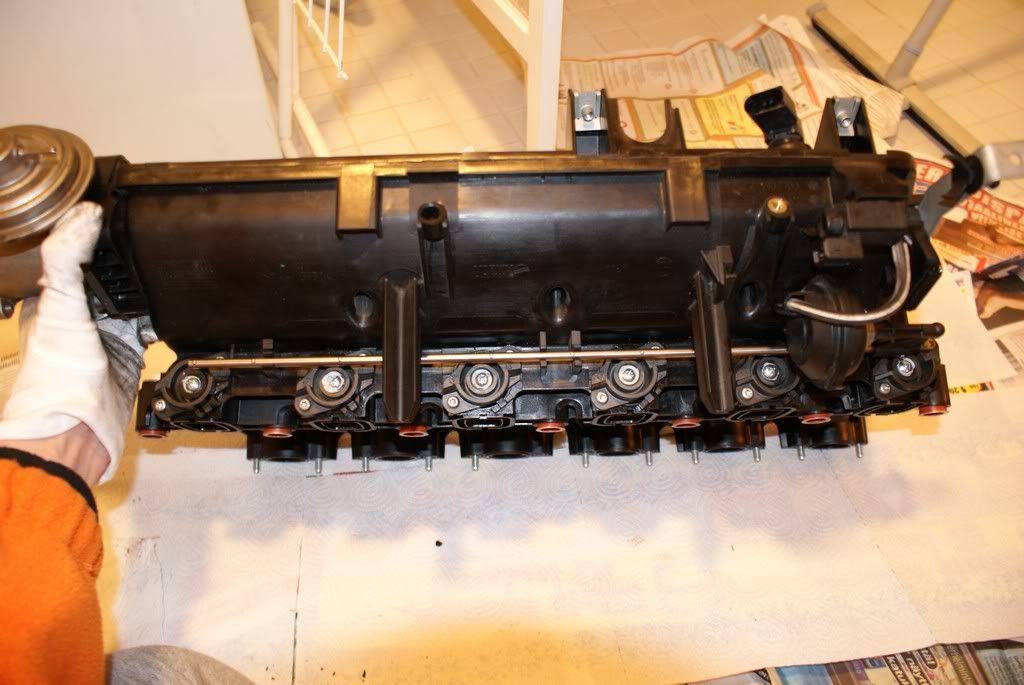
- Few notes about reinstalling things:
* While installing the intake manifold, check that you don't drop anything into air inlets leading in the engine (rubber seals for example)!
* Watch that you don't left the wiring harness (on top of the engine) under the edges of the intake manifold when installing it!
* Make sure you plug every cable and tube in before restarting the car!
---------------------------------------------------------------------------
Well, that's about it.
Thanks to everyone who I'm talked with about this case!
If anybody has any questions, please don't hesitate to contact me .
.
- Remove the red rectangle shaped rubber seals and clean them
- Pull the tube off from the electric valve
- Open two torx bolts holding the air pump
- Remove the rod (and the air pump) by twisting it out from it's holdings
- Remove the swirl flap casings by opening the two torx bolts holding each one
- Pull the casing out
- Cut the axel with a Dremel (or similar tool) in the point indicated by red line
- Pull the parts out
- Note! Mine axels were the reinforced 4,5mm, and they were strong, so MAYBE they would have beared... But no need to worry anymore
!- The hole in the casing must be closed with a screw
- Twist the M5 10mm screws in to make threads
- Note! My screws were 16mm so I cut them a bit
- The family picture before glueing
- Dip each screw in sealing glue (or similar)
- Note! I used the glue meant for tough conditions (-40?C to +100?C Casco Fix-it Construction glue)
- Turn the screws into flap casings, let dry
---------------------------------------------------------------------------
4) Putting everything back in one piece again
- Start putting everything back by acting in the opposite order!
- Note! I left the rod installed, but it can be removed too (it doesn't have anything to move anymore
)- Few notes about reinstalling things:
* While installing the intake manifold, check that you don't drop anything into air inlets leading in the engine (rubber seals for example)!
* Watch that you don't left the wiring harness (on top of the engine) under the edges of the intake manifold when installing it!
* Make sure you plug every cable and tube in before restarting the car!
---------------------------------------------------------------------------
Well, that's about it.
Thanks to everyone who I'm talked with about this case!
If anybody has any questions, please don't hesitate to contact me
.
The following users liked this post:
Swanny_UK (07-21-2022)

 02-08-2009, 03:25 AM
#5
Contributors
Thread Starter
Join Date: Apr 2007
Location: Kajaani, Finland
Posts: 5,851
Likes: 0
Received 3 Likes
on
3 Posts
My Ride: Bmw 530d 2004
Originally Posted by yt645cic' post='787763' date='Feb 8 2009, 02:10 PM
Great DIY, Do you notice any difference while driving? Or while Idling?
 02-08-2009, 04:40 AM
#7
Contributors
Thread Starter
Join Date: Apr 2007
Location: Kajaani, Finland
Posts: 5,851
Likes: 0
Received 3 Likes
on
3 Posts
My Ride: Bmw 530d 2004
Originally Posted by Dr Dave' post='787775' date='Feb 8 2009, 03:28 PM
that was just what the doctor ordered.
thanks mate, i owe you a beer.
im doing this tomorrow.
how long do you think it took?
thanks mate, i owe you a beer.
im doing this tomorrow.
how long do you think it took?
 !
!I took it easy all the time and took pictures also:
Phases 1 and 2 --> 1,5 hours
Phase 3 --> 2 hours
Phase 4 --> 1,5 hours
But don't count on these, take your time. Check you have all the tools before starting
.If you encounter any problems, just PM me!
 02-08-2009, 05:35 AM
#9
Contributors
Join Date: Sep 2007
Location: South Florida
Posts: 1,921
Likes: 0
Received 0 Likes
on
0 Posts
My Ride: 2008 535i w/ Sports & Permium Pkg. Silv/Blk
2008 VW R32 w/Nav.
1992 VW Corrado Silv/Blk-retired
2001 530i Sports/Premium-retired
Originally Posted by Hepokatti' post='787591' date='Feb 7 2009, 07:24 PM
Excellent DIY!
 ......makes me wish I had some swirl flaps .....love to take stuff apart and put them back togather.
  02-08-2009, 07:55 AM
#10
Contributors
Thread Starter
Join Date: Apr 2007
Location: Kajaani, Finland
Posts: 5,851
Likes: 0
Received 3 Likes
on
3 Posts
My Ride: Bmw 530d 2004
Originally Posted by MiamiPhill' post='787791' date='Feb 8 2009, 04:35 PM
+1 ......makes me wish I had some swirl flaps .....love to take stuff apart and put them back togather.
......makes me wish I had some swirl flaps .....love to take stuff apart and put them back togather. !