DIY: 545i Wishbone Control Arm (Rear)
 08-25-2010, 02:07 PM
#1
Senior Members
Thread Starter
Join Date: Nov 2007
Location: Irving, TX (DFW)
Posts: 400
Likes: 0
Received 0 Likes
on
0 Posts
My Ride: 05 545i 6MT
Part #16 in the following diag:
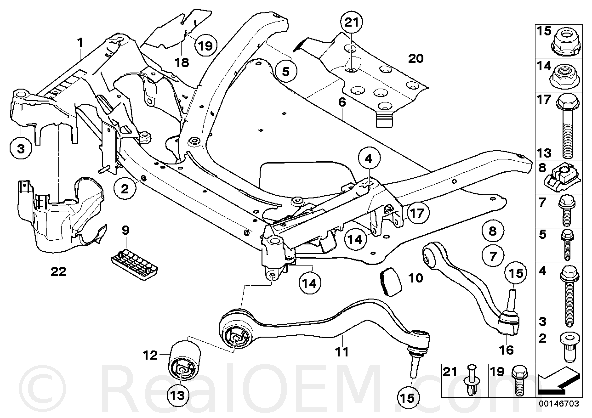
BMW term: Wishbone control arm
Left part #: 31126760182 Right part #: 31126768297 (makes UP TO 3/2006)
Some vendor calls this FRONT (front side of the car) REAR (rear side of two control arms) control arm.
I ended up w/ Febi Bilstein brand because immaterial difference in price compared to other non German brands.
Bought mine from:
http://www.pelicanparts.com/euro/cat...Suspension.htm
Reason:
I had this squeeking noise from the front left of the car.
The noise is gone when it rains / wet condition.
I lubed EVERYTHING from the steering joints in the cabin above the pedals and outside of the cabin (where steering shaft meets the rack) and still didn't eliminate the squeek.
Recently I replaced my struts and while working on that I found out my left Wishbone control arm ball joint had some play and also torn rubber boot.
My 545 had 47K miles. The bushing itself seems to be fine and will probably last another 50K miles but the ball joint is not a replaceable part so I am replacing the whole arm together.
It's also advised to change both sides of the arms together for synchronize feel of the steering and also for both sides to wear evenly in the future.
Tools needed:
22mm, 21mm, Torx, 18mm, 10mm, 8mm, phillips screw driver, 4 ramps, 16mm Ball joint separator (get the various sizes from Harbor Freight or rent from Autozone)

Steps:
1. Remove wheel/tires
2. Remove Xenon sensor from the control arm (it's EXPENSIVE if you break it)
3. Remove splash shield surrounding the wishbone control arm and tie rod.
4. Soak the ball joint bolt and bushing side bolt w/ Liquid Wrench/WD40.
5/ Remove ball joint bolt w/ Torx and 21mm wrench
5. If your ball joint is stuck then use ball joint removal fork and hammer it out (Mine wasn't stuck so it slides very easy.
6. Remove the bushing side bolt w/ 18mm wrench/socket
7. Put Anti seize on the ball joint area where it meets the knuckle and on the steering knuckle so it doesn't stuck next time you perform similar repair.
8. Install new control arm. Make sure you use the NEW nut (22mm). This nut is self locking which can't be reused. Go ahead and tighten this nut.
9. For the bushing bolt (engine side) 18mm bolt - TIGHTEN it SNUG by finger w/o tool. DO NOT FULLY TIGHTEN because suspension has to rest on normal position prior tightening this other wise the bushing will wear out prematurely.
10. Now put back the wheels on. Keep the splash shield removed.
11. Now jack up 4 sides of the car and slide ramp underneath each tire (make sure your Ebrake is engaged and confirm car will not move forward. (You could be KILLED)
12. Slide underneath front of the car and tighten that 18mm bolt on the bushing side of the arm.
13. Jack up the car on 4 corners again and remove the ramp
14. Remove the wheels then confirm all bolts are fully tightened.
15. Reinstall the splash shield.
16. Reinstall the Xenon sensor.
17. Reinstall the wheels and your DONE
Go for a test drive to make sure everything is good.
Hear for weird noise, clunking, squeek, etc.
I'd recommend drive the car maybe 10-15 miles of rough road so the suspension (control arm will settle) then go for an alignment.
See pictures below to get an idea what happened and good luck
BMW term: Wishbone control arm
Left part #: 31126760182 Right part #: 31126768297 (makes UP TO 3/2006)
Some vendor calls this FRONT (front side of the car) REAR (rear side of two control arms) control arm.
I ended up w/ Febi Bilstein brand because immaterial difference in price compared to other non German brands.
Bought mine from:
http://www.pelicanparts.com/euro/cat...Suspension.htm
Reason:
I had this squeeking noise from the front left of the car.
The noise is gone when it rains / wet condition.
I lubed EVERYTHING from the steering joints in the cabin above the pedals and outside of the cabin (where steering shaft meets the rack) and still didn't eliminate the squeek.
Recently I replaced my struts and while working on that I found out my left Wishbone control arm ball joint had some play and also torn rubber boot.
My 545 had 47K miles. The bushing itself seems to be fine and will probably last another 50K miles but the ball joint is not a replaceable part so I am replacing the whole arm together.
It's also advised to change both sides of the arms together for synchronize feel of the steering and also for both sides to wear evenly in the future.
Tools needed:
22mm, 21mm, Torx, 18mm, 10mm, 8mm, phillips screw driver, 4 ramps, 16mm Ball joint separator (get the various sizes from Harbor Freight or rent from Autozone)
Steps:
1. Remove wheel/tires
2. Remove Xenon sensor from the control arm (it's EXPENSIVE if you break it)
3. Remove splash shield surrounding the wishbone control arm and tie rod.
4. Soak the ball joint bolt and bushing side bolt w/ Liquid Wrench/WD40.
5/ Remove ball joint bolt w/ Torx and 21mm wrench
5. If your ball joint is stuck then use ball joint removal fork and hammer it out (Mine wasn't stuck so it slides very easy.
6. Remove the bushing side bolt w/ 18mm wrench/socket
7. Put Anti seize on the ball joint area where it meets the knuckle and on the steering knuckle so it doesn't stuck next time you perform similar repair.
8. Install new control arm. Make sure you use the NEW nut (22mm). This nut is self locking which can't be reused. Go ahead and tighten this nut.
9. For the bushing bolt (engine side) 18mm bolt - TIGHTEN it SNUG by finger w/o tool. DO NOT FULLY TIGHTEN because suspension has to rest on normal position prior tightening this other wise the bushing will wear out prematurely.
10. Now put back the wheels on. Keep the splash shield removed.
11. Now jack up 4 sides of the car and slide ramp underneath each tire (make sure your Ebrake is engaged and confirm car will not move forward. (You could be KILLED)
12. Slide underneath front of the car and tighten that 18mm bolt on the bushing side of the arm.
13. Jack up the car on 4 corners again and remove the ramp
14. Remove the wheels then confirm all bolts are fully tightened.
15. Reinstall the splash shield.
16. Reinstall the Xenon sensor.
17. Reinstall the wheels and your DONE
Go for a test drive to make sure everything is good.
Hear for weird noise, clunking, squeek, etc.
I'd recommend drive the car maybe 10-15 miles of rough road so the suspension (control arm will settle) then go for an alignment.
See pictures below to get an idea what happened and good luck
 05-03-2014, 02:15 PM
#2
New Members

Join Date: Sep 2013
Location: Rochester, MI
Posts: 3
Likes: 0
Received 0 Likes
on
0 Posts
My Ride: 2006 M5
Nice writeup! Shop wouldn't align until bushings were replaced. Good shop, I guess, not taking my $$ without doing the job right. Then again, it was 20 minutes til they closed and they would rather push me out the door.

Thread
Thread Starter
Forum
Replies
Last Post
turboawd
E60 Discussion
20
08-23-2017 12:27 AM
balbs
E60, E61 Parts, Accessories and Mods
10
03-12-2015 12:14 PM
balbs
E60 Discussion
0
03-09-2015 01:37 PM