
ANGEL EYES INSTALL


Members
Joined: Sep 2007
Posts: 213
Likes: 0
From: LA
My Ride: 04 545i Jet Blk, Blk Int, SMG, Sport, Nav, Prem, CW Pack, L7, PDC
i have my umnitza v3 sitting in my garage and i keep feeling like this might be more than what i can do. it seems easy, but the umnitza ones comes with 2 power and 2 ground wires along with a small socket and a larger one. Most of the diy that i'm finding only has 1 power and 1 ground wire and I see people only plugging in the small socket. i'm not sure where the other power and ground wires along with the larger socket is suppose to go. the plugs aren't attached to the wires either.. 
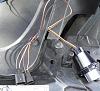
where does the plug on the left go??
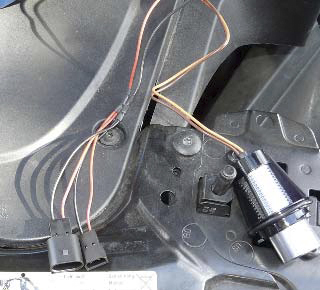
where does the plug on the left go??
Contributors
Joined: Nov 2006
Posts: 2,903
Likes: 0
From: Los Angeles, CA
My Ride: 2007 E60 530i
Color: Jet Black/Black Anthracite
STEP | Sport | Premium | NAV | Logic 7
EXTERIOR:
M-Tech Kit | M5 Mirrors, Trunk Finisher | Jet Black Kidney Surrounds | Madico Charcool Tint 54%, 35%
LIGHTING:
Euro-Headlights | Euro-LCI Tail Lights | AiB V3.0 | Solaris Invisi-bulbs | OEM LED Plate Lights
PERFORMANCE:
Porterfield R4-S Brake Pads | K&N Air Filter
WHEELS & SUSPENSION:
Work VS-XX 20x9, 20x10 | Toyo T1R 245/30/20, Michelin Pilot Sport A/S 295/25/20 | KW V2 Coilovers | Rogue Engineering 15mm Spacers
Originally Posted by lilazngrl4o8' post='501555' date='Dec 1 2007, 01:17 PM
where does the plug on the left go??
Members
Joined: Sep 2007
Posts: 213
Likes: 0
From: LA
My Ride: 04 545i Jet Blk, Blk Int, SMG, Sport, Nav, Prem, CW Pack, L7, PDC
Originally Posted by KnIgHtCoM' post='501986' date='Dec 2 2007, 08:37 PM
The larger plug is for the E39's and other models. He does that so you can transfer them to another BMW in the case you change cars. Also easier to sell them which is nice. But it does make things a lot messier. :shrugs:
Contributors
Joined: Aug 2006
Posts: 3,105
Likes: 0
From: Orange County, Ca
My Ride: 2004 530i
Originally Posted by lilazngrl4o8' post='503834' date='Dec 6 2007, 09:27 PM
Thanks! Is it ok/safe to just leave the wires free hanging in the the headlight? Granted i'd be covering it in electrical tape or something or even putting the larger plug on the wires and then covering the ends of the plug with electrical tape...
As long as you cover it in electrical tape, and i recommend zip tying the loose wires so its not bouncing around..it should be fine
Members
Joined: Sep 2007
Posts: 213
Likes: 0
From: LA
My Ride: 04 545i Jet Blk, Blk Int, SMG, Sport, Nav, Prem, CW Pack, L7, PDC
Originally Posted by ImSort0fABigDeal' post='504118' date='Dec 7 2007, 01:04 PM
As long as you cover it in electrical tape, and i recommend zip tying the loose wires so its not bouncing around..it should be fine
awesome. thanks! I'll give it a shot this weekend if I find some time.


Members
Joined: Apr 2007
Posts: 54
Likes: 0
From: Split/CROATIA
Originally Posted by jordan23junkee' post='420831' date='May 3 2007, 07:04 PM
dave from custom angel eyes. hes around herre somehwere
buying them now.. waiting for shipping price...
http://cgi.ebay.com/ebaymotors/HYPER-WHITE...sspagenameZWD1V
all the best
Members
Joined: Apr 2007
Posts: 54
Likes: 0
From: Split/CROATIA
Originally Posted by DrLev99' post='501544' date='Dec 1 2007, 03:53 PM
Just did AIB v3.0's myself without removing the headlight assembly. Once I got the left one done, the right was a snap. Due to the learning curve, the left took about 40 minutes, the right took 15! I used some longer needle nose pliers as well as some normal pliers. I scratched up the old ones a bit, but who cares (they are real junk). And it was actually very easy to pop the new ones in and give that slight turn to tighten.
For those of you considering taking off your entire headlight assembly, forget it...not necessary. Just remove the radiator cover with a torx 25 bit and a drill to give you more room to move. That part was real easy!
And whalla, all done.
I also did my FOGS today with Hoen lights recommended by C's Bimmer (pics 5 & 6: left OEM, right HOEN). Give a look!
Thanks to all those who gave me advice, like Calton and JRV550i (whose DIY above was great!) and others who posted DIY's in the past!
Some before and after's....
Where did you find the FOGS? i cannot find them on ebay... anywhere else? thankss
Members
Joined: Dec 2007
Posts: 21
Likes: 0
From: Whittier, CA
My Ride: 2006 Silver Grey E60 M5
Originally Posted by depeche2007' post='505540' date='Dec 11 2007, 10:58 AM
buying them now.. waiting for shipping price...
http://cgi.ebay.com/ebaymotors/HYPER-WHITE...sspagenameZWD1V
all the best
http://cgi.ebay.com/ebaymotors/HYPER-WHITE...sspagenameZWD1V
all the best