
12v sockets and Aux in the rear center armrest and boot
 02-24-2007, 10:07 AM
#1
Contributors
Thread Starter

Join Date: Nov 2005
Location: London, UK
Posts: 4,719
Likes: 0
Received 3 Likes
on
3 Posts
My Ride: BMW E60 520d SE Saloon M47 2.0dTitanium Grey II, Grey−Dakota Leather, Visibility Package, Media Package, Through Load System, Lumbar support − fr seats, Automatic Air Conditioning−Advanced, High beam assistant, Hi−Fi Loudspeak
Model Year: 2006
I thought I'd write an article of how to install the 12V sockets and the Aux in the center armrest. My car's interior is non wood grey.
I bought all parts from BMW or Maplins (www.maplins.co.uk)
Parts required for 12V socket plate
How to :
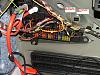
Look at the image it shows where to connect the wire both for the rear 12V and the boot 12V. In case you car didn't come with the boot 12V then you can do both jobs together. My car came with through-load seats and hence I got the boot 12V socket (parts needed CIGARETTE LIGHTER SOCKET 61346906374 and SOCKET MOUNT 61346904008 along with the plugs). I attached image is from Radioham's car who had the rear 12V sockets but no boot plug. Infact the entire project was a result of Rahioham and me talking to each other and solving each others problem. The reason it wasn't straight forward was the pictures in the WDS 8.0 were different than both our cars. Infact the plug X11011 itself has changed position and from a 10 pin as shown in the WDS has become a 12 pin plug which confused us even more.
Attach the 61138364832 connector to one end of your Live wire. Remove the plug from the fuse box and connect the wires into the plug as shown (pin 3 for rear sockets and pin 2 for boot socket). You will need to lift a side catch flap in order for the connector to go completely and snap into the plug.
Since I was interested in rear sockets only, Route you wire (using wire ties or tape to attach it to the main wiring harness) behind the boot felt panels and into the back of the car. Because I had the drop down seats it was slightly easier and I routed the wire along with the main wiring harness entering the car.
Remove the bottom of the rear seats. No screws holding it, simply hold the front of it and lift up. With cars with a drop down seats the small upright back seat panel near the right door needs to be pulled out so that you can route the wire behind it. Its a simple pulling out by holding the top of it below the right seat belt, no screws holding this down. You then need to pull out the 2 trim pieces between the door and the seat. 1 trim piece is held with one screw but the remaining part is simply snapped in. You dont actually need to remove the screw because all you are trying to do is route the wire under the carpet to the center of the car. Leave that wire there for now near the center of the car in front of the rear seats.
Now the tricky part starts. Remove the cubby hole in the back of the center armrest. I simply held and pulled it with my nails but you can use a credit card or something to ease the sides out. Remove the ac vent clips and also the ac duct. There are two nuts holding the center console down at the back. Remove these nuts and you will notice the back of the center console now lifts up. You will notice that inside there are slits in the carpet to allow the handbrake wires to be routed under the carpet and under the car. Use a stiff wire or better still a hollow stiff tubing. Point the wire/tube from the back of the front seat and push this towards the rear seats between the slit in the carpet and the metal tube of the handbrake wire. Now push this wire/tube toward the back seats under the carpet. You may find it easier if you try and lift the carpet and foam a little from the back seat area while trying to route this wire/tube backwards. Its a 6-8 inch hard journey for this wire/tube and you may dig into the foam a few times before you see if come out the other side.
If you used a tube then route the wire that you bought from the back fuse box thru the tube until you see it arrive in the center armrest or attach it very well to your stiff wire and pull the stiff wire back until your wire comes into the center armrest. Once it appears on the other side, the worst is over.
So now you have your 12V Live wire in the armrest. Attach it to the cigarette socket either via the Red Lucar plugs or the BMW plug. You will need to parallel up another Red Lucar plug to power both sockets.
For the negative simply connect another coloured wire to the Eyelet. This Eyelet then goes between under one of the two the nuts that holds the center armrest down that you removed earlier. Connect the negative wire either via the Blue Lucar plugs or the BMW plug. Again you will need to parallel up another Blue Lucar plug to power both sockets.
That will give you your rear 12V power sockets. I actually added a third power socket that is hidden inside the armrest. I'll tell you why later.
Will update article for Aux.
I bought all parts from BMW or Maplins (www.maplins.co.uk)
Parts required for 12V socket plate
- 1 x COVERING REAR GRAU 51167141356
- 2 x BLIND PLATE 64228385142 (or 3 in case you are not installing the Aux extension)
- 1 x BLIND PLATE 51167110223
- 1 x SOCKET CONTACT ELO-POWER 2,8X0,63 0,5-1,0 MM? 61138364832
- about 5meters of thick grade wire for the 12V live. If you want it exactly colour coded it needs to be Green wire with a white strip. I found Green with yellow strip in Maplin code XR38R)
- about 2 feet of thick grade wire for the ground. If you want it exactly colour coded it needs to be Brown wire with a Red strip. I found Brown in Maplin code XR34M)
- 1 x Blue Terminal Insulated Ins Eyelet 6.7 (Maplins code JH73Q)
Either buy for plugging into the lighter plugs. - 2 x PLUG HOUSING 2 POL. 61131351144
- 4 x CABLE SOCKET FEMALE 0,5-1,0 MM? 61131362868
or - 2 x Red Fully Insulated Crimp Terminal - ?Lucar? Female (Maplins code JH81C)
- 2 x Blue Fully Insulated Crimp Terminal - ?Lucar? Female (Maplins code JH82D)
- 1 x UNIVERSAL SOCKET HOUSING UNCODED 10 POL 61136909008
- 6 x BUSHING CONTACT 0,2- 0,5MM? 61130005197 (N.B. these contacts come with a foot of black wire attached to each of of them)
If you only want an Aux in then - 1 X AUDIO SOCKET, SINGLE 61316986791
I actually wanted AV in and out so I used - 1 X PLUG SOCKET AV 61318368346
- about 4 meters of 3 core wire. I used Maplin code XR20W.
How to :

Look at the image it shows where to connect the wire both for the rear 12V and the boot 12V. In case you car didn't come with the boot 12V then you can do both jobs together. My car came with through-load seats and hence I got the boot 12V socket (parts needed CIGARETTE LIGHTER SOCKET 61346906374 and SOCKET MOUNT 61346904008 along with the plugs). I attached image is from Radioham's car who had the rear 12V sockets but no boot plug. Infact the entire project was a result of Rahioham and me talking to each other and solving each others problem. The reason it wasn't straight forward was the pictures in the WDS 8.0 were different than both our cars. Infact the plug X11011 itself has changed position and from a 10 pin as shown in the WDS has become a 12 pin plug which confused us even more.
Attach the 61138364832 connector to one end of your Live wire. Remove the plug from the fuse box and connect the wires into the plug as shown (pin 3 for rear sockets and pin 2 for boot socket). You will need to lift a side catch flap in order for the connector to go completely and snap into the plug.
Since I was interested in rear sockets only, Route you wire (using wire ties or tape to attach it to the main wiring harness) behind the boot felt panels and into the back of the car. Because I had the drop down seats it was slightly easier and I routed the wire along with the main wiring harness entering the car.
Remove the bottom of the rear seats. No screws holding it, simply hold the front of it and lift up. With cars with a drop down seats the small upright back seat panel near the right door needs to be pulled out so that you can route the wire behind it. Its a simple pulling out by holding the top of it below the right seat belt, no screws holding this down. You then need to pull out the 2 trim pieces between the door and the seat. 1 trim piece is held with one screw but the remaining part is simply snapped in. You dont actually need to remove the screw because all you are trying to do is route the wire under the carpet to the center of the car. Leave that wire there for now near the center of the car in front of the rear seats.
Now the tricky part starts. Remove the cubby hole in the back of the center armrest. I simply held and pulled it with my nails but you can use a credit card or something to ease the sides out. Remove the ac vent clips and also the ac duct. There are two nuts holding the center console down at the back. Remove these nuts and you will notice the back of the center console now lifts up. You will notice that inside there are slits in the carpet to allow the handbrake wires to be routed under the carpet and under the car. Use a stiff wire or better still a hollow stiff tubing. Point the wire/tube from the back of the front seat and push this towards the rear seats between the slit in the carpet and the metal tube of the handbrake wire. Now push this wire/tube toward the back seats under the carpet. You may find it easier if you try and lift the carpet and foam a little from the back seat area while trying to route this wire/tube backwards. Its a 6-8 inch hard journey for this wire/tube and you may dig into the foam a few times before you see if come out the other side.
If you used a tube then route the wire that you bought from the back fuse box thru the tube until you see it arrive in the center armrest or attach it very well to your stiff wire and pull the stiff wire back until your wire comes into the center armrest. Once it appears on the other side, the worst is over.
So now you have your 12V Live wire in the armrest. Attach it to the cigarette socket either via the Red Lucar plugs or the BMW plug. You will need to parallel up another Red Lucar plug to power both sockets.
For the negative simply connect another coloured wire to the Eyelet. This Eyelet then goes between under one of the two the nuts that holds the center armrest down that you removed earlier. Connect the negative wire either via the Blue Lucar plugs or the BMW plug. Again you will need to parallel up another Blue Lucar plug to power both sockets.
That will give you your rear 12V power sockets. I actually added a third power socket that is hidden inside the armrest. I'll tell you why later.
Will update article for Aux.
 02-24-2007, 11:27 AM
#2
Contributors
Thread Starter
Join Date: Nov 2005
Location: London, UK
Posts: 4,719
Likes: 0
Received 3 Likes
on
3 Posts
My Ride: BMW E60 520d SE Saloon M47 2.0dTitanium Grey II, Grey−Dakota Leather, Visibility Package, Media Package, Through Load System, Lumbar support − fr seats, Automatic Air Conditioning−Advanced, High beam assistant, Hi−Fi Loudspeak
Model Year: 2006
Moderator why can't I edit this post now? I need to change the title to "12v sockets and Aux in the rear center armrest and boot"
02-24-2007, 02:15 PM
#3
Contributors
Thread Starter
Join Date: Nov 2005
Location: London, UK
Posts: 4,719
Likes: 0
Received 3 Likes
on
3 Posts
My Ride: BMW E60 520d SE Saloon M47 2.0dTitanium Grey II, Grey−Dakota Leather, Visibility Package, Media Package, Through Load System, Lumbar support − fr seats, Automatic Air Conditioning−Advanced, High beam assistant, Hi−Fi Loudspeak
Model Year: 2006
I recently had to change my phone to a Orange M3100 aka HTC TyTN. Although this now provides complete bluetooth integration there is no cradle available for it. So I'm busy building my own cradle. I've got a few old cradles but none are able to charge the phone because the current is too low although the voltage is correct. Infact the Motorola V3 even has the correct plug but will only charge the phone if its off. Once its on the power is too low, so in order words its rather pointless.
I've bought a HTC Tytn holder only ( http://www.expansys.com/zoompic.aspx?type=item&i=140720 ) and also bought a car charger and a nice litte 3 in 1 USB adaptor ( http://www.expansys.com/p.aspx?i=144681 ) that allow you to charge your phone and connect a 3.5mm stereo plug and also the original headset. This is exactly what I need. I needed to be able to use my charge, use my phone and also listen to music via the car.
I initially thought I would connect a bluetooth headset directly to the Aux in the glovebox but the problem is the phone then doesn't connect to the car's handfree because the bluetooth is in use.
So I decided to extend the Aux from the glovebox to the center armrest. I also took this opurtunity to tap the Aux from behind the resistors and capacitors. This way I have both Aux connections in case I need them. One with the protective circuit and one without.
You need to remove the glovebox, search for the Aux wire and then cut it and join your 3 core audio wire to it. The original Aux cable is colour coded as White/Blue = Audio R, White/Red = Audio L, White/Brown = Audio GND. Run this wire behind the center column and behind the trim pieces on the passenger side and get the wire to the center armrest on the rear. This is easily done because the armrest is still liftable because the 2 nuts holding it down are removed.
I then connected this to the Audio socket 61316986791 via plug 61318368346. This plug is 10 pins but you need only 3 pins for the input and 3 for the output. You need to connect the Aux in extension to the following pins Audio GND = pin 2 or 4, Audio R = pin 5 and Audio L = pin 1.
I then connected a 3.5mm plug that I will connect my phone to and connected that to the Audio Out on the plug. The pin connections for that are Audio GND = pin 7 or 9, Audio R = pin 10 and Audio Left = pin 6.
This arrangement allow a headphone to be connected to the Audio out in case someone wants to listen to music on my phone while something else or nothing is playing on the car stereo. It also allows people in the rear to connect something to the cars music system via the Audio in (Aux in extension). In normal usage the Audio In and Audio Out are connected via a small stereo patch cable that I made.
I'll post some pictures later of the finished product.
The hidden cigarette lighter in the armrest is used to connect up the phone's car charger. The 3.5mm audio plug and the car charger are plugged into the 3 in 1 adaptor. I had to modify the car phone cradle and remove the charger plug and replace it with the 3 in 1 adaptor plug. Now I've got to find a way to attach the phone to the shark fin aerial. I have a few ideas but need time to build the custom cradle.
02-26-2007, 11:15 AM
#4
Contributors
Thread Starter
Join Date: Nov 2005
Location: London, UK
Posts: 4,719
Likes: 0
Received 3 Likes
on
3 Posts
My Ride: BMW E60 520d SE Saloon M47 2.0dTitanium Grey II, Grey−Dakota Leather, Visibility Package, Media Package, Through Load System, Lumbar support − fr seats, Automatic Air Conditioning−Advanced, High beam assistant, Hi−Fi Loudspeak
Model Year: 2006
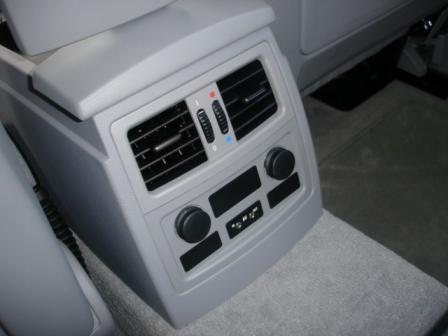
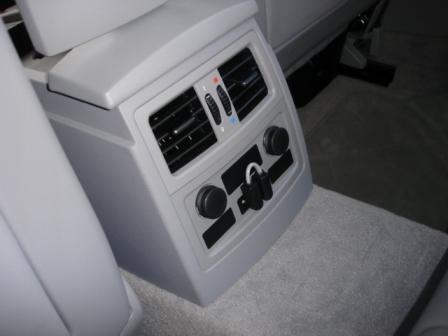
Finished product.
Ofcourse you can't see the hidden cigar lighter.

The stereo patch cable that connects the Out to In. Without that cable the In allow connection to the car's Aux and the Out allows you to plug a standard headphone to listen to mp3s from the phone.
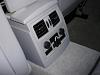
Plus my custom cradle http://forums.e60.net/index.php?showtopic=37261&st=0 that gives me charging and mp3.
Ofcourse you can't see the hidden cigar lighter.
The stereo patch cable that connects the Out to In. Without that cable the In allow connection to the car's Aux and the Out allows you to plug a standard headphone to listen to mp3s from the phone.
Plus my custom cradle http://forums.e60.net/index.php?showtopic=37261&st=0 that gives me charging and mp3.
02-26-2007, 12:44 PM
#5
Contributors
Join Date: Mar 2005
Location: Germany
Posts: 244
Likes: 0
Received 0 Likes
on
0 Posts
My Ride: BMW E60 9/04
BMW E46 / 3
You re genius! Respect. Too sad my english is lousy to understand everything about connecting the rear 12V outlet. I?d realy love to do this diy too. But the pic abouve is a great helping to try it out.
What I didn?t understand is - Is the fuse box prepared for the rear outlets so I only have to clip in the wire in the middle and connect the ground and it?s working? Sounds like.
Thank you again for this - I?m waiting for this for 3 years ago.
What I didn?t understand is - Is the fuse box prepared for the rear outlets so I only have to clip in the wire in the middle and connect the ground and it?s working? Sounds like.
Thank you again for this - I?m waiting for this for 3 years ago.
02-26-2007, 02:23 PM
#6
Contributors

Join Date: Nov 2004
Location: CORNWALL
Posts: 405
Likes: 0
Received 0 Likes
on
0 Posts
My Ride: 640D MSPORT GT
Originally Posted by Harry' post='395939' date='Feb 26 2007, 09:44 PM
You re genius! Respect. Too sad my english is lousy to understand everything about connecting the rear 12V outlet. I?d realy love to do this diy too. But the pic abouve is a great helping to try it out.
What I didn?t understand is - Is the fuse box prepared for the rear outlets so I only have to clip in the wire in the middle and connect the ground and it?s working? Sounds like.
Thank you again for this - I?m waiting for this for 3 years ago.
What I didn?t understand is - Is the fuse box prepared for the rear outlets so I only have to clip in the wire in the middle and connect the ground and it?s working? Sounds like.
Thank you again for this - I?m waiting for this for 3 years ago.
the green/white wire shown is of the rear tunnel 12v socket outlets 12v line. a ground -12v is taken from earth point in the tunnel bolt/nut that secures the frame of tunnel assembly.
the wire point in centre between green/white and red wire (open socket pointer shown ) is 12v to luggage compartment/trunk 12v socket on rear back plate of boot. there is a space available there it is a recessed square plastic indentation that fits the socket outlet housing.behind the plastic pasnel there is a metal cutout already for the position of socket.
02-28-2007, 12:49 PM
#7
Contributors
Join Date: Nov 2004
Location: CORNWALL
Posts: 405
Likes: 0
Received 0 Likes
on
0 Posts
My Ride: 640D MSPORT GT
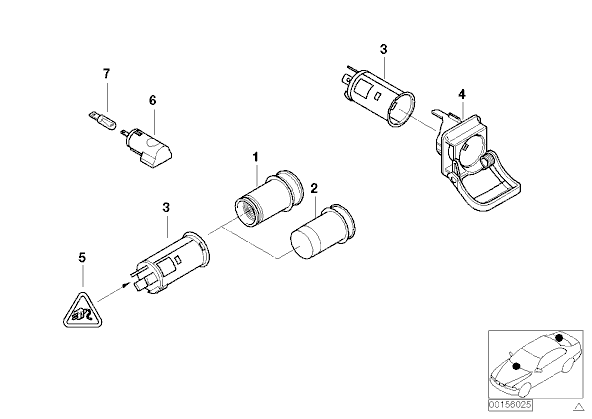
FOR VEHICLES WITH THROUGH-LOADING SYSTEM these parts are fitted for rear 12v outlet.
parts needed
wire green/white to control box
wire brown to earth point under rear light post above battery with tag connector (lug)
round hole drilled in plastic moulding if placed behind rear number plate panel inside trunk.
03 CIGARETTE LIGHTER SOCKET 1 61346906374 price aprox $4.18
(check for correct piece 03 as they are diferent the trunk socket has a reduced outer rim that fits the housingmount 04)
03 CIGARETTE LIGHTER SOCKET 1 61346973037 $4.18
04 SOCKET MOUNT 1 61346904008 $7.37
05 PLUG HOUSING 2 POL. 1 61131351144 $0.50
the mount o5 is just standard lucar push fit electrical connectors, insulated covers to push fit the contacts of 04.make your own up.
 03-05-2007, 11:21 AM
#8
Contributors
Join Date: Mar 2005
Location: Germany
Posts: 244
Likes: 0
Received 0 Likes
on
0 Posts
My Ride: BMW E60 9/04
BMW E46 / 3
Another thing that comes to my mind; if I buy that wire that will be clicked into the place on your pic - how did you make a Y-wire of this for the TWO seperate lighters? They need one wire for each. It would be VERY helpful, if you took a pic of the backside of the finished plate with lighters including wireing.
03-05-2007, 11:36 AM
#9
Contributors
Thread Starter
Join Date: Nov 2005
Location: London, UK
Posts: 4,719
Likes: 0
Received 3 Likes
on
3 Posts
My Ride: BMW E60 520d SE Saloon M47 2.0dTitanium Grey II, Grey−Dakota Leather, Visibility Package, Media Package, Through Load System, Lumbar support − fr seats, Automatic Air Conditioning−Advanced, High beam assistant, Hi−Fi Loudspeak
Model Year: 2006
That's correct, which is why I mentioned you need to parallel up the wires for the two lighters. Basically the way I did it was to take the wire that came from the boot to one of the Crimp Terminal attached another small bit of wire to that and then soldered it into the Crimp Terminal. So instead of a Y joint I made a jump loop.
boot -------->cig 1 ---------->cig 2 instead of cig 1 <----------boot----------->cig 2
boot -------->cig 1 ---------->cig 2 instead of cig 1 <----------boot----------->cig 2
