Power Tailgate Oil. Acceptable Substitutes?
 05-19-2014, 10:27 PM
#21
Members

Join Date: May 2011
Location: Karm�y, Norway
Posts: 199
Likes: 0
Received 2 Likes
on
2 Posts
My Ride: 2001 320Ci Coupè
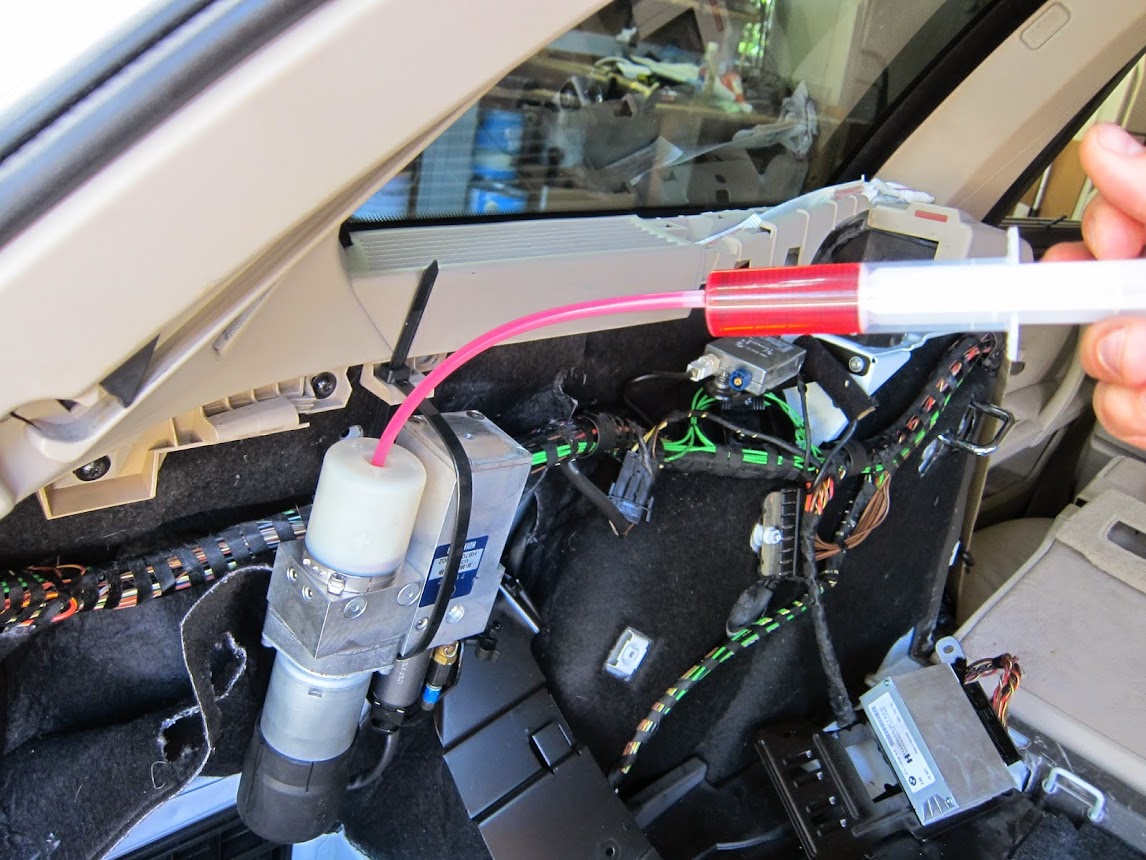
Take of the cover on the left side of the boot (the one that opens), remove the amplifier if you have one (I didn't have one), undo the 3 nuts holding the pump, disconnect the cable and hoses (there won't be any spill), and the take out the whole pump. Shouldn't take more than 15-20 minutes to remove it.
 07-01-2014, 09:48 PM
#22
Senior Members


 01-20-2015, 05:43 PM
#24
New Members

Join Date: Jan 2015
Location: Elizabethville, PA
Posts: 28
Likes: 0
Received 1 Like
on
1 Post
My Ride: '07 530xiT, '06 M3 Cabrio 6-sp., '09 X5 3.0 (wife's car), '88 535is
Model Year: 2007
Hi, new member to this site, but not new to issues with the power tailgate on an E61. I feel like a member of some fraternal organization. Wish I would have spent more time on here before I sent my car to the shop to look for broken wiring in the tailgate hinges, which they could not find. Sounds to me like I've had a hydraulic pump with low fluid all along. Should (hopefully) be getting my car back tomorrow (took care of a few other issues as well). Going to order the hydraulic fluid tonight.
BTW - In all of my research on this issue, I stumbled across a company called Top Hydraulics (www.tophydraulicsinc.com). They do rebuilds on (mainly) convertible top hydraulic pumps for higher-end cars. However, they do offer a rebuild service for the tailgate hydraulic pump for the E61! It's $300.00.....much cheaper than a new pump, and according to their web site, they rebuild it with proprietary seals and other bits that makes it last longer and improves performance over stock. That's where I'm headed next if the fluid top-off doesn't fix my situation!
Thanks for everyone's input! Have been dealing with this for well over a year now....starting to think I may be close to actually fixing it!!
01-25-2015, 08:06 PM
#25
New Members
Join Date: Jan 2015
Location: Elizabethville, PA
Posts: 28
Likes: 0
Received 1 Like
on
1 Post
My Ride: '07 530xiT, '06 M3 Cabrio 6-sp., '09 X5 3.0 (wife's car), '88 535is
Model Year: 2007
Took me a little extra time, but I got the pump removed and reservoir topped-off yesterday. Tailgate works awesome!!! The noise level the pump makes was at least cut in half. Works as nice as the tailgate on my wife's '09 X5!
And yes, the upper bolt is an absolute S.O.B.! I did not disconnect any lines from the pump when I finally got the upper bolt out....I just pulled it out as far as I could, removed the three nuts on the back which hold it to the mounting plate (which is required to get at the fill hole on the bottom of the reservoir), and I propped it up on a small cardboard box which put it at about a 45-degree angle. You don't want to fill it all the way anyways, as that puts it well over the "+" mark on the side of the reservoir when it's secured back in it's cubby hole. I ended up being a little over the mark anyways, but it seems fine. A tip.....once you put fluid in and replace the plug, before you re-attach the mounting plate, I would turn it over and hold it on about the same angle as it is when installed. When I initially replaced the pump, I was right at the mark, but all of a sudden the level was well over it and there was just a little air at the top of the reservoir. Apparently when you turn it upside down, some of the fluid goes into the pump. Give it about a minute to see where the fluid level settles. I ended up taking some fluid back out before finally re-installing it.
Good luck!
 06-03-2015, 12:10 PM
#27
New Members

Join Date: Jun 2015
Location: Southern California
Posts: 3
Likes: 0
Received 0 Likes
on
0 Posts
My Ride: 2008 535xi E61
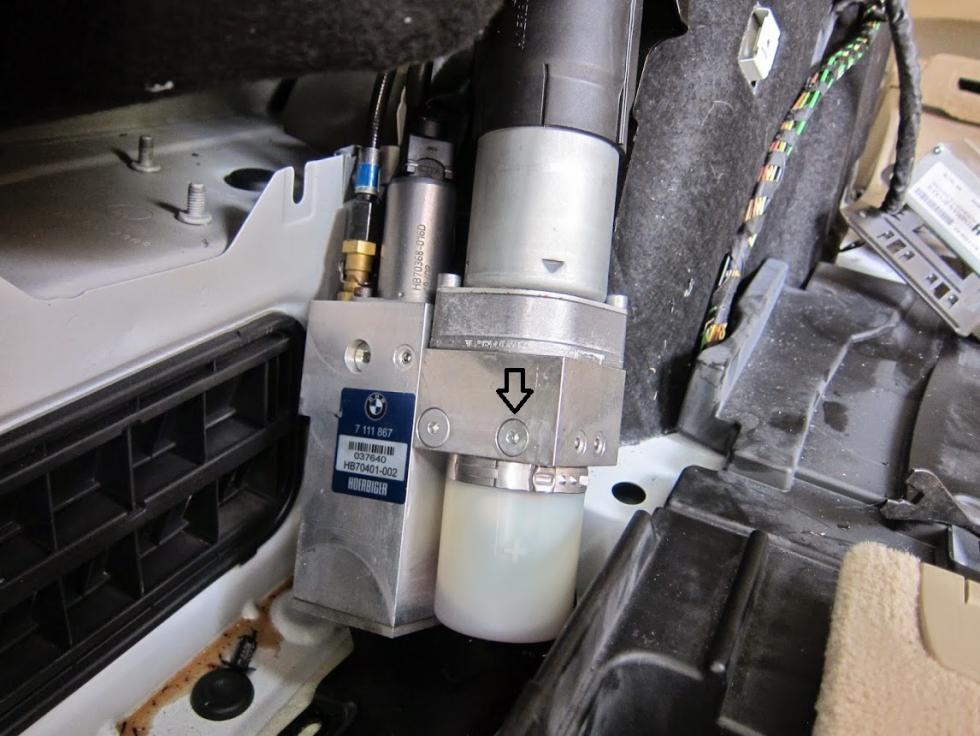
Many thanks to Evan ucsbwsr for the excellent photos! On my 2008 e61 the upper mounting bracket BOLT must be removed from the trim (upholstered side), not from the inside where the pump lives. The bottom two mounts have nuts with washers attached. I bought Shell Aerofluid 4 today, put in some fluid, and put it back together. It operated perfectly and was smoooth and as quiet as when it was zero miles on the car.
EVAN'S PHOTOS ARE WORTH THOUSANDS OF WORDS!
Regarding the above question "has anyone tried removing the plug at the arrow" I WOULD NOT RECOMMEND TRYING THIS because the BMW copyright instructions for "topping up fluid in hydraulic unit" specifically say to "remove the seal plug" in the plastic reservoir. That machined plug shown in the above photo might have high pressure behind it!
The small plus sign in the plastic reservoir photo above is the high/low limit for the fluid. High is at the top edge of the plus sign and Low is at the bottom of the plus sign......the range is about 3/8 inch. I used an epoxy injector from West Systems and put in 4 to 5 injector fulls of fluid.
Last edited by CarlsbadBill; 06-04-2015 at 07:39 PM. Reason: corrections and updating completion of job
06-04-2015, 04:43 PM
#28
New Members

Join Date: Jan 2015
Location: Atlanta, GA
Posts: 18
Likes: 0
Received 0 Likes
on
0 Posts
My Ride: 2006 BMW 530xiT
AC Delco 10-5041 has the same specs as the Shell fluid. $22 from Amazon. I've used this in my 2006 530xiT and it worked perfectly.
http://www.amazon.com/ACDelco-10-504...ydraulic+fluid
http://www.amazon.com/ACDelco-10-504...ydraulic+fluid
06-04-2015, 07:39 PM
#29
New Members
Join Date: Jun 2015
Location: Southern California
Posts: 3
Likes: 0
Received 0 Likes
on
0 Posts
My Ride: 2008 535xi E61
Thanks ggal625; I bought The Shell Aerofluid 4 today and it worked great. Quiet and smooth as it was when new. BMW should be ashamed of themselves for putting us all through this hassle.
NOTE FOR THOSE CONSIDERING THIS JOB: It is possible to do the job WITHOUT removing upholstery. Take out the left rear side panel (opens and removes similar to the battery access on the right side). Pull out the fabric sound-deadening material from the bottom; under it on the back side of the wheel well arch you will see the hydraulic pump. There is a black bracket holding the pump to the car; it is fastened by two nuts at the bottom, and one bolt at the top. The bottom nuts are easy, the top is a hex head (about 9 mm). a 1/4 inch drive socket with no extension is your best bet to get this out. The hydraulic unit pulls back and then out with the hydraulic hoses attached. Do not disconnect them. Remove the black bracket from the pump by removing 4 nuts. Turn the pump so the fill hole on the bottom of the plastic reservoir is pointed upward, remove it with the appropriate hex key, and fill the reservoir about 1/3 full. Replace the plug and hold the unit with the reservoir down. The appropriate level is anywhere on the + that is on the reservoir. Put the bracket on and put the assembly back into position; put the 2 nuts on loose until you can get the top bolt in......you will be swearing about this time. The + is about 3/8 high....that is the fill range when the unit is completely reassembled at the angle where it lives.
NOTE FOR THOSE CONSIDERING THIS JOB: It is possible to do the job WITHOUT removing upholstery. Take out the left rear side panel (opens and removes similar to the battery access on the right side). Pull out the fabric sound-deadening material from the bottom; under it on the back side of the wheel well arch you will see the hydraulic pump. There is a black bracket holding the pump to the car; it is fastened by two nuts at the bottom, and one bolt at the top. The bottom nuts are easy, the top is a hex head (about 9 mm). a 1/4 inch drive socket with no extension is your best bet to get this out. The hydraulic unit pulls back and then out with the hydraulic hoses attached. Do not disconnect them. Remove the black bracket from the pump by removing 4 nuts. Turn the pump so the fill hole on the bottom of the plastic reservoir is pointed upward, remove it with the appropriate hex key, and fill the reservoir about 1/3 full. Replace the plug and hold the unit with the reservoir down. The appropriate level is anywhere on the + that is on the reservoir. Put the bracket on and put the assembly back into position; put the 2 nuts on loose until you can get the top bolt in......you will be swearing about this time. The + is about 3/8 high....that is the fill range when the unit is completely reassembled at the angle where it lives.
Last edited by CarlsbadBill; 06-07-2015 at 06:11 PM.
