review of BimmerTech VividScreen with rearview camera, AppleTV, and iOS mirroring
 11-10-2016, 06:00 PM
#1
New Members
Thread Starter
Join Date: Dec 2015
Location: Boston, MA
Posts: 367
Likes: 0
Received 4 Likes
on
4 Posts
My Ride: BMW 530xiT (E61)
Model Year: 2007
Hi Everyone-
For anyone that is interested in upgrading their stock CCC/MASK system with something more full-featured and versatile (and with modern technology), I wanted to post a quick review of my experience installing and using one of the new BimmerTech products called VividScreen that allows/includes:
-integration of a rearview camera that functions exactly like an OE camera.
-integration of other audio/video inputs (i.e. front view camere, DVD player, gaming system)
-mirroring of your iOS device to the car's screen
-full functionality of an (included) AppleTV including streaming live TV, accessing your music/videos, Netflix/Hulu
-split screen capability (i.e. AppleTV or iOS mirroring on half of the screen and the factory iDrive screen on the other half)
-a totally new iDrive screen with HD resolution (replaces the factory screen)
In full disclosure, I was offered a very moderate discount in exchange for my honest review as a "beta tester" of the unit in my 2007 E61. In the end, it turned out that there really weren't any major kinks to speak of to be worked out with the product and everything worked as promised right out of the box. This review is totally in my own words and was not written or paid for by anyone at BimmerTech. My intention is to be totally transparent with my experiences (both good and bad) with the install and the functionality of the kit. Knowing what I know now about how the kit works, how easy it was to install, and the functionality that it offers, I would still have bought the kit even with no discount. It's not cheap by any means, but if you spend a lot of time in the car and/or want to refresh the very outdated NAV and multimedia interface in your E60/E61, this is a great place to start. Additionally, the car can be reverted back to stock relatively easily if you end up selling it. There is no splicing or cutting of wires, so the install can be reversed pretty easily.
If you don't feel like reading through the next few posts and just want the quick a dirty about the functionality, I uploaded a quick video to YouTube (link below). I apologize for the quality of the video - I'm an old fart and not really experienced with video production/editing, etc.
If anyone has any questions about the kit, the install, functionality, etc. please send me a PM and I'd be happy to discuss in more detail. If you live in the New England are and would like to see the kit in action, you're more than welcome to come see it before you buy one. I'd also be happy to FaceTime with anyone that wants to see any specific functions that I might have overlooked in the video or review.
Jon
Edit: I forgot to include the links to the product
https://www.bimmer-tech.net/bmw-rear-view-cameras/
https://www.bimmer-tech.net/shop/bmw...ts/vividscreen
Here is a video walking through the features of the kit:
Here is a video walking through the installation and location of the kit components:
And one last video showing the features of the AppleTV and live video streaming:
Last edited by BostonJon; 11-16-2016 at 09:56 AM.
 11-10-2016, 06:00 PM
#2
New Members
Thread Starter
Join Date: Dec 2015
Location: Boston, MA
Posts: 367
Likes: 0
Received 4 Likes
on
4 Posts
My Ride: BMW 530xiT (E61)
Model Year: 2007
Over the next few posts, I'm going to try to provide some additional detail (including photos) on the components, install, and functionality for the folks that want more info.
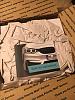
After ordering the kit, I was expecting it to take several weeks to arrive. Much to my surprise it shipped almost immediately from FL and I had it in less than 3 days. Everything was padded and wrapped securely. I thought the car on top was a nice touch. The kit that I bought didn't have any formal instructions - these were developed together with Maciej at BimmerTech as I went through the install. I was a little concerned at first, but once I got out the components it became pretty self-explanatory what everything was and how it should be installed.

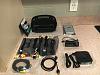
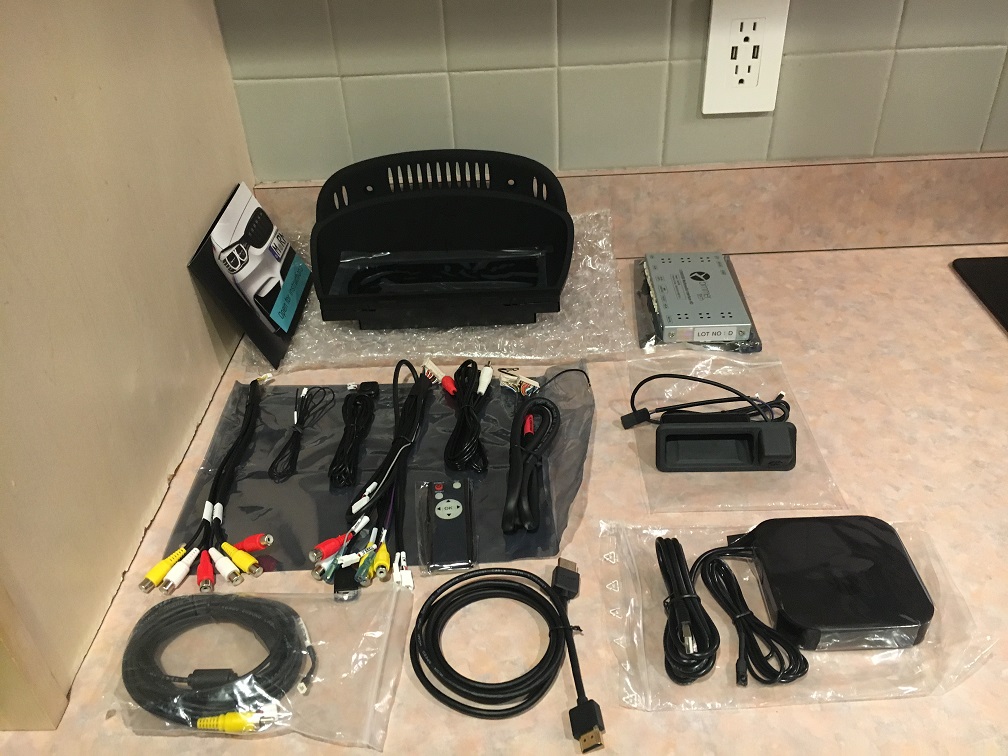
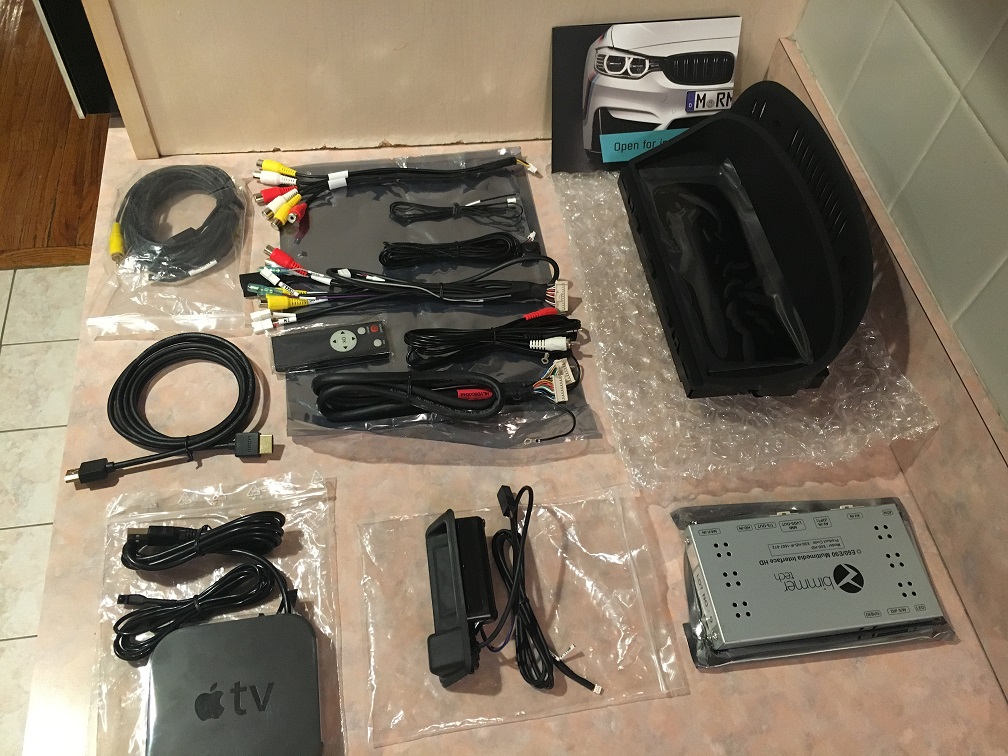
The photos below give you an idea of everything that is included in the kit. ALL wiring is included in the kit and everything is totally plug-and-play with the car's existing wiring. There's nothing to cut, splice, solder, cut, or otherwise permanently modify. I had a good set of trim tools, but it would have been a nice touch if they had included a few with a kit that costs this much. A minor detail for sure, but this kit can be installed by someone with very little experience with electronics or disassembly of their trim panels and not everyone may have a trim tool kit. Looking at the first picture below, the components of the kit are as follows:
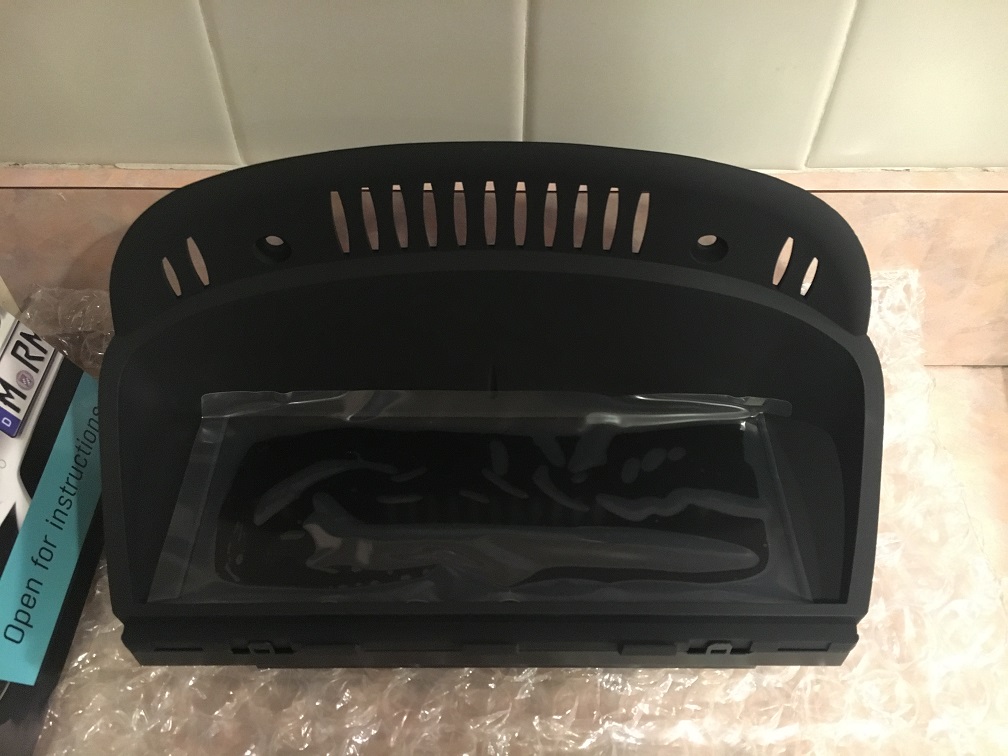
-top center: new HD screen. this is an EXACT fit for the existing screen that you will be replacing and fit perfectly in the factory location. even the vented plastic trim around the screen is identical to the stock unit.
-top right: the MMI unit. this is the "brains" of the whole system that integrates the various A/V inputs (like the rearview camera and AppleTV) and sends the signal to the screen
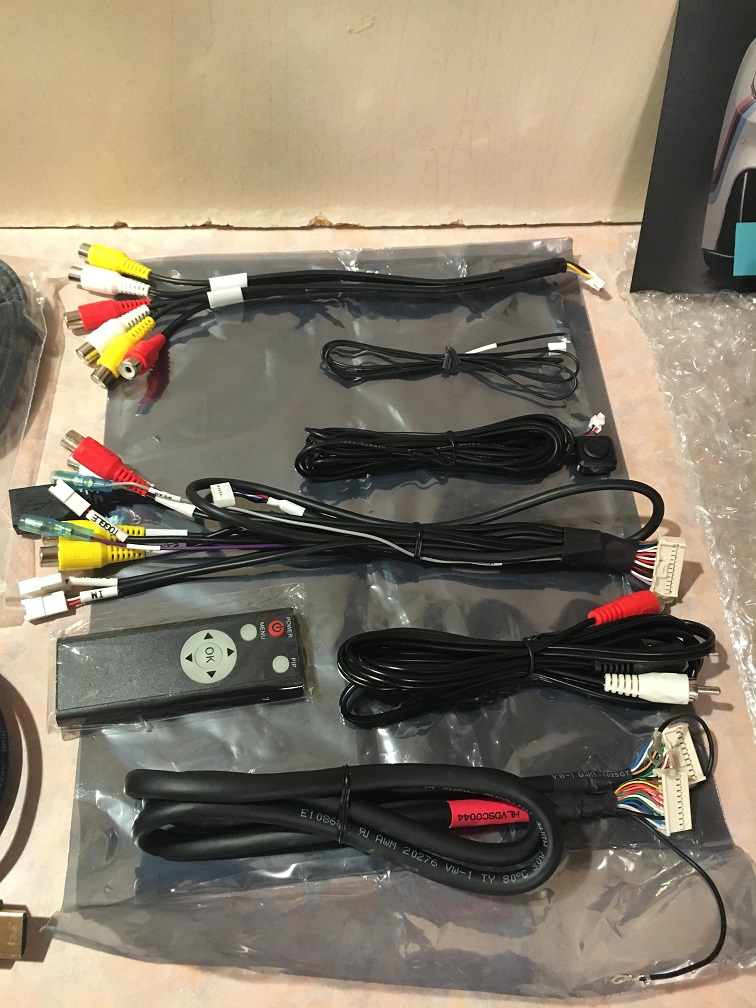
-middle left: all of the wiring for the system. everything is labeled. i could immediately tell that the wiring looms were well made. everything had labels and heatshrink tubing on it. you can also see a small black remote - this is the remote for the MMI unit that allows you to access a lot of the settings.
-middle right: the new trunk switch with integrated camera. this unit is an EXACT fit for the existing trunk switch and includes the rearview camera. the switch even has a soft-touch rubber lining just like the factory unit.
-bottom left: integrated RCA/power cable for the rearview camera
-bottom middle: included HDMI cable for the AppleTV to MMI connection. This was a 3' cable. A 1' cable would be better because the AppleTV and MMI unit are installed together and the longer 3' cable just means there is more cable that you have to loop together and stash away.
-bottom right: the AppleTV. my kit included a 3rd gen AppleTV unit. the AppleTV unit comes modified to run off of USB power and to have a longer lead for the IR remote (more on that later). one thing that would be nice would be the 4th gen AppleTV unit. i believe the newer remotes have a voice recognition function. this would be a really nice feature to be able to utilize when searching for things in the car (i.e. streaming YouTube videos).
edit: I emailed with BimmerTech about the 3rd gen vs. 4th gen AppleTV. I didn't realize that the 4th gen has significantly higher power consumption and is therefore more difficult to modify to work with the USB power lead on the MMI box without requiring another wiring harness and dedicated power supply. From what I could find online, the 3rd gen unit uses about 1.5W of power while the 4th gen unit uses up to 6W of power. One other difference is that the 4th gen remote works over bluetooth so you dont need a line of sight IR receiver like you do with the 3rd gen unit. If you had a USB power hub that could supply enough power for a gen 4 unit, you could likely use your own v4 AppleTV for this kit.

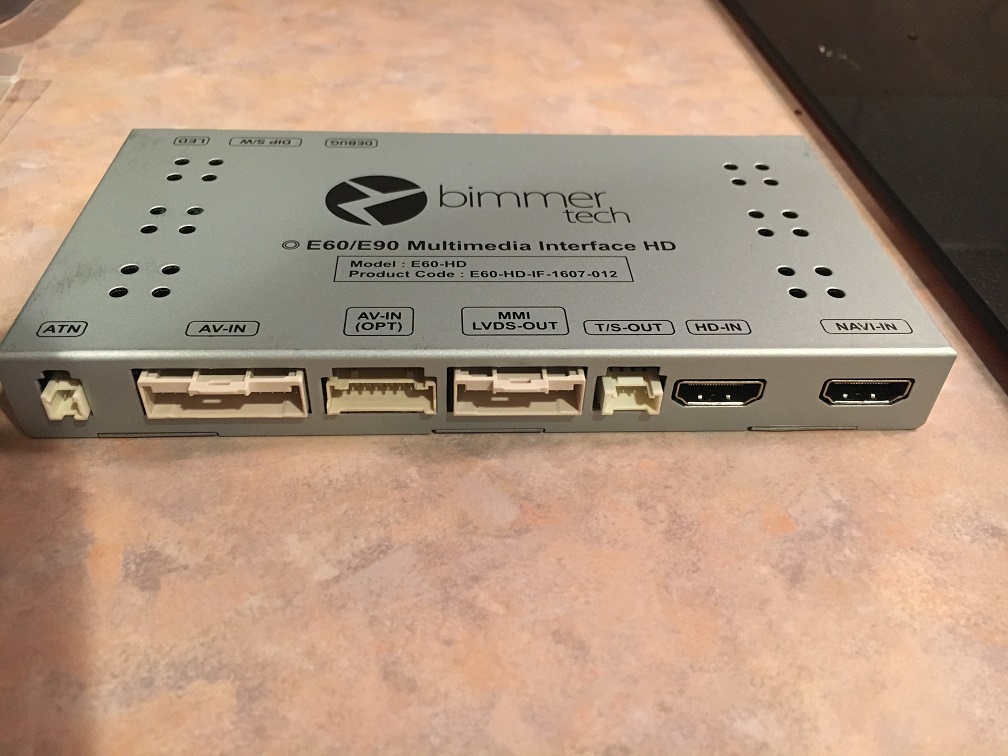
An up-close shot of the MMI unit. All of the wiring attaches to the end of the unit that you see closest to the camera. The DIP switches for the various settings are at the far end. The inputs/outputs are:
-ATN: i *think* this is the transmitting antenna for the FM transmitter. The unit has a functional built-in FM transmitter, but (like all FM transmitters) the quality isn't great.
-AV-IN: this is the main harness that supplies a USB port to power the AppleTV, carries the rear camera power and video feed, supplies an audio out signal (over an included RCA cable) that runs to your existing aux-in port, and has a secondary RCA input for an optional front-view camera (fancy!).
-AV-IN (OPT): 2 additional RCA (red/white/yellow) inputs. I'm not using these so I can't say much about them. To be honest, I'm not sure what you'd add to the system that had an RCA input, but I supposed you could wire in an old DVD player or something if you really wanted to. i guess you could also use them as additional audio-in inputs for other devices.
-MMI LVDS-OUT: this is the big cable that runs between the MMI unit and the new screen.
-T/S-OUT: i dont think this is used.
-HD-IN: the HDMI input from the AppleTV
-NAVI-IN: not used. this port fits an HDMI cable but must use a different protocol than standard HDMI because I activated this input, hooked up an HDMI source to it, and could not get it to display on the screen. it would be pretty cool though if you could have a second HDMI input to utilize.

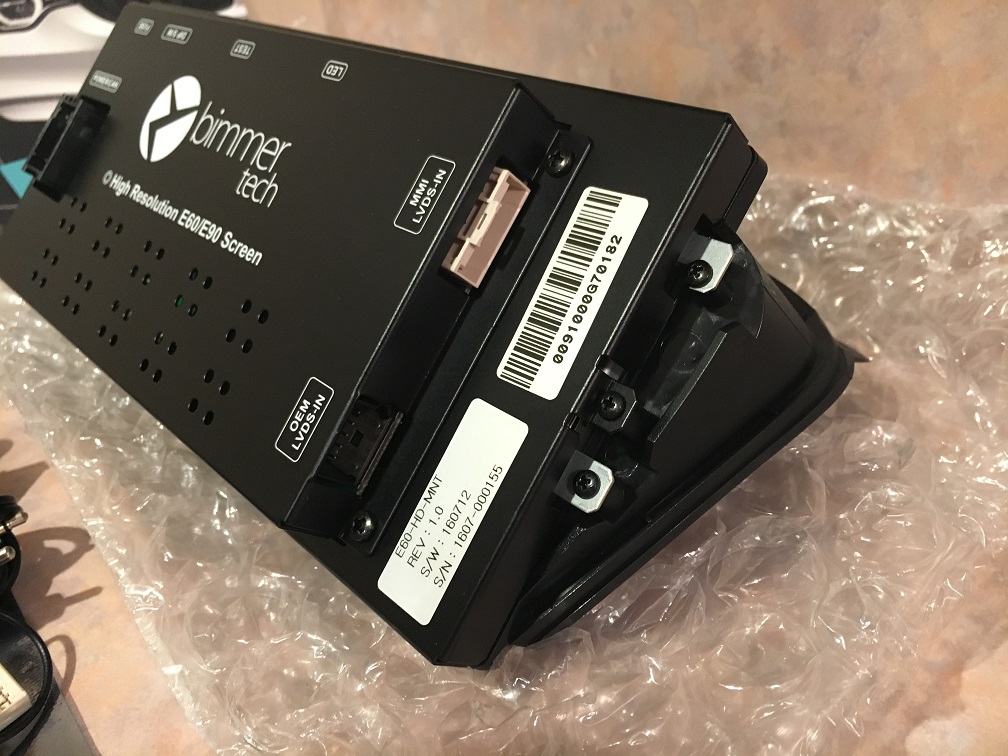
A few shots of the new HD screen. There are three things that will plug into your new screen:
-POWER/CAN: this is an existing cable that you move over from your existing screen
-MMI LVDS-IN: this is a new cable that runs from the MMI unit to the new screen
-OEM LVDS-IN: this is an existing cable that you move over from your existing screen.

After ordering the kit, I was expecting it to take several weeks to arrive. Much to my surprise it shipped almost immediately from FL and I had it in less than 3 days. Everything was padded and wrapped securely. I thought the car on top was a nice touch. The kit that I bought didn't have any formal instructions - these were developed together with Maciej at BimmerTech as I went through the install. I was a little concerned at first, but once I got out the components it became pretty self-explanatory what everything was and how it should be installed.


The photos below give you an idea of everything that is included in the kit. ALL wiring is included in the kit and everything is totally plug-and-play with the car's existing wiring. There's nothing to cut, splice, solder, cut, or otherwise permanently modify. I had a good set of trim tools, but it would have been a nice touch if they had included a few with a kit that costs this much. A minor detail for sure, but this kit can be installed by someone with very little experience with electronics or disassembly of their trim panels and not everyone may have a trim tool kit. Looking at the first picture below, the components of the kit are as follows:
-top center: new HD screen. this is an EXACT fit for the existing screen that you will be replacing and fit perfectly in the factory location. even the vented plastic trim around the screen is identical to the stock unit.
-top right: the MMI unit. this is the "brains" of the whole system that integrates the various A/V inputs (like the rearview camera and AppleTV) and sends the signal to the screen
-middle left: all of the wiring for the system. everything is labeled. i could immediately tell that the wiring looms were well made. everything had labels and heatshrink tubing on it. you can also see a small black remote - this is the remote for the MMI unit that allows you to access a lot of the settings.
-middle right: the new trunk switch with integrated camera. this unit is an EXACT fit for the existing trunk switch and includes the rearview camera. the switch even has a soft-touch rubber lining just like the factory unit.
-bottom left: integrated RCA/power cable for the rearview camera
-bottom middle: included HDMI cable for the AppleTV to MMI connection. This was a 3' cable. A 1' cable would be better because the AppleTV and MMI unit are installed together and the longer 3' cable just means there is more cable that you have to loop together and stash away.
-bottom right: the AppleTV. my kit included a 3rd gen AppleTV unit. the AppleTV unit comes modified to run off of USB power and to have a longer lead for the IR remote (more on that later). one thing that would be nice would be the 4th gen AppleTV unit. i believe the newer remotes have a voice recognition function. this would be a really nice feature to be able to utilize when searching for things in the car (i.e. streaming YouTube videos).
edit: I emailed with BimmerTech about the 3rd gen vs. 4th gen AppleTV. I didn't realize that the 4th gen has significantly higher power consumption and is therefore more difficult to modify to work with the USB power lead on the MMI box without requiring another wiring harness and dedicated power supply. From what I could find online, the 3rd gen unit uses about 1.5W of power while the 4th gen unit uses up to 6W of power. One other difference is that the 4th gen remote works over bluetooth so you dont need a line of sight IR receiver like you do with the 3rd gen unit. If you had a USB power hub that could supply enough power for a gen 4 unit, you could likely use your own v4 AppleTV for this kit.
An up-close shot of the MMI unit. All of the wiring attaches to the end of the unit that you see closest to the camera. The DIP switches for the various settings are at the far end. The inputs/outputs are:
-ATN: i *think* this is the transmitting antenna for the FM transmitter. The unit has a functional built-in FM transmitter, but (like all FM transmitters) the quality isn't great.
-AV-IN: this is the main harness that supplies a USB port to power the AppleTV, carries the rear camera power and video feed, supplies an audio out signal (over an included RCA cable) that runs to your existing aux-in port, and has a secondary RCA input for an optional front-view camera (fancy!).
-AV-IN (OPT): 2 additional RCA (red/white/yellow) inputs. I'm not using these so I can't say much about them. To be honest, I'm not sure what you'd add to the system that had an RCA input, but I supposed you could wire in an old DVD player or something if you really wanted to. i guess you could also use them as additional audio-in inputs for other devices.
-MMI LVDS-OUT: this is the big cable that runs between the MMI unit and the new screen.
-T/S-OUT: i dont think this is used.
-HD-IN: the HDMI input from the AppleTV
-NAVI-IN: not used. this port fits an HDMI cable but must use a different protocol than standard HDMI because I activated this input, hooked up an HDMI source to it, and could not get it to display on the screen. it would be pretty cool though if you could have a second HDMI input to utilize.
A few shots of the new HD screen. There are three things that will plug into your new screen:
-POWER/CAN: this is an existing cable that you move over from your existing screen
-MMI LVDS-IN: this is a new cable that runs from the MMI unit to the new screen
-OEM LVDS-IN: this is an existing cable that you move over from your existing screen.

Last edited by BostonJon; 11-11-2016 at 07:16 AM.
11-10-2016, 06:00 PM
#3
New Members
Thread Starter
Join Date: Dec 2015
Location: Boston, MA
Posts: 367
Likes: 0
Received 4 Likes
on
4 Posts
My Ride: BMW 530xiT (E61)
Model Year: 2007
For those of you with the E60 sedan or the folks that don't get the rearview camera option (even though it's totally worth it), you can ignore this section. I installed the camera on my 2007 E61 wagon. This was by far the most time-consuming part of the install. Not because it was tricky or complicated, but there were a few trim panels that need to be removed and you have to fish the cable for the camera video/power through the tailgate, into the dreaded tailgate hinge, through the headliner, down the B-pillar, across the door sill, and finally into the MMI unit behind the glovebox. It probably took me almost two hours for this part, but I went really slowly, cleaned all the trim as I went, and took the time to make the install as factory-looking as possible.
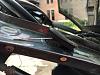
In the first picture, I have the liftgate close, the glass hatch open, and am beginning to remove the trim panels that I will need remove to run the camera cable. if you have access to TIS, it's pretty easy to find the BMW instructions on how to remove these trim panels. send me a PM if you can't access them and I will send them to you.
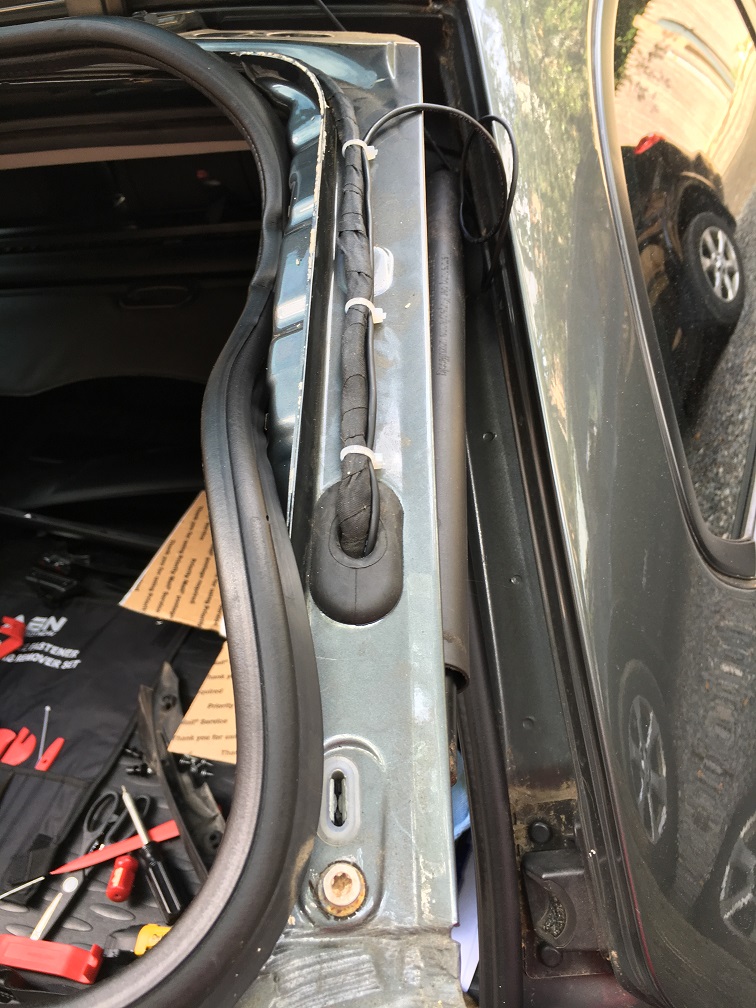
For orientation, the first two pictures are close ups of the passenger side of the liftgate with the glass hatch open and the trim panel removed from the previous picture. you can see what a mess my car was under the trim so that's why i spent some extra time cleaning as I took things apart. I used a coat hanger to punch a hole through the existing rubber grommet and run the wire through. Once i got it through the grommet, i used the coat hanger again to get the wire down near the taillight that is on the rear hatch. In the third picture, you can get an idea of how i ran the wire. towards the top of the picture, I am getting ready to run the wire into the tailgate hinge. this is all covered by trim so the zip ties and additional wire are not visible once everything is buttoned up.
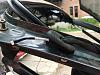
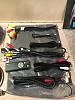
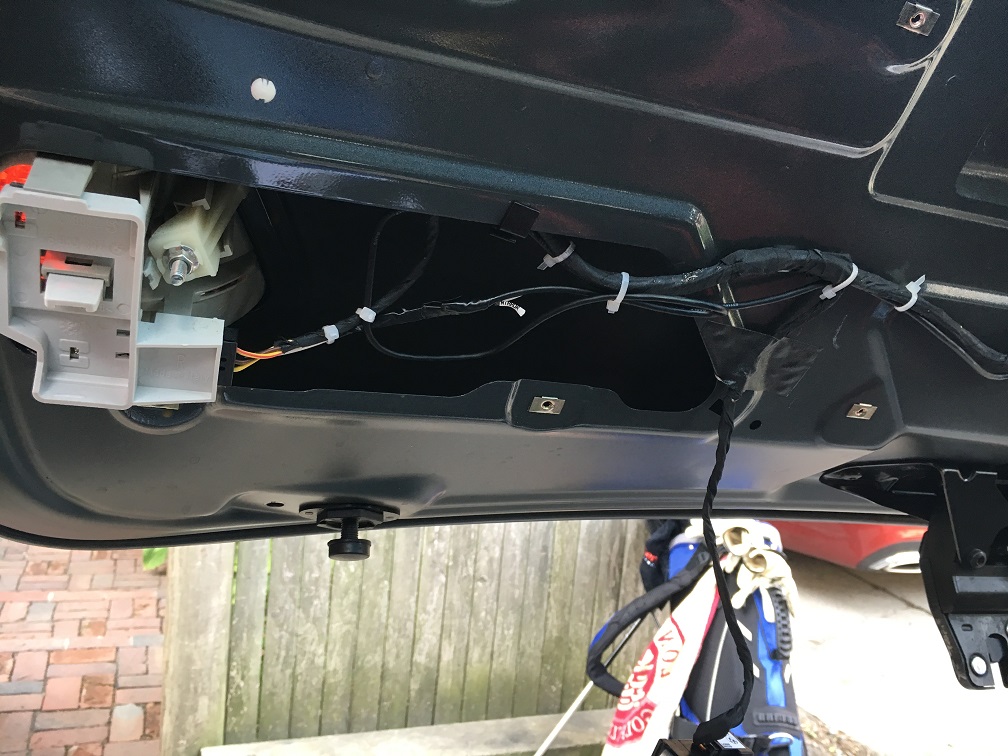
The trim inside the rear lifegate has been removed. This needs to be removed to access the back of the trunk switch for the new switch/camera and to run the camera wire. You can see where I have zip tied the new wire to some existing wiring. The wiring running to the right runs TO the new trunk switch/camera and the wire running to the LEFT runs up behind the right taillight and through the rubber grommet you see in the previous picture. interestingly, the tailgate switch is not screwed in - it just pops out using a trim tool. once you have the rear liftgate trim off, it's pretty easy to access the back side of the switch.
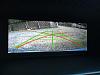
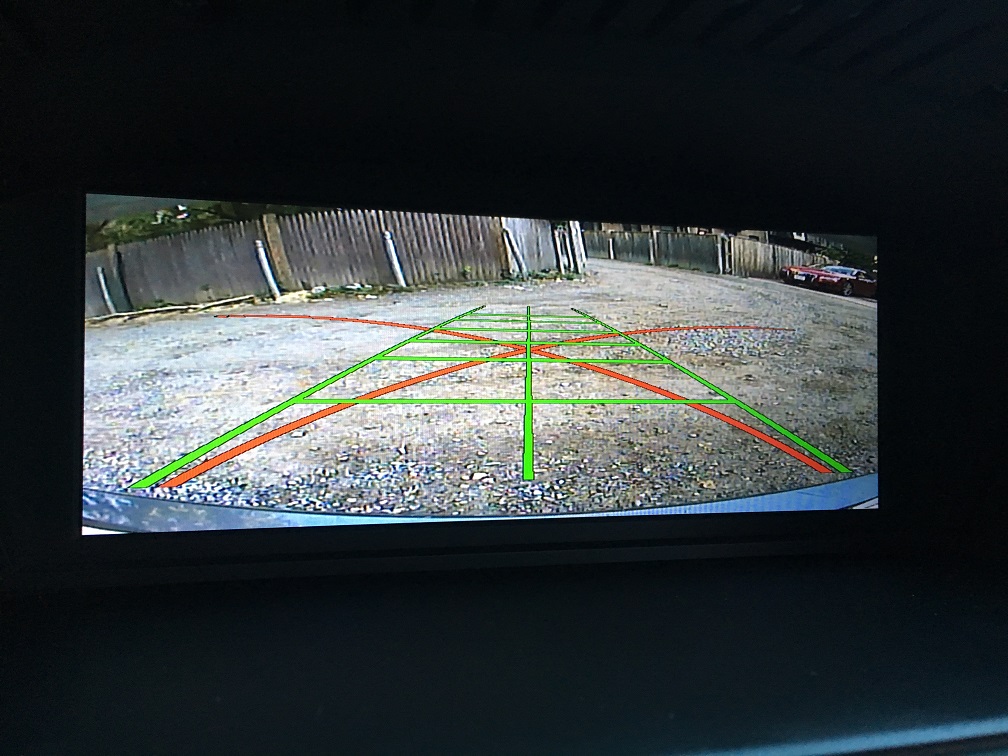
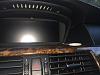
And the money shot! The camera quality is amazing both in daylight and night. The placement of the camera is perfect - you can just make out the edge of the bumper so you know exactly how close you are to something when backing up. The green lines on the screen are dynamic so they move when you turn the steering wheel and you can get a pretty good idea of where the car is going when you're backing up. if you dont like the moving lines, you can switch them to be static or turn the lines off all together.
edit: below is a video that I made of the rear view camera functionality in action. sorry for the portrait orientation
In the first picture, I have the liftgate close, the glass hatch open, and am beginning to remove the trim panels that I will need remove to run the camera cable. if you have access to TIS, it's pretty easy to find the BMW instructions on how to remove these trim panels. send me a PM if you can't access them and I will send them to you.
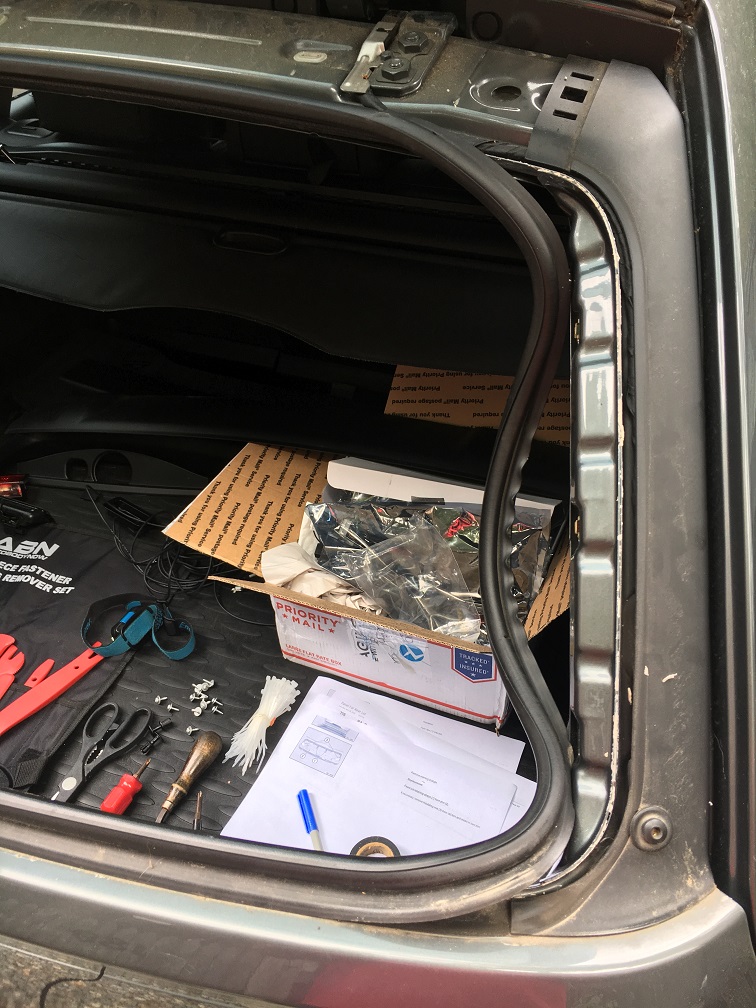
For orientation, the first two pictures are close ups of the passenger side of the liftgate with the glass hatch open and the trim panel removed from the previous picture. you can see what a mess my car was under the trim so that's why i spent some extra time cleaning as I took things apart. I used a coat hanger to punch a hole through the existing rubber grommet and run the wire through. Once i got it through the grommet, i used the coat hanger again to get the wire down near the taillight that is on the rear hatch. In the third picture, you can get an idea of how i ran the wire. towards the top of the picture, I am getting ready to run the wire into the tailgate hinge. this is all covered by trim so the zip ties and additional wire are not visible once everything is buttoned up.


The trim inside the rear lifegate has been removed. This needs to be removed to access the back of the trunk switch for the new switch/camera and to run the camera wire. You can see where I have zip tied the new wire to some existing wiring. The wiring running to the right runs TO the new trunk switch/camera and the wire running to the LEFT runs up behind the right taillight and through the rubber grommet you see in the previous picture. interestingly, the tailgate switch is not screwed in - it just pops out using a trim tool. once you have the rear liftgate trim off, it's pretty easy to access the back side of the switch.
And the money shot! The camera quality is amazing both in daylight and night. The placement of the camera is perfect - you can just make out the edge of the bumper so you know exactly how close you are to something when backing up. The green lines on the screen are dynamic so they move when you turn the steering wheel and you can get a pretty good idea of where the car is going when you're backing up. if you dont like the moving lines, you can switch them to be static or turn the lines off all together.
edit: below is a video that I made of the rear view camera functionality in action. sorry for the portrait orientation
Last edited by BostonJon; 11-13-2016 at 11:57 AM.
11-10-2016, 06:00 PM
#4
New Members
Thread Starter
Join Date: Dec 2015
Location: Boston, MA
Posts: 367
Likes: 0
Received 4 Likes
on
4 Posts
My Ride: BMW 530xiT (E61)
Model Year: 2007
Here is some info on how/where I installed the components - specifically the MMI unit and the AppleTV.
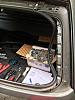
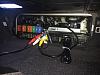
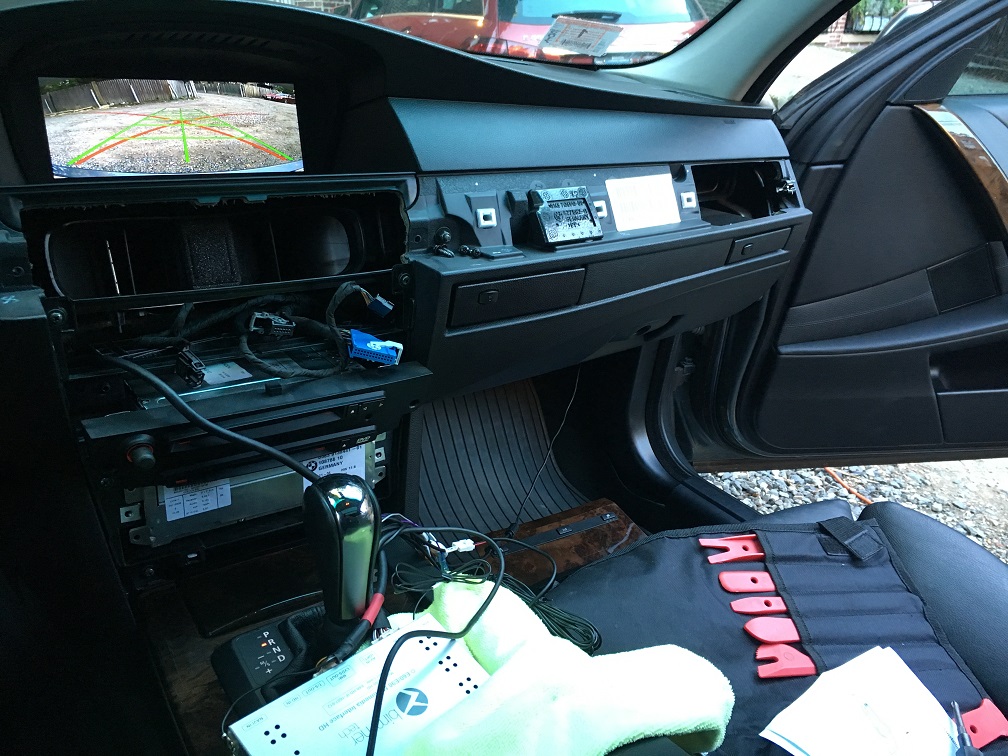
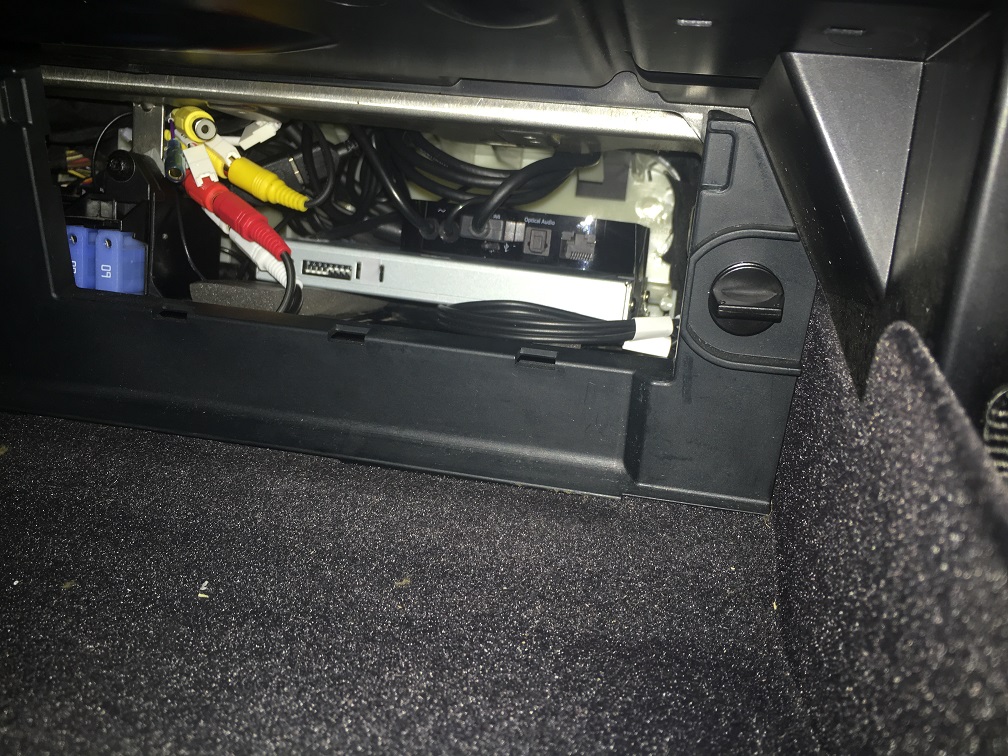
Don't do this! Initially, I took the front dash apart thinking that I would put the MMI unit and AppleTV somewhere behind the dash. It might be possible - although I dont think there is room behind the CCC unit. Then it occurred to me that there is big open spot behind the glovebox where the factory CD changer would typically go. If you don't have a CD changer or do have one but no longer use it (you won't need it after you install this kit), the spot behind the glovebox is PERFECT and is completely hidden. Read on...

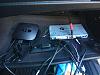
I started by laying the components in the glovebox to get everything set up properly and tested. You can see the LVDS cable with the red heat shrink tubing on it. This cable runs up behind the dash to the new screen. Once the old screen is out (remove the two small T10 screws and tip it forward), it's pretty easy to fish the cables. I started in the opening where the screen goes and fished the cable down to area behind the glovebox. At the same time, i also ran the IR receiver cable for the AppleTV. In this picture, you can see the black IR cable still twist-tied in front of the AppleTV. These are the only two wires you need to run behind the dash. I should note here that the new LVDS cable has a grounding eyelet on each end. There are screws on both the new screen and MMI box that you can screw it to.
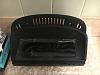
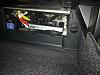
Now you can see the big open space behind the dash where the fuse panel is. There is a plastic trip piece at the back of the glovebox. You need to twist two screws and it can be removed. Check out that space back there!
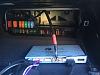
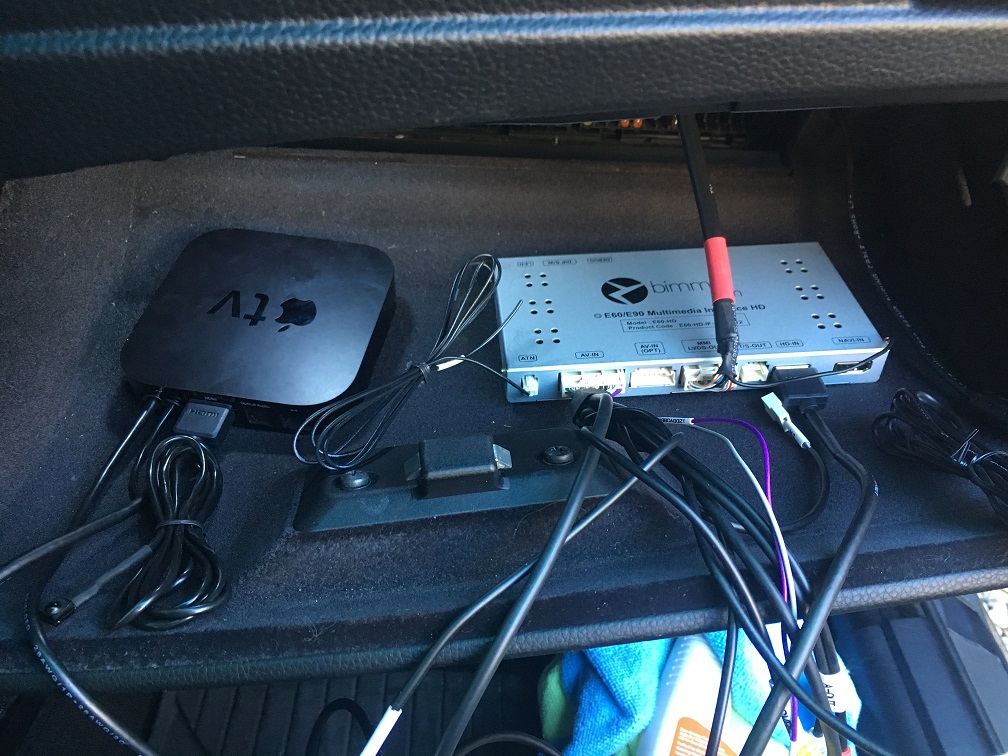
Now the MMI box is in its permanent home. It's not in this picture, but I put some foam table under the MMI unit to isolate it from the bumps while driving. I used that inexpensive foam tape that is used for insulating doors/windows. You can buy it at the home store for a few bucks a roll.
Now we're making progress! You can see the foam table under the MMI unit and now the AppleTV is installed as well. Plenty of room! The slack in the HDMI cable is coiled up at the top and the MMI box inputs are facing the front of the car. You can see why a 1' HDMI cable would work perfectly well.
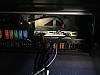
All of the wiring tucked up and away into the CD changer spot.
Plastic panel is put back in the back of the glovebox. You can pop out a small piece of the panel and can access the entire unit and all the inputs if you ever wanted/needed to change anything.
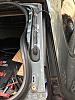
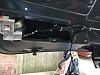
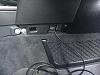
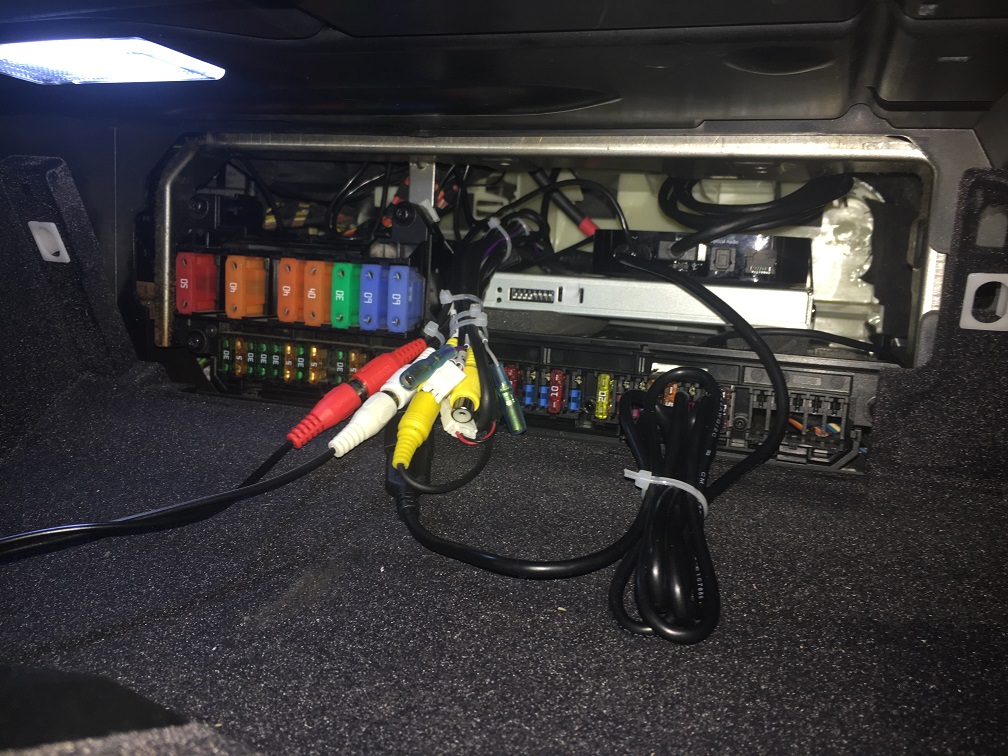
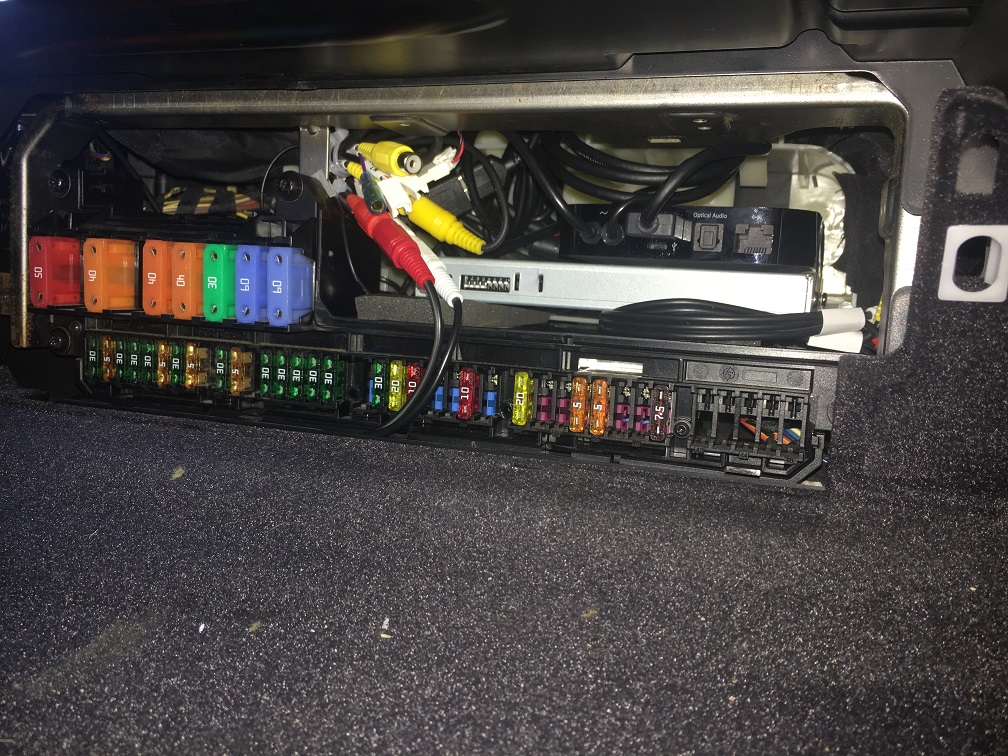
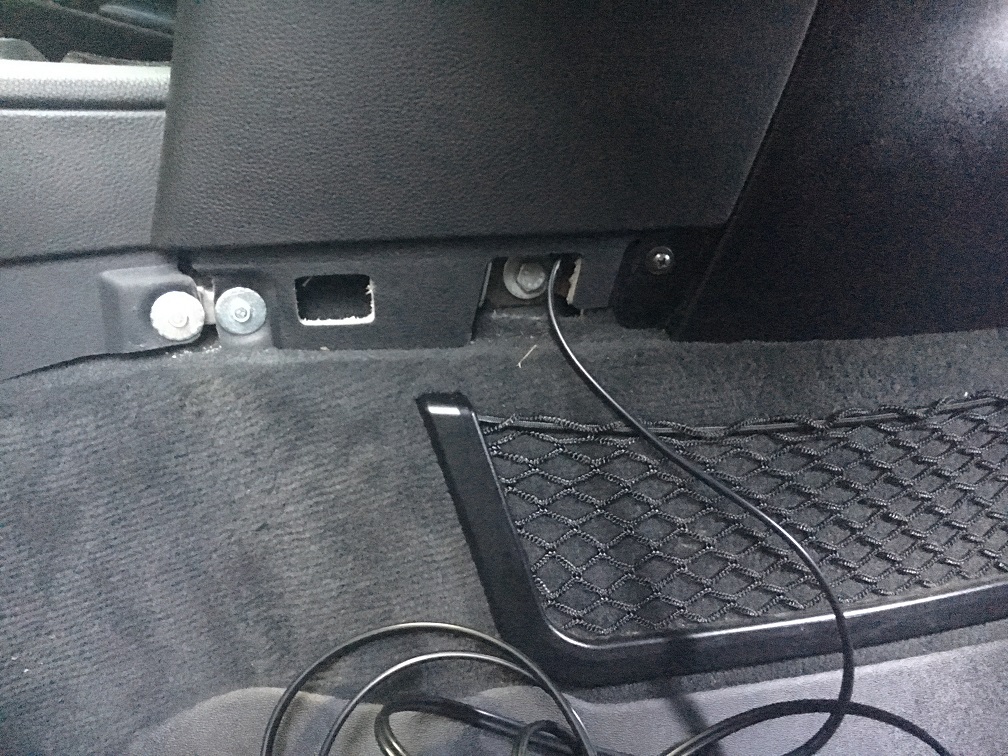
Last but not least, you have to run a cable from the MMI unit to your existing aux port. I ran this cable down behind the black plastic panel (at the top right in the picture) and behind the center console. In this picture, that long skinny carpet-covered piece of trim is removed and I'm running the cable to my aux port in the center console.
Don't do this! Initially, I took the front dash apart thinking that I would put the MMI unit and AppleTV somewhere behind the dash. It might be possible - although I dont think there is room behind the CCC unit. Then it occurred to me that there is big open spot behind the glovebox where the factory CD changer would typically go. If you don't have a CD changer or do have one but no longer use it (you won't need it after you install this kit), the spot behind the glovebox is PERFECT and is completely hidden. Read on...
I started by laying the components in the glovebox to get everything set up properly and tested. You can see the LVDS cable with the red heat shrink tubing on it. This cable runs up behind the dash to the new screen. Once the old screen is out (remove the two small T10 screws and tip it forward), it's pretty easy to fish the cables. I started in the opening where the screen goes and fished the cable down to area behind the glovebox. At the same time, i also ran the IR receiver cable for the AppleTV. In this picture, you can see the black IR cable still twist-tied in front of the AppleTV. These are the only two wires you need to run behind the dash. I should note here that the new LVDS cable has a grounding eyelet on each end. There are screws on both the new screen and MMI box that you can screw it to.
Now you can see the big open space behind the dash where the fuse panel is. There is a plastic trip piece at the back of the glovebox. You need to twist two screws and it can be removed. Check out that space back there!

Now the MMI box is in its permanent home. It's not in this picture, but I put some foam table under the MMI unit to isolate it from the bumps while driving. I used that inexpensive foam tape that is used for insulating doors/windows. You can buy it at the home store for a few bucks a roll.

Now we're making progress! You can see the foam table under the MMI unit and now the AppleTV is installed as well. Plenty of room! The slack in the HDMI cable is coiled up at the top and the MMI box inputs are facing the front of the car. You can see why a 1' HDMI cable would work perfectly well.
All of the wiring tucked up and away into the CD changer spot.
Plastic panel is put back in the back of the glovebox. You can pop out a small piece of the panel and can access the entire unit and all the inputs if you ever wanted/needed to change anything.
Last but not least, you have to run a cable from the MMI unit to your existing aux port. I ran this cable down behind the black plastic panel (at the top right in the picture) and behind the center console. In this picture, that long skinny carpet-covered piece of trim is removed and I'm running the cable to my aux port in the center console.
Last edited by BostonJon; 11-10-2016 at 07:27 PM.
11-10-2016, 06:01 PM
#5
New Members
Thread Starter
Join Date: Dec 2015
Location: Boston, MA
Posts: 367
Likes: 0
Received 4 Likes
on
4 Posts
My Ride: BMW 530xiT (E61)
Model Year: 2007
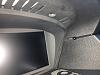
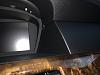
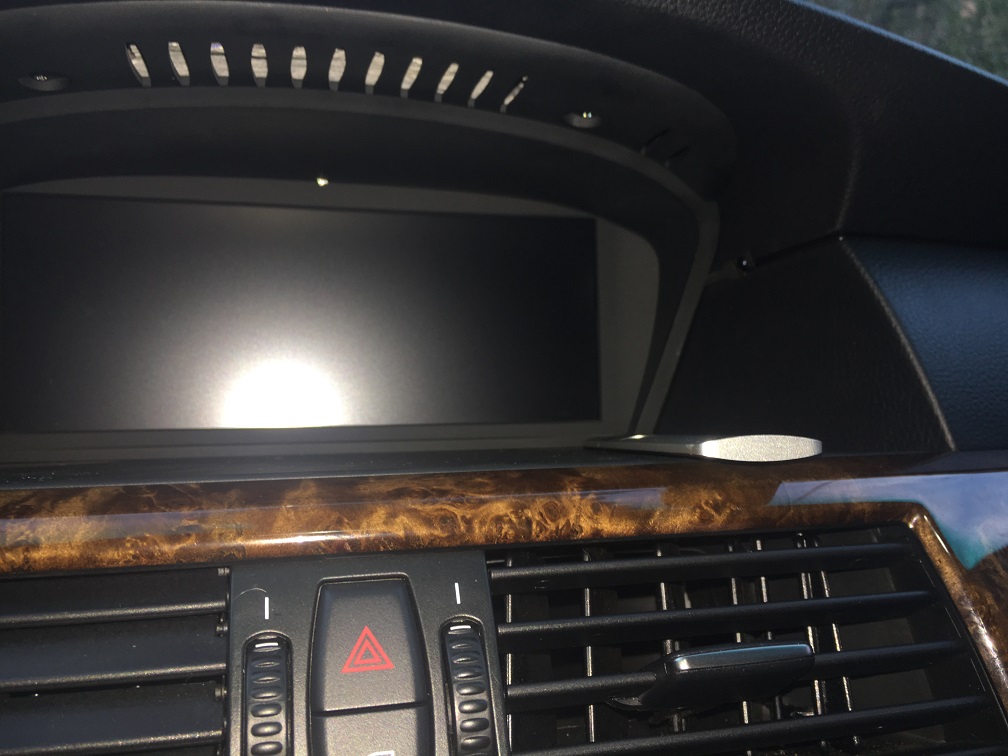
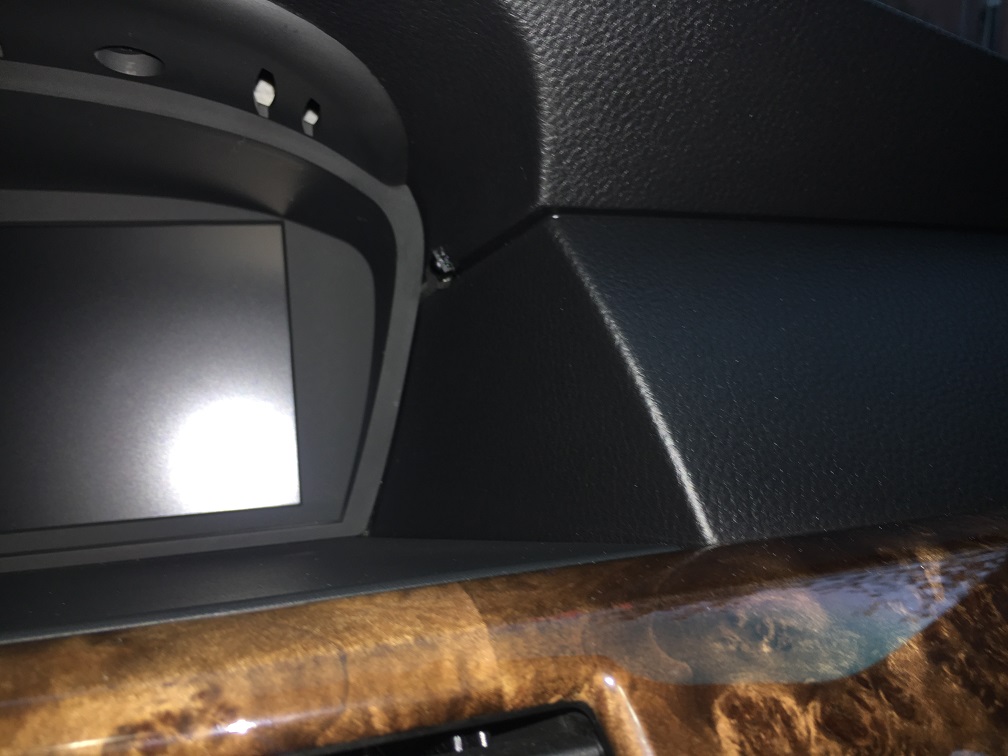
Here's a few pictures related to the new HD screen. The quality/resolution of the screen is amazing. It is vivid and crisp even on extremely sunny days which would have previously made the factory screen hard to read. The video review doesn't do it justice, but it's like having a mini HD TV in your car.
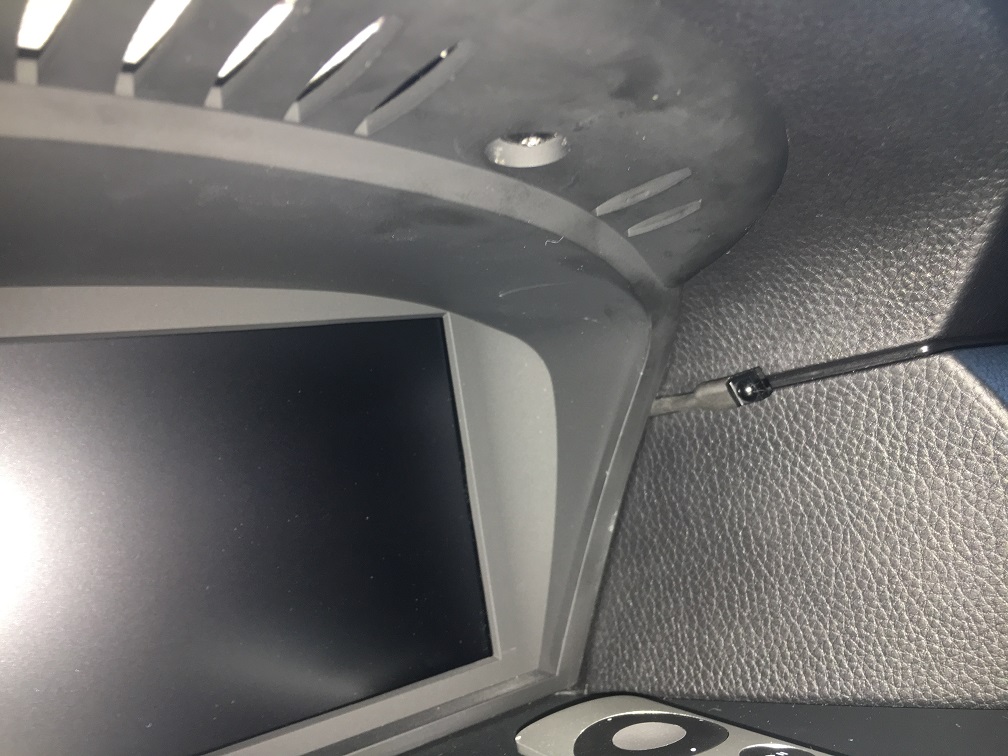
These three pictures give you an idea where i mounted the IR receiver. You can put it pretty much anywhere you want, but since i already had to run a cable from the MMI box to the new screen, this seemed like a good place for it. And it is barely noticeable unless your're looking for it. Again, I was trying to have an install that looked as factory as possible. Now the only giveaway that something special is going in is the AppleTV remote that I leave sitting on the little shelf by the screen.
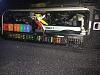
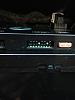
These are the DIP switches on the back of the screen. These will be set depending on what inputs you have installed and whether your original setup had had the MASK or NAV screen.
These three pictures give you an idea where i mounted the IR receiver. You can put it pretty much anywhere you want, but since i already had to run a cable from the MMI box to the new screen, this seemed like a good place for it. And it is barely noticeable unless your're looking for it. Again, I was trying to have an install that looked as factory as possible. Now the only giveaway that something special is going in is the AppleTV remote that I leave sitting on the little shelf by the screen.
These are the DIP switches on the back of the screen. These will be set depending on what inputs you have installed and whether your original setup had had the MASK or NAV screen.

Last edited by BostonJon; 11-10-2016 at 07:32 PM.
11-10-2016, 06:01 PM
#6
New Members
Thread Starter
Join Date: Dec 2015
Location: Boston, MA
Posts: 367
Likes: 0
Received 4 Likes
on
4 Posts
My Ride: BMW 530xiT (E61)
Model Year: 2007
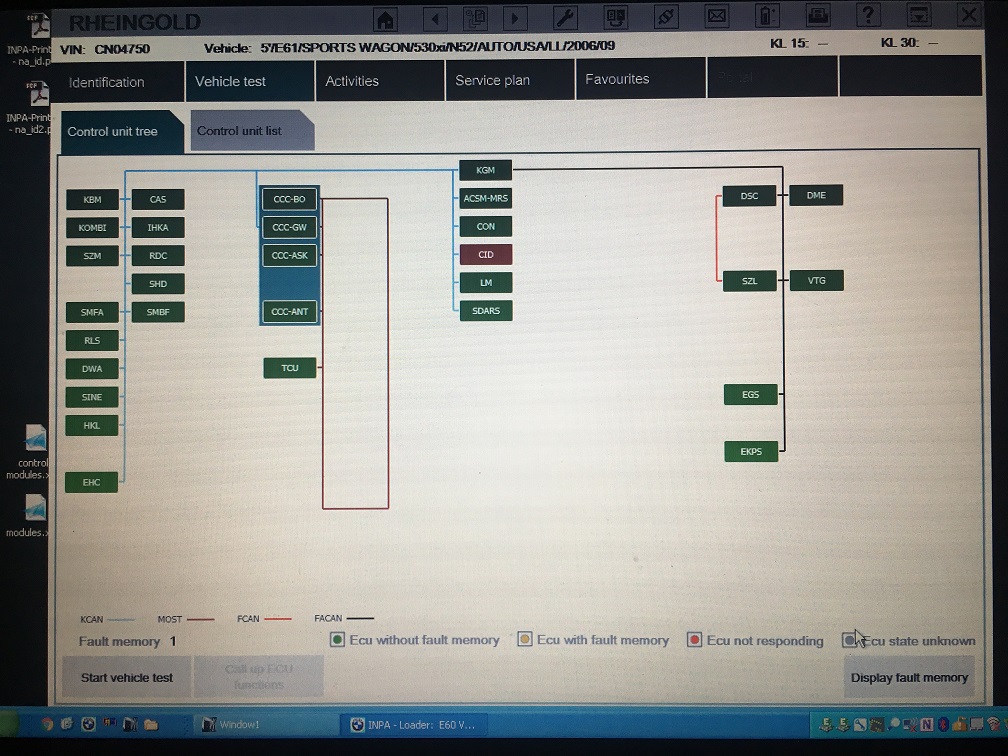
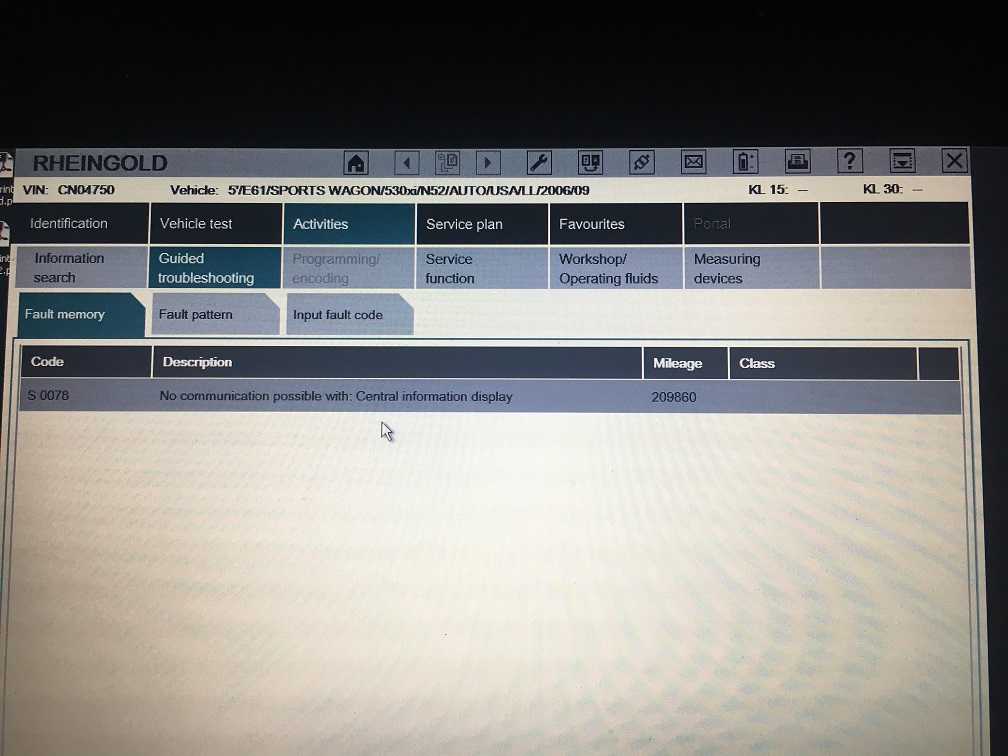
One final note for those of you that use ISTA.
Because you are replacing the factory screen, the car will obviously no longer recognize that module and won't be able to communicate with it. There are no warning messages on the iDrive screen, but you will have an error code if you pull the codes through ISTA/INPA. This is not a big deal at all and doesn't affect the factory functionality of the iDrive system, but just something I thought might be worth noting to you guys that have diagnostic software set up.


Because you are replacing the factory screen, the car will obviously no longer recognize that module and won't be able to communicate with it. There are no warning messages on the iDrive screen, but you will have an error code if you pull the codes through ISTA/INPA. This is not a big deal at all and doesn't affect the factory functionality of the iDrive system, but just something I thought might be worth noting to you guys that have diagnostic software set up.
Last edited by BostonJon; 11-10-2016 at 07:35 PM.
 11-11-2016, 02:40 AM
#8
Members
Senior Members
Join Date: May 2012
Location: Tampa Bay, FL
Posts: 2,539
Likes: 0
Received 10 Likes
on
6 Posts
My Ride: 530i
Model Year: 2004
Engine: M54
Thanks for posting this, am considering something like this for my CCC equipped car.
Also I like your choice in sirius stations
Also I like your choice in sirius stations
11-20-2016, 10:26 AM
#9
Members

Join Date: Dec 2008
Location: BAY AREA
Posts: 243
Likes: 0
Received 0 Likes
on
0 Posts
My Ride: E60
Model Year: 2006
I have the standard Bimmertech MMI module, front and rear camera and not HD. Do you think the replacing the factory screen 6.5 business with the high vivid screen will work with this. Thanks
11-20-2016, 02:01 PM
#10
Contributors
Join Date: May 2008
Location: San Antonio, TX
Posts: 5,895
Likes: 0
Received 0 Likes
on
0 Posts
My Ride: 04 525i, 04 Dinan M3
Wow this is awesome, might have to do this myself. You can have navigation show up directly from the phone on the big screen?