
Removing the swirl flaps in E39 M57 525dA

Thread Starter
Members
Joined: Nov 2010
Posts: 6
Likes: 0
From: Mogilev, Belarus
Hi guys! (Sorry for my english) 
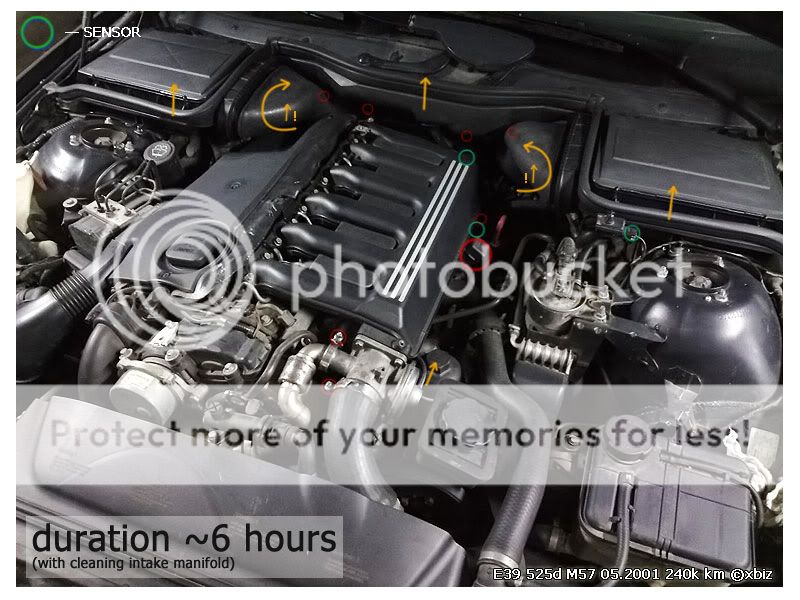
Present to you my photo report - removing the swirl flaps in E39 525dA M57 05.2001 mileage 240,000 km.
This is the second report on the forum about removing the swirl flaps in a diesel engine.
The first report here Removing the swirl flaps in a diesel engine (Author Anzafin)
All about everything takes about 5-7 hours of time.
Two hours of which need to clean the intake manifold.
Let's start ...
1.
Do not dwell on this point, because all this is described in the TIS.
Do not forget to disconnect the battery!
And be careful when renting air (there is a chance of breakage attachment).
2.
The first step is immediately close intake ports! For this I used a rag.
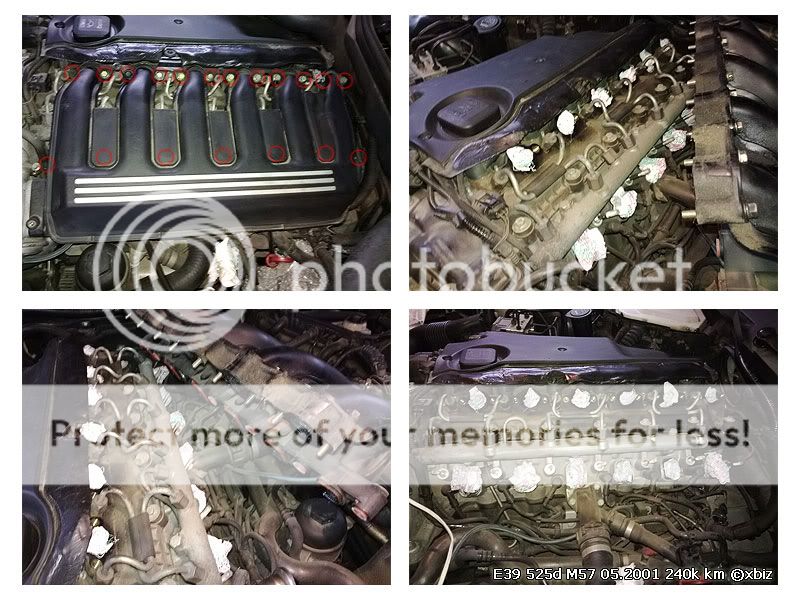
3.
Extract the rubber seals. Rectangular rubber seals were in perfect condition, but around the rubber seals would do well to replace the (small strain), but since I did not buy them in advance, had to put the old ones.

4.
Remove and clean valve EGR. The most convenient way to clean a toothbrush watering valve petrol to soften the plaque.
5.
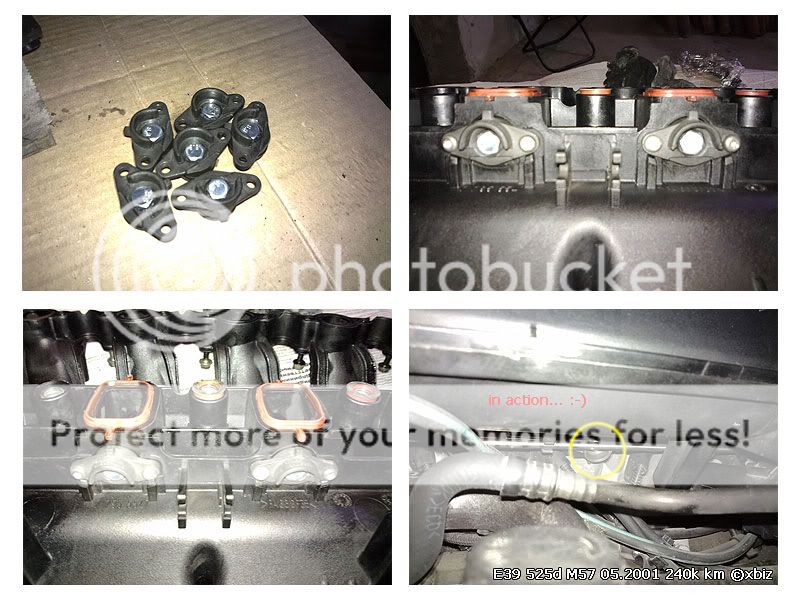
Unscrew torx bolts air pump housing bolts and torx swirl flaps.
Screwdriver to help get out the rod guides.
Pulling out of manifold body swirl flaps.
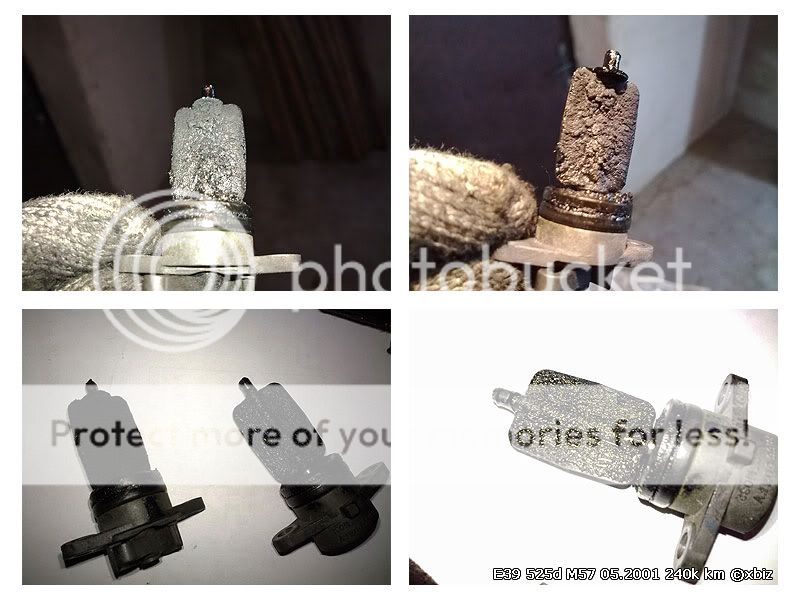
6.
That looks so impressive swirl flaps. Plaque is similar to clay.
Swirl flaps has a small gap (but I guess this is normal).
Assess the life expectancy of swirl flaps heavily, they may well hold fast to the axle.
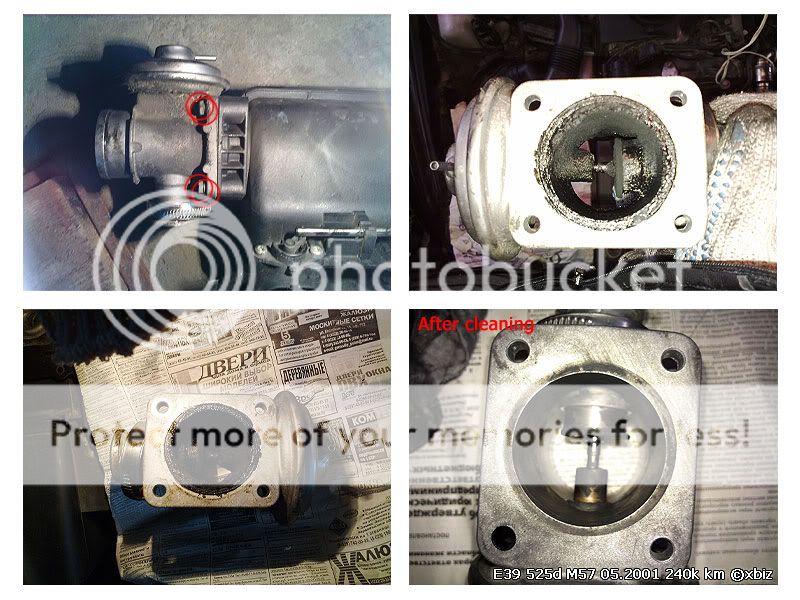
7.
Flick of the wrist, twist swirl flaps (they are very fragile ...)

Omit the body swirl flaps in petrol to clean the dirt.
8.
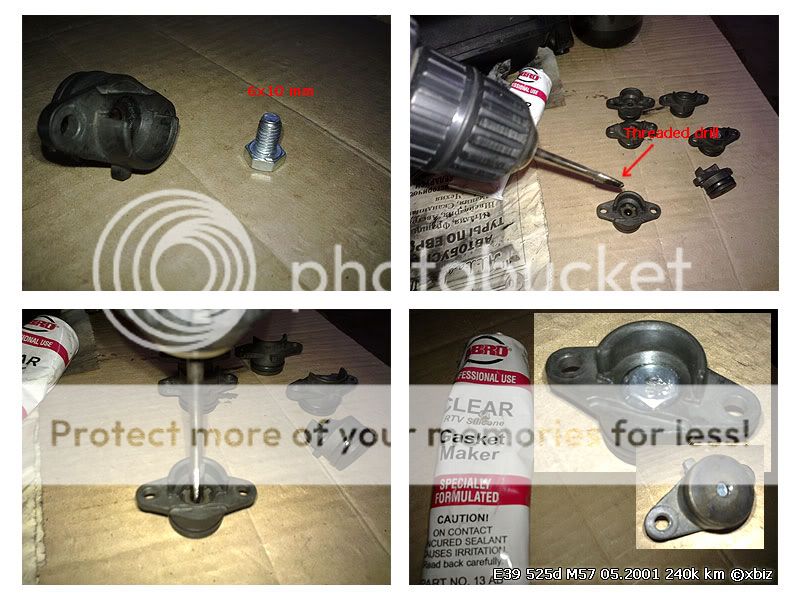
Now you need to close the hole where was the axle.
For this I used a bolt 6x10mm.
Pre-threaded, screw-bolt into the case.
To be safe, the bolt strike a silicone. I used a heat-resistant silicone.
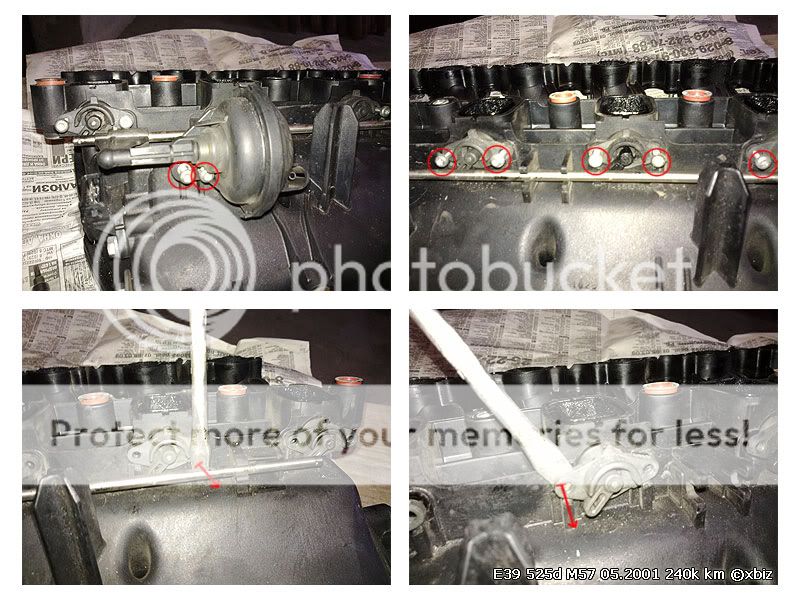
9.
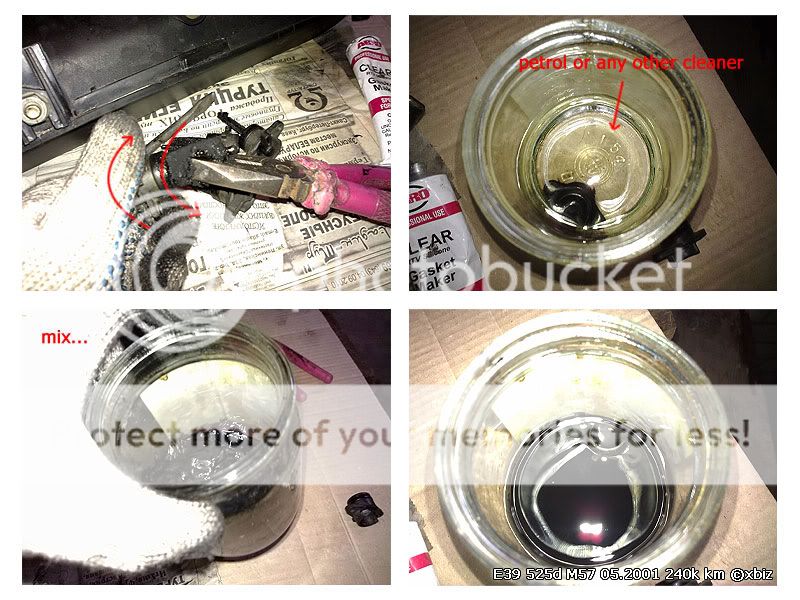
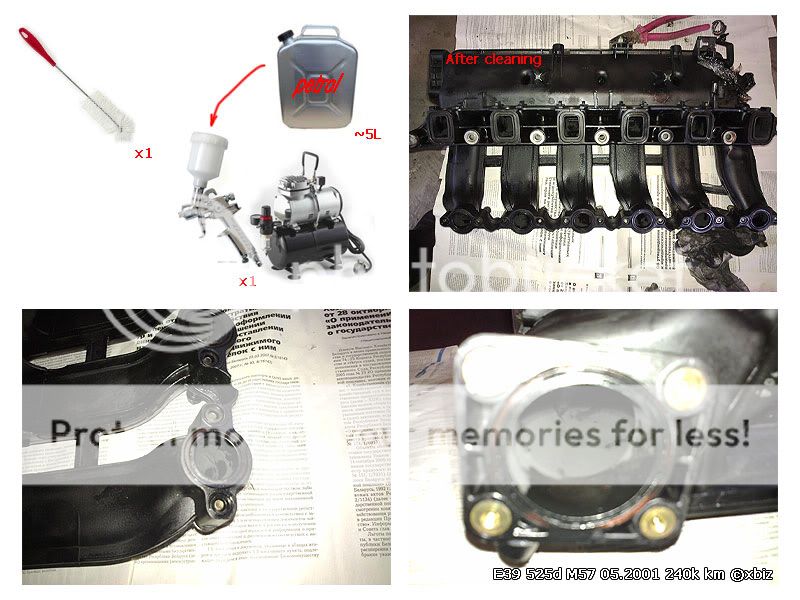
The most time-consuming operation - it is clean intake manifold (Warning: There will be a lot of dirt! Prepare a lot of rags.)
For cleaning job for us: brush plumbing, 5 liters of gasoline, and, ideally, an air compressor.
I filled in the intake manifold ~ 1 liter of gasoline, and began to clean the brushes plumbing every hole (at the beginning of the passage is difficult to brush until all this crap does not soften). At first it will seem that clear it is simply not realistic, but gradually you'll see the result.
Then poured gasoline, and fill it with fresh - repeat the procedure with cleaning brushes.
Further cleaning of gasoline by high pressure air compressor (very effectively !!!).
In conclusion, cleaning - washes in gasoline and purged.
10.
I left the rod set, he now works in the blank and nothing on impact.
Later in this topic, I will write what changes I noticed after removing the swirl flaps.
But I will say unequivocally, I am pleased that I did, and now I am calm, and no longer think about this issue.
I hope my guide useful to someone.
Present to you my photo report - removing the swirl flaps in E39 525dA M57 05.2001 mileage 240,000 km.
This is the second report on the forum about removing the swirl flaps in a diesel engine.
The first report here Removing the swirl flaps in a diesel engine (Author Anzafin)
All about everything takes about 5-7 hours of time.
Two hours of which need to clean the intake manifold.
Let's start ...
1.
Do not dwell on this point, because all this is described in the TIS.
Do not forget to disconnect the battery!
And be careful when renting air (there is a chance of breakage attachment).
2.
The first step is immediately close intake ports! For this I used a rag.
3.
Extract the rubber seals. Rectangular rubber seals were in perfect condition, but around the rubber seals would do well to replace the (small strain), but since I did not buy them in advance, had to put the old ones.
4.
Remove and clean valve EGR. The most convenient way to clean a toothbrush watering valve petrol to soften the plaque.
5.
Unscrew torx bolts air pump housing bolts and torx swirl flaps.
Screwdriver to help get out the rod guides.
Pulling out of manifold body swirl flaps.
6.
That looks so impressive swirl flaps.
Plaque is similar to clay. Swirl flaps has a small gap (but I guess this is normal).
Assess the life expectancy of swirl flaps heavily, they may well hold fast to the axle.
7.
Flick of the wrist, twist swirl flaps (they are very fragile ...)
Omit the body swirl flaps in petrol to clean the dirt.
8.
Now you need to close the hole where was the axle.
For this I used a bolt 6x10mm.
Pre-threaded, screw-bolt into the case.
To be safe, the bolt strike a silicone. I used a heat-resistant silicone.
9.
The most time-consuming operation - it is clean intake manifold (Warning: There will be a lot of dirt!
Prepare a lot of rags.)For cleaning job for us: brush plumbing, 5 liters of gasoline, and, ideally, an air compressor.
I filled in the intake manifold ~ 1 liter of gasoline, and began to clean the brushes plumbing every hole (at the beginning of the passage is difficult to brush until all this crap does not soften). At first it will seem that clear it is simply not realistic, but gradually you'll see the result.
Then poured gasoline, and fill it with fresh - repeat the procedure with cleaning brushes.
Further cleaning of gasoline by high pressure air compressor (very effectively !!!).
In conclusion, cleaning - washes in gasoline and purged.
10.
I left the rod set, he now works in the blank and nothing on impact.
Later in this topic, I will write what changes I noticed after removing the swirl flaps.
But I will say unequivocally, I am pleased that I did, and now I am calm, and no longer think about this issue.
I hope my guide useful to someone.

Members
Joined: Mar 2010
Posts: 153
Likes: 0
From: Holland
I know i probably won't build up enough pressure to move it. But when i try it i just suck/blow right through it. the air comes out/in the little hole in the round unit. Should this happen or is it broken?

New Members
Joined: Jul 2012
Posts: 1
Likes: 0
From: Gävle, Sweden
My Ride: 02 530dAT M-sport Individual LeMans-blue
Old thread, ai know, but....
Removed the flaps yesterday in my 530dA 02' at 297k km!! They have had to changed at some point earlier cause they where in perfect condition! But now they're gone. It took about 2,5 hours (including the time for the silicone gasket on the screws to cure.....). But I have to admit......I cheated....never cleaned the EGR-valve or the intake manifold, yes I know, I'm a bad person!! :$
The car runs smoother at idle but otherwise I didn't notice any power loss or power gained.Haven't driven enough for an accurate fuelconsumption. Just glad a potential threat is gone!
//David

New Members
Joined: Nov 2012
Posts: 1
Likes: 0
I've also removed the flaps on my 525dA '01 at 280k. My engine had already eaten a flap costing me some valves and a valve seat job a year ago. After the incident I decided to simply brake off all remaining flaps.
Now, reading this post and some others I see people install some form of plug (screws or even special made blanking pieces). I never installed any plug, just left the remaining of the flap axle in there after braking of the flaps "in-situ".
Do you believe there is a danger of that being thrown out by turbo pressure? Does the op or anybody else who did this mod remember if there was anything (screw?) keeping the the remaining of the axle in after braking off the plate? If not, I gues i should dismantle again and put in some screws ...
Thanks in advance for any insight on this matter.

Thread
Thread Starter
Forum
Replies
Last Post
ucsbwsr
E60, E61 Parts, Accessories and Mods
26
Feb 26, 2025 08:22 AM
umichchris
Private Member Classifieds
13
Dec 10, 2015 01:00 PM
PelicanParts.com
Vendor Classifieds
0
Jul 9, 2015 01:07 PM