M5 front fender swap - DIY
 10-31-2011, 03:23 PM
#1
Contributors
Thread Starter
Join Date: Apr 2007
Location: Kajaani, Finland
Posts: 5,851
Likes: 0
Received 3 Likes
on
3 Posts
My Ride: Bmw 530d 2004
This is a DIY guide to swap OEM M5 front fenders (+inner wheel housings) into a non-M5 E60 equipped with OEM MTech front bumper.
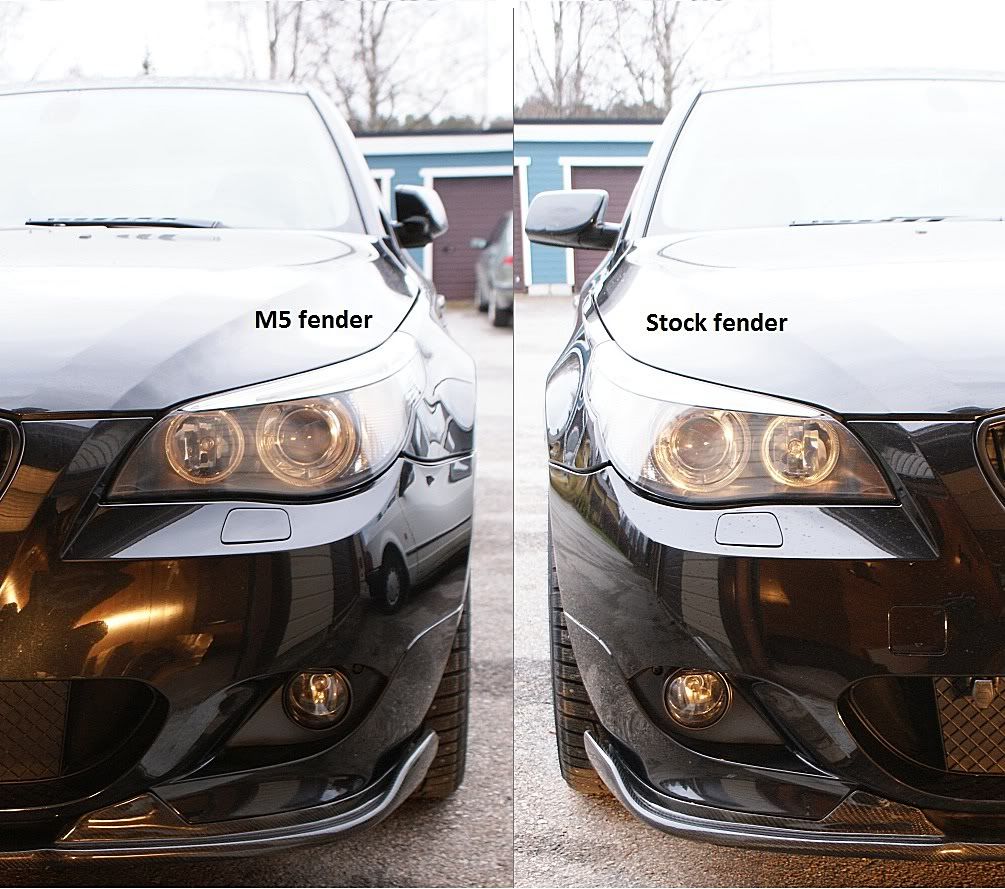
Ok, everyone knows E60 M5 front fenders are wider and more spacious than fenders in a non-M5 E60. Along the bigger wheel well, the M5 can be fitted with bigger wheels and/or tyres easier without rubbing problems.
The front bumper of the M5 is also different to non-M5's MTech bumper. It looks a bit different in front, and both corners are a bit different compared to an MTech. However, I wanted to skip buying an OEM M5 bumper to save costs, and decided to fit and mod the MTech bumper with the new fenders.
Sure you can follow this guide if you wanted the OEM M5 front bumper as well, but swapping the front bumper isn't covered here. I also think you could follow this guide to install M5 fenders with the stock bumper too!
So, I used OEM parts (except the side grilles). I don't know how this all would work with aftermarket parts, possibly ok, but I'm not sure.
I'm definitely not the first one who has done this. I got some tips from member ivan545, who had done this before with his car .
.
---------------------------------------------------------------------
The parts list
You will need the aluminium fenders, inner wheel housings, side grilles and few expanding rivets (because you're probably going to break these ). Nothing more, as you can salvage the needed clips, body nuts and screws from your old fenders.
Fenders (part #1 in pic):
- left 41357898315
- right 41357898316
Wheel housings (part #17 in pic):
- left 51717896839
- right 51717896839
Expanding rivets (part #22 in a little box in the pic):
- 6 x 51161881149

OEM side grilles (note that I used aftermarket):
- left 51137896849
- right 51137896850
---------------------------------------------------------------------
DIY guide
The DIY guide consists of these parts:
A) Removing the inner wheel housing
 Removing the front fender
C) Installing the M5 front fender
D) Installing the M5 inner wheel housing
Before everything, you need to lift the nose of the car up (one side at a time is enough) and remove the wheel. Remember to secure the lifted car body if using only a jack!
Oh, sorry about the DIRTY car in pics!
-----------------------------------------
A) Removing the inner wheel housing
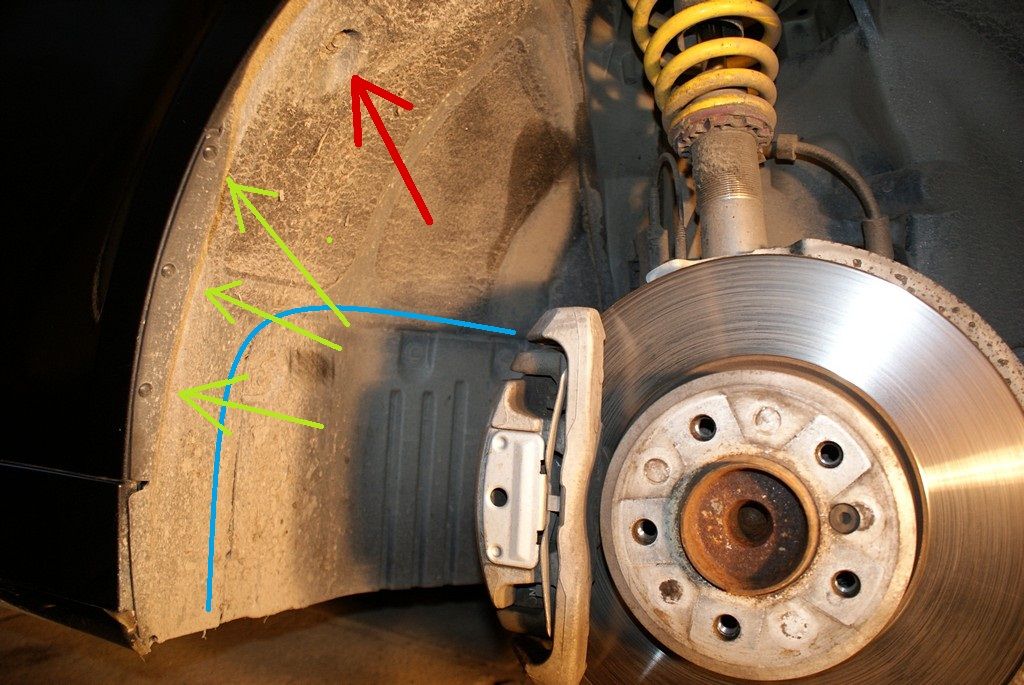
The inner wheel housing is held in its position with numerous screws and few rivets. You will find them all only by looking at the housing, but here's a pic from TIS showing them:

Few notes. In this pic the red arrow indicates a typical screw holding the housing, green arrows show the rivets that you will possibly break, and the blue line indicates a separate part that you can remove as well, because the M5 wheel well housing is in one piece and covers this area. This separate flap locates only on the right side of the car.
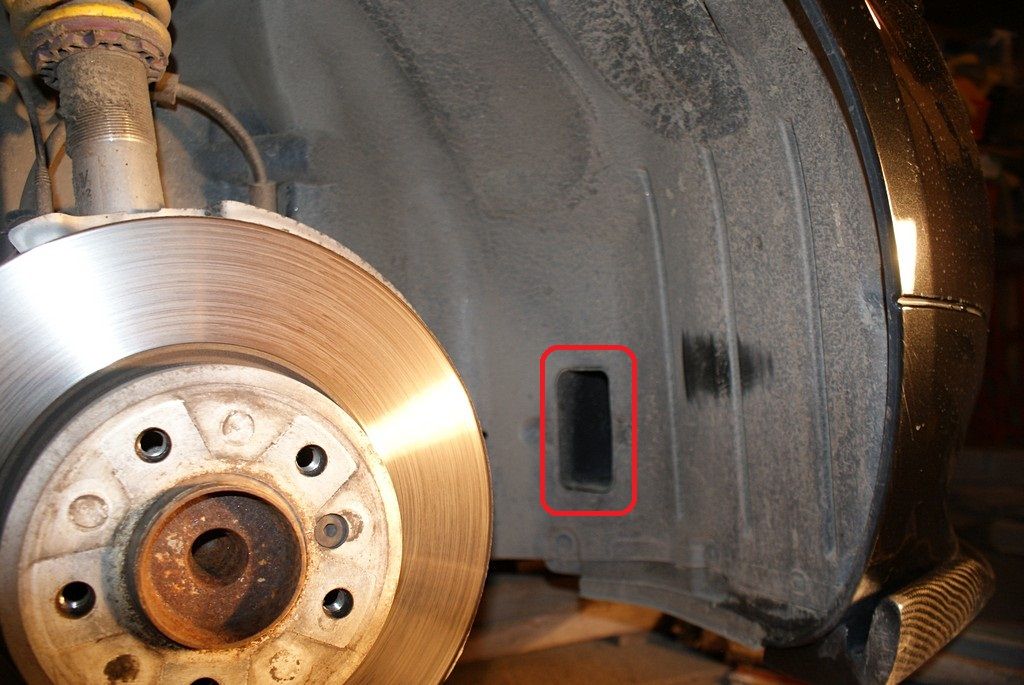
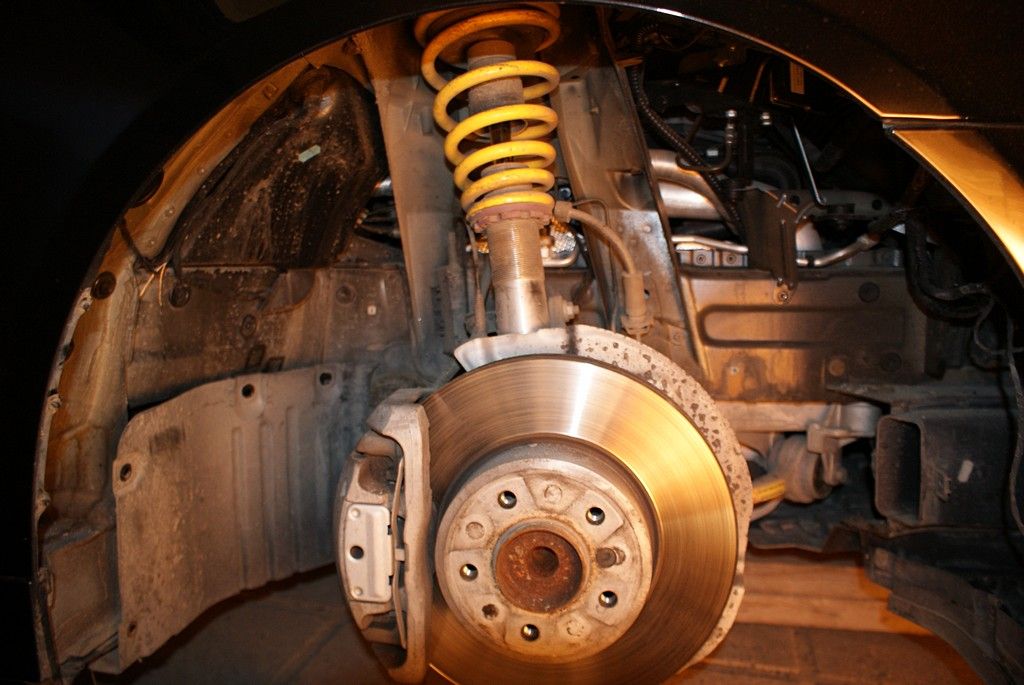
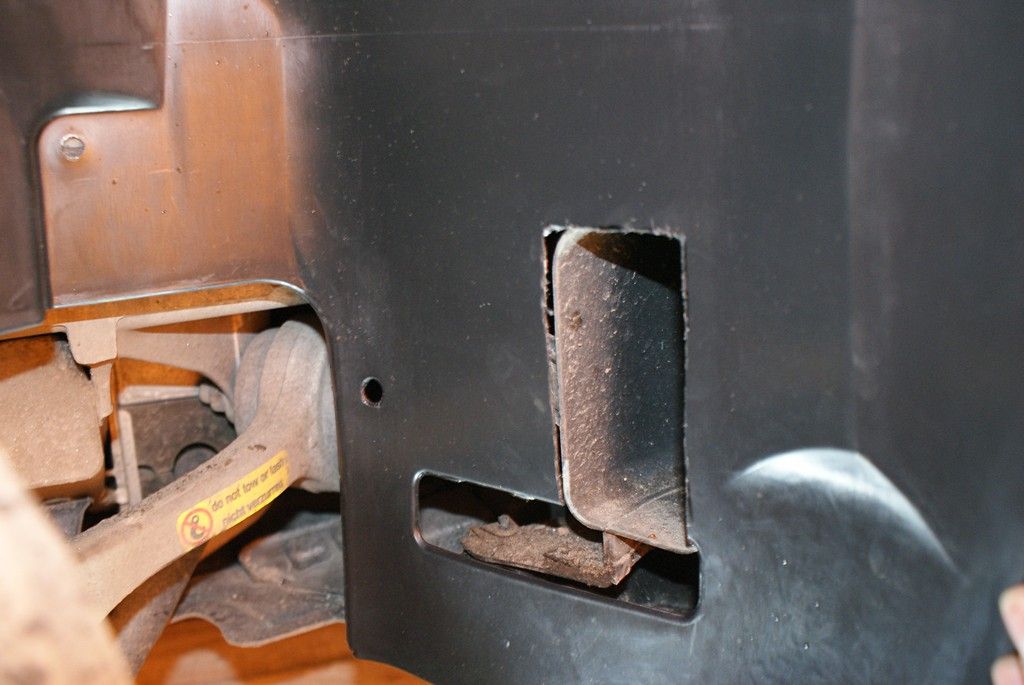
Here you can see a ventilation hole for the brakes. This area is different in the M5 wheel housing, because the ventilation hole and tube are different in M5 front bumper. We'll get to this later.
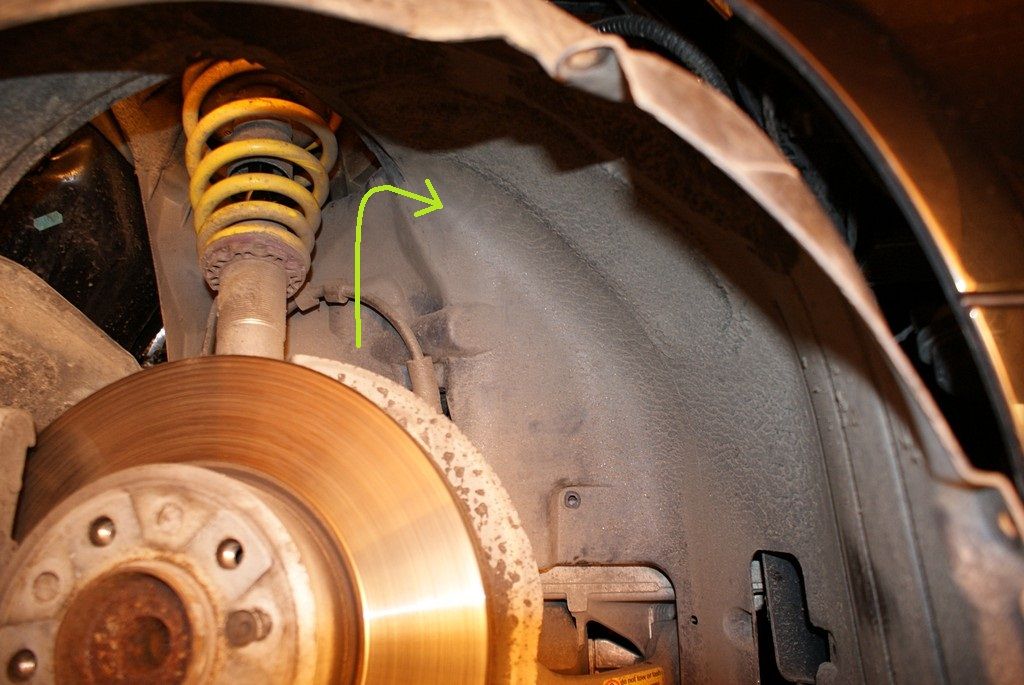
After you have removed all the screws and rivets holding the housing, you have to thread it out. I can promise this is annoying.
The housing is shaped like the letter U upside down. At first you have to lift it up to get it over the ABS sensors and break tubes, and the turn it towards the nose of the car and the down. You'll figure it out, I'm sure. Did I say this is annoying?
Goes of like this...
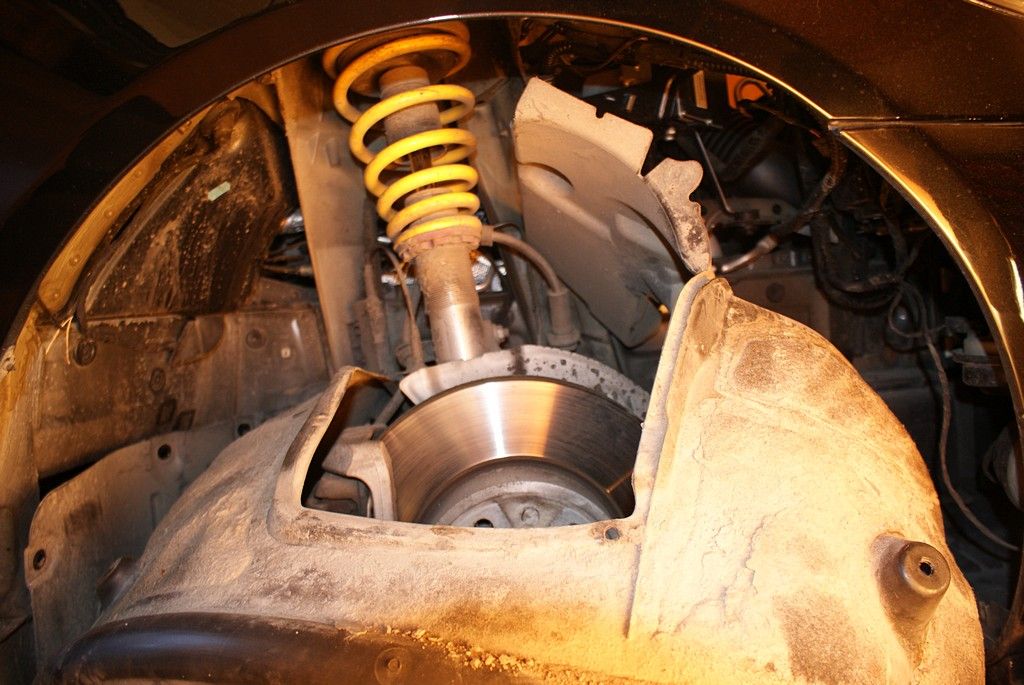
Leaving you to this.
Ok, everyone knows E60 M5 front fenders are wider and more spacious than fenders in a non-M5 E60. Along the bigger wheel well, the M5 can be fitted with bigger wheels and/or tyres easier without rubbing problems.
The front bumper of the M5 is also different to non-M5's MTech bumper. It looks a bit different in front, and both corners are a bit different compared to an MTech. However, I wanted to skip buying an OEM M5 bumper to save costs, and decided to fit and mod the MTech bumper with the new fenders.
Sure you can follow this guide if you wanted the OEM M5 front bumper as well, but swapping the front bumper isn't covered here. I also think you could follow this guide to install M5 fenders with the stock bumper too!
So, I used OEM parts (except the side grilles). I don't know how this all would work with aftermarket parts, possibly ok, but I'm not sure.
I'm definitely not the first one who has done this. I got some tips from member ivan545, who had done this before with his car
.---------------------------------------------------------------------
The parts list
You will need the aluminium fenders, inner wheel housings, side grilles and few expanding rivets (because you're probably going to break these
). Nothing more, as you can salvage the needed clips, body nuts and screws from your old fenders.Fenders (part #1 in pic):
- left 41357898315
- right 41357898316
Wheel housings (part #17 in pic):
- left 51717896839
- right 51717896839
Expanding rivets (part #22 in a little box in the pic):
- 6 x 51161881149
OEM side grilles (note that I used aftermarket):
- left 51137896849
- right 51137896850
---------------------------------------------------------------------
DIY guide
The DIY guide consists of these parts:
A) Removing the inner wheel housing
Removing the front fenderC) Installing the M5 front fender
D) Installing the M5 inner wheel housing
Before everything, you need to lift the nose of the car up (one side at a time is enough) and remove the wheel. Remember to secure the lifted car body if using only a jack!
Oh, sorry about the DIRTY car in pics!
-----------------------------------------
A) Removing the inner wheel housing
The inner wheel housing is held in its position with numerous screws and few rivets. You will find them all only by looking at the housing, but here's a pic from TIS showing them:
Few notes. In this pic the red arrow indicates a typical screw holding the housing, green arrows show the rivets that you will possibly break, and the blue line indicates a separate part that you can remove as well, because the M5 wheel well housing is in one piece and covers this area. This separate flap locates only on the right side of the car.
Here you can see a ventilation hole for the brakes. This area is different in the M5 wheel housing, because the ventilation hole and tube are different in M5 front bumper. We'll get to this later.
After you have removed all the screws and rivets holding the housing, you have to thread it out. I can promise this is annoying.
The housing is shaped like the letter U upside down. At first you have to lift it up to get it over the ABS sensors and break tubes, and the turn it towards the nose of the car and the down. You'll figure it out, I'm sure. Did I say this is annoying
?Goes of like this...
Leaving you to this.
 10-31-2011, 03:29 PM
#2
Contributors
Thread Starter
Join Date: Apr 2007
Location: Kajaani, Finland
Posts: 5,851
Likes: 0
Received 3 Likes
on
3 Posts
My Ride: Bmw 530d 2004
Removing the front fenderThis TIS pic shows the locations of the screws and nuts holding the front fender.

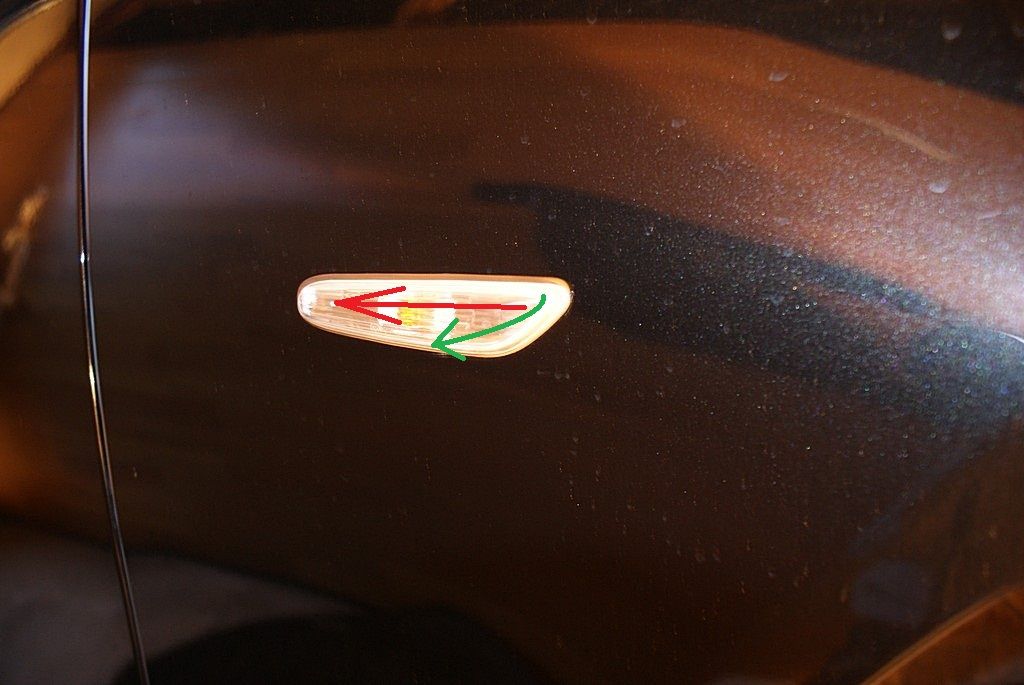
Start by removing the side blinker. At first slide it backwards (red arrow) and then lift the front end out (green arrow).
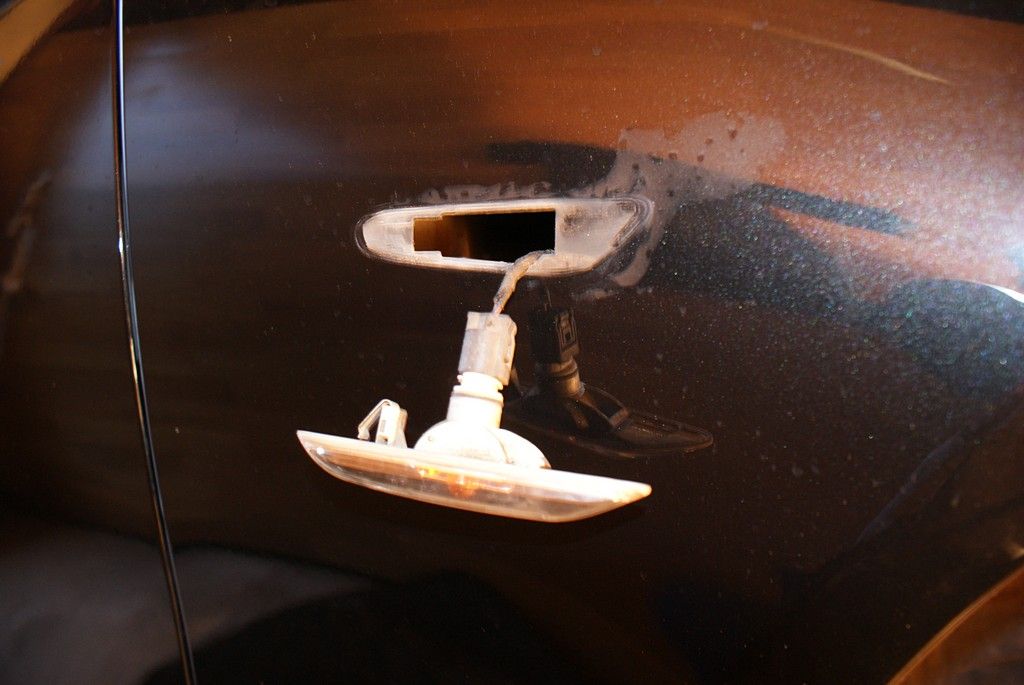
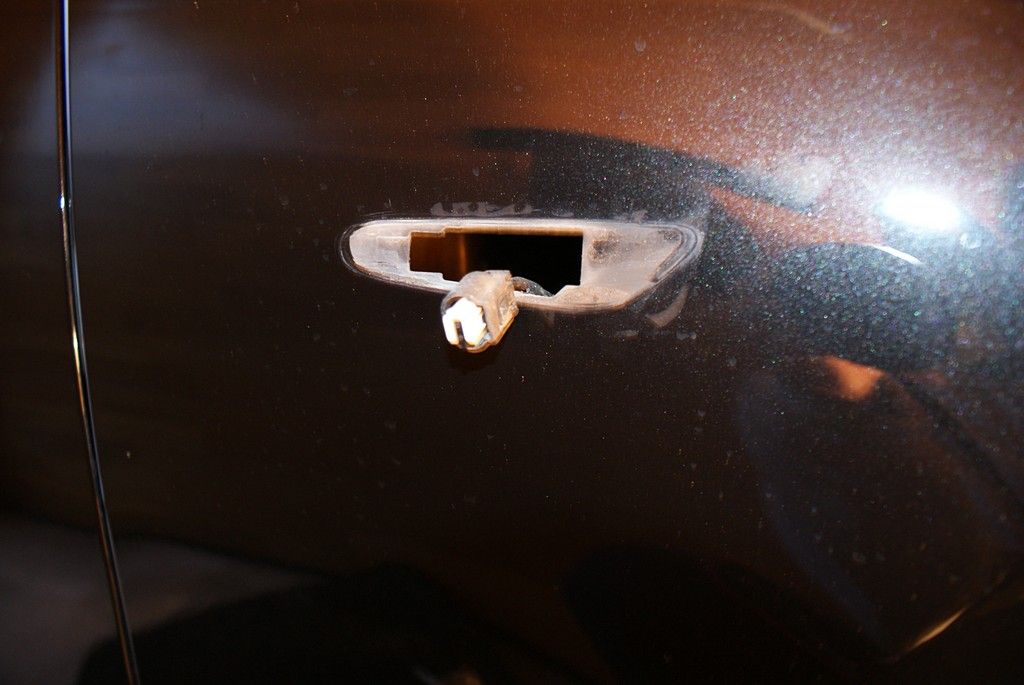
Detach the blinker by pressing the clip in a plug.
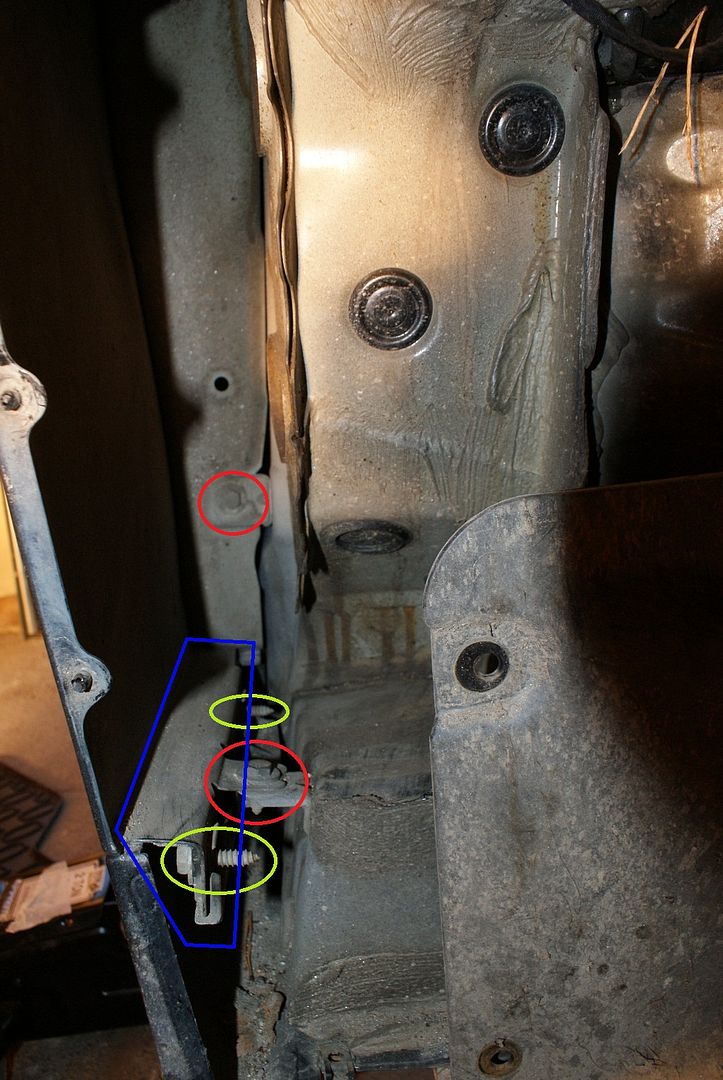
The lower section attaching points:
Ok, then you can start removing the screws and stuff. This pic shows the lowest corner of the front fender. The two screws (red) are the only screws that are attaching the front fender to the cars body in this section, but the plastic holder (blue) connects to the front end of the side skirt and you have to pull the front end of the skirt out to remove the fender. The two screws (green) are the screws that hold the plastic holder in the fender. You don't have to remove those screws and the holder at this point, though. So, remove the screws indicated in red.
Then, remove few of the first plastic screws under the sideskirt to be able to pull the front end of the skirt out. I removed 4 of them (the third in the pic locates behind the lifting point).
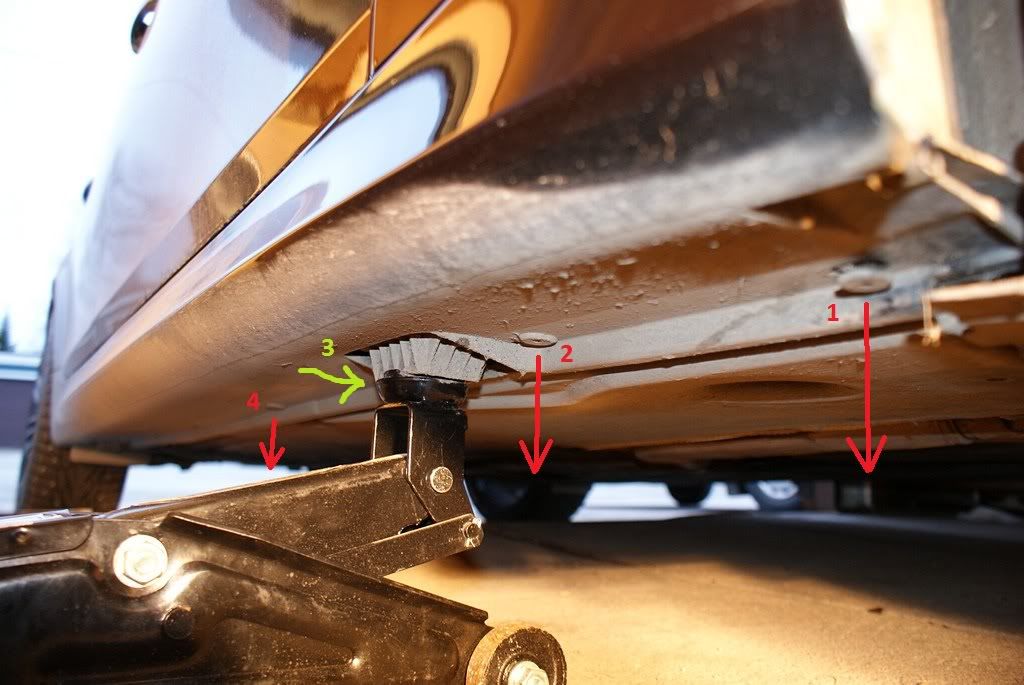
Then, pull the front end of the sideskirt out. You may have to use some force here.
After this the sideskirt isn't preventing the fender being lifted up.
Front corner attaching points:
Next, let's take a look at the front corner, where a complicated method is used to tie the bumper, fender and the car body together.
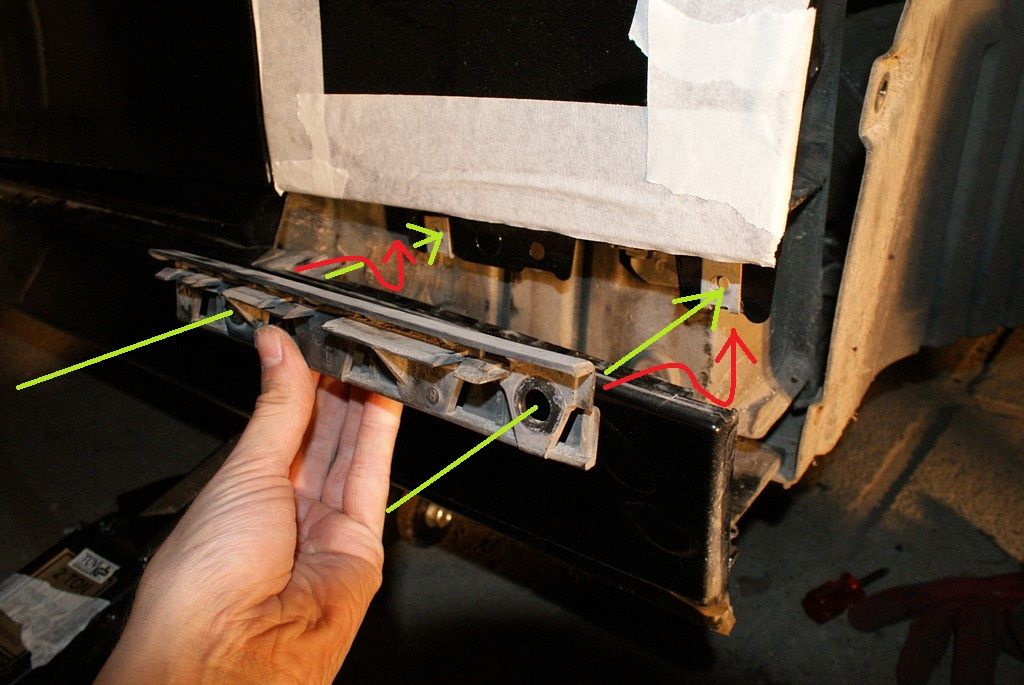
There are two screws again (reds) that are holding the fender itself in the car body. The two screws (green) attach the plastic holder (blue) in to the fender. The plastic holder keeps the bumper and the fender together. The corner of the front bumper is being held in the plastic holder with three clips. This is the area where you have to play a little later when mounting the M5 fenders. At this point, remove all four screws (reds and greens).
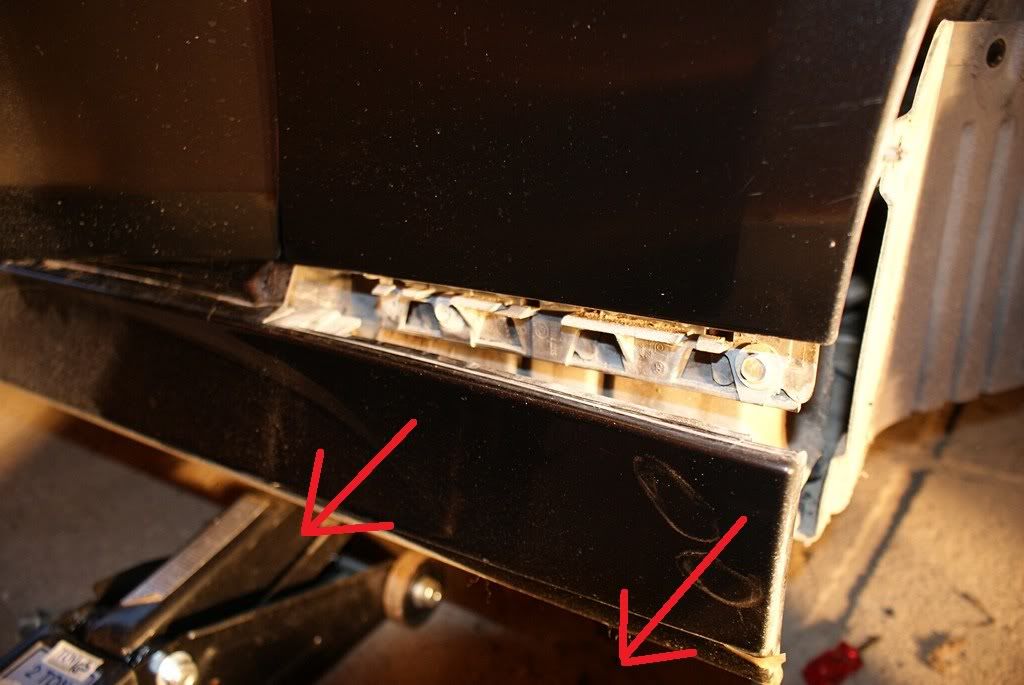
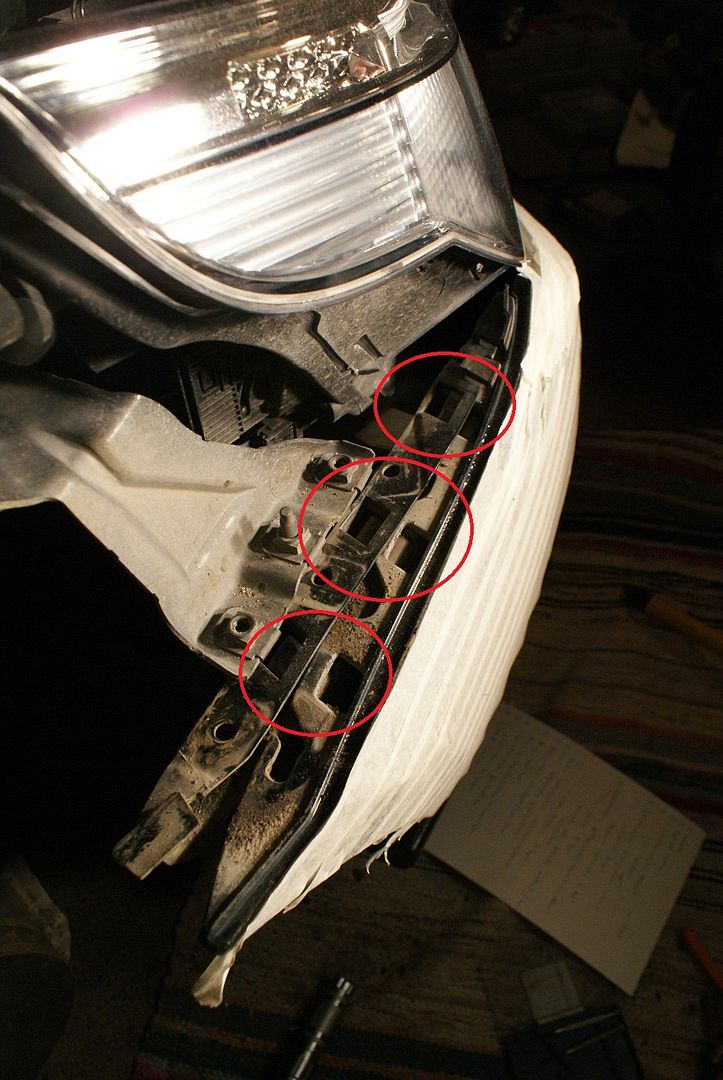
Here you can see the plastic holder being removed from the front bumper. The three clips (reds) are clearly visible.
 10-31-2011, 03:31 PM
#3
Contributors
Thread Starter
Join Date: Apr 2007
Location: Kajaani, Finland
Posts: 5,851
Likes: 0
Received 3 Likes
on
3 Posts
My Ride: Bmw 530d 2004
Top edge attaching points:
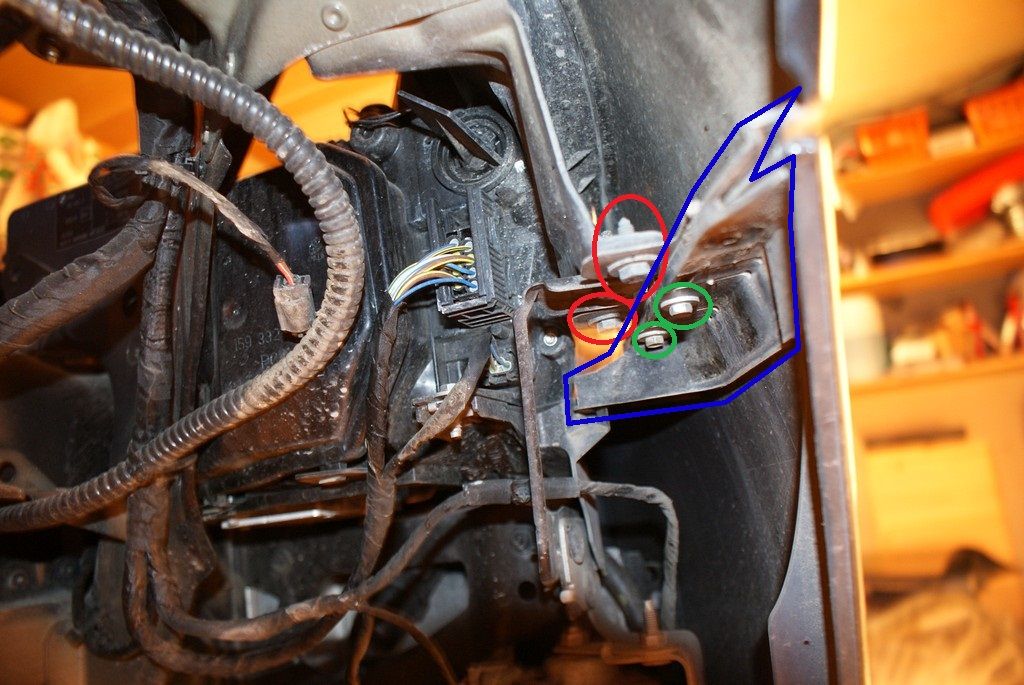
Now, the easiest part of removing the front fender. Start with removing the rubber seal (red) by simply lifting it up. You have to remove the upper flap (blue) as well.
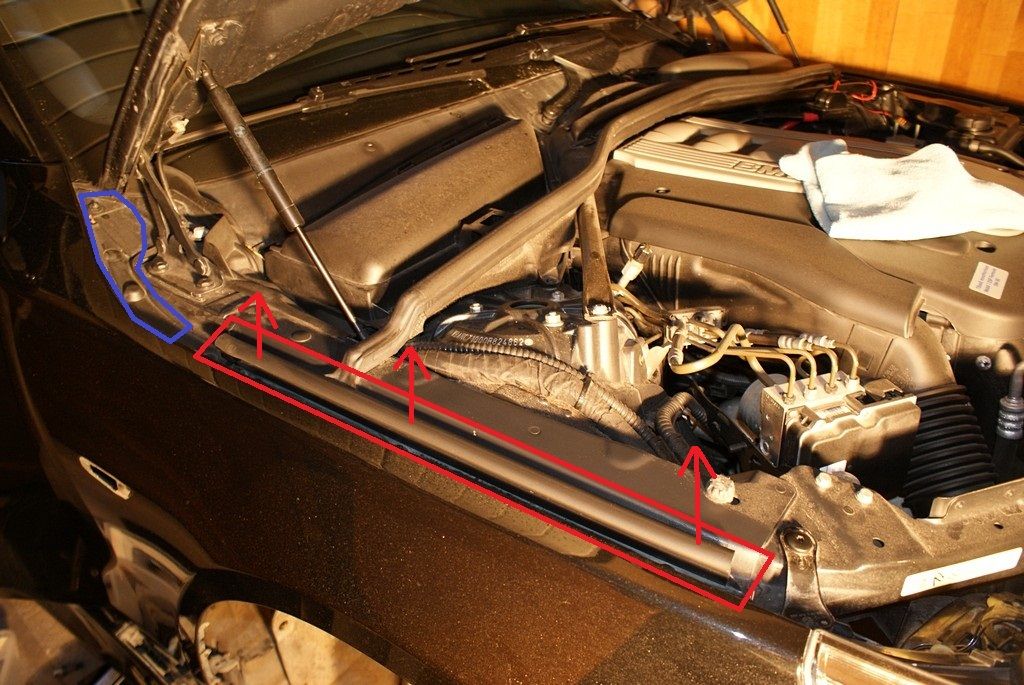
To remove the flap, you have to gently remove the expanding rivets (greens). It may be a bit tricky. After the flap is gone, there's a nut under the bulb (the other blue circle) that you have to remove. The other blue circle in the back indicates another nut that has to be removed (actually there are one on top of the other).
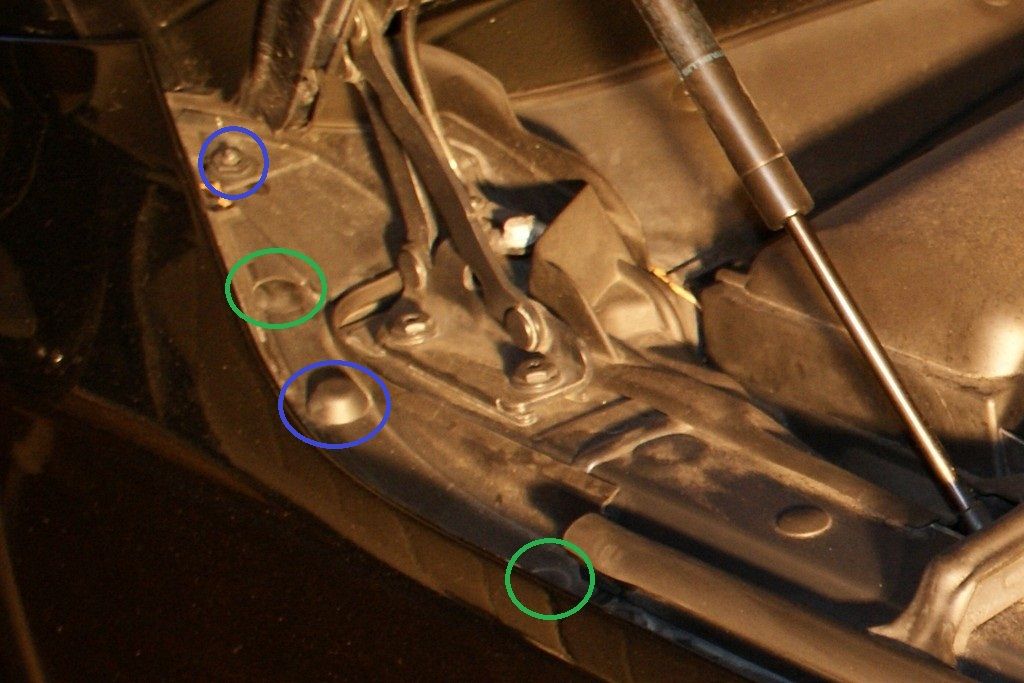
There are three screws (reds) under the rubber seal that you just removed. Remove them.
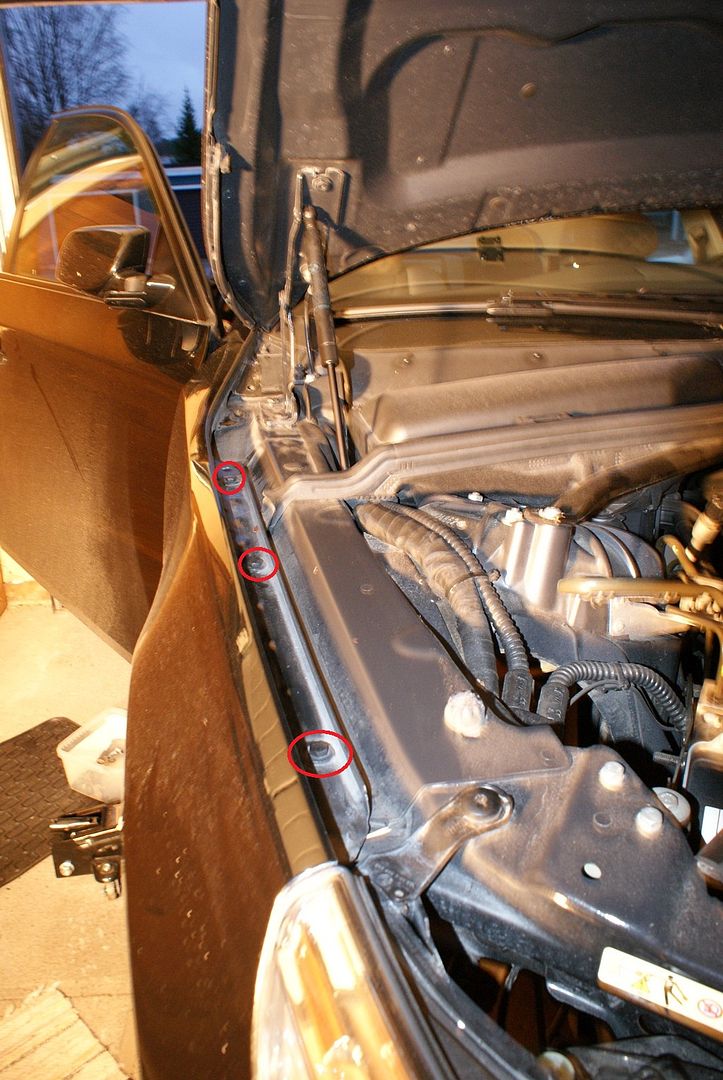
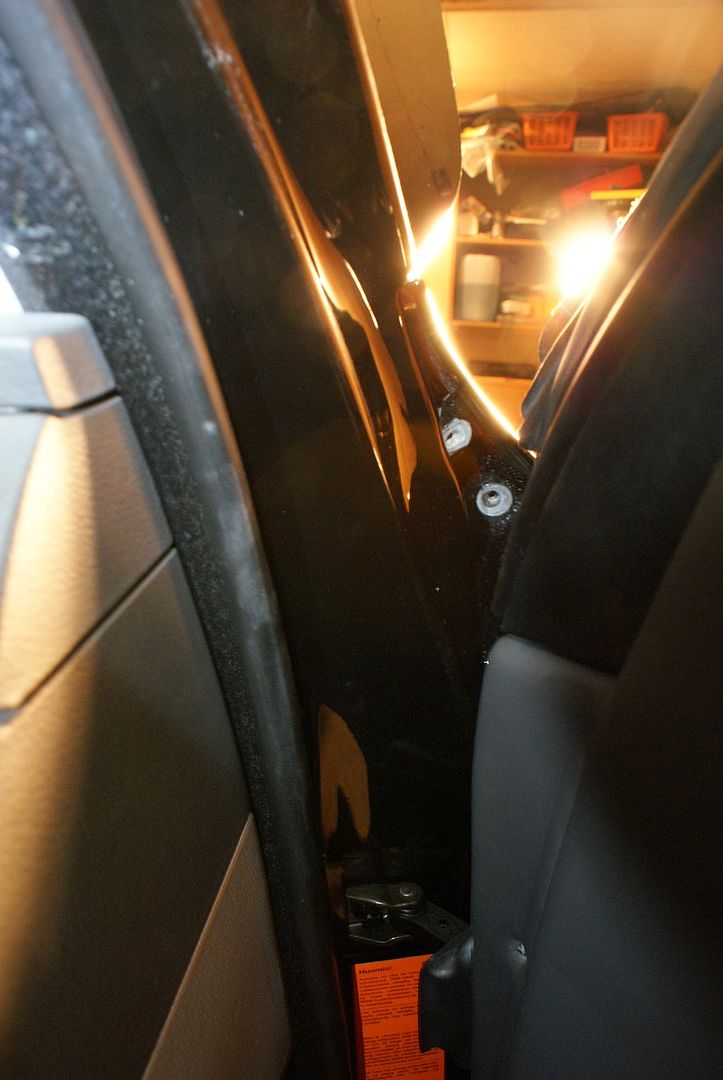
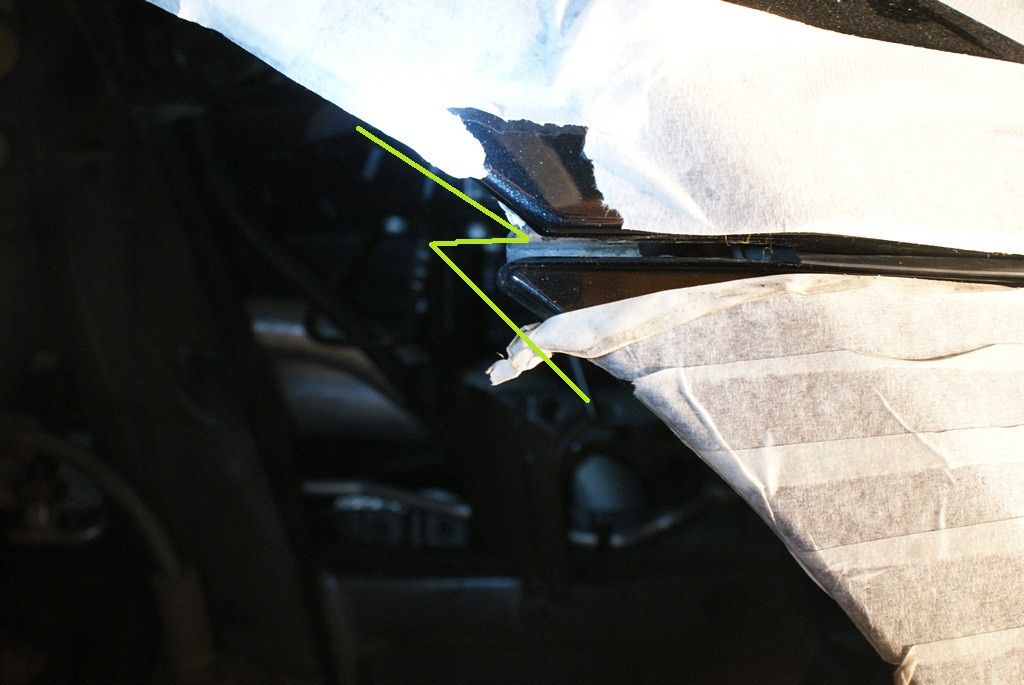
The last two screws holding the front fender locate behind the front edge of the front door. Here the screws have been already removed.
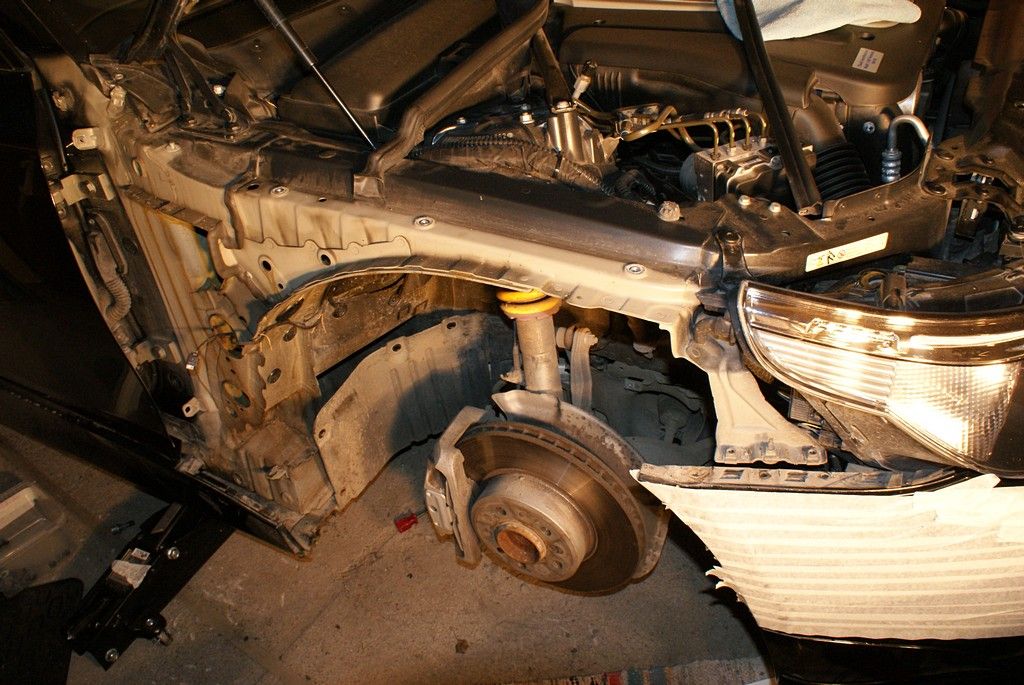
Now you are able to lift the fender out. The dirt goes everywhere!
Now, the easiest part of removing the front fender. Start with removing the rubber seal (red) by simply lifting it up. You have to remove the upper flap (blue) as well.
To remove the flap, you have to gently remove the expanding rivets (greens). It may be a bit tricky. After the flap is gone, there's a nut under the bulb (the other blue circle) that you have to remove. The other blue circle in the back indicates another nut that has to be removed (actually there are one on top of the other).
There are three screws (reds) under the rubber seal that you just removed. Remove them.
The last two screws holding the front fender locate behind the front edge of the front door. Here the screws have been already removed.
Now you are able to lift the fender out. The dirt goes everywhere!
10-31-2011, 03:33 PM
#4
Contributors
Thread Starter
Join Date: Apr 2007
Location: Kajaani, Finland
Posts: 5,851
Likes: 0
Received 3 Likes
on
3 Posts
My Ride: Bmw 530d 2004
C) Installing the M5 front fender
Before starting to install the fender, I protected the edges with a tape. Might be a wise thing to do!
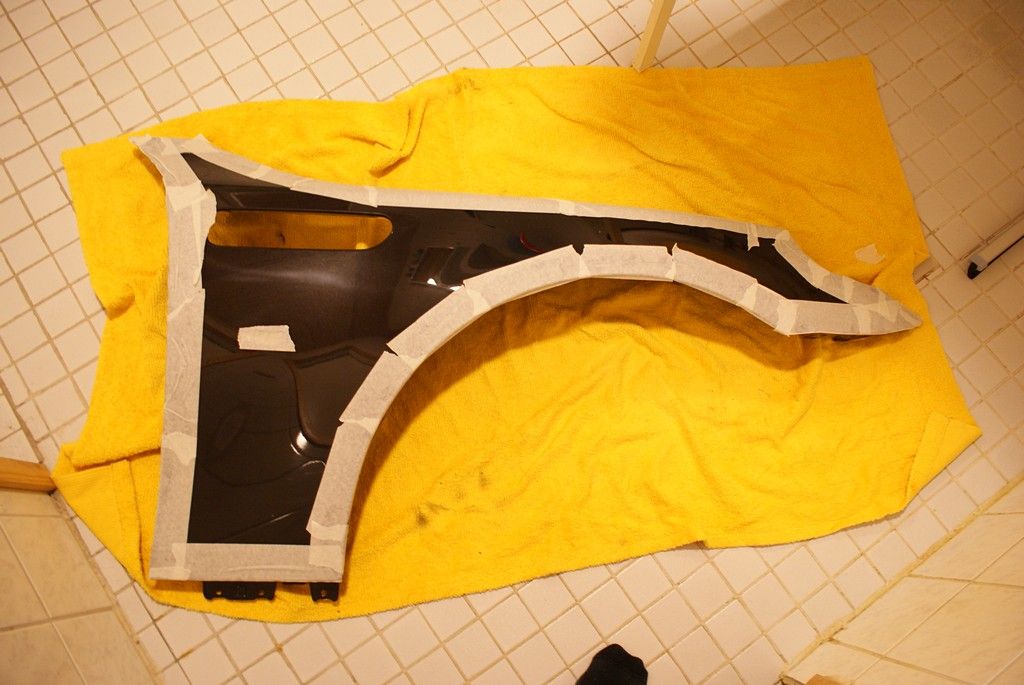
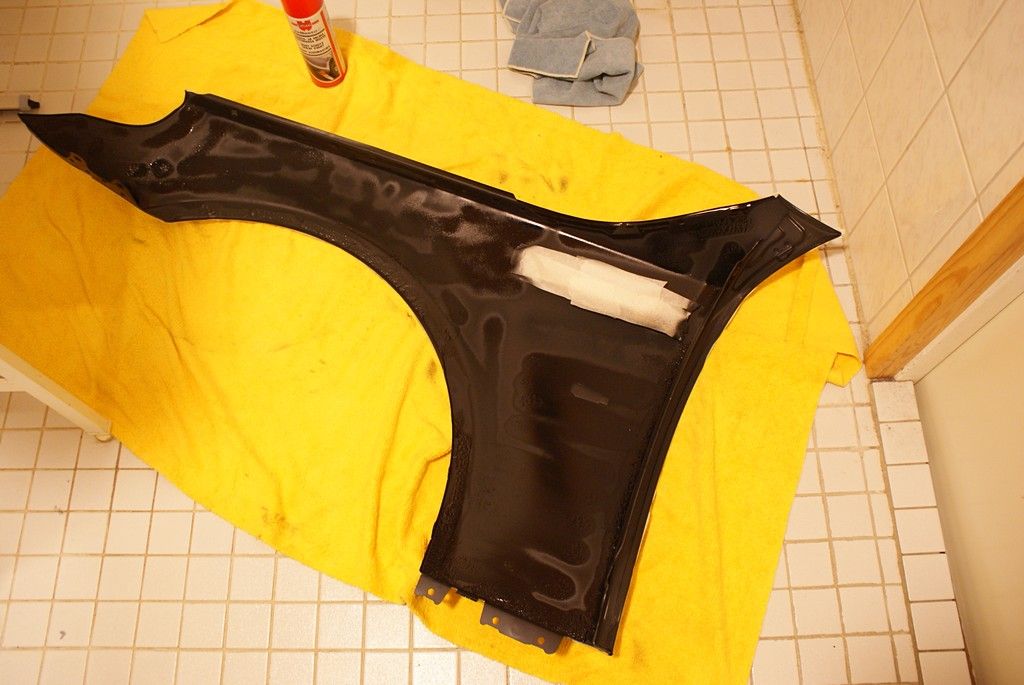
I also sprayed a rust protection spray on the backside and especially in folded edges.
Now, slowly place the M5 fender in its place. Don't forget to salvage and install all the body nuts from the old fender! Secure the fender with one screw on top to prevent it to fall down when you're doing the adjusting.
The lower section attaching points:
Connect the bracket for the sideskirt into the low edge of the fender. Slide it up (red arrow) and secure it with the two screws (greens).
Then put the two screws back that hold the fender in car body. I really think you should start putting the screws back at this corner, because I realized that when playing around with the front corner, the fender will move a little and after that lining the fender with the front door was extremely difficult. So line the fender with the door, and tighten the screws! You can push the sideskirt back now if you like and put the plastic screws under the car back.
Front corner attaching points:
This is the biggest problem in the front corner where the M5 fender meets the MTech front bumper. As you can see the front bumper must be pushed forwards to line it correctly. I'm not giving any more detailed instructions here, you just have to play with the bracket and the screws inside to make it. I believe every car is individual at this area especially, so maybe there's not an universal method to do this, sorry.
Top edge attaching points:
Again, the easiest part is to put the three screws and two (or three actually, as you remember there are one on top of other in the back) nuts back. Remember to check all linings and gaps before you put the plastic flap and the rubber seal back in place.
Side grilles:
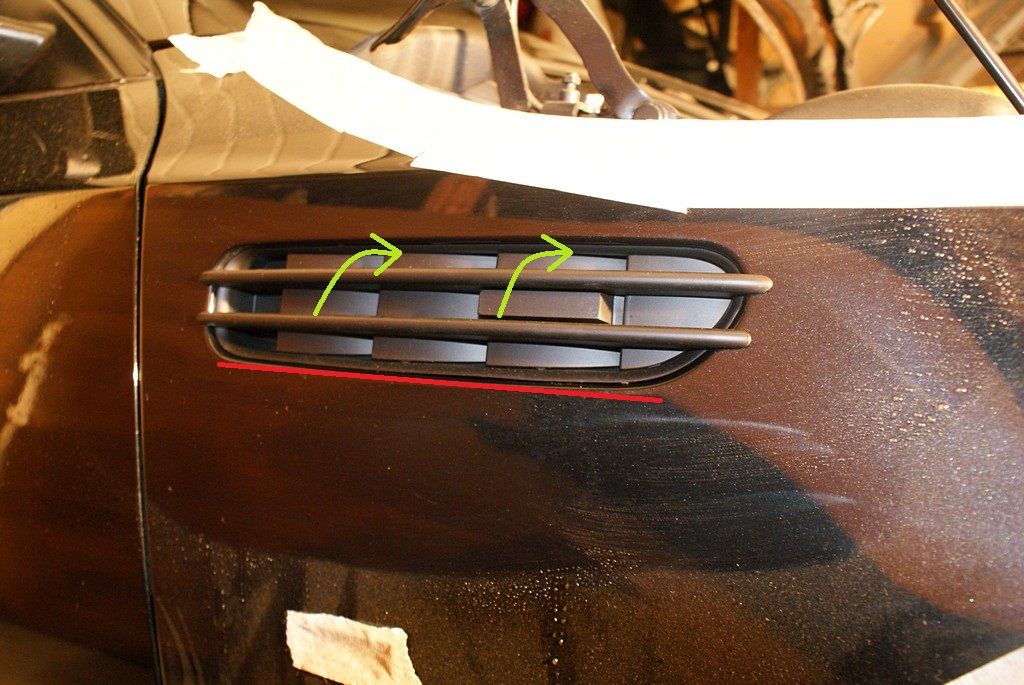
Fun part. Just clip them in (don't try to save too much money by buying the cheapest aftermarket option, or they WON'T just clip in lol!) Place the lower edge (red) on the hole and the clip the upper edge in (green),
Before starting to install the fender, I protected the edges with a tape. Might be a wise thing to do!
I also sprayed a rust protection spray on the backside and especially in folded edges.
Now, slowly place the M5 fender in its place. Don't forget to salvage and install all the body nuts from the old fender! Secure the fender with one screw on top to prevent it to fall down when you're doing the adjusting.
The lower section attaching points:
Connect the bracket for the sideskirt into the low edge of the fender. Slide it up (red arrow) and secure it with the two screws (greens).
Then put the two screws back that hold the fender in car body. I really think you should start putting the screws back at this corner, because I realized that when playing around with the front corner, the fender will move a little and after that lining the fender with the front door was extremely difficult. So line the fender with the door, and tighten the screws! You can push the sideskirt back now if you like and put the plastic screws under the car back.
Front corner attaching points:
This is the biggest problem in the front corner where the M5 fender meets the MTech front bumper. As you can see the front bumper must be pushed forwards to line it correctly. I'm not giving any more detailed instructions here, you just have to play with the bracket and the screws inside to make it. I believe every car is individual at this area especially, so maybe there's not an universal method to do this, sorry.
Top edge attaching points:
Again, the easiest part is to put the three screws and two (or three actually, as you remember there are one on top of other in the back) nuts back. Remember to check all linings and gaps before you put the plastic flap and the rubber seal back in place.
Side grilles:
Fun part. Just clip them in (don't try to save too much money by buying the cheapest aftermarket option, or they WON'T just clip in lol!) Place the lower edge (red) on the hole and the clip the upper edge in (green),
10-31-2011, 03:36 PM
#5
Contributors
Thread Starter
Join Date: Apr 2007
Location: Kajaani, Finland
Posts: 5,851
Likes: 0
Received 3 Likes
on
3 Posts
My Ride: Bmw 530d 2004
D) Installing the M5 inner wheel housing
Guide the M5 wheel housing in its position in the opposite order than removing. It is exactly as much annoying as before.
All screw holes will not locate in the same places as in stock housings, but it doesn't matter, there's still enough attaching points. Fasten the screws.
Then, you have to cut the some parts of the wheel housing. At first take a look that ventilation tube for the breaks. Cut the marked area off.
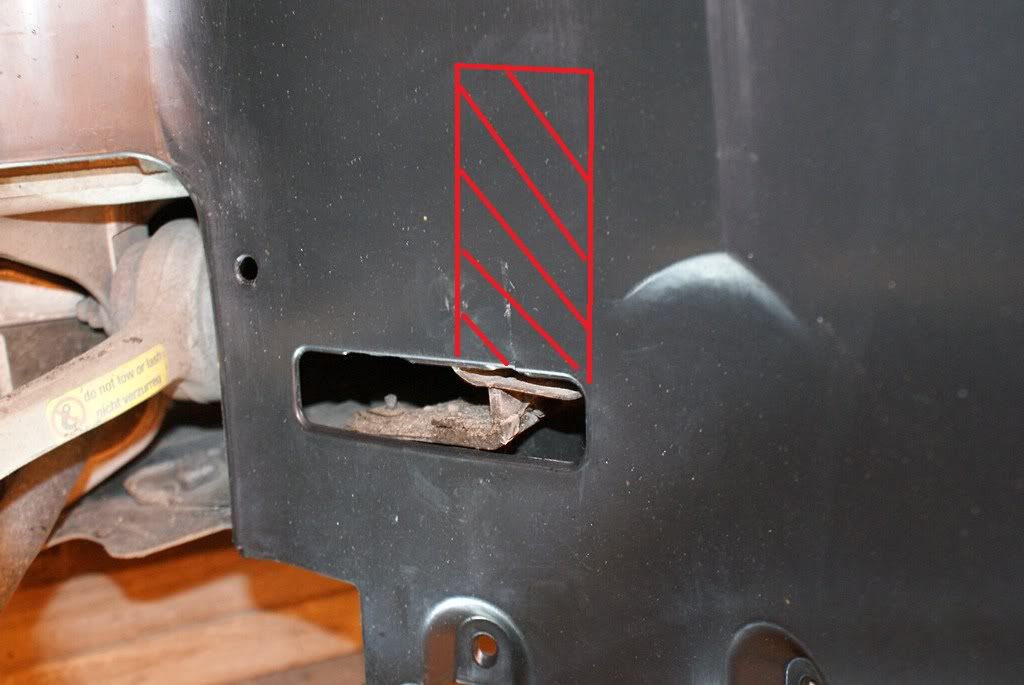
Like this.
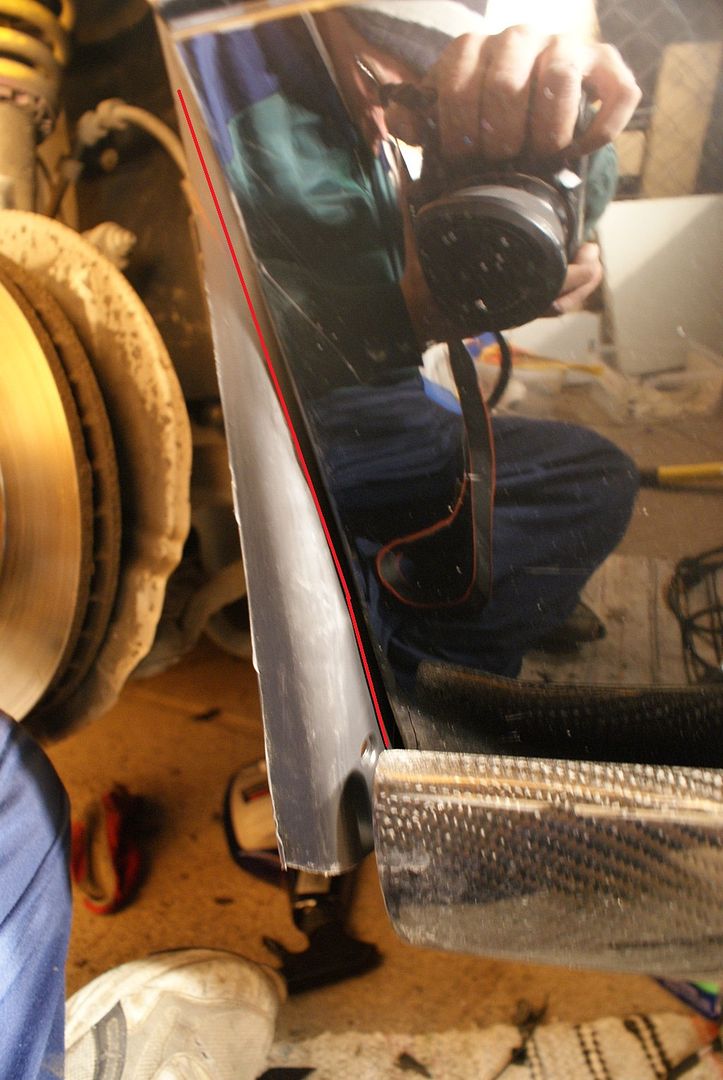
The M5 wheel housing is a bit wider than the MTech bumper on the lower front section. Cut along the line and push the edge inside the bumper.
You can also cut the excessive parts under the car if you like.
I also made three new holes into the wheel housing in the lower front edge to be able to attach the housing. You have to find a way to measure the correct points. Sorry this pic is with the stock wheel housing, but I mean these three screws (reds).

-----------------------------------------
There you got it! Congrats! Now you just have to do the other side haha! Or maybe you could start a new trend by leaving it like this!
I hope this helps anyone who's thinking about this mod or is going to do it.
If you have anything to ask, just ask, please.
- Antti -
ps. Flat Eric fans, sorry. He thought this is too dirty job for his shiny yellow fur. That b*stard!
Guide the M5 wheel housing in its position in the opposite order than removing. It is exactly as much annoying as before.
All screw holes will not locate in the same places as in stock housings, but it doesn't matter, there's still enough attaching points. Fasten the screws.
Then, you have to cut the some parts of the wheel housing. At first take a look that ventilation tube for the breaks. Cut the marked area off.
Like this.
The M5 wheel housing is a bit wider than the MTech bumper on the lower front section. Cut along the line and push the edge inside the bumper.
You can also cut the excessive parts under the car if you like.
I also made three new holes into the wheel housing in the lower front edge to be able to attach the housing. You have to find a way to measure the correct points
. Sorry this pic is with the stock wheel housing, but I mean these three screws (reds).-----------------------------------------
There you got it! Congrats! Now you just have to do the other side haha! Or maybe you could start a new trend by leaving it like this!
I hope this helps anyone who's thinking about this mod or is going to do it.
If you have anything to ask, just ask, please
.- Antti -
ps. Flat Eric fans, sorry. He thought this is too dirty job for his shiny yellow fur. That b*stard!


