Front Wood Trim Install DIY
 12-21-2004, 02:06 PM
#1
Members
Senior Members
Thread Starter

Here's a quick DIY of the front console wood trim install for us MY2004 owners. It's fairly simple but you need to be careful not to scratch up the trim or other plastic parts. I messed up the strip of switches with the dsc, pdc buttoms a little bit by scratching it but it can barely be seen.
So to begin, I'd do this with the car off since you have to unplug things. There's some PDF's on this site somehwere from TIS which show pictures too but I think the below are good.
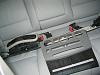
First you just need to pop out the door lock switch from the top and bottom and unplug it to get it out of the way:
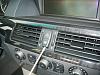
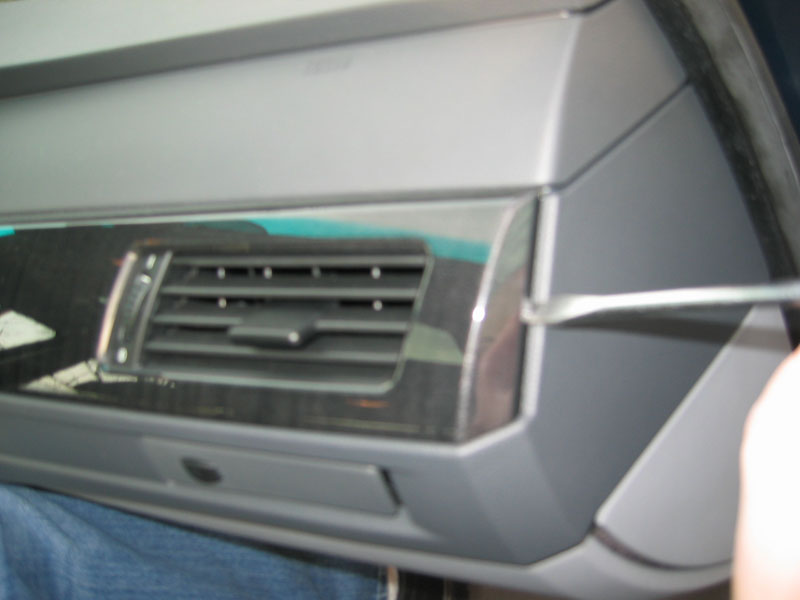
Next, start from the right side there and pop out the long strip of trim. It's a little scarey but trust me, you won't break it. Work your way to the left slowly prying it out.
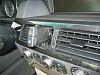
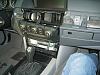
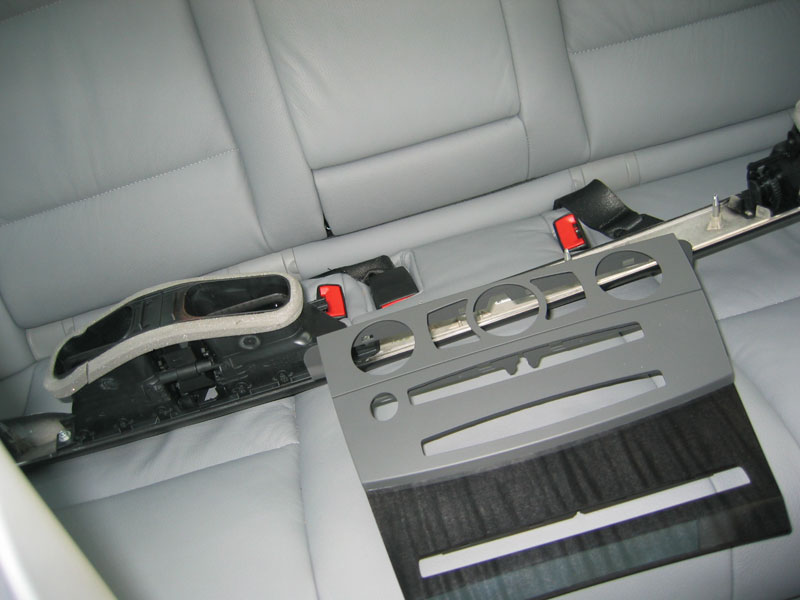
Here's the nakid dash and the trim I put in the back along with the new piece. You'll see those white clips, you may rip some of them out and they'll be attached to the long trim. Just pry them off and put them back in their slot. When the long trim piece is re-installed you have to rotate them diagonally so they look like a diamond rather than a square. I forgot to take a picture of that.
Next, there's two screws which need to be removed that hold in the plastic center trim. There's some clips on the left and right side which snap out fairly easily. The two clips on the bottom though are a little harder to snap out. I stuck the screwdriver in from the underside and they came out.

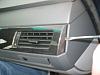
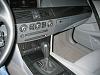
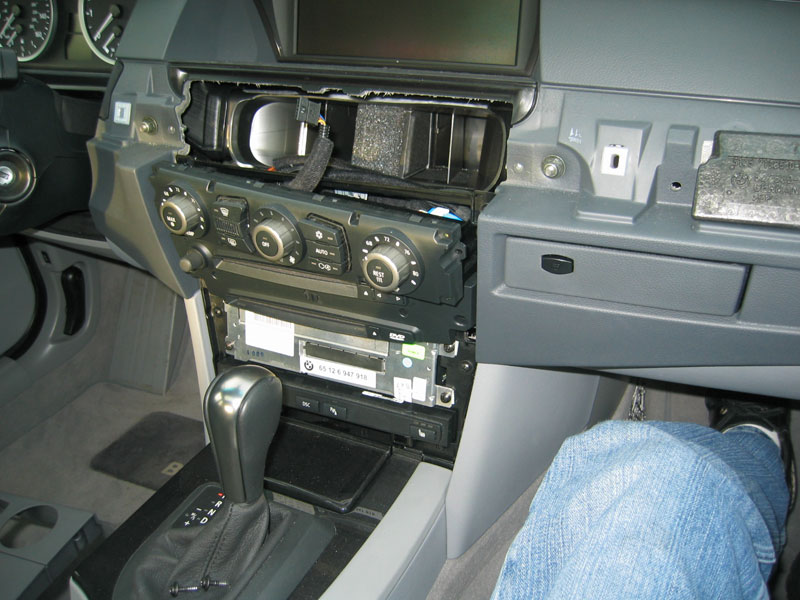
The center piece should now be loose but the AC and DSC button strips still attached. They need to be popped out, you'll see the little notches on top and bottom. I suggest popping out the bottom side first, then the top will come out easy for the AC controls. The DSC button strip again was a little harder to pop out since it's hard to reach the bottom but I got it out. Here's the nakid dash again:
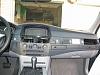
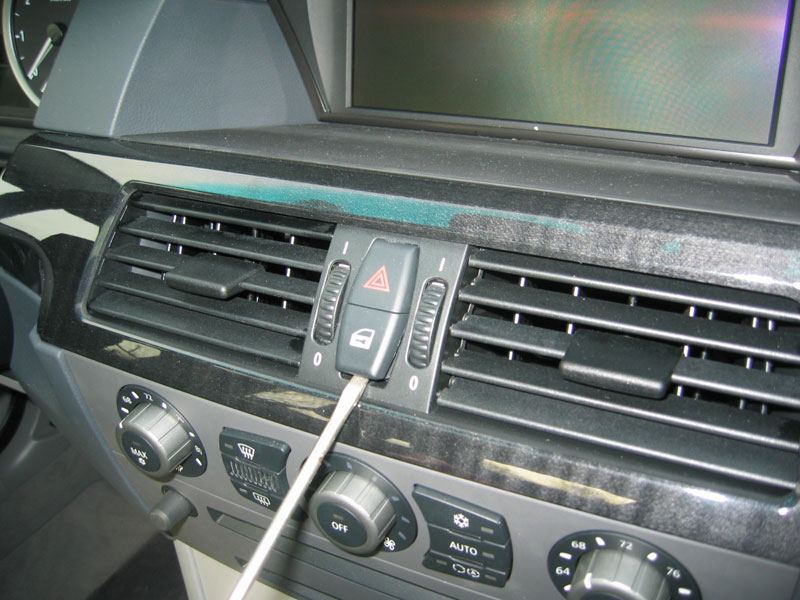
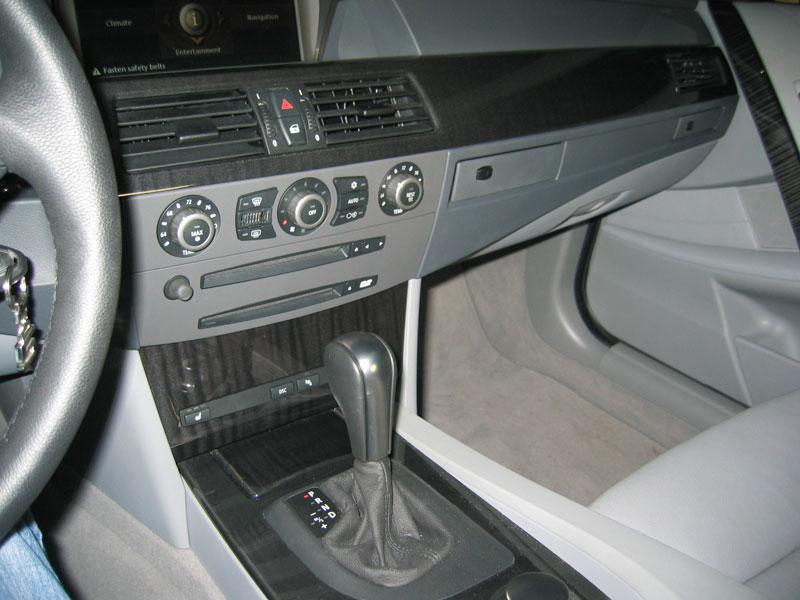
That's basically it. The old trim will be out. You can pop the DSC and AC controls back in their respective spots. Snap in the new trim and screw it back in and put the long trim piece back on (after rotating those white clips like I said before). Don't forget to put the door lock button back in and don't loose that wire! The final result:
I love it, looks much, much, much better!! I'll admit like I said above I damaged that strip of buttons with the DSC, PDC, heater buttons. It's not noticable really but I'm looking for a replacement anyway. It should only be a few bucks for the button cover.
Just be careful and good luck!
So to begin, I'd do this with the car off since you have to unplug things. There's some PDF's on this site somehwere from TIS which show pictures too but I think the below are good.
First you just need to pop out the door lock switch from the top and bottom and unplug it to get it out of the way:

Next, start from the right side there and pop out the long strip of trim. It's a little scarey but trust me, you won't break it. Work your way to the left slowly prying it out.
Here's the nakid dash and the trim I put in the back along with the new piece. You'll see those white clips, you may rip some of them out and they'll be attached to the long trim. Just pry them off and put them back in their slot. When the long trim piece is re-installed you have to rotate them diagonally so they look like a diamond rather than a square. I forgot to take a picture of that.

Next, there's two screws which need to be removed that hold in the plastic center trim. There's some clips on the left and right side which snap out fairly easily. The two clips on the bottom though are a little harder to snap out. I stuck the screwdriver in from the underside and they came out.

The center piece should now be loose but the AC and DSC button strips still attached. They need to be popped out, you'll see the little notches on top and bottom. I suggest popping out the bottom side first, then the top will come out easy for the AC controls. The DSC button strip again was a little harder to pop out since it's hard to reach the bottom but I got it out. Here's the nakid dash again:
That's basically it. The old trim will be out. You can pop the DSC and AC controls back in their respective spots. Snap in the new trim and screw it back in and put the long trim piece back on (after rotating those white clips like I said before). Don't forget to put the door lock button back in and don't loose that wire! The final result:
I love it, looks much, much, much better!! I'll admit like I said above I damaged that strip of buttons with the DSC, PDC, heater buttons. It's not noticable really but I'm looking for a replacement anyway. It should only be a few bucks for the button cover.
Just be careful and good luck!


 . i'll have mine done by my dealer this thursday. will post some pics later. hope they won't screw up
  .
.

 12-23-2004, 03:35 AM
#6
Contributors
Join Date: Oct 2004
Location: Singapore
Posts: 2,926
Likes: 0
Received 0 Likes
on
0 Posts
My Ride: 530iA Silver Grey , black interior. Premium Package, Navigation System, Head-up Display, Radio Satellite, Adaptive Xenon Headlights. AC Schnitzer Front Lip, H&R springs, Rear red reflector, All season Floor mat,
alohalc, how much did you get it for? Is it in the E60 accessories broucher?
12-23-2004, 08:07 AM
#7
Contributors
Join Date: Jun 2004
Location: Netherlands
Posts: 3,374
Likes: 0
Received 0 Likes
on
0 Posts
My Ride: [i][b][u]Since 19 august 2004[/u][/b][/i]: [color=red][b]530i[/b] High Executive[/color], Silvergray with beige interior, Popular wood, Servotronic, Sportssuspension, electric foldable and dimmed mirrors, dimmed interior mirror, pappelmaser braun wood, cupholders, styling 123 18" wheels, Logic 7, Steptronic, alarm class 3, electric sunscreen in the rear and suncreens for sidewindows, Comfort seats, heated seats, Xenon with headlightwashers, Adaptive corner lights ALC, Advanced airconditioning, lightpackage, Nav Pro, 6 cd changer, side airbags rearseats, bluetooth siemens S55, chrome kidneys, gearlever with wood, voice recognition retrofit, front windshield with green band.
Waiting for trunkopener button from Hobi :)
I love my wood piece to.. My car looks a bit more darker from the inside due to the beige converted in poplar wood. I like the look much more, very classy!!!
12-23-2004, 12:17 PM
#8
Senior Members

Join Date: Jun 2004
Location: USA
Posts: 9,135
Likes: 0
Received 0 Likes
on
0 Posts
Originally Posted by soc_fans' date='Dec 23 2004, 02:35 AM
alohalc, how much did you get it for? Is it in the E60 accessories broucher?
[snapback]71791[/snapback]
 .
.
 12-31-2004, 03:02 PM
#10
Contributors
Join Date: May 2004
Location: Huntington Beach, CA
Posts: 688
Likes: 0
Received 0 Likes
on
0 Posts
My Ride: 545, Auto, Sport, L7, Pdc, Sunshades, Silver Gray/Black, 19x8.5/9.5 Monet Wheels, Michelin PS A/S Tires, Full M-KIt, B&B Exhaust, 20% Llumar Tint
Awesome thanks!!! I have this piece sitting on my work bench...I was waiting on the dealer but I think this is going to be the first thing I do in 2005 now 