E60 550i Aux cooling fan motor replacement
 01-19-2014, 03:28 PM
#1
New Members
Thread Starter
Join Date: Oct 2013
Location: Phoenix
Posts: 41
Likes: 0
Received 1 Like
on
1 Post
My Ride: 2008 550i & 2009 X6 35i
I've been doing some searching and I couldn't find a DIY for replacing the failed Auxiliary cooling fan motor that has plagued so many of us E60 owners. So I thought I write one up. Hope you guys find it helpful.
Vehicle: 2008 550i M-Sport.
First off, your local BMW stealership doesn’t sell just the electric fan motor that you need. BMW would rather you to purchase the entire fan/shroud assembly for somewhere in the neighborhood of $750; then spend a few hundred more for install. My stealership wanted $1380 to do this job. IMO, find one on eBay, save yourself about a grand (or more) and do the work yourself. On a scale of 1 to 10 with 10 being the most difficult, I’d give this job about a 4. As with most things BMW the job itself isn’t difficult. It’s getting everything out of your way that’s a real PITA.
What you’ll need:
• T20, T25 & T27 Torx bits
• 3 & 6mm Allen wrenches
• 10mm socket and ratchet
• Flat head screwdriver
• Engine oil (full Synthetic of course)
• Coolant (I’m in AZ so I run a Distilled water & Water Wetter mix in my 550)
• Replacement Fan Motor
• Floor jack
• Jack stands
• Oil and Coolant catch pans
• A six pack of your favorite brew.
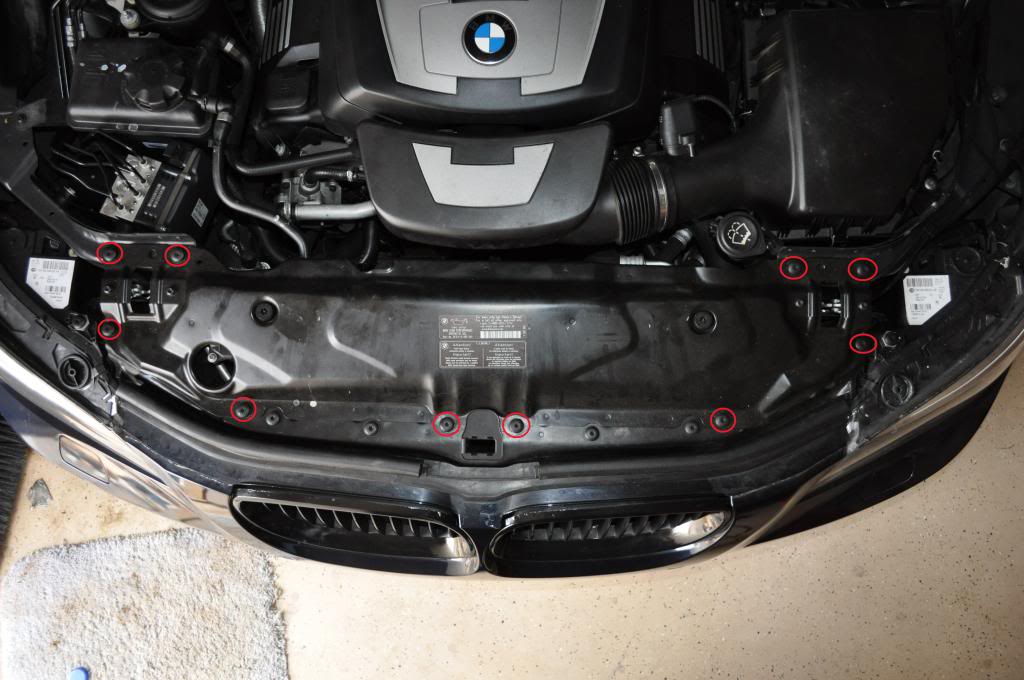
1. First you’ll want to remove the plastic engine cover. It’s held in place with 4 10mm cap nuts
2. Then remove the intake snorkel from the throttle body. No need to remove the entire air cleaner assembly. Just remove the snorkel.
3. Next you’ll want to remove the metal radiator cover. It’s held in place with 10 T27 Torx screws. No need to remove the hood latch cables from the cover; just set the entire assembly on top of the engine or generally out of the way.
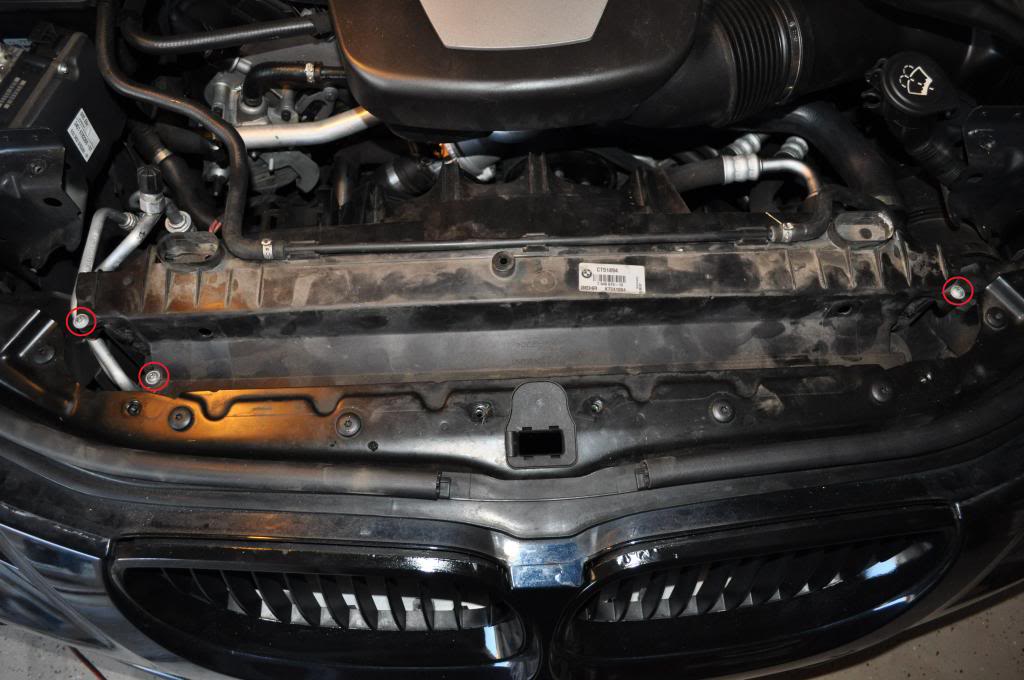
4. Remove the plastic radiator cover. It’s held in place with 4 T25 Torx screws. Only 3 are visible in the picture.
5. Jack up the driver’s side of the car then slide the coolant catch pan under the radiator.
6. Open the drain plug and drain the coolant from the radiator. If you open the overflow tank cap it will drain quicker.
7. Detach the electrical connector from the coolant temp sensor/switch on the lower coolant hose.
8. Disconnect the large electrical fan connection on the passenger’s side of the radiator as well.
9. Disconnect the lower coolant hose from the radiator by lifting up on the retaining clip and pulling the hose off the radiator. The coolant hoses can be stubborn so take your time.
10. Remove the upper coolant hose using the same process.
11. There’s a small vent tube that runs from the upper coolant hose location to the overflow tank. Remove the hose clamp and disconnect the hose from the radiator as well.
12. The last coolant connection is on the lower driver’s side of the radiator. It’s best accessed from under the car. It has a black pull tab on the retaining clip. Pull down on the tab and carefully remove the connection from the radiator.
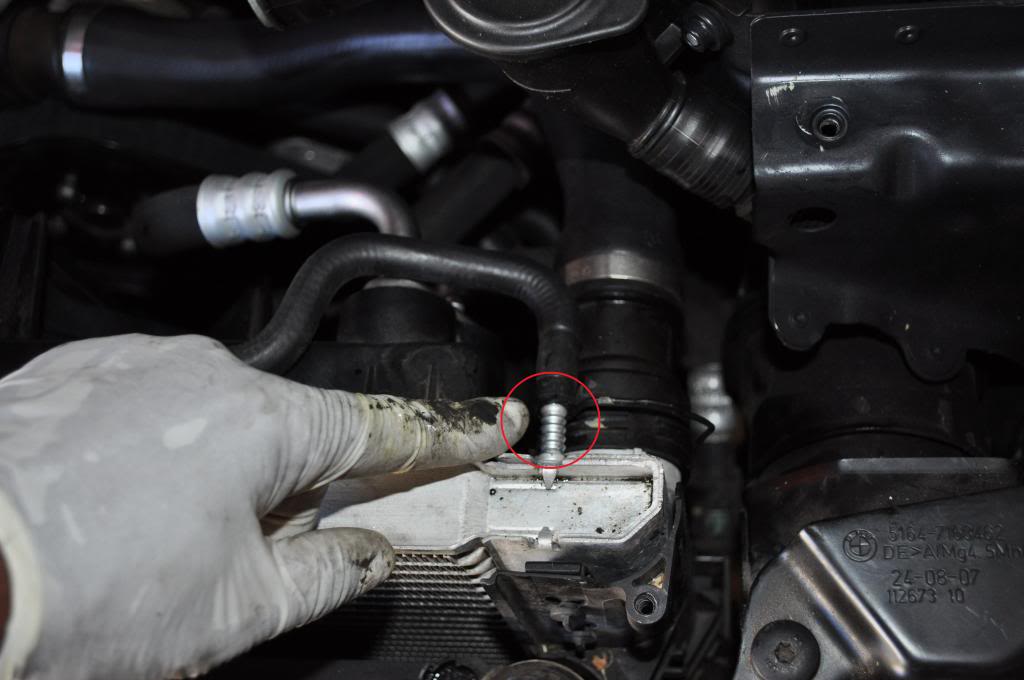
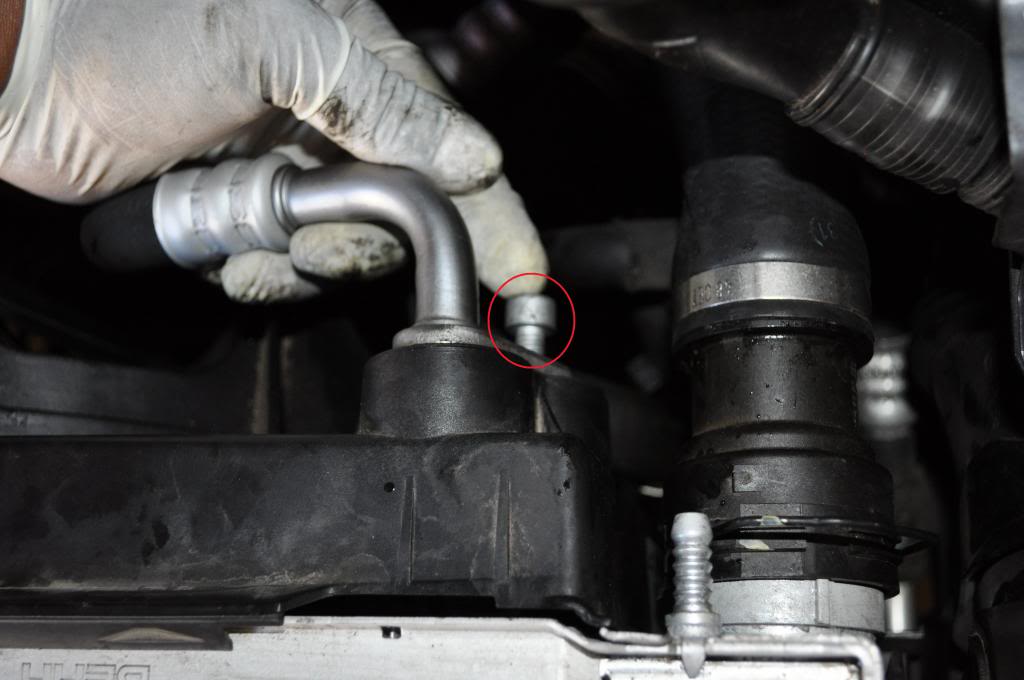
13. Those geniuses in Bavaria thought it was a good idea to run the oil cooler lines through the shroud on the 550i. Like the radiator the oil cooler has upper and lower lines (both on the driver’s side of the shroud). They’re held in place with two 6mm Allen head screws. Get your oil catch pan in place then remove both Allen head screws. Once the screws are removed the lines just pull off. You will lose some oil and make a bit of a mess, hence the catch pan.
Upper
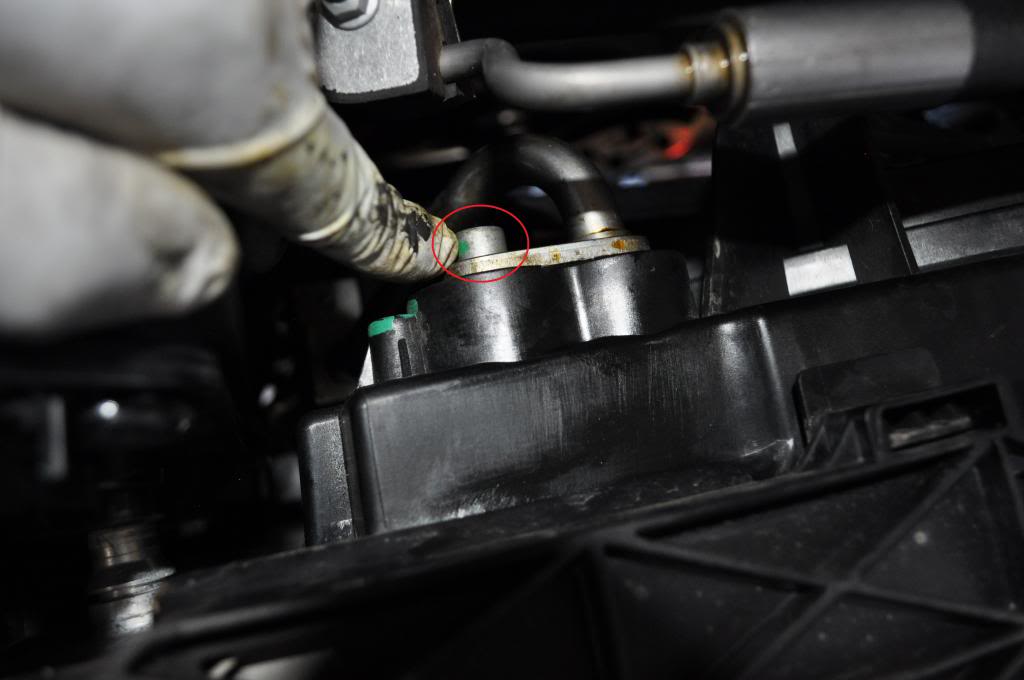
Lower
14. Brew time. Take 15 and go have a cold one.
15. Ok, you’re ready to remove the radiator, oil cooler and fan assembly. Have both catch pans ready as some oil and coolant will still be in the units. Grab the fan shroud and lift straight up. Be careful not to hit the radiator and damage the fins.
16. Do the same with the radiator, i.e. lift it straight up and out.
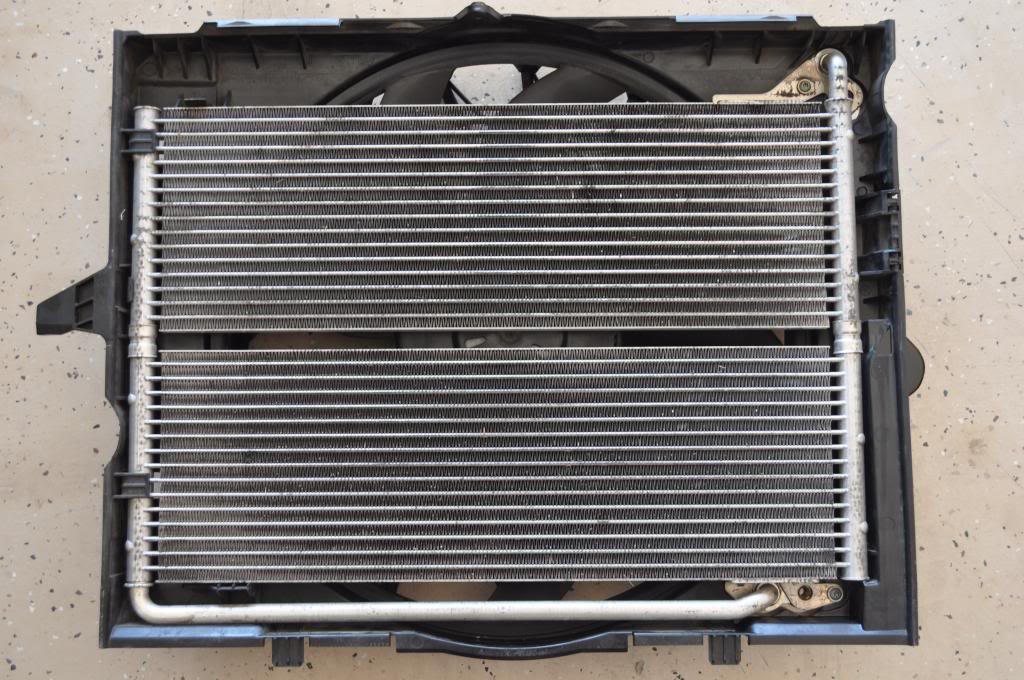
17. Now that everything is out of the engine bay, clean out all the crap that has collected between the radiator and the condenser.
18. Now that there’s plenty of room, now is a good time to tackle other jobs you may have been putting off; T-stat and water pump change, belts, vacuum pump seal kit, oil pressure switch, coolant hoses, etc. You have a lot of room right now so take advantage of it. I changed my t-stat and water pump then I gave my radiator a good cleaning with a pressure washer to removed rocks and other debris.
19. I picked up my lightly used fan motor on eBay for less than $200. It was originally for an E83 X3. The shroud was completely different but the motor was the same. If you picked up a fan/shroud assembly that’s identical to yours or purchased new from your local stealership or another vendor then all you need to do at this point is swap over the oil cooler and install everything in reverse order. However, if you’re like me and you found the correct motor but the wrong shroud then continue on.
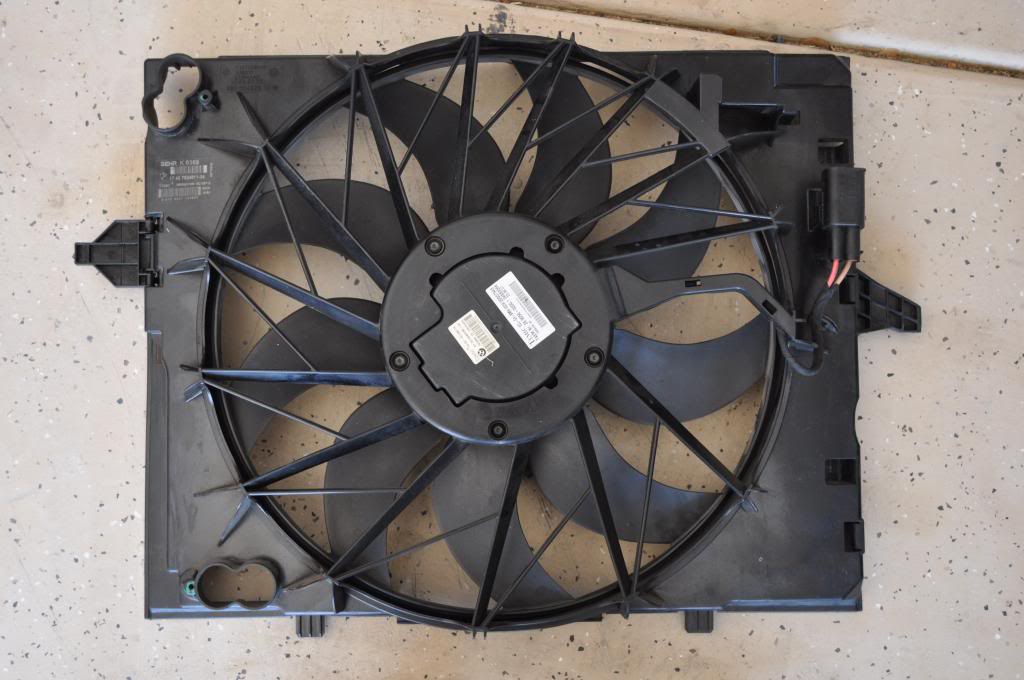
My fan and shroud assembly
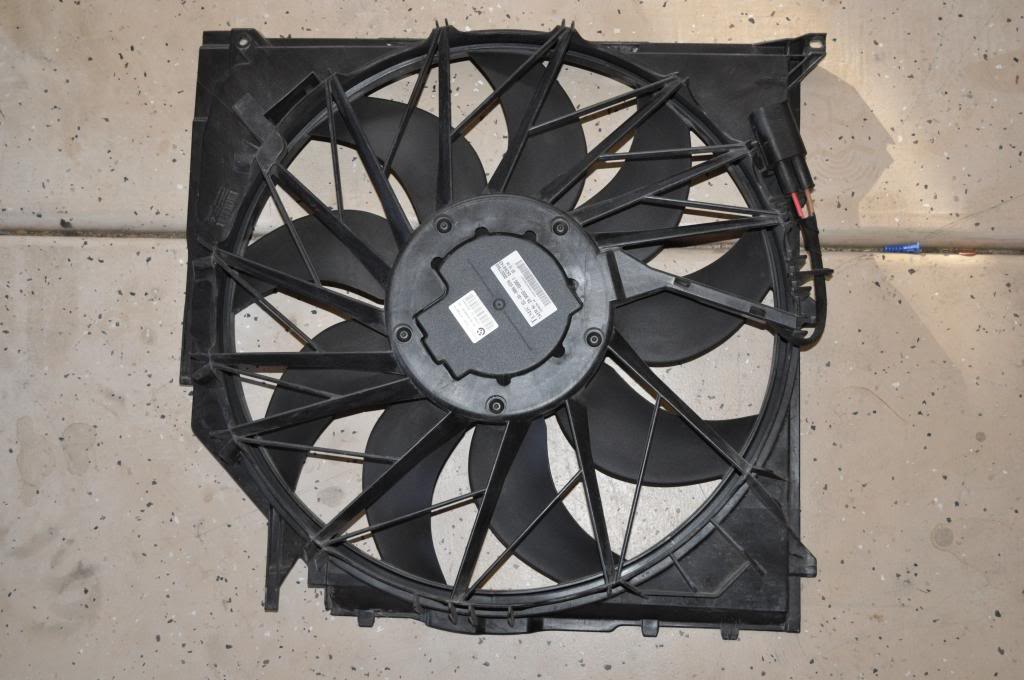
The fan and shroud assembly I found on eBay. Notice the difference in the shroud? This one is for an E83 X3.
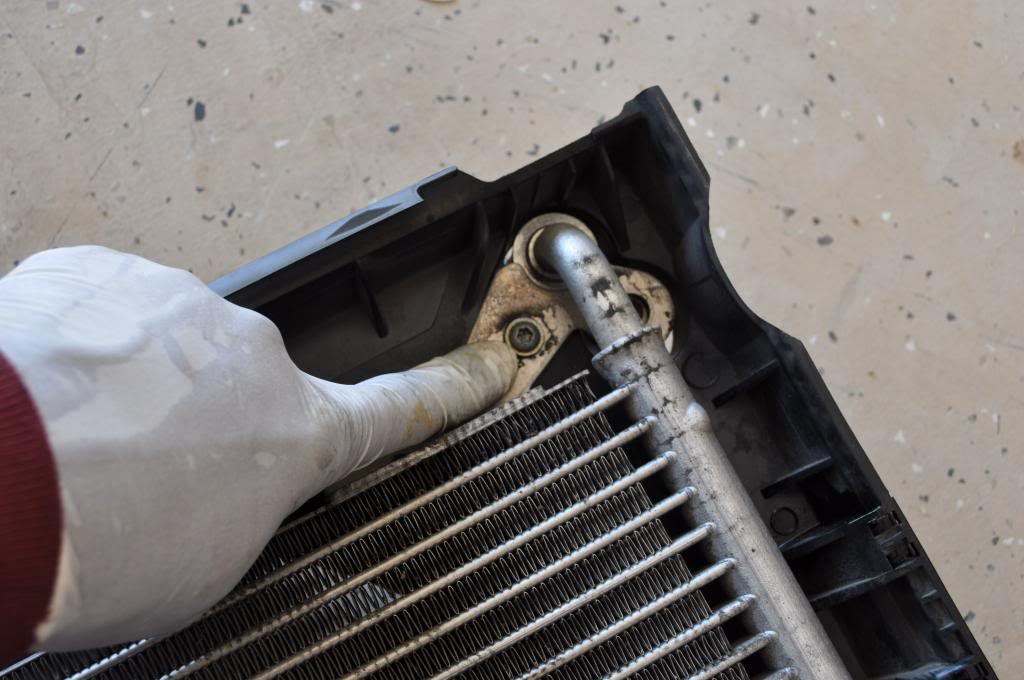
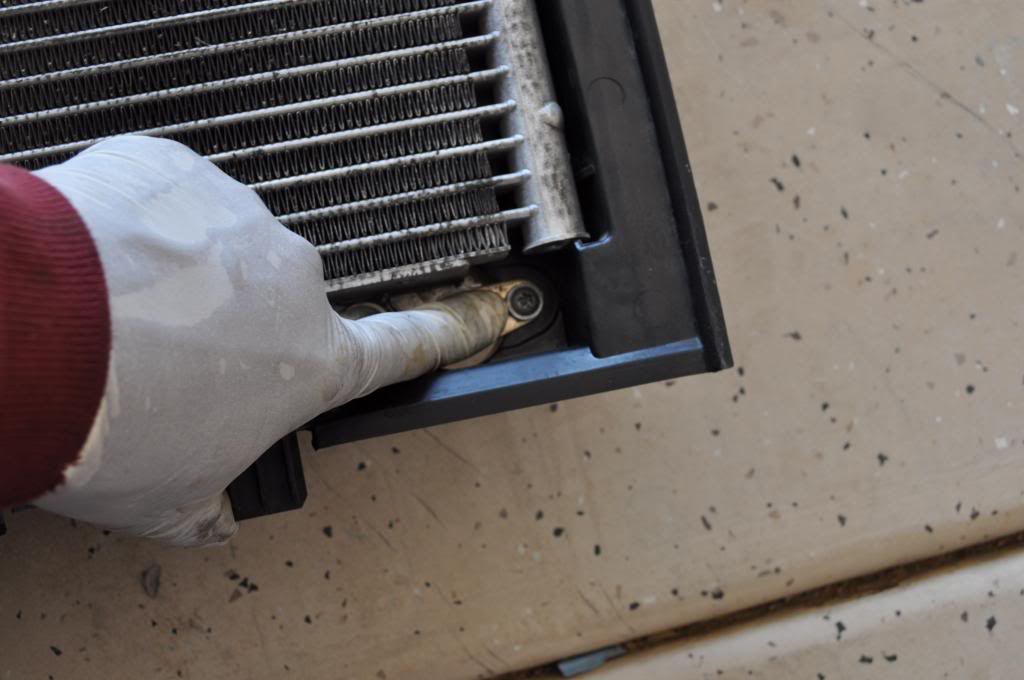
20. To free the fan motor from the shroud you’ll need to remove the oil cooler. There are two T25 Torx screws that hold it in place; remove them then slide the cooler out of the shroud.
Upper
Lower
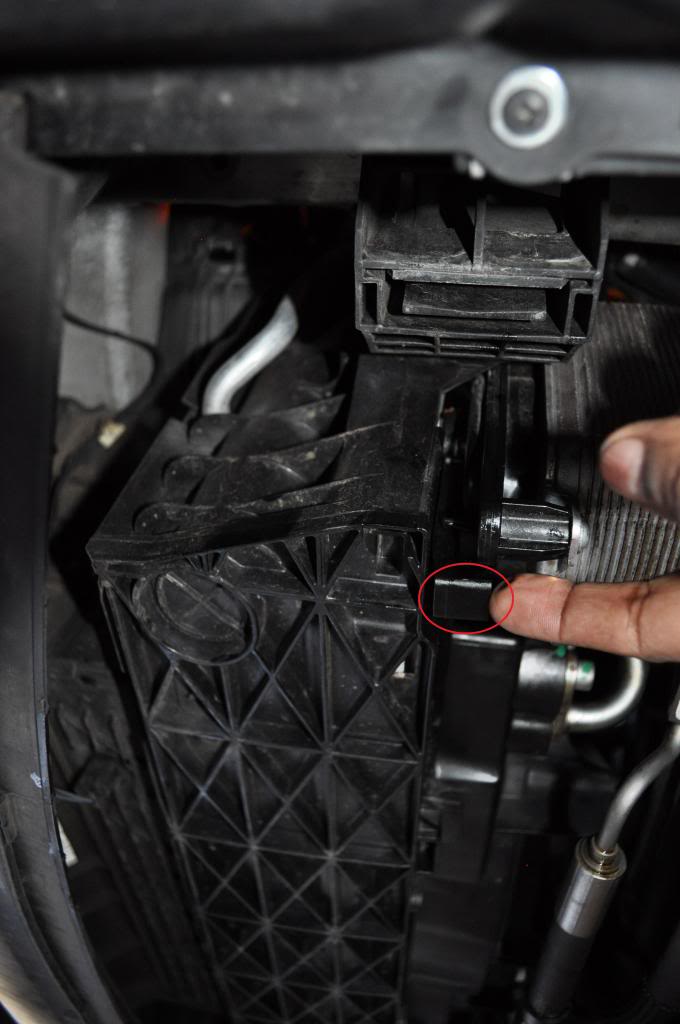
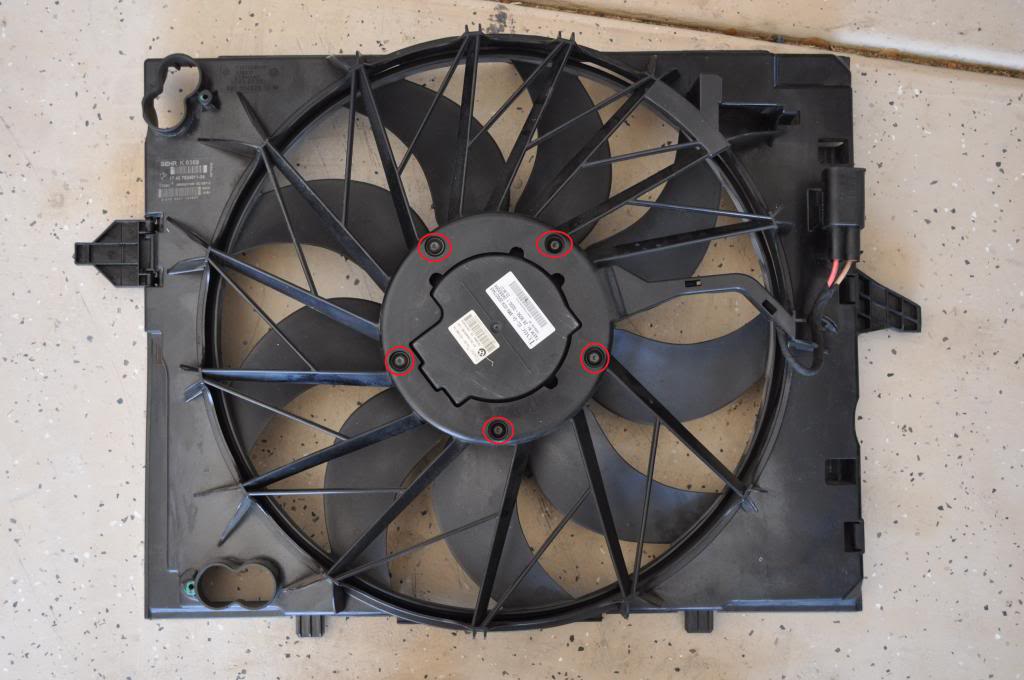
21. Flip the shroud over and disconnect the electrical plug from the shroud. There’s a pinch tab under the plug. You’ll want to pinch and pull down to disengage it from the shroud.
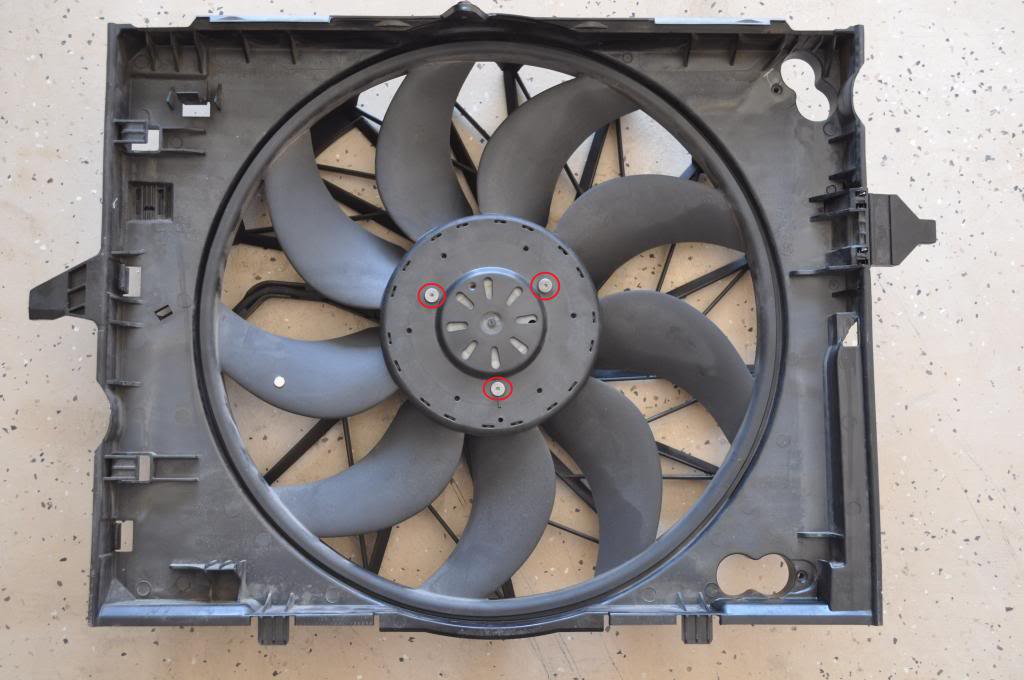
22. There are 5 T20 Torx screws holding the fan and motor assembly to the shroud. Remove those and the motor will slide out with the fan blades attached
23. For those that want or need to remove the fan blades there are three small 3mm Allen head screws on the fan blade side. Remove those and the blades will slide off the motor assembly.
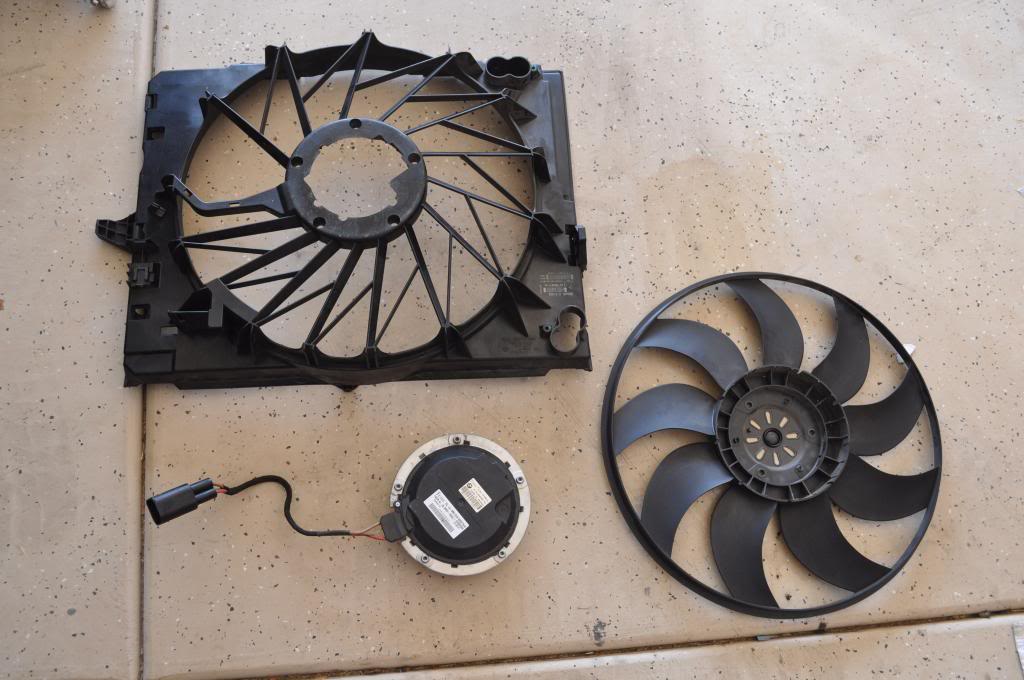
Fan/shroud completely dissembled
24. Before you start the reinstall process, its brew time. Grab another cold one!
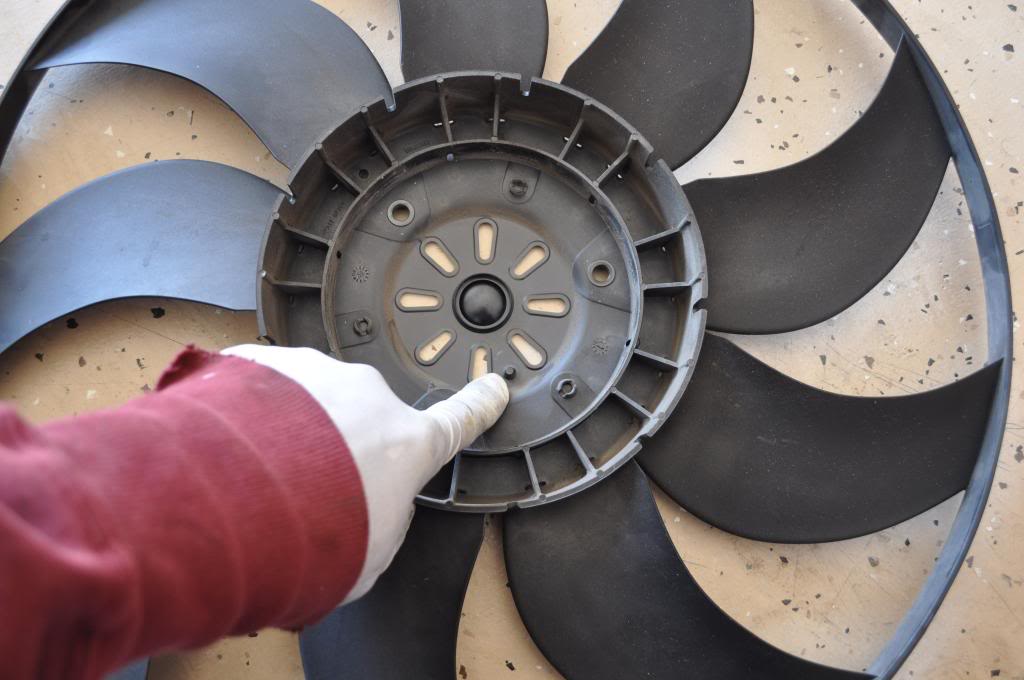
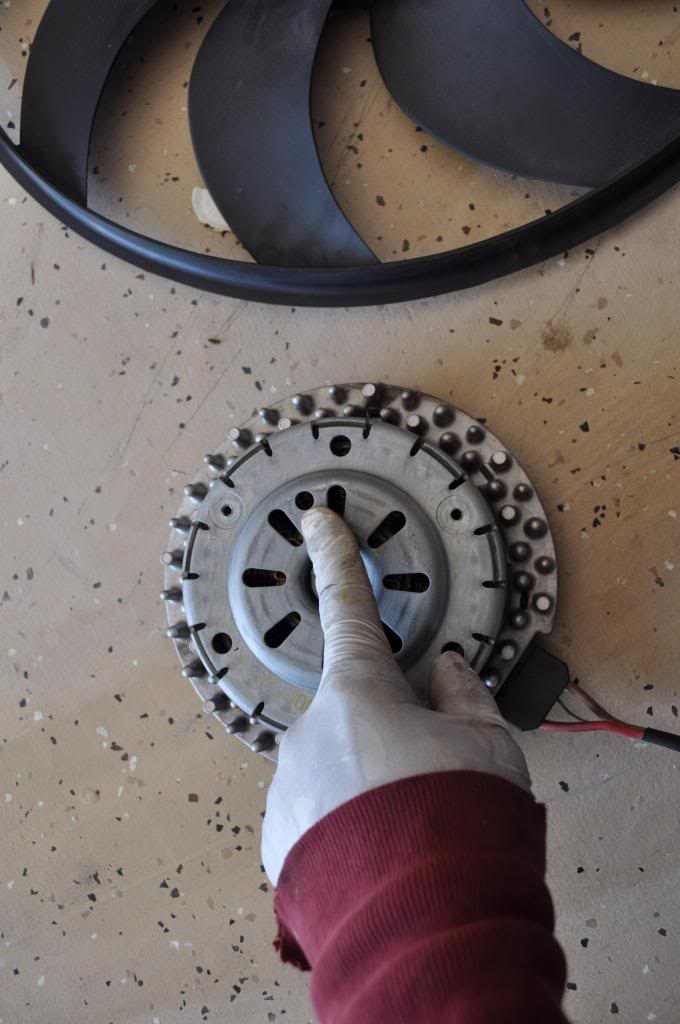
25. Simply install in reverse order. Quick note: If you removed the fan blades pay attention to how to install them on your new motor. There’s a small alignment pin on the back of the fan that should line up with a hole on the fan motor. If you don’t get this right, the fan will wobble when it kicks on and you’ll have to do this all over again.
26. After everything is reinstalled you need to check your oil level and fill appropriately as well as fill the system with coolant and purge trapped air appropriately. There are several write-ups on both if you need them. I took the opportunity to change the oil and filter as well.
27. That’s it. You now have the satisfaction of having done the job yourself, knowing it was done properly and the kicker….. you saved a ton of cash! Cash that you can now spend on some go fast or look good goodies or if you’re looking to gain some brownie points, something nice for the wife or girlfriend!
Vehicle: 2008 550i M-Sport.
First off, your local BMW stealership doesn’t sell just the electric fan motor that you need. BMW would rather you to purchase the entire fan/shroud assembly for somewhere in the neighborhood of $750; then spend a few hundred more for install. My stealership wanted $1380 to do this job. IMO, find one on eBay, save yourself about a grand (or more) and do the work yourself. On a scale of 1 to 10 with 10 being the most difficult, I’d give this job about a 4. As with most things BMW the job itself isn’t difficult. It’s getting everything out of your way that’s a real PITA.
What you’ll need:
• T20, T25 & T27 Torx bits
• 3 & 6mm Allen wrenches
• 10mm socket and ratchet
• Flat head screwdriver
• Engine oil (full Synthetic of course)
• Coolant (I’m in AZ so I run a Distilled water & Water Wetter mix in my 550)
• Replacement Fan Motor
• Floor jack
• Jack stands
• Oil and Coolant catch pans
• A six pack of your favorite brew.
1. First you’ll want to remove the plastic engine cover. It’s held in place with 4 10mm cap nuts
2. Then remove the intake snorkel from the throttle body. No need to remove the entire air cleaner assembly. Just remove the snorkel.
3. Next you’ll want to remove the metal radiator cover. It’s held in place with 10 T27 Torx screws. No need to remove the hood latch cables from the cover; just set the entire assembly on top of the engine or generally out of the way.

4. Remove the plastic radiator cover. It’s held in place with 4 T25 Torx screws. Only 3 are visible in the picture.

5. Jack up the driver’s side of the car then slide the coolant catch pan under the radiator.
6. Open the drain plug and drain the coolant from the radiator. If you open the overflow tank cap it will drain quicker.
7. Detach the electrical connector from the coolant temp sensor/switch on the lower coolant hose.
8. Disconnect the large electrical fan connection on the passenger’s side of the radiator as well.
9. Disconnect the lower coolant hose from the radiator by lifting up on the retaining clip and pulling the hose off the radiator. The coolant hoses can be stubborn so take your time.
10. Remove the upper coolant hose using the same process.
11. There’s a small vent tube that runs from the upper coolant hose location to the overflow tank. Remove the hose clamp and disconnect the hose from the radiator as well.

12. The last coolant connection is on the lower driver’s side of the radiator. It’s best accessed from under the car. It has a black pull tab on the retaining clip. Pull down on the tab and carefully remove the connection from the radiator.

13. Those geniuses in Bavaria thought it was a good idea to run the oil cooler lines through the shroud on the 550i. Like the radiator the oil cooler has upper and lower lines (both on the driver’s side of the shroud). They’re held in place with two 6mm Allen head screws. Get your oil catch pan in place then remove both Allen head screws. Once the screws are removed the lines just pull off. You will lose some oil and make a bit of a mess, hence the catch pan.
Upper

Lower

14. Brew time. Take 15 and go have a cold one.
15. Ok, you’re ready to remove the radiator, oil cooler and fan assembly. Have both catch pans ready as some oil and coolant will still be in the units. Grab the fan shroud and lift straight up. Be careful not to hit the radiator and damage the fins.
16. Do the same with the radiator, i.e. lift it straight up and out.
17. Now that everything is out of the engine bay, clean out all the crap that has collected between the radiator and the condenser.
18. Now that there’s plenty of room, now is a good time to tackle other jobs you may have been putting off; T-stat and water pump change, belts, vacuum pump seal kit, oil pressure switch, coolant hoses, etc. You have a lot of room right now so take advantage of it. I changed my t-stat and water pump then I gave my radiator a good cleaning with a pressure washer to removed rocks and other debris.
19. I picked up my lightly used fan motor on eBay for less than $200. It was originally for an E83 X3. The shroud was completely different but the motor was the same. If you picked up a fan/shroud assembly that’s identical to yours or purchased new from your local stealership or another vendor then all you need to do at this point is swap over the oil cooler and install everything in reverse order. However, if you’re like me and you found the correct motor but the wrong shroud then continue on.
My fan and shroud assembly

The fan and shroud assembly I found on eBay. Notice the difference in the shroud? This one is for an E83 X3.

20. To free the fan motor from the shroud you’ll need to remove the oil cooler. There are two T25 Torx screws that hold it in place; remove them then slide the cooler out of the shroud.

Upper

Lower

21. Flip the shroud over and disconnect the electrical plug from the shroud. There’s a pinch tab under the plug. You’ll want to pinch and pull down to disengage it from the shroud.
22. There are 5 T20 Torx screws holding the fan and motor assembly to the shroud. Remove those and the motor will slide out with the fan blades attached

23. For those that want or need to remove the fan blades there are three small 3mm Allen head screws on the fan blade side. Remove those and the blades will slide off the motor assembly.

Fan/shroud completely dissembled

24. Before you start the reinstall process, its brew time. Grab another cold one!
25. Simply install in reverse order. Quick note: If you removed the fan blades pay attention to how to install them on your new motor. There’s a small alignment pin on the back of the fan that should line up with a hole on the fan motor. If you don’t get this right, the fan will wobble when it kicks on and you’ll have to do this all over again.


26. After everything is reinstalled you need to check your oil level and fill appropriately as well as fill the system with coolant and purge trapped air appropriately. There are several write-ups on both if you need them. I took the opportunity to change the oil and filter as well.
27. That’s it. You now have the satisfaction of having done the job yourself, knowing it was done properly and the kicker….. you saved a ton of cash! Cash that you can now spend on some go fast or look good goodies or if you’re looking to gain some brownie points, something nice for the wife or girlfriend!
Last edited by rm4two; 07-07-2014 at 08:55 AM.

The following users liked this post:
User 21921 (06-25-2020)
 05-13-2014, 07:52 AM
#4
Members
Senior Members

Join Date: Jan 2012
Location: Dayton, OH
Posts: 557
Likes: 0
Received 1 Like
on
1 Post
My Ride: 07 550i Sports Package
Model Year: 2007
The bentley manual should do it. Take note however, that for this particular repair job the Bentley got it wrong, it does not factor in the oil cooler. Otherwise its the best out there.
 11-07-2015, 09:59 AM
#7
New Members

Join Date: Nov 2015
Location: Valencia, CA
Posts: 33
Likes: 0
Received 0 Likes
on
0 Posts
My Ride: 2008 550i - Stock
I hope this thread is still good. I have an 08 550i. I was told by BMW that my fan needed to be replaced. I replaced it with a genuine BMW part. It was not a fun job. It's all hooked up and still no fan action. I also replaced the thermostat with sensor, and the lower radiator hose sensor.
Any suggestions? Fuse? Does the car need to be programmed to recognize the new fan?
Any suggestions? Fuse? Does the car need to be programmed to recognize the new fan?
11-07-2015, 10:00 AM
#8
New Members
Join Date: Nov 2015
Location: Valencia, CA
Posts: 33
Likes: 0
Received 0 Likes
on
0 Posts
My Ride: 2008 550i - Stock
Oh, also, I now seem to have a small leak on that huge coolant connection at the bottom driver's side of the radiator. Any suggestions there? That thing wasn't fun to take off or put back on.
