DIY: LCI HID Angel Eyes V2
 04-07-2010, 08:43 PM
#1
Banned
Thread Starter

Join Date: Jun 2008
Location: Queens, NY
Posts: 7,983
Likes: 0
Received 1 Like
on
1 Post
My Ride: A Car
This is a DIY for HID angel eyes. As many of you may have seen my previous setup, it was harder to DIY. This V2 setup is quite easy except the fact if you connect positive and negative flip flopped, you canburn the capacitor inside the small black box. It's a specially modified box with error cancelling functions AND smooths the operation of the entire HID system. Not just your normal radio shack capacitor. Bear in mind these are ALL high quality items.
Headlight NEEDs to be removed for V8 or V10 models since there's no room in engine bay to mount ballasts. You must mount them underneath the headlight. For a MORE sophiticated DIY on removing headlights, use this DIY: https://5series.net/forums/index.php...0&gopid=969316
Headlight does NOT need to be removed for I6 models since there's MUCH room in engine bay. 528 and 535 are easier than the V8s and V10s I did.
Tools & Materials Needed:
T27 or T30 Torx to remove the screw on upper headlight and bumper
13 mm socket to remove strut bolt and positive bolt
8 mm with long extension (minimum 6 inches) to remove lower headlight screws
Zip Ties
Electrical Tape
BMW Screwdriver or any Philips Screwdriver and Flat-Head
Drill with a 1-inch Drill Bit/Head
RevItNYC HID Angel Eye Kit
Difficulty (Scale 1-10, 10 being hardest): 5 for I6 Models. 6 for V8 and V10 Models.
Time Needed: I6 models, 30-45 minutes. V8 V10 models 45-90 minutes.
Caution:
DO NOT CONNECT NEGATIVE AND POSITIVE INCORRECTLY OR THE ELECTRONICS INSIDE THE BLACK BOX WILL BE DAMAGED IMMEDIATELY. ON THE STOCK HARNESS FROM THE ANGEL EYE BULB, A = POSITIVE AND B = NEGATIVE
Please refrain from posting comments until entire DIY is done. There's at least 60 pictures for this DETAILED DIY.
Thanks!
John
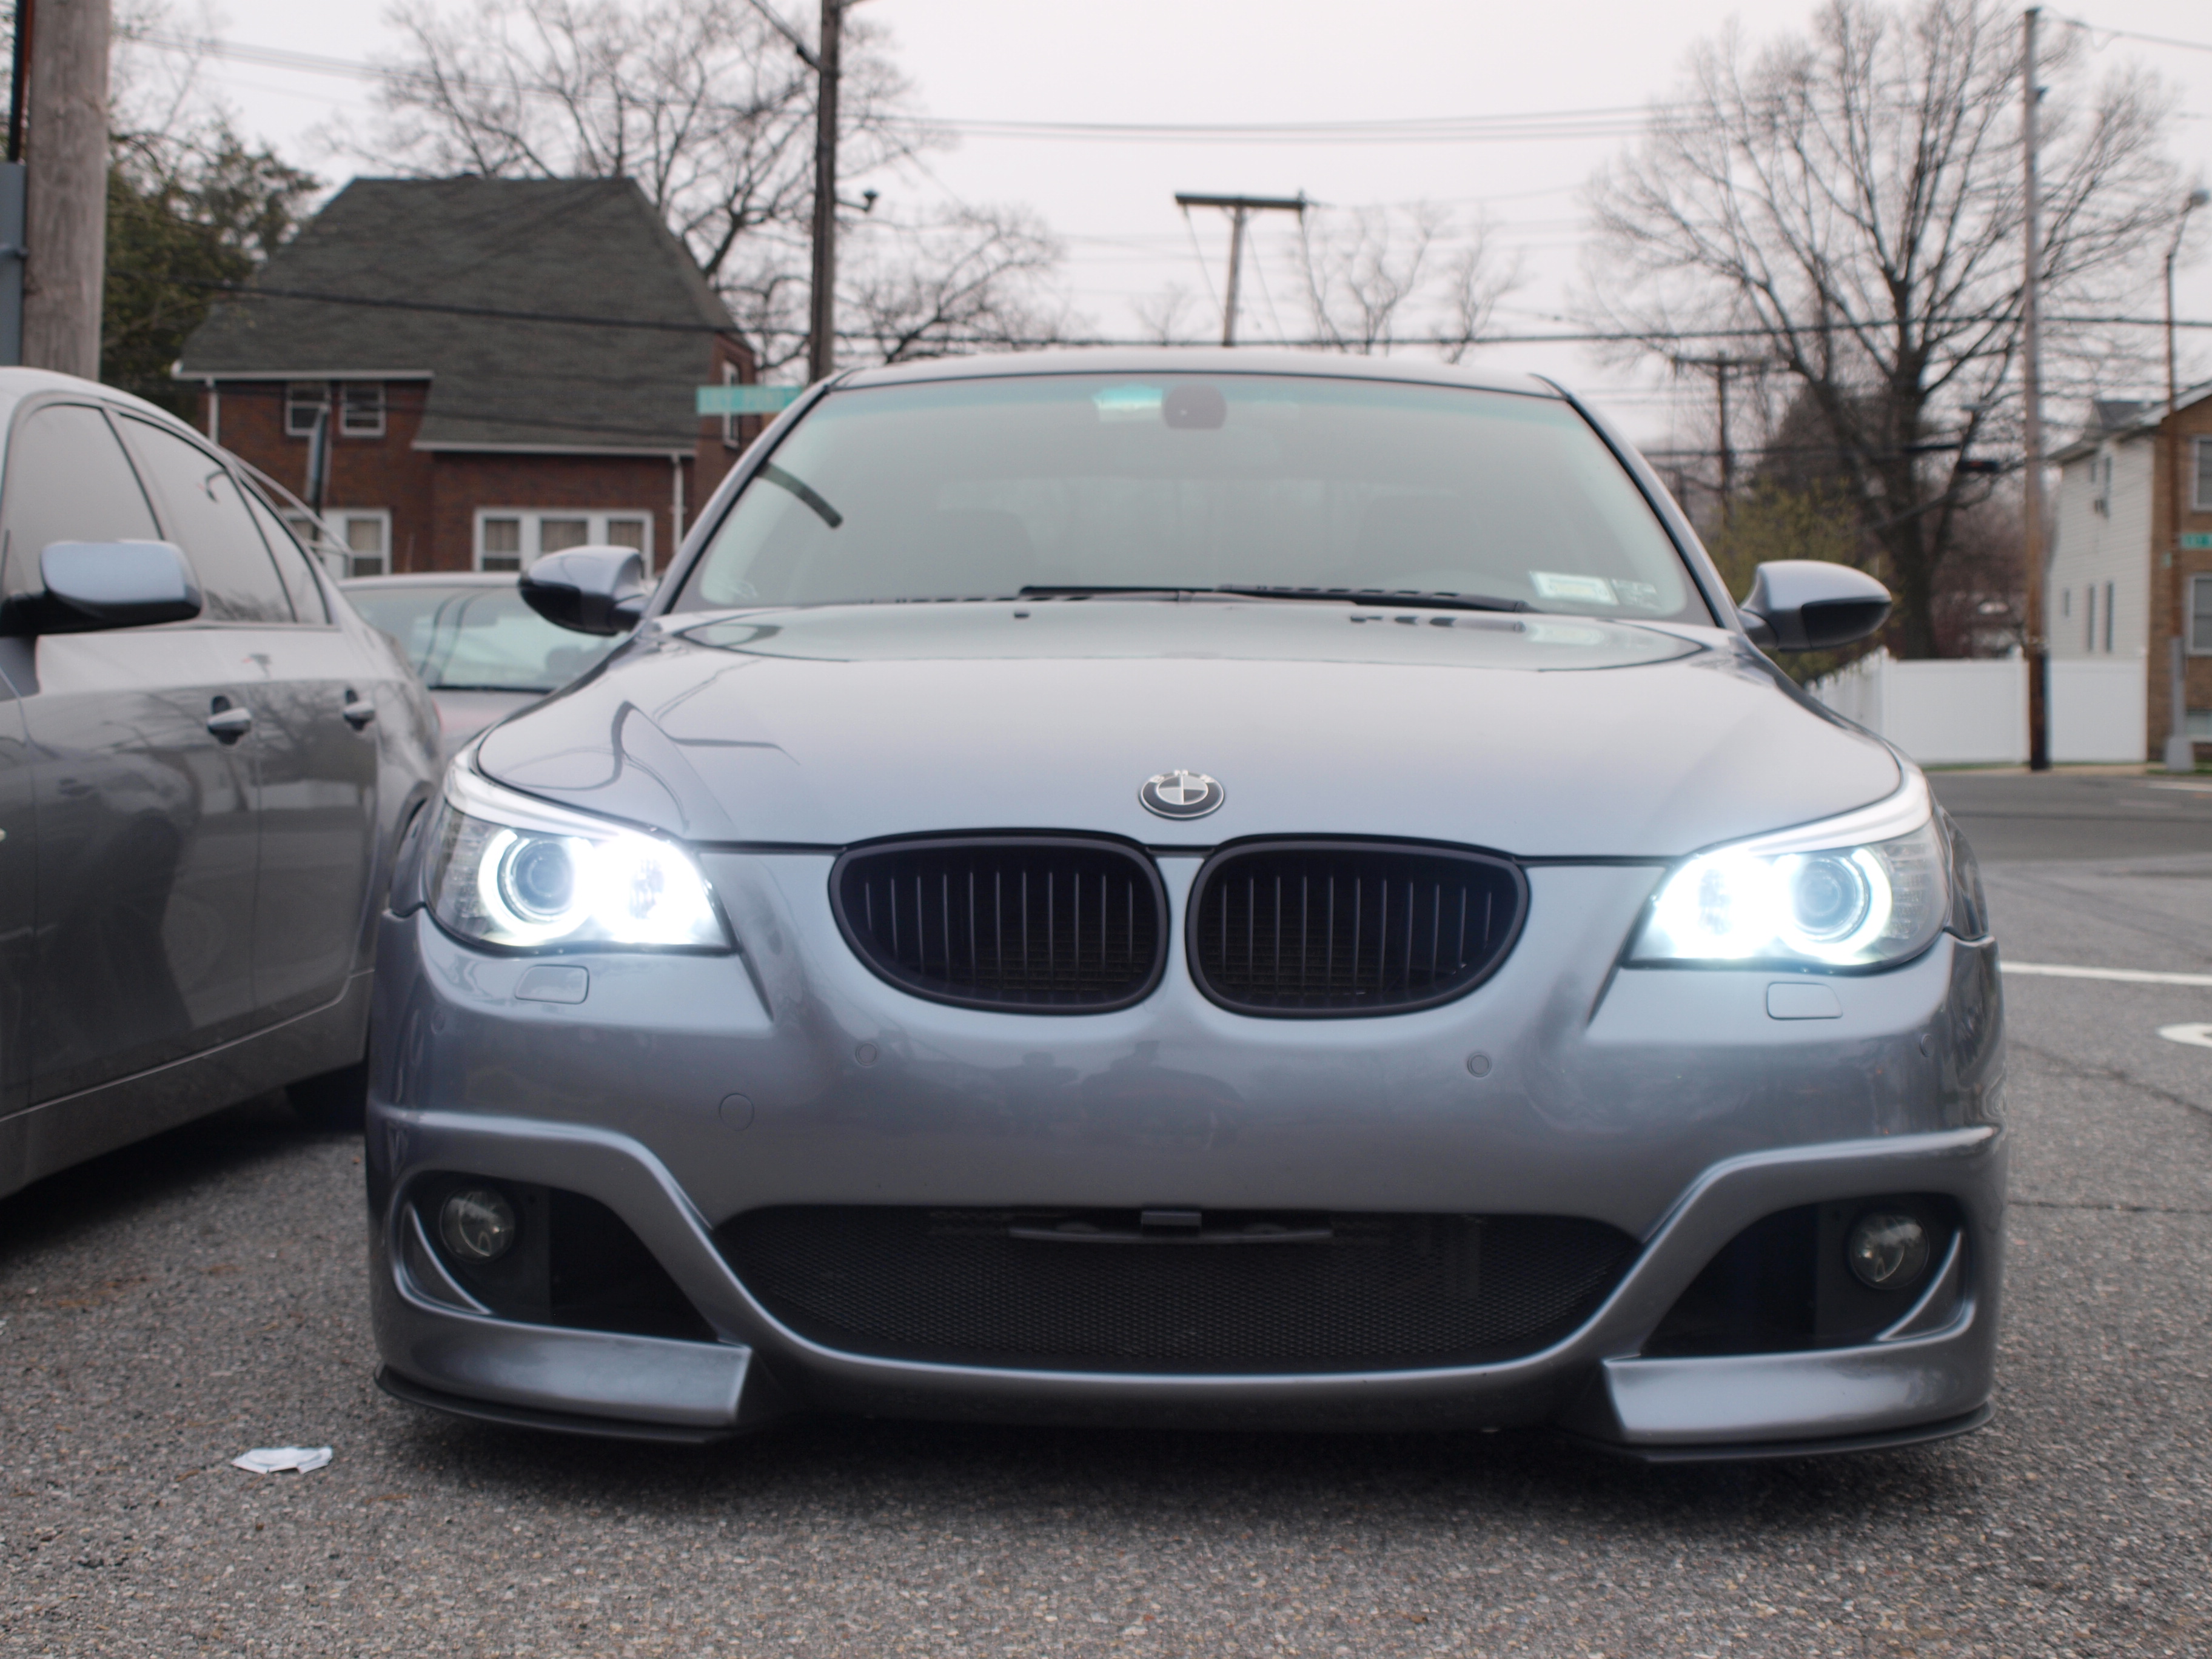
Here's the end result:


Headlight NEEDs to be removed for V8 or V10 models since there's no room in engine bay to mount ballasts. You must mount them underneath the headlight. For a MORE sophiticated DIY on removing headlights, use this DIY: https://5series.net/forums/index.php...0&gopid=969316
Headlight does NOT need to be removed for I6 models since there's MUCH room in engine bay. 528 and 535 are easier than the V8s and V10s I did.
Tools & Materials Needed:
T27 or T30 Torx to remove the screw on upper headlight and bumper
13 mm socket to remove strut bolt and positive bolt
8 mm with long extension (minimum 6 inches) to remove lower headlight screws
Zip Ties
Electrical Tape
BMW Screwdriver or any Philips Screwdriver and Flat-Head
Drill with a 1-inch Drill Bit/Head
RevItNYC HID Angel Eye Kit
Difficulty (Scale 1-10, 10 being hardest): 5 for I6 Models. 6 for V8 and V10 Models.
Time Needed: I6 models, 30-45 minutes. V8 V10 models 45-90 minutes.
Caution:
DO NOT CONNECT NEGATIVE AND POSITIVE INCORRECTLY OR THE ELECTRONICS INSIDE THE BLACK BOX WILL BE DAMAGED IMMEDIATELY. ON THE STOCK HARNESS FROM THE ANGEL EYE BULB, A = POSITIVE AND B = NEGATIVE
Please refrain from posting comments until entire DIY is done. There's at least 60 pictures for this DETAILED DIY.
Thanks!
John
Here's the end result:
 04-07-2010, 08:47 PM
#2
Banned
Thread Starter
Join Date: Jun 2008
Location: Queens, NY
Posts: 7,983
Likes: 0
Received 1 Like
on
1 Post
My Ride: A Car
These are the parts: 
Entire Kit:

Special Modified HID Ballasts And Bulbs:

Modified Black Electronic Boxes:

Modified Relay Cable:


Step 1:
Pop your hood and remove the weather strip to locate the screws from the bumper. Remove the 9 screws using the t27 or t30 torz screws (depending on which screw BMW used) and palce the screws in a safe place.


Entire Kit:
Special Modified HID Ballasts And Bulbs:
Modified Black Electronic Boxes:
Modified Relay Cable:
Step 1:
Pop your hood and remove the weather strip to locate the screws from the bumper. Remove the 9 screws using the t27 or t30 torz screws (depending on which screw BMW used) and palce the screws in a safe place.
04-07-2010, 09:28 PM
#3
Banned
Thread Starter
Join Date: Jun 2008
Location: Queens, NY
Posts: 7,983
Likes: 0
Received 1 Like
on
1 Post
My Ride: A Car
Step 2:
Use the 8mm socket to remove the 2 bottom screw holding the headlight. Remove angel eye cover to reveal the inner screw.


Better Picture of the screw
I am hiding right here!! See me??

Step 3 (This step is optional for I6 but mandatory for V8 and V10; I6 enthusiasts, you can proceed to Step 4 if you want to mount the ballasts in engine bay as opposed to under the headlight):
Headlights can now be removed. Use extra care if it's your first time removing the headlights. We wouldn't want beautiful angel eyes with a messed up bumper. Use masking tape if needed.

You might want to pull the bumper with your right hand and ull the headlight with your left hand.

Remove ugly halogen factory bulb. It's probably kinda melted from the daily use. Halogen is hot and burns hot!


Step 4:
Let's take out that drill with the 1" drill head/bit. Woohoo! Time to drill our baby! How often can we do that?

 [/size]
Use the 8mm socket to remove the 2 bottom screw holding the headlight. Remove angel eye cover to reveal the inner screw.
Better Picture of the screw
I am hiding right here!! See me??
Step 3 (This step is optional for I6 but mandatory for V8 and V10; I6 enthusiasts, you can proceed to Step 4 if you want to mount the ballasts in engine bay as opposed to under the headlight):
Headlights can now be removed. Use extra care if it's your first time removing the headlights. We wouldn't want beautiful angel eyes with a messed up bumper. Use masking tape if needed.
You might want to pull the bumper with your right hand and ull the headlight with your left hand.
Remove ugly halogen factory bulb. It's probably kinda melted from the daily use. Halogen is hot and burns hot!
Step 4:
Let's take out that drill with the 1" drill head/bit. Woohoo! Time to drill our baby! How often can we do that?
[/size]
04-07-2010, 10:16 PM
#4
Banned
Thread Starter
Join Date: Jun 2008
Location: Queens, NY
Posts: 7,983
Likes: 0
Received 1 Like
on
1 Post
My Ride: A Car
Step 5:
Make note of the connections and where everything goes before you proceed. Try to hide the wires where the factory wires go.
This is where we connect the red wire from the special relay. This is the positive. Remove the cover.

Cover opened.

Cover removed.

Use the 13mm socket to loosen the bolt.

This is the negative. This is where the black wire will be connected to.

Step 6 (This step is optional for I6 but mandatory for V8 and V10; I6 enthusiasts, you can proceed to Step 7 if you want to mount the ballasts in engine bay as opposed to under the headlight):
You can mount the ballasts in this area for the passenger side. Find a bolt and mount the bracket and ballast. You have to use your imagination. For V8 and V10 models, there's a lil more room there and you can use the bolt to the right.

You can mount the ballasts in this area for the driver side. Find a bolt and mount the bracket and ballast. Once again, you have to use your imagination. You see that bolt in front of you? Make good use of it.

Make note of the connections and where everything goes before you proceed. Try to hide the wires where the factory wires go.
This is where we connect the red wire from the special relay. This is the positive. Remove the cover.
Cover opened.
Cover removed.
Use the 13mm socket to loosen the bolt.
This is the negative. This is where the black wire will be connected to.
Step 6 (This step is optional for I6 but mandatory for V8 and V10; I6 enthusiasts, you can proceed to Step 7 if you want to mount the ballasts in engine bay as opposed to under the headlight):
You can mount the ballasts in this area for the passenger side. Find a bolt and mount the bracket and ballast. You have to use your imagination. For V8 and V10 models, there's a lil more room there and you can use the bolt to the right.
You can mount the ballasts in this area for the driver side. Find a bolt and mount the bracket and ballast. Once again, you have to use your imagination. You see that bolt in front of you? Make good use of it.
04-07-2010, 10:16 PM
#5
Banned
Thread Starter
Join Date: Jun 2008
Location: Queens, NY
Posts: 7,983
Likes: 0
Received 1 Like
on
1 Post
My Ride: A Car
Step 7:
Now we can install the HID bulb into the housing!!!


VERY VERY Important Information. PLEEEASE Do not mess up. If you blow the black box, it will cost $20 for a new one. Remember A = POSITIVE and B = Negative!!! Blue and Red Wires are POSITIVE and black wires are NEGATIVE. Connect it PROPERLY please
This is the factory harness for the H8 bulb
You see the A and B here.

Connect A to POSITIVE and B to NEGATIVE!

Wrap it around with electical tape.

Step 8:
Let's put it together!!!
Put the angel eye cover back on. For V8 and V10 Models, it's now time to connect put the ballast underneath and connect the ballast to the bulb along with the black box and relay cable since everything is underneath, Blue and Red Wires are POSITIVE and black wires are NEGATIVE. For the 528, lift up your airbox slightly and you can mount the ballast and leave the relay there. For 535, there's a bolt where you can mount the ballast. V8, V10, under the headlight!

Use the rubber/silicone grommet and seal it with the 1-inch hole to prevent moisture and water going in.

Do the same to BOTH sides


Now we can install the HID bulb into the housing!!!
VERY VERY Important Information. PLEEEASE Do not mess up. If you blow the black box, it will cost $20 for a new one. Remember A = POSITIVE and B = Negative!!! Blue and Red Wires are POSITIVE and black wires are NEGATIVE. Connect it PROPERLY please
This is the factory harness for the H8 bulb
You see the A and B here.
Connect A to POSITIVE and B to NEGATIVE!
Wrap it around with electical tape.
Step 8:
Let's put it together!!!
Put the angel eye cover back on. For V8 and V10 Models, it's now time to connect put the ballast underneath and connect the ballast to the bulb along with the black box and relay cable since everything is underneath, Blue and Red Wires are POSITIVE and black wires are NEGATIVE. For the 528, lift up your airbox slightly and you can mount the ballast and leave the relay there. For 535, there's a bolt where you can mount the ballast. V8, V10, under the headlight!
Use the rubber/silicone grommet and seal it with the 1-inch hole to prevent moisture and water going in.
Do the same to BOTH sides
04-07-2010, 10:17 PM
#6
Banned
Thread Starter
Join Date: Jun 2008
Location: Queens, NY
Posts: 7,983
Likes: 0
Received 1 Like
on
1 Post
My Ride: A Car
Step 9:
Routing the wires
This is where the special relay will sit for ALL models. However, you may have to squeeze through on some models due to the intake being there.

Fish it through the radiator shroud and follow the factory hood release cable. BTW, try to let your car cool down so you don't burn yourself and be like


We will later use zip ties to secure the wires. Who invented zip ties???

Routing the wires
This is where the special relay will sit for ALL models. However, you may have to squeeze through on some models due to the intake being there.
Fish it through the radiator shroud and follow the factory hood release cable. BTW, try to let your car cool down so you don't burn yourself and be like
We will later use zip ties to secure the wires. Who invented zip ties???
04-07-2010, 10:19 PM
#7
Banned
Thread Starter
Join Date: Jun 2008
Location: Queens, NY
Posts: 7,983
Likes: 0
Received 1 Like
on
1 Post
My Ride: A Car
Step 10:
Connecting the relay. This powers your system!
Use your 13 mm socket and unscrew the bolt. Connect the red wire to it like so.

Put the cover back on for a better factory look.

Connect the negative.

Zip tie the relay so it doesn't dangle around. Relays ger car sick too if it bounces too much. LOL It's just to keep things neat.

Everything tucked in

Connecting the relay. This powers your system!
Use your 13 mm socket and unscrew the bolt. Connect the red wire to it like so.
Put the cover back on for a better factory look.
Connect the negative.
Zip tie the relay so it doesn't dangle around. Relays ger car sick too if it bounces too much. LOL
It's just to keep things neat.Everything tucked in
04-07-2010, 10:19 PM
#8
Banned
Thread Starter
Join Date: Jun 2008
Location: Queens, NY
Posts: 7,983
Likes: 0
Received 1 Like
on
1 Post
My Ride: A Car
Step 11:
Let's put the special black boxes in and connect the ballast for the passenger side. Below is for I6 models. V8 and V10 models, these boxes will be under the headlight area.
The one labelled PASSENGER side meaning for LHD vehicles, use it for the passenger side. Connect the black box wire to the wire coming OUT of the headlight. Once again, positive to positive and negative to negative.


Tuck the box away in that corner

Connect the ballast to the bulb.

Connect the wire coming from the relay to the ballast. This is where the ballast is for I6 models.

Let's put the special black boxes in and connect the ballast for the passenger side. Below is for I6 models. V8 and V10 models, these boxes will be under the headlight area.
The one labelled PASSENGER side meaning for LHD vehicles, use it for the passenger side. Connect the black box wire to the wire coming OUT of the headlight. Once again, positive to positive and negative to negative.
Tuck the box away in that corner
Connect the ballast to the bulb.
Connect the wire coming from the relay to the ballast. This is where the ballast is for I6 models.
04-07-2010, 10:19 PM
#9
Banned
Thread Starter
Join Date: Jun 2008
Location: Queens, NY
Posts: 7,983
Likes: 0
Received 1 Like
on
1 Post
My Ride: A Car
Step 12:
Now for the driver side!!! Aren't you excited? ALMOST DONE!!!
This is the wire going to the ballast FROM the relay.

There's two wires. The other one goes to the black box.

Connect it the wire from relay to the ballast!

Connect wire coming from the angel eye bulb to the black box. REMEMBER POSITIVE TO POSITIVE AND NEGATIVE TO NEGATIVE!!!!

Now connect the black box wire to the relay wire.

Hide the box to the right.

Now for the driver side!!! Aren't you excited? ALMOST DONE!!!
This is the wire going to the ballast FROM the relay.
There's two wires. The other one goes to the black box.
Connect it the wire from relay to the ballast!
Connect wire coming from the angel eye bulb to the black box. REMEMBER POSITIVE TO POSITIVE AND NEGATIVE TO NEGATIVE!!!!
Now connect the black box wire to the relay wire.
Hide the box to the right.


