DIY: headlight tint removal + headlight restoration e60.
 09-23-2011, 01:41 PM
#1
Members
Senior Members
Thread Starter
Join Date: Sep 2011
Location: so cal
Posts: 476
Likes: 0
Received 1 Like
on
1 Post
My Ride: coilvers retrofits
Model Year: 2001 and 2011
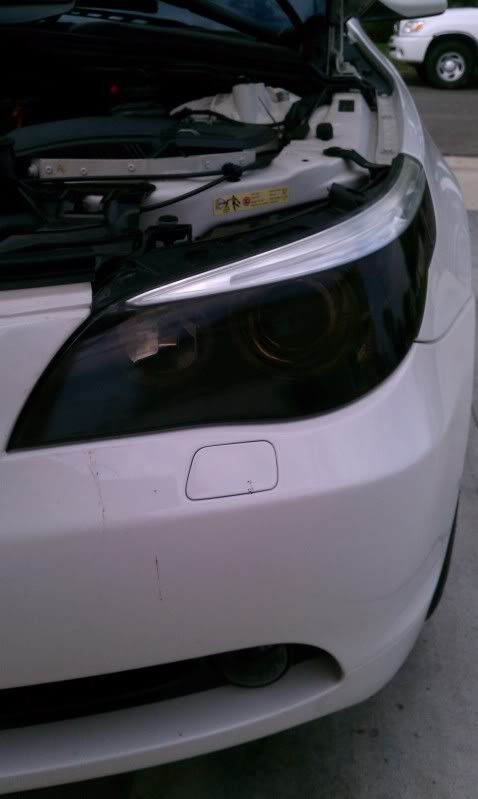
when i bought my e60 the lights where tinted. at first i thought it was pretty cool, til i realized at night the light was effected by the tint, not so bad but whats the point of HIDs if its not reaching its full effect. then i found these forums and read about orions AE and blacking out the lights and knew i have to do these mods. it would be the best mod to still keep my black and white exterior theme and have nothing effecting the lightening, plus it looks awesome.
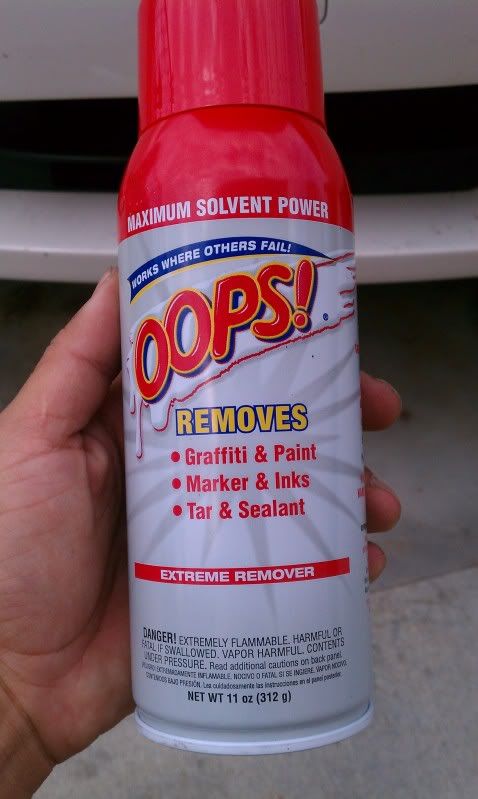
problem was i have no idea what paint the guy used to tint the headlight, im going to guess nightshade, but it didnt really look too much like nightshade, i can sorta tell the different being ive been doing automotive painting as a hobby for quite a while now. anyways i didnt want to use anything too strong, and i always had luck with Oops paint removal on plastics. not too strong but always gets the job done with a little elbow grease.
i picked up a bottle of oops (6.99)
assortment of sand paper (1000k, 1500k, 2000k and 3000k) (5.49)
i had microfiber towels
smart wax (not sure the type i used, my friend is sponsored by them and he just picked up a new wax that they just came out with and let me try it out, and it worked absolutely awesome.
automotive tape (blue or green works, i had green laying around) normal cost is about 4.99 a roll.
water (free!)
time (sometimes that equals money though)
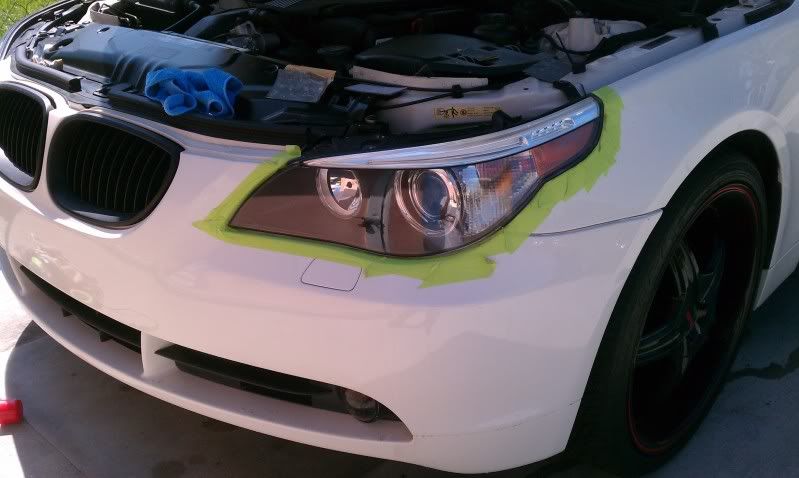
first of all do this on a well ventilated area, i did mine in my drive way so it was perfect. in a garage open the door or wear a respirator. open hood and mask off surrounding areas so you don't accidentally knick the paint with the sand paper.
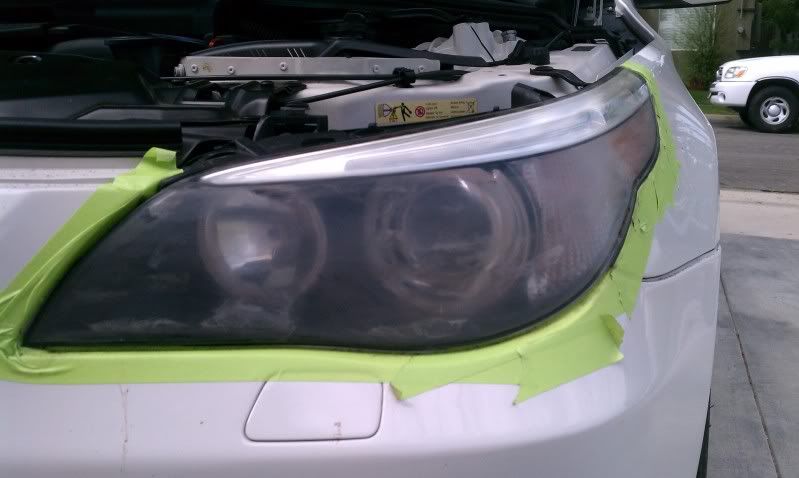
OK lets see what i was dealing with. heres the headlight before:
and a bottle of
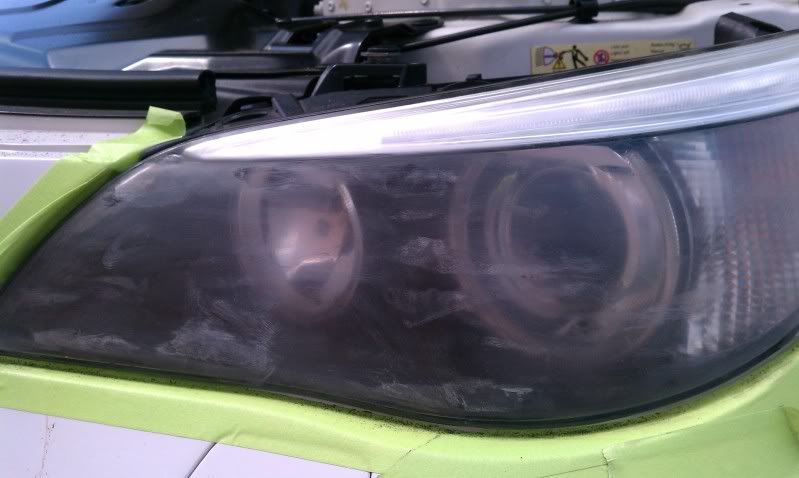
the best way was to work in sections, spray some of the oops on a little area, let it sit for about 5-10 seconds and begin rubbing off, i used shop rags as microfiber towels will get ruined after a while with the chemical. dont let it sit for too long just enough to let it soak in and them rub away. this took me like 30 minutes per headlights to get off. little tiny spots i just sprayed a little directly on the towel and rub it off like that. i tried to have as little oops on the plastic as possible. PLEASE be away not to have any dipping down on your paint. i have a extra towel to catch anything from dripping and a piece of cardboard to block any over spray from hitting anything else on the car.
after about 30 minutes, your headlight should look like this. (no matter how many times ive done this, i always stop and think "oh no what have i done! i should have just left it alone! lol but just know it will get better!). as you can see i have a lot to work with, and the oops ruffed up a few spots of the plastic than i expected, but nothing i cant fix. maybe it was there before the previous owner painted it. who knows.
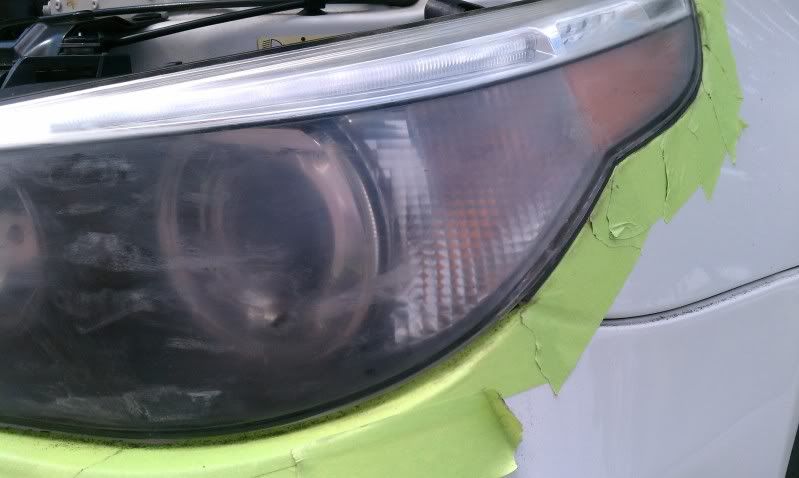
now time to start sanding. i wished i had started off with 800 grit, but i was also watching my niece and didn't have a baby seat to be able to head to the store and get some so i just started with 1000k grit wet sanding. i used a small little foam block and went over every area of the headlight. i sanded going one way, and for the 2nd pass i went the opposite way and so on. i dont know if its necessary, but i always have luck doing this method. i sanding for about 20 minutes, til i saw everything was evenly sanded and also between passes i dried it with a towel to see any areas i should go over. then on to the next size which was 1500k grit. again repeat process. repeat til you are at 3000k grit and don't cheat out on cutting less time between sanding. you want to make sure every sandpaper cuts away the old grit.
after i finished and dried my headlight it should look pretty dull, but very even. when you spray water on it you can see it almost clear, but trust me it will get much clearer after buff...
and heres the headlight all buffed out.
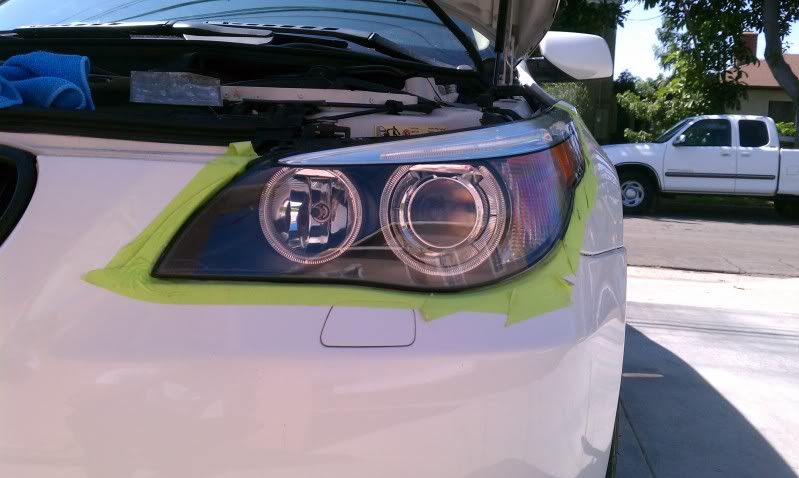
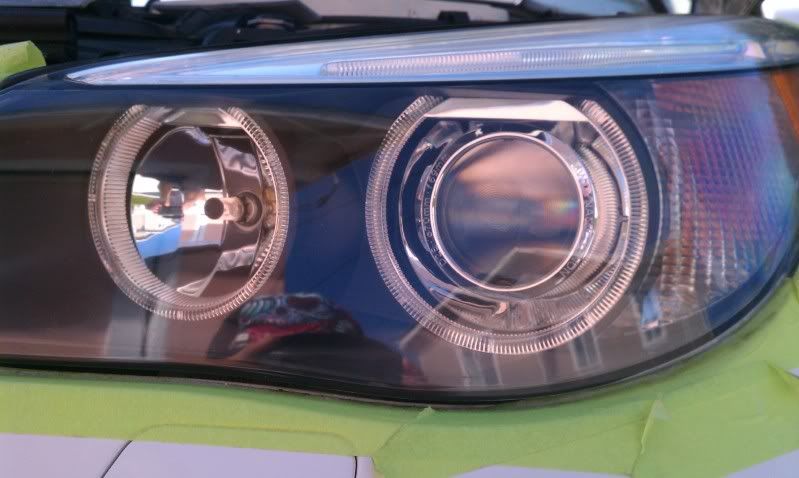
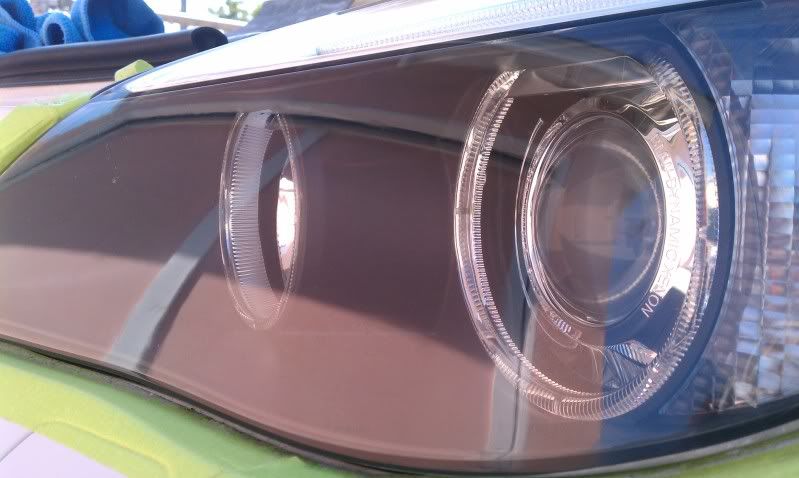
almost like new! now please be aware that when you sand off the layer of the headlight, you are removing a UV protect layer. now the absolute best method would be to shoot a coat of clear over the headlight (but would require removing the headlight) and i like to use automotive clear, so i would need to take out the compressor, gun and paint. i plan on doing this but when i take off the headlight for the Orion AE and blackout mod so i dont have to take out the headlight twice. i plan on ordering the supplies for these mods this week.
anyways. have fun you guys restoring your headlights, you can skip the part of removing the paint with oops if you just want to make yours look like new again. also not responsible for any damage done to your vehicle for following this guide. this is my method and always have luck with it, but i dont want to be held responsible if you dont get the same results.
problem was i have no idea what paint the guy used to tint the headlight, im going to guess nightshade, but it didnt really look too much like nightshade, i can sorta tell the different being ive been doing automotive painting as a hobby for quite a while now. anyways i didnt want to use anything too strong, and i always had luck with Oops paint removal on plastics. not too strong but always gets the job done with a little elbow grease.
i picked up a bottle of oops (6.99)
assortment of sand paper (1000k, 1500k, 2000k and 3000k) (5.49)
i had microfiber towels
smart wax (not sure the type i used, my friend is sponsored by them and he just picked up a new wax that they just came out with and let me try it out, and it worked absolutely awesome.
automotive tape (blue or green works, i had green laying around) normal cost is about 4.99 a roll.
water (free!)
time (sometimes that equals money though)
first of all do this on a well ventilated area, i did mine in my drive way so it was perfect. in a garage open the door or wear a respirator. open hood and mask off surrounding areas so you don't accidentally knick the paint with the sand paper.
OK lets see what i was dealing with. heres the headlight before:
and a bottle of
the best way was to work in sections, spray some of the oops on a little area, let it sit for about 5-10 seconds and begin rubbing off, i used shop rags as microfiber towels will get ruined after a while with the chemical. dont let it sit for too long just enough to let it soak in and them rub away. this took me like 30 minutes per headlights to get off. little tiny spots i just sprayed a little directly on the towel and rub it off like that. i tried to have as little oops on the plastic as possible. PLEASE be away not to have any dipping down on your paint. i have a extra towel to catch anything from dripping and a piece of cardboard to block any over spray from hitting anything else on the car.
after about 30 minutes, your headlight should look like this. (no matter how many times ive done this, i always stop and think "oh no what have i done! i should have just left it alone! lol but just know it will get better!). as you can see i have a lot to work with, and the oops ruffed up a few spots of the plastic than i expected, but nothing i cant fix. maybe it was there before the previous owner painted it. who knows.
now time to start sanding. i wished i had started off with 800 grit, but i was also watching my niece and didn't have a baby seat to be able to head to the store and get some so i just started with 1000k grit wet sanding. i used a small little foam block and went over every area of the headlight. i sanded going one way, and for the 2nd pass i went the opposite way and so on. i dont know if its necessary, but i always have luck doing this method. i sanding for about 20 minutes, til i saw everything was evenly sanded and also between passes i dried it with a towel to see any areas i should go over. then on to the next size which was 1500k grit. again repeat process. repeat til you are at 3000k grit and don't cheat out on cutting less time between sanding. you want to make sure every sandpaper cuts away the old grit.
after i finished and dried my headlight it should look pretty dull, but very even. when you spray water on it you can see it almost clear, but trust me it will get much clearer after buff...
and heres the headlight all buffed out.
almost like new! now please be aware that when you sand off the layer of the headlight, you are removing a UV protect layer. now the absolute best method would be to shoot a coat of clear over the headlight (but would require removing the headlight) and i like to use automotive clear, so i would need to take out the compressor, gun and paint. i plan on doing this but when i take off the headlight for the Orion AE and blackout mod so i dont have to take out the headlight twice. i plan on ordering the supplies for these mods this week.
anyways. have fun you guys restoring your headlights, you can skip the part of removing the paint with oops if you just want to make yours look like new again. also not responsible for any damage done to your vehicle for following this guide. this is my method and always have luck with it, but i dont want to be held responsible if you dont get the same results.
 09-23-2011, 02:35 PM
#2
Contributors
Join Date: Jun 2008
Location: FT. Bliss Texas
Posts: 2,674
Likes: 0
Received 0 Likes
on
0 Posts
My Ride: 2008 528i, Space Grey, Nav, PDC, Premium, Sports, Grey Leather, Xenon, Cornering...
Typically, from what i have seen, they take clear coat and mix it with a color and spray that. That is what I got done to my taillights.
Great job BTW.
Great job BTW.
09-23-2011, 02:54 PM
#3
Members
Senior Members
Thread Starter
Join Date: Sep 2011
Location: so cal
Posts: 476
Likes: 0
Received 1 Like
on
1 Post
My Ride: coilvers retrofits
Model Year: 2001 and 2011
yeah that's the way i do it too, so im lucky he didn't do it that way otherwise i probably wouldn't have been able to take it off. the best way to do it is get paint, delude it until it is transparent and then shoot a clear over that base, or use a candy color for the base. color sand clear and buff. im done with painting tails tho, vinyl film is the way to go plus its removable. used to hate it, now i love using it. plan to smoke my rear tails using vinyl film, just a slight smoke tho.
09-23-2011, 03:03 PM
#4
Contributors
Join Date: Jun 2008
Location: FT. Bliss Texas
Posts: 2,674
Likes: 0
Received 0 Likes
on
0 Posts
My Ride: 2008 528i, Space Grey, Nav, PDC, Premium, Sports, Grey Leather, Xenon, Cornering...
Mine look pretty dark in the pic but they are actually a vibrant cherry color. I love them. They were tinted at first and when I saw the results I wanted it permanent.
09-24-2011, 11:28 AM
#6
Members
Senior Members
Thread Starter
Join Date: Sep 2011
Location: so cal
Posts: 476
Likes: 0
Received 1 Like
on
1 Post
My Ride: coilvers retrofits
Model Year: 2001 and 2011
yeah, i could have just sanded away the paint, but when i test spoted the Oops! it came off so easily, saved me lot of time on sanding with a lower grit (probably start with 600-800). if it had been done with car paint like tonymacs tails, i would have sanded it and not bothered with the oops. i always found using the oops works best on those rattle can tail tinting.
09-24-2011, 09:14 PM
#7
Members
Senior Members

Join Date: Aug 2011
Location: Los Angeles CA,
Posts: 383
Likes: 0
Received 0 Likes
on
0 Posts
yeah, i could have just sanded away the paint, but when i test spoted the Oops! it came off so easily, saved me lot of time on sanding with a lower grit (probably start with 600-800). if it had been done with car paint like tonymacs tails, i would have sanded it and not bothered with the oops. i always found using the oops works best on those rattle can tail tinting.
09-29-2014, 02:50 PM
#9
New Members

Join Date: Sep 2014
Location: San Jose
Posts: 1
Likes: 0
Received 0 Likes
on
0 Posts
My Ride: BMW540
I just tried this and worked real good and clean. The Klean Paint stripper for furniture. I used small amount on a piece of cloth and rubbed it on the headlight and the paint just came right off. Then I finished up by using a little bit of carwax.So so easy.

Thread
Thread Starter
Forum
Replies
Last Post
ASpec818
E60 Discussion
11
11-30-2015 04:14 AM
TexaZ3
Complete Car Sales
17
05-06-2015 09:54 AM

