Dension AVR Install DIY
 12-27-2010, 05:20 AM
#1
Contributors
Thread Starter
Join Date: Aug 2009
Location: UK - Romford, Essex
Posts: 379
Likes: 0
Received 0 Likes
on
0 Posts
Hello
I received a Dension AVR unit as a late birthday and Xmas present, so went about installing it and thought I would do a little write up.
I already had installed the Dension AVR following the excellent DIY by Muttley You will need to get the TV option coded to allow the AVR to work.
I started by unpacking the contents of the box, here's what you get...
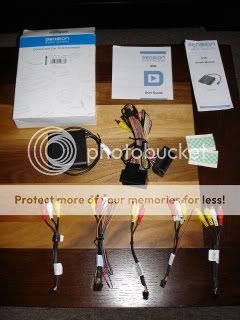
You have the RCA type connectors for Rear screens, rear camera, 2 AV inputs
The following tools will be needed
1X large flat bladed screw driver
1X small thin flat bladed screw driver
1X medium sized Philips (Cross) type screw driver
1X break out type (Scotch lock) type connector
So, I started the install by removing the passenger side glove box, upper trim glove box trim and centre dash trim
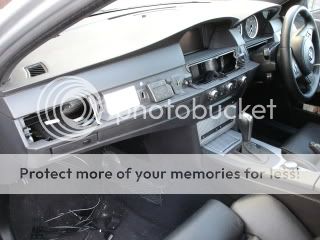
Next remove the centre dash trim, two screws hold the fan / heater controls and two clips towards the bottom
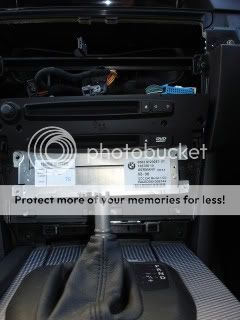
Now remove the CCC unit, 4 screws and pull forward. I had to remove the gear stick as it was in Park.
Remove the connectors on the back 3 on the right and the LCD connector (Metal connector) in the middle and the Block connector on the left
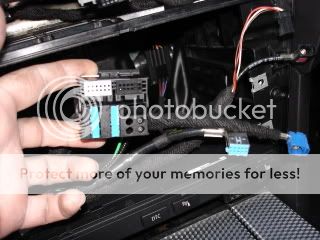
Now place the CCC unit somewhere safe and you are now ready to install te AVR unit.
Start by taking out the fibre cable connector of the block connector (Bottom right of the pic above) its held in place with by a clip, once pressed it will slide out much like the one in the CDC connector.
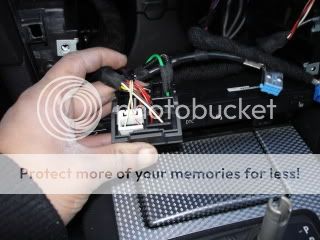
Now take the AVR interface loom and connect the fibre cable connector in the male CCC end that looks identical to the one you have installed in the car
Now follow the dension AVR install instructions, by connecting the AVR interface female end to the original car block connector
Take the CCC and connect the male end into it and feed the wires through to the passenger side, replace the wires on the back of the CCC and push it back into the centre dash.
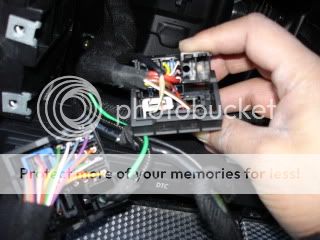
Now connect the small block connector from the Dension AVR interface loom into the AVR unit
Connect the yellow male RCA type connector into the AVR video in.
Connect the AV HU Out lead to the AVR and then connect the yellow male end to the yellow female end from the Dension AVR interface loom
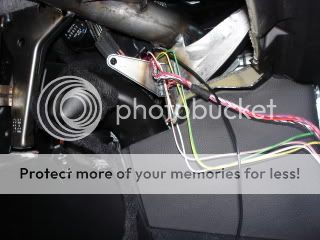
Now take the break out / scotch lock type connector and connect the white and red coloured lead marked Hand Break to the black negative / ground lead of the Dension 500 unit. The AVR can use the CAN bus to detect the hand brake and reverse gear but you need to do this step to get the AVR unit to send the video signal (Thanks for the heads up Delwarulislam)
Remove the 9 pin White IPOD connector from the Dension 500 and plug it into the AVR
Plug in the 9 pin white connector from the AVR to the port on the Dension 500 you just had the IPOD connected to (nearest the USB port).
Plug in all other connectors you want to use ( I just used the AV1 input for now)
You are now ready to test your AVR unit...
Put the car ingnition key / start button to POS1 so the idrive startes up
Select > CD5> Source IPOD GW > CD5 > Video > select your ipod video. You should now hear it start playing. You now need to come out of the menu, and back to the Idrive source option FM / AM/ CD/ TV option and select TV
The main screen will now switch to the Video being played
Once you have confirmed that all is working as it should, tidy the cabling and replace all the passenger side and glove box trim (Not the passenger dash trim at this stage)
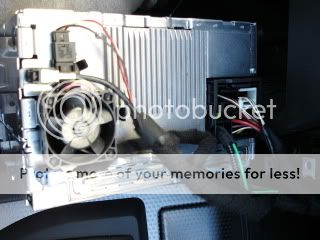
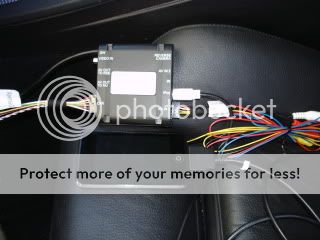
I mounted the AVR above the CDC unit on top of the metal fuse box, the Dension 500 is mounted to the very left of the fuse box
Screw in the CCC and replace the centre dash trim and connect the fan / heater control leads.
Screw the fan heater back in place and now replace the passenger side dash trim.
You may also want to update to the latest Dension 500 firmware and enable video in motion on the AVR from the Dension website
Firmware
http://www.dension.c...to_one=Firmware
Video in motion enabling
http://www.dension.c...many_to_one=All
I hope this helps others. Its a bit more daunting as you having to remove more trim but its not any harder then fitting the Dension 500! If you need any more info drop me a PM and I will try and help!
I received a Dension AVR unit as a late birthday and Xmas present, so went about installing it and thought I would do a little write up.
I already had installed the Dension AVR following the excellent DIY by Muttley
You will need to get the TV option coded to allow the AVR to work. I started by unpacking the contents of the box, here's what you get...
You have the RCA type connectors for Rear screens, rear camera, 2 AV inputs
The following tools will be needed
1X large flat bladed screw driver
1X small thin flat bladed screw driver
1X medium sized Philips (Cross) type screw driver
1X break out type (Scotch lock) type connector
So, I started the install by removing the passenger side glove box, upper trim glove box trim and centre dash trim
Next remove the centre dash trim, two screws hold the fan / heater controls and two clips towards the bottom
Now remove the CCC unit, 4 screws and pull forward. I had to remove the gear stick as it was in Park.
Remove the connectors on the back 3 on the right and the LCD connector (Metal connector) in the middle and the Block connector on the left
Now place the CCC unit somewhere safe and you are now ready to install te AVR unit.
Start by taking out the fibre cable connector of the block connector (Bottom right of the pic above) its held in place with by a clip, once pressed it will slide out much like the one in the CDC connector.
Now take the AVR interface loom and connect the fibre cable connector in the male CCC end that looks identical to the one you have installed in the car
Now follow the dension AVR install instructions, by connecting the AVR interface female end to the original car block connector
Take the CCC and connect the male end into it and feed the wires through to the passenger side, replace the wires on the back of the CCC and push it back into the centre dash.
Now connect the small block connector from the Dension AVR interface loom into the AVR unit
Connect the yellow male RCA type connector into the AVR video in.
Connect the AV HU Out lead to the AVR and then connect the yellow male end to the yellow female end from the Dension AVR interface loom
Now take the break out / scotch lock type connector and connect the white and red coloured lead marked Hand Break to the black negative / ground lead of the Dension 500 unit. The AVR can use the CAN bus to detect the hand brake and reverse gear but you need to do this step to get the AVR unit to send the video signal (Thanks for the heads up Delwarulislam)
Remove the 9 pin White IPOD connector from the Dension 500 and plug it into the AVR
Plug in the 9 pin white connector from the AVR to the port on the Dension 500 you just had the IPOD connected to (nearest the USB port).
Plug in all other connectors you want to use ( I just used the AV1 input for now)
You are now ready to test your AVR unit...
Put the car ingnition key / start button to POS1 so the idrive startes up
Select > CD5> Source IPOD GW > CD5 > Video > select your ipod video. You should now hear it start playing. You now need to come out of the menu, and back to the Idrive source option FM / AM/ CD/ TV option and select TV
The main screen will now switch to the Video being played
Once you have confirmed that all is working as it should, tidy the cabling and replace all the passenger side and glove box trim (Not the passenger dash trim at this stage)
I mounted the AVR above the CDC unit on top of the metal fuse box, the Dension 500 is mounted to the very left of the fuse box
Screw in the CCC and replace the centre dash trim and connect the fan / heater control leads.
Screw the fan heater back in place and now replace the passenger side dash trim.
You may also want to update to the latest Dension 500 firmware and enable video in motion on the AVR from the Dension website
Firmware
http://www.dension.c...to_one=Firmware
Video in motion enabling
http://www.dension.c...many_to_one=All
I hope this helps others. Its a bit more daunting as you having to remove more trim but its not any harder then fitting the Dension 500! If you need any more info drop me a PM and I will try and help!
 12-27-2010, 06:36 AM
#3
Contributors
Thread Starter
Join Date: Aug 2009
Location: UK - Romford, Essex
Posts: 379
Likes: 0
Received 0 Likes
on
0 Posts
No not  yet let me thaw out and I'll get some. I'm going to convert a few clips from DVD and see what the resolution is like, seems good on the clips I have on my ipod. Anyone know what the best resolution to set the images too?
yet let me thaw out and I'll get some. I'm going to convert a few clips from DVD and see what the resolution is like, seems good on the clips I have on my ipod. Anyone know what the best resolution to set the images too?
12-27-2010, 12:48 PM
#4
Contributors
Thread Starter
Join Date: Aug 2009
Location: UK - Romford, Essex
Posts: 379
Likes: 0
Received 0 Likes
on
0 Posts
Some pics of it running 
Hangover..
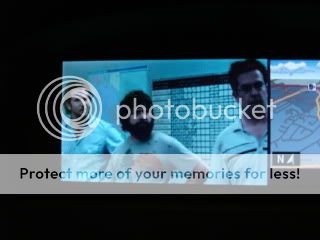
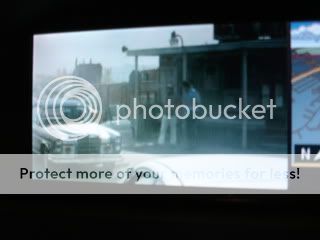
Big Bang Theory...

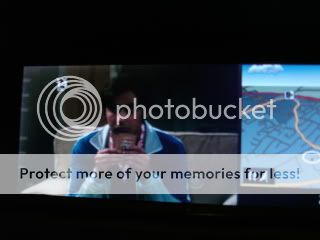
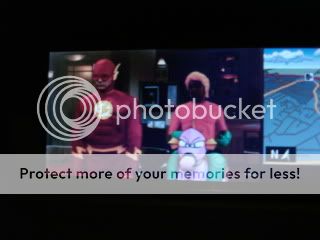
Family Guy
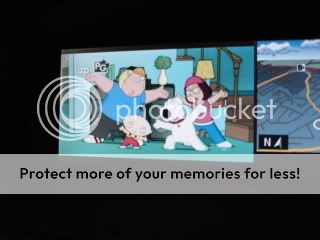
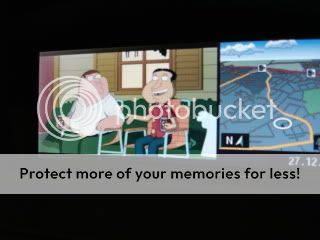
Very watch-able , used dvdvideosofts converter..to convert them to ipod compatible files.
Tip for to get the movies to always start from the beginning, in itunes select the video and right click > Get Info > options > disable remember last position
Hangover..
Big Bang Theory...
Family Guy
Very watch-able
, used dvdvideosofts converter..to convert them to ipod compatible files.Tip for to get the movies to always start from the beginning, in itunes select the video and right click > Get Info > options > disable remember last position
02-22-2011, 12:14 PM
#6
Members

Join Date: Jan 2009
Posts: 22
Likes: 0
Received 0 Likes
on
0 Posts
Hi guys
I am from SW london does anybody know where I could get my dension gtw 500 installed including the avr unit, a rear view camera and a dvd player?
I haven't got the dvd player yet any suggestions which one is good?
Thanks in advance guys
I am from SW london does anybody know where I could get my dension gtw 500 installed including the avr unit, a rear view camera and a dvd player?
I haven't got the dvd player yet any suggestions which one is good?
Thanks in advance guys
07-26-2011, 12:47 AM
#7
New Members

Join Date: Jul 2011
Location: Farnham, UK
Posts: 1
Likes: 0
Received 0 Likes
on
0 Posts
Hi,
New to the forum but about to give the AVR install a go - already have GW500 running happily.
One question - did you already have TV enabled (coded?) in the car or did you get it coded after you installed the AVR?
I currently don't have TV as an option in my CCC Professional Nav menu - the last entry is AUX...
I've asked Dension, a UK distributor of Dension and an independant BMW specialist and none of them can either agree or give me a convincing answer...
Thanks for any help.
Jo
07-26-2011, 01:16 PM
#8
Contributors
Thread Starter
Join Date: Aug 2009
Location: UK - Romford, Essex
Posts: 379
Likes: 0
Received 0 Likes
on
0 Posts
You need the TV option coded so you see the option in IDrive, and for the dension to show the video, else you will just get sound and no picture, your BMW specialist can code it for you if they have Autologic I think.
Or find someone local that has NCS expert up and running, that can code it for you.
Dension's customer support is
Or find someone local that has NCS expert up and running, that can code it for you.
Dension's customer support is
08-02-2011, 07:13 PM
#9
New Members

Join Date: Aug 2011
Location: JHJGH
Posts: 1
Likes: 0
Received 0 Likes
on
0 Posts
08-14-2011, 06:43 AM
#10
Members

Join Date: Aug 2011
Location: London
Posts: 9
Likes: 0
Received 0 Likes
on
0 Posts
Hello
I received a Dension AVR unit as a late birthday and Xmas present, so went about installing it and thought I would do a little write up.
I already had installed the Dension AVR following the excellent DIY by Muttley You will need to get the TV option coded to allow the AVR to work.
I started by unpacking the contents of the box, here's what you get...
You have the RCA type connectors for Rear screens, rear camera, 2 AV inputs
The following tools will be needed
1X large flat bladed screw driver
1X small thin flat bladed screw driver
1X medium sized Philips (Cross) type screw driver
1X break out type (Scotch lock) type connector
So, I started the install by removing the passenger side glove box, upper trim glove box trim and centre dash trim
Next remove the centre dash trim, two screws hold the fan / heater controls and two clips towards the bottom
Now remove the CCC unit, 4 screws and pull forward. I had to remove the gear stick as it was in Park.
Remove the connectors on the back 3 on the right and the LCD connector (Metal connector) in the middle and the Block connector on the left
Now place the CCC unit somewhere safe and you are now ready to install te AVR unit.
Start by taking out the fibre cable connector of the block connector (Bottom right of the pic above) its held in place with by a clip, once pressed it will slide out much like the one in the CDC connector.
Now take the AVR interface loom and connect the fibre cable connector in the male CCC end that looks identical to the one you have installed in the car
Now follow the dension AVR install instructions, by connecting the AVR interface female end to the original car block connector
Take the CCC and connect the male end into it and feed the wires through to the passenger side, replace the wires on the back of the CCC and push it back into the centre dash.
Now connect the small block connector from the Dension AVR interface loom into the AVR unit
Connect the yellow male RCA type connector into the AVR video in.
Connect the AV HU Out lead to the AVR and then connect the yellow male end to the yellow female end from the Dension AVR interface loom
Now take the break out / scotch lock type connector and connect the white and red coloured lead marked Hand Break to the black negative / ground lead of the Dension 500 unit. The AVR can use the CAN bus to detect the hand brake and reverse gear but you need to do this step to get the AVR unit to send the video signal (Thanks for the heads up Delwarulislam)
Remove the 9 pin White IPOD connector from the Dension 500 and plug it into the AVR
Plug in the 9 pin white connector from the AVR to the port on the Dension 500 you just had the IPOD connected to (nearest the USB port).
Plug in all other connectors you want to use ( I just used the AV1 input for now)
You are now ready to test your AVR unit...
Put the car ingnition key / start button to POS1 so the idrive startes up
Select > CD5> Source IPOD GW > CD5 > Video > select your ipod video. You should now hear it start playing. You now need to come out of the menu, and back to the Idrive source option FM / AM/ CD/ TV option and select TV
The main screen will now switch to the Video being played
Once you have confirmed that all is working as it should, tidy the cabling and replace all the passenger side and glove box trim (Not the passenger dash trim at this stage)
I mounted the AVR above the CDC unit on top of the metal fuse box, the Dension 500 is mounted to the very left of the fuse box
Screw in the CCC and replace the centre dash trim and connect the fan / heater control leads.
Screw the fan heater back in place and now replace the passenger side dash trim.
You may also want to update to the latest Dension 500 firmware and enable video in motion on the AVR from the Dension website
Firmware
http://www.dension.c...to_one=Firmware
Video in motion enabling
http://www.dension.c...many_to_one=All
I hope this helps others. Its a bit more daunting as you having to remove more trim but its not any harder then fitting the Dension 500! If you need any more info drop me a PM and I will try and help!
I received a Dension AVR unit as a late birthday and Xmas present, so went about installing it and thought I would do a little write up.
I already had installed the Dension AVR following the excellent DIY by Muttley
You will need to get the TV option coded to allow the AVR to work. I started by unpacking the contents of the box, here's what you get...
You have the RCA type connectors for Rear screens, rear camera, 2 AV inputs
The following tools will be needed
1X large flat bladed screw driver
1X small thin flat bladed screw driver
1X medium sized Philips (Cross) type screw driver
1X break out type (Scotch lock) type connector
So, I started the install by removing the passenger side glove box, upper trim glove box trim and centre dash trim
Next remove the centre dash trim, two screws hold the fan / heater controls and two clips towards the bottom
Now remove the CCC unit, 4 screws and pull forward. I had to remove the gear stick as it was in Park.
Remove the connectors on the back 3 on the right and the LCD connector (Metal connector) in the middle and the Block connector on the left
Now place the CCC unit somewhere safe and you are now ready to install te AVR unit.
Start by taking out the fibre cable connector of the block connector (Bottom right of the pic above) its held in place with by a clip, once pressed it will slide out much like the one in the CDC connector.
Now take the AVR interface loom and connect the fibre cable connector in the male CCC end that looks identical to the one you have installed in the car
Now follow the dension AVR install instructions, by connecting the AVR interface female end to the original car block connector
Take the CCC and connect the male end into it and feed the wires through to the passenger side, replace the wires on the back of the CCC and push it back into the centre dash.
Now connect the small block connector from the Dension AVR interface loom into the AVR unit
Connect the yellow male RCA type connector into the AVR video in.
Connect the AV HU Out lead to the AVR and then connect the yellow male end to the yellow female end from the Dension AVR interface loom
Now take the break out / scotch lock type connector and connect the white and red coloured lead marked Hand Break to the black negative / ground lead of the Dension 500 unit. The AVR can use the CAN bus to detect the hand brake and reverse gear but you need to do this step to get the AVR unit to send the video signal (Thanks for the heads up Delwarulislam)
Remove the 9 pin White IPOD connector from the Dension 500 and plug it into the AVR
Plug in the 9 pin white connector from the AVR to the port on the Dension 500 you just had the IPOD connected to (nearest the USB port).
Plug in all other connectors you want to use ( I just used the AV1 input for now)
You are now ready to test your AVR unit...
Put the car ingnition key / start button to POS1 so the idrive startes up
Select > CD5> Source IPOD GW > CD5 > Video > select your ipod video. You should now hear it start playing. You now need to come out of the menu, and back to the Idrive source option FM / AM/ CD/ TV option and select TV
The main screen will now switch to the Video being played
Once you have confirmed that all is working as it should, tidy the cabling and replace all the passenger side and glove box trim (Not the passenger dash trim at this stage)
I mounted the AVR above the CDC unit on top of the metal fuse box, the Dension 500 is mounted to the very left of the fuse box
Screw in the CCC and replace the centre dash trim and connect the fan / heater control leads.
Screw the fan heater back in place and now replace the passenger side dash trim.
You may also want to update to the latest Dension 500 firmware and enable video in motion on the AVR from the Dension website
Firmware
http://www.dension.c...to_one=Firmware
Video in motion enabling
http://www.dension.c...many_to_one=All
I hope this helps others. Its a bit more daunting as you having to remove more trim but its not any harder then fitting the Dension 500! If you need any more info drop me a PM and I will try and help!
Great stuff you did. I m new here and a BEGINNER regarding car electronics.
My 1st (maybe stupid) question is: How do I get the dashborad trim etc off (1st step in the DIY)?
2: I have idrive Prof Nav - do I need to have the TV function enabled b/f the AVR can play back films?... & if so how do I go about it?... and any costs involved?
3: Dension 500 DIY: I got stuck at the very end trying to attach the dension power cable to the CDC. I d be grateful for any tips! I tried playing mp3s on the single CD (I even tried it in the dvd changer while hoping against hope it wouldnt get stuck): no show!!
 Could this also be part of the reason for the failure? I can see text when playing some new cds: eg one on the recent BBC proms...